
In this recipe we will learn how to build the user interface for our social networking application project.
In this section, we will start by building the components that will comprise of the user interface for our application.
To begin, follow the simple steps as outlined in the given order:
- Launch Xcode from the
/Xcode4/Applicationsfolder. - Choose Create a new Xcode project, or File | New Project.
- Select the Single View Application from the list of available templates.
- Click on the Next button to proceed to the next step in the wizard.
- Next, enter in
SocialNetworkAppas the name for your project. - Choose iPhone from under the Devices drop-down list.
- Ensure that the Use Storyboards checkbox has not been selected.
- Ensure that the Use Automatic Reference Counting and the Include Unit Tests checkboxes have not been selected.
- Next, click on the Next button to proceed to the next step in the wizard and specify the location where you would like to save your project.
- Then, click on the Create button to continue and display the Xcode workspace.
Now that we have created our SocialNetworkApp project, we can start building our user interface that will be responsible for allowing us to communicate with Facebook:
- Select the
ViewController.xibfiles from the Project Navigator Window. - From the Object Library, select and drag a UIToolbar object, and add this to our view and select the Item button located within our toolbar.
- From the Attributes Inspector section, change the Identifier property to Custom and change the value of Style to Bordered and the value of Title to Sign In.
- Create an outlet for this
UIBarButtonItem, and name itloginButton. - Create the
actionmethod for the Sign In button and name itloginButton. - Add a flexible space bar button item next to the Sign In button.
- Add another
UIBarButtonItemto the right of the flexible space bar button item and from the Attributes Inspector, change the Identifier property to Action. - From the Object Library, drag a UIImageView object onto the view.
- Resize the
UIImageViewcontrol so that it can hold a passport size photo. - Next, create the outlet for this
UIImageView, and name itimgPhoto. - From the Object Library, drag a UITextView object onto the view.
- Resize the UITextView control so that it takes up the width of the View Controller.
- Next, create the outlet for this
UITextView, and name ituserInfoDetails. - Save the SocialNetworkApp by choosing File | Save from the menu bar.
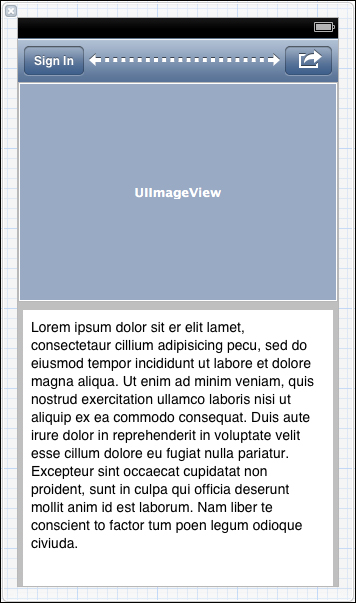
If you have followed the steps correctly, the completed View Controller screen should look similar to the previous screenshot. Feel free to adjust your screen accordingly.
In this recipe, we started by building our user interface for our SocialNetworkApp application that will enable us to log in and out of Facebook and post messages to our wall. In our next recipe, we will look at how to add the Facebook iOS SDK into our project, which allows us to communicate with the Facebook mobile development platform, and includes the necessary properties and methods that allows us to post messages to the current user's wall.
- The Adding the Facebook SDK and dependencies to your project recipe
- The Using Xcode to create an iOS project recipe in Chapter 1, Getting and Installing the iOS SDK Development Tools
- The Creating outlets to Interface Builder objects recipe in Chapter 1, Getting and Installing the iOS SDK Development Tools