
In this recipe we will learn how to use the features of the accelerometer events of the iOS device.
To begin, follow these simple steps as outlined:
- Select the
AccelGyroExampleproject from the Project Navigator. - Then select your project from under the TARGETS group.
- Select the Build Phases tab.
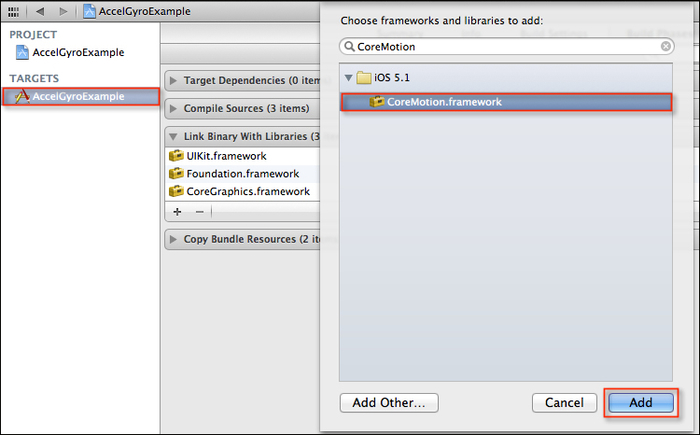
- Expand the Link Binary With Libraries disclosure triangle.
- Click on the + button and select the CoreMotion.framework from the list.
- Then click on the Add button to add the framework to your project.
- Our next step is to create the code functionality that will be responsible for accessing the accelerometer device features.
- Open the
ViewController.hinterface file and create the following highlighted entries as shown in the following code snippet:// ViewController.h // AccelGyroExample // Created by Steven F Daniel on 19/09/12. // Copyright (c) 2012 GenieSoft Studios. All rights reserved. #import <UIKit/UIKit.h> #import <CoreMotion/CoreMotion.h> @interface ViewController : UIViewController <UIAccelerometerDelegate> { CMMotionManager *motionManager; } @property (nonatomic, retain) CMMotionManager *motionManager; @end
- Open the
ViewController.mimplementation file, and add the following highlighted code snippet:#import "ViewController.h" @interface ViewController () @end @implementation ViewController @synthesize motionManager; - Next, modify the
viewDidLoadmethod as shown by the highlighted code sections:- (void)viewDidLoad { [super viewDidLoad]; // Set up the accelerometer UIAccelerometer *accelerometer = [UIAccelerometer sharedAccelerometer]; accelerometer.updateInterval = 0.5; accelerometer.delegate = self; } - Next, create the
handleAccelerationmethod as shown in the following code snippet:// Handle processing of the Accelerometer -(void)accelerometer:(UIAccelerometer *)accelerometer didAccelerate:(UIAcceleration *)acceleration { UIAccelerationValue xAxes; UIAccelerationValue yAxes; UIAccelerationValue zAxes; xAxes = acceleration.x; yAxes = acceleration.y; zAxes = acceleration.z; if (xAxes > 0.5) { // Moving Right self.view.backgroundColor = [UIColor purpleColor]; } else if (xAxes < -0.5) { // Moving Left self.view.backgroundColor = [UIColor redColor]; } else if (yAxes > 0.5) { // Moving Upside Down self.view.backgroundColor = [UIColor yellowColor]; } else if (yAxes < -0.5) { // Standing Up self.view.backgroundColor = [UIColor blueColor]; } else if (zAxes > 0.5) { // Facing Up self.view.backgroundColor = [UIColor magentaColor]; } else if (zAxes < -0.5) { // Facing Down self.view.backgroundColor = [UIColor greenColor]; } double value = fabs(xAxes); if (value > 1.0) { value = 1.0;} self.view.alpha = value; } - Change the deployment target to your iOS device.
- Build and run the application by choosing Product | Run from the Product menu, or alternatively by pressing Command + R.
When the compilation completes, the application will be displayed onto your iOS device. Try moving your device in all directions and see the background color change.
What we have done in
this recipe is implement the UIAccelerometerDelegate protocol so that we can use this within our ViewController.m implementation file.
We then declare an instance CMMotionManager of variable motionManager that will enable us to use the accelerometer and gyroscope features. We then need to synthesize our property we declared within our ViewController.h interface file. If we don't declare this, we will receive a warning error messages which can cause unexpected application errors.
Next, we declare our methods that will handle the accelerometer and the gyroscope features. In the first part, we declare a delegate to the UIAccelerometer class, and then derive the values for the x, y, and z which will be used to determine the current device orientation and set the background color accordingly.
As a final step, we set the background alpha property from transparent to opaque depending on whether the value is within the range 0.0 to 1.0, where 0.0 represents totally transparent, and 1.0 represents opaque.
Note
When you set the alpha property of a view, it only affects the current view and does not affect any of its embedded sub-views. The fabs function is a C/C++ library function that returns the absolute value of X.
If you would like to find out more information on the CoreMotion class, you can refer to the Apple Developer documentation located at the following link provided: http://developer.apple.com/library/ios/#documentation/CoreMotion/Reference/CoreMotion_Reference/_index.html.
So far you have been focusing on how to detect when a user performs taps and how to detect device shakes. We now move on to the really exciting stuff, not that what you have not already covered is exciting, but the iPhone's accelerometer is much more powerful than you think and is capable of giving you live data for all three dimensions of the (x, y, and z) axes when the iOS device is tilted.
The iOS's device
accelerometer data is delivered via the UIAccelerometer class and the delegate accelerometer:didAccelerate method which provides you with the data for each of the three axes, each being of UIAcceleration class. Each of the values returned have a range between -1 and +1 with 0 being the middle center point. When the device is moved or tilted, these values increase or decrease.
The Core Motion framework is a system framework which obtains motion data from sensors on the iOS device. The application can then use these values. Handling of the sensor data is handled within the Core Motion's own thread and it detects the motion events for the accelerometer and the gyroscope (which is currently only available on the iPhone 4). This can be illustrated in the following diagram:

The following table describes each of the components that make up the Core Motion framework:
- The Using the shake gesture with the touch interface recipe
- The Working with the iOS device gyroscope recipe
- The Using Xcode to create an iOS project recipe in Chapter 1, Getting and Installing the iOS SDK Development Tools