
In this recipe, we will take a closer look at outlets and how these can be used to communicate with our UI.
In our previous section, we looked at how to add controls to our ViewController to form the construction of our user interface as well as set some properties to our controls. In this section, we will look at how we can connect these up and access these controls within our code.
Creating outlets to Interface Builder objects is a simple process and can be achieved by performing the following simple steps:
- Open the assistant editor by selecting Navigate | Open In Assistant Editor or pressing option + command + ,.
- Ensure that the
ViewController.hinterface file is displayed within the assistant editor window. - Next, select the Firstname (
Label) control, then hold down the command key and drag it into theViewController.hinterface file, within the brackets and the@interfaceand@endlines. - Choose Outlet from the Connection drop-down menu for the type of connection to create.
- Enter
lblFirstnamefor the name of the outlet property to create. - Choose Strong from the Storage drop-down menu and click on the Connect button.
- Next, select the Firstname (
Textfield) control, then hold down the command key, and drag it into theViewController.hinterface file. - Choose Outlet from the Connection drop-down menu for the type of connection to create.
- Enter in
txtFirstnamefor the name of the Outlet property to create. - Choose Strong from the Storage drop-down menu and click on the Connect button.
- Repeat steps 3 to 9 to add the Surname, Label, and Tap Here button, while providing the names such as
lblSurname,txtSurname,lblOutput, andbtnTapHerefor each.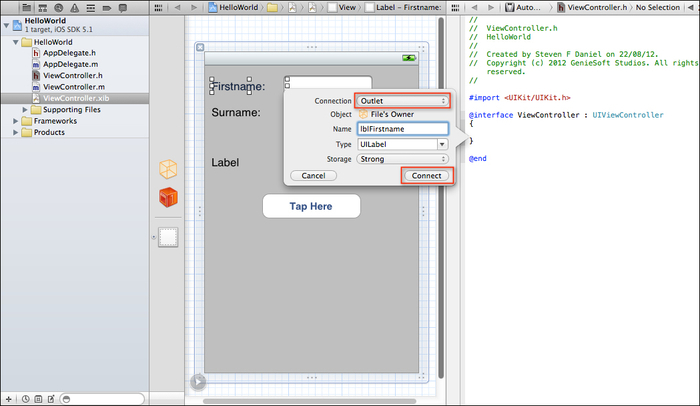
- Once you have created the necessary outlets, it would be good to save your project by selecting File | Save, or alternatively pressing Command + S.
Whenever we use outlets, these simply provide a means of allowing our Interface Builder objects to communicate with the code. This is necessary and is the only way in which we can access the user interface objects that have been created within the Interface Builder designer environment.
There is another thing that we need to do when declaring outlets and that is to create the necessary properties for them. Creating these properties provides us access to these controls, and automatically creates the getter and setter methods for our objects.
Creating properties to Interface Builder objects is a similar process to adding outlets, and can be achieved by performing the following simple steps:
- Ensure that the
ViewController.hinterface file is displayed within the assistant editor window. - Next, select the Firstname (
Label) control, then hold down the command key and drag it into theViewController.hinterface file at the end of the closing curly brace. - Choose Outlet from the Connection drop-down menu for the type of connection to create.
- Enter
lblFirstnamefor the name of the outlet property to create. - Choose Strong from the Storage drop-down menu and click on the Connect button.
- Next, select the Firstname (
Textfield) control, then hold down the command key, and drag it into theViewController.hinterface file. - Choose Outlet from the Connection drop-down menu for the type of connection to create.
- Enter
txtFirstnamefor the name of the outlet property to create. - Choose Strong from the Storage drop-down menu and click on the Connect button.
- Repeat steps 3 to 9 to add the Surname, Label, and Tap Here button, while providing the names such as
lblSurname,txtSurname,lblOutput, andbtnTapHerefor each.
Once you have created each of the
property outlets, the completed ViewController.h interface file will resemble the following code snippet:
//  ViewController.h
//  HelloWorld
//
//  Created by Steven F Daniel on 22/08/12.
//  Copyright (c) 2012 GenieSoft Studios. All rights reserved.

#import <UIKit/UIKit.h>

@interface ViewController : UIViewController
{
    IBOutlet UILabel        *lblFirstname;
    IBOutlet UITextField  *txtFirstname;
    IBOutlet UILabel        *lblSurname;
    IBOutlet UITextField  *txtSurname;
    IBOutlet UILabel        *lblOutput;
    IBOutlet UIButton      *btnTapHere;
}

@property (strong, nonatomic) IBOutlet UILabel *lblFirstname;
@property (strong, nonatomic) IBOutlet UITextField *txtFirstname;
@property (strong, nonatomic) IBOutlet UILabel *lblSurname;
@property (strong, nonatomic) IBOutlet UITextField *txtSurname;
@property (strong, nonatomic) IBOutlet UILabel *lblOutput;
@property (strong, nonatomic) IBOutlet UIButton *btnTapHere;

@end
Since we created our outlets, you will notice that Interface Builder has also created each of our outlets and have declared these within our ViewController.m implementation file, as shown in the following code snippet:
//  ViewController.m
//  HelloWorld
//
//  Created by Steven F Daniel on 22/08/12.
//  Copyright (c) 2012 GenieSoft Studios. All rights reserved.

#import "ViewController.h"

@interface ViewController ()

@end

@implementation ViewController
@synthesize lblFirstname;
@synthesize txtFirstname;
@synthesize lblSurname;
@synthesize txtSurname;
@synthesize lblOutput;
@synthesize btnTapHere;