
In this recipe, we will learn how to handle Facebook errors within our application.
Following on from our previous recipe, handling errors within your application when using the Facebook SDK is extremely easy. Should any errors occur within your iOS application, the FBRequestDelegate and the FBDialogDelegateprotocols will immediately handle them.
To begin, follow the simple steps as outlined in the given order:
- Open the
ViewController.mimplementation file from the Project Navigator. - Next, create the following code sections, as specified in the following code snippets:
# pragma mark method is called when an error has occurred
# while pragma mark retrieving GraphAPI details.
-(void)request:(FBRequest *)request didFailWithError:(NSError *)error{
  NSLog(@"An error occurred obtaining details: %@",error);
}

- (void)dialog:(FBDialog*)dialog didFailWithError:(NSError *)error{
  NSLog(@"An error occurred obtaining details: %@",error);
}
In this recipe, we start by creating the
request::(FBRequest *)request:didFailWithError:, which gets called upon whenever an error during the requesting of information using the Graph API occurs. Any errors that occur will be captured and returned in the error object.
The dialog:didFailWithError method is invoked if there is an error during the dialog process. Any errors that occur will be captured and returned in the error object.
Note
For more information on how to handle errors when using the Facebook iOS SDK, you can refer to the Facebook iOS Reference documentation at the following URL: https://developers.facebook.com/docs/mobile/ios/build/#errors
We just have a few more things to implement before we have a complete working application. We will need to make some changes to our application's property list to enable SSO support when the application is run.
This can be achieved by following the given, simple steps:
- Select the
SocialNetworkApp-info.plistfile from within Project Navigator. - Next, right-click within the center of the panel, then select Add Row from the pop up list.
- Add a new entry called
URL Types, and set its type to be Array. - Right-click and select Add Row inside the URL types.
- Then, create a new item called
Item 0, and set its type to be Dictionary. - Next, create a new entry called
URL Schemes, and set its type to be Array. - Then, create a new item called
Item 0, and set its type to be String. - Finally, using the Facebook AppID value when we registered our mobile application, enter this in for the Value field. You must prefix this with
fbfollowed by your App ID for this to work correctly.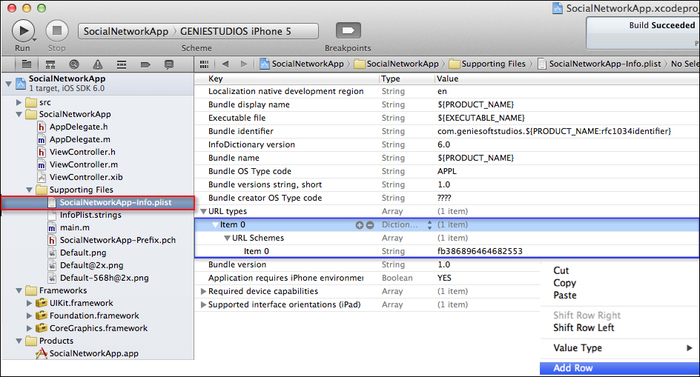
As you can see from the preceding screenshot, we have modified our
.plistfile so that it can support SSO. We specifically created and registered two URL variables:URL TypesandURL Schemes, so that it can uniquely identify your application with iOS. - Next, build and run the application by choosing Product | Run from the Product menu, or Mac users can alternatively press Command+ R.
The following screenshot shows the application running on the iOS device:
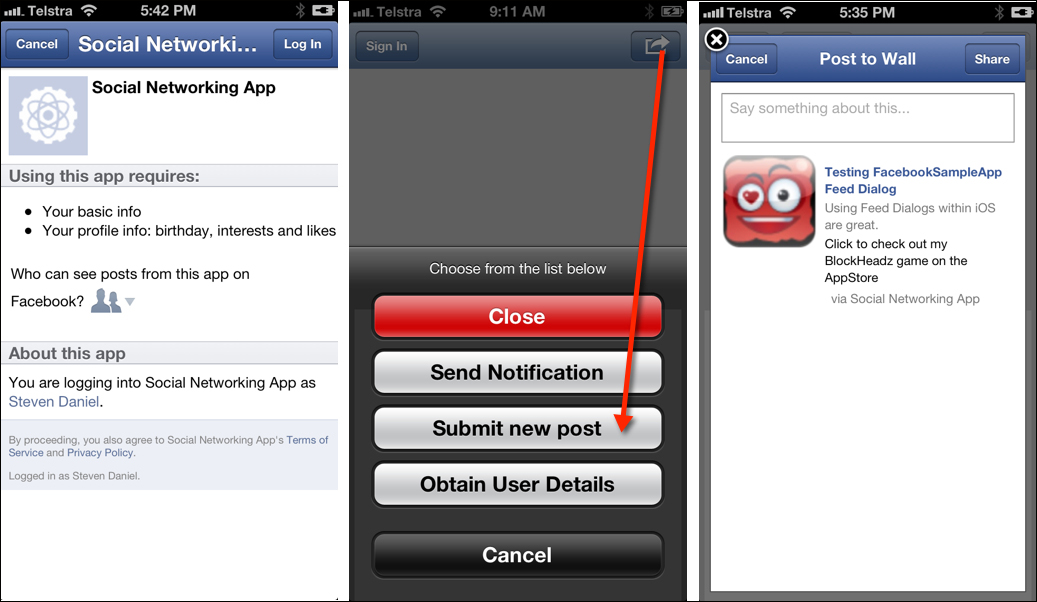
From the preceding screenshot, you can see that when we first load our social networking application, we receive the authorization dialog box with the permissions that we have requested.
Once the user has pressed on the Log In button, the dialog box will disappear, and our iOS application will be displayed (as shown in the second part of the screenshot).
We then press the Action button and select the Submit new post button to display the posted new message to our wall, which is shown in the final screenshot.