
In this recipe, we will take a look at how we can compile our project with Xcode.
Xcode offers various options for compiling your application. In this section, we will take a look at these options.
Whenever you want to compile your application, you have the option of choosing to have your application run on the iOS device, or within each of the simulators for iPad or iPhone. The version number associated with the Simulators is dependent on the version of the iOS SDK you have installed on your computer. In Xcode 4, whenever you open an existing Xcode project or create a new one, Xcode will automatically create a default scheme for you.
This scheme allows you to either test your application within the iOS Simulator, or have it deployed to an iOS device. Additional schemes can be created, which we will shortly take a look at.
Schemes are not new to Xcode 4 and they have existed since the early releases of Xcode 3. In previous releases of Xcode, you had to configure each of the items separately when setting an active target, a build configuration, or even an executable.
This posed many issues as all of these were linked to each other. This is where defining your own schemes comes in.
Schemes can be thought of as separate configurations, meaning that you can create a scheme to specify which targets to build, what configuration build to use, and what executable environment to use when the product specified by the target is launched (this could be if you wanted to target a specific iOS version, or if you wanted to have the application launch within the iOS Simulator). Perform the following steps:
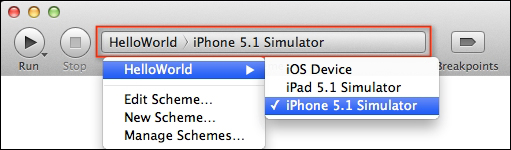
- To choose a scheme, you can just select it from the scheme pop-up menu, as shown in the preceding screenshot. HelloWorld is our default scheme that was created for us automatically when the project was created.
- In order to create a new scheme, select the New Scheme… option. Alternatively, if you wanted to edit the active scheme you can choose the Edit Scheme… option. These options are also available under the Product menu.
Each scheme can be set to do a specific task. For instance, you may have a scheme to do a design build and one to handle the release or distribution. Various types of build options are available for building, testing, running, profiling (using instruments), and archiving your products, which can then be submitted to the App Store. There is no limit on the number of schemes that you can define. However, only one scheme can be active at one time.
- Schemes can also be managed by selecting the Manage Schemes… option, or similarly from the Product menu.
You can specify whether schemes should be stored on a per-project basis, in which case these will be made available to every workspace that includes that project, or you can choose to have it stored within the workspace environment that it's currently in.
The following screenshot shows how you can customize the active scheme. You can specify the type of build configuration to use, the type of debugger, and the current working directory to use. You can also choose to have your product run at a higher resolution, which enables you to simulate your application running at different display resolutions.
