
In this recipe, we will learn how to configure an application's project properties using Xcode so that it is set up correctly to use a storyboard file.
To begin, perform the following simple steps:
- Select your project from the project navigator window.
- Then, select your project target from under the TARGETS group and select the Summary tab.
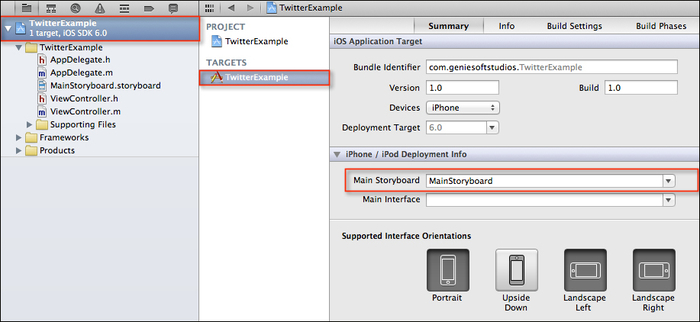
- Select MainStoryboard from the Main Storyboard drop-down menu, as shown in the preceding screenshot.
In this recipe, we gained an understanding of what storyboards are, as well as how they differ from user interfaces created in the past, whereby a new view would need to be created for each XIB file for your application.
Whether you are creating applications for the iPad or iPhone, each view controller that gets created within your storyboard represents the contents of a single screen, comprised of the contents of more than one scene.
Each object contained within a view controller can be linked to another view controller that implements another scene.
In our final steps, we looked at how to configure our project properties so that it is set up to use the storyboard user interface file by our application.
You can also choose to manually add new Storyboard template to your project. This can be achieved by performing the following simple steps:
- Select your project from the project navigator window.
- Select File | New | File… or press command + N.
- Select the Storyboard template from the list of available templates, located under the User Interface subsection within the iOS section.
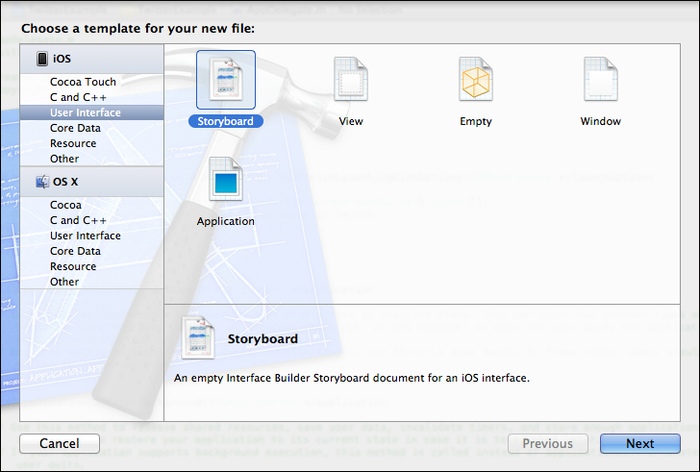
- Click on the Next button to proceed to the next step in the wizard.
- Ensure that you have selected iPhone from under the Device Family drop-down menu.
- Click on the Next button to proceed to the next step in the wizard.
- Specify the name of the storyboard file within the Save As field as the name of the file to be created.
- Click on the Create button to save the file to the specified folder.
- Finally, when we create our project using storyboards, we will need to modify our application's delegate
AppDelegate.mfile, as shown in the following code snippet:- (BOOL)application:(UIApplication *)application didFinishLaunchingWithOptions:(NSDictionary *)launchOptions { // Override point for customization after // application launch. return YES; }Note
For more information about using storyboards in your applications, you can refer to the Apple Developer documentation, located at https://developer.apple.com/library/ios/#documentation/ToolsLanguages/Conceptual/Xcode4UserGuide/InterfaceBuilder/InterfaceBuilder.
- The Creating a Twitter application recipe
- The Creating storyboard scenes recipe
- The Adding and customizing views recipe in Chapter 2, User Interfaces – Creating the UI