
In this recipe, we will take a look at how easy it is to add and configure entitlements using Xcode to enable your applications to communicate with the iCloud service.
In order to protect the data your application creates, a number of specific entitlements need to be created at build-time, in order to use iCloud storage. You will need to ensure that you have selected the option to enable iCloud for your application's app ID.
Before your application can communicate with the iCloud service, you will need to create a new app ID from within the iOS provisioning portal, which can be located at https://developer.apple.com/ios/manage/bundles/index.action/.
If you are using an existing app ID, this cannot consist of a wild card ID, and must contain the full name of the application that you will be creating, for example, com.yourcompany.*.To enable your app ID to communicate with the iCloud service, follow the following simple steps:
- Create a
new App IDvalue or edit the one that you have created previously. - Set up your provisioning profile for use with iCloud, by simply checking the Enable for iCloud checkbox from the Configure App ID screen:

- Next, you will be presented with a pop-up dialog box, explaining that any new provisioning profiles that you create using the chosen App ID will be enabled for iCloud services:
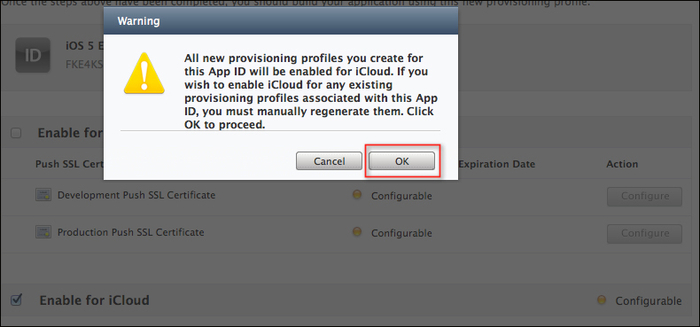
- Once you have clicked on the OK button, you will be returned back to the Configure App ID screen, and the Enable for iCloud button will be set to green, as shown in the following screenshot:

- Click on the Done button to close this screen.
- Next, click on the Provisioning tab, and then click on the Development tab to download your Development Provisioning Profiles as shown in the following screenshot:

- Next, from the Provisioning tab, and click on the Distribution tab to download Distribution Provisioning Profiles as shown in the following screenshot:

- Next, from the Project Navigator window, click on your project, in the Targets section, and then on the Summary page and scroll down till you get to the Entitlements section.
- Check the Enable Entitlements and the Enabled iCloud checkboxes. This will add a file called
iCloudExample.entitlementsto your project.
- Next, click on the + button to autofill the Ubiquity Containers and Keychain Groups sections.
There are two entitlements that an application can request, depending on which iCloud features it is required to use. These are explained in the following table:
When working with the Key-Value store data, you will need to ensure that the Use Store with Identifier option has been ticked. This must be consistent and take on the form <TEAMID>.<CUSTOM_STRING>, where <TEAMID> is the unique 10 character identifier that is associated with your development team. The <CUSTOM_STRING> identifier is the reverse DNS string that identifies the container for storing your applications documents.
Note
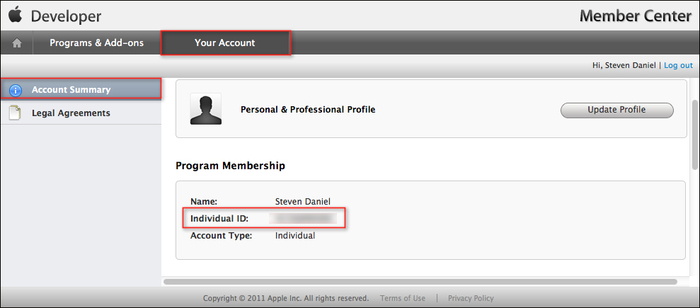
To locate your unique identifier associated with your development team, log in to the Apple developer connection website, and then go to the Member Center page which can be found at http://developer.apple.com/membercenter.
Select the Your Account tab, and then select Organization Profile (if you have set up your profile to be used as an organization) from the column on the left of the tab. Your team's identifier is in the Company / Organization ID field.
Applications using iCloud document storage can specify multiple containers for storing documents and data. The com.apple.developer.ubiquity-container-identifiers key is an array of strings.
The following screenshot displays the property list view within the project navigator of the iCloudExample.Entitlements entitlements file:

The TEAMID value (as shown in the previous screenshot), can be obtained from the Account Summary page of your developer account, and using the Individual ID value, as shown in the following screenshot:
In this recipe, we learned how to set up and configure an app ID so that it has the ability to communicate with the iCloud service. Whenever a new or existing application ID is created and/or modified, this will be directly bound to your provisioning profiles for both development and distribution, and will need to be downloaded and reinstalled on your computer to avoid issues when you deploy this on your iOS devices.
You can also choose to do this using the Xcode development environment using the Organizer interface. In our next steps, we need to set up the entitlements that will give our application access to the iCloud directory by enabling the Enable iCloud checkbox and auto-filling the Ubiquity Contrainers and Keychain Group sections.
When these have been set, it sets up the directory location on the device where you can find and create the iCloud files. The
iCloud daemon service will then automatically fetch new files to this directory, as they become available, update files that are currently there, and watch for any changes to file states that you put there.