
8
Creating the Login Page
In this chapter, we’ll implement the authorization infrastructure for the frontend side of our task manager application, and create login and user management pages to test it. We’ll start by configuring both Quarkus and React to be able to consume the secured HTTP APIs in development mode. Then, we’ll learn how to use Redux Toolkit to manage the frontend session, and create a login page to be able to initiate a new one. Finally, we’ll create a protected user management page, and run the application to verify that everything works as expected.
By the end of this chapter, you should be able to use Redux Toolkit to implement the authentication and authorization infrastructure for React applications to be able to consume secure HTTP APIs based on JWT.
We will be covering the following topics in this chapter:
- Setting up the authentication workflow
- Creating the Login page
- Adding a protected user management page
- Running the application
Technical requirements
You will need the latest Java JDK LTS version (at the time of writing, this is Java 17). In this book, we will be using Fedora Linux, but you can use Windows or macOS as well.
You will need the latest Node.js LTS version (at the time of writing, this is 16.15).
You will need a working Docker environment to deploy a PostgreSQL database and to create a Linux native image using Docker. There are Docker packages available for most Linux distributions. If you are on a Windows or macOS machine, you can install Docker Desktop.
You can download the full source code for this chapter from https://github.com/PacktPublishing/Full-Stack-Quarkus-and-React/tree/main/chapter-08.
Setting up the authentication workflow
In Chapter 4, Securing the Application, we learned how to implement a security layer in Quarkus using JWT, and then used it to protect the backend side of the task manager. Attempting to consume the HTTP API from the frontend without an adequate authentication workflow and infrastructure would result in forbidden and unauthorized responses. In this chapter, we’ll see how to create an auth service that will enable us to perform login requests to obtain a JWT and use it to authorize the requests to protected endpoints.
Now, let’s learn how to set up Quarkus to be able to consume its API from a React application running in dev mode.
Configuring Quarkus for React dev mode
When we deliver our application to a production environment, both the React frontend side and the HTTP API will be served by Quarkus. However, during the development phase, we’ll be running the React application in dev mode using the npm start command we analyzed in Chapter 7, Bootstrapping the React Project. The HTTP requests we perform from the frontend application to the Quarkus backend will originate from React’s development server at localhost:3000 and target the Quarkus development server at localhost:8080. Your browser’s built-in cross-origin resource sharing (CORS) policy will very likely block these requests, so we need to configure Quarkus’ CORS filter to allow this origin.
We can do this by editing the src/main/resources/application.properties file and adding the following properties:
%dev.quarkus.http.cors=true
%dev.quarkus.http.cors.origins=http://localhost:3000
Notice that both properties are prefixed with %dev., which enables them only for Quarkus dev mode. Let’s see what each of these configuration properties does:
- %dev.quarkus.http.cors: This property enables the Quarkus CORS filter. The filter will identify cross-origin HTTP requests and add the required headers to allow cross-origin access if applicable.
- %dev.quarkus.http.cors.origins: This property sets the list of allowed origins that can perform cross-origin requests. In this case, we’re setting the URL where we’ll be accessing the frontend application.
Now that we’ve configured Quarkus, let’s continue by configuring React.
CORS
CORS is a mechanism that allows a server to share resources to origins (domain, scheme, or port) different from its own, which would normally be prevented by a browser, by providing special HTTP headers.
Configuring React’s environments
Depending on the target environment, development or production, the frontend application will be served from different servers. When we run the application in development mode, it will be served from http://localhost:3000. When we run the application in production mode, it will be served from the same URL as the backend. This is a problem since the HTTP API will be available at different locations, depending on the environment. To overcome this, we’ll be using environment variables defined in .env files.
We’ll create the following files and content:
- src/main/frontend/.env:
REACT_APP_API_URL=/api/v1
- src/main/frontend/.env.development:
REACT_APP_API_URL=http://localhost:8080/api/v1
In both files, we’re defining REACT_APP_API_URL, which we’ll consume later on to compute the URL where we’ll perform the HTTP requests. For the development environment, the URL includes the domain and port since the backend and frontend will be served separately. Note that the environment variables we define on these files will be embedded at build time into the final static application code bundle (the HTML, CSS, and JS files).
Note
In Chapter 7, Bootstrapping the React Project, we initialized the application in the src/main/frontend directory. All of the directories and files referenced in the rest of this chapter related to the frontend application modules will be relative to this folder.
With that, we have configured Quarkus and React to be able to consume the backend HTTP API from the frontend application. Now, let’s continue by implementing the frontend session management functionality.
Managing the frontend session
We’ll use Redux Toolkit and our application’s global store to perform the required HTTP requests to obtain the JWT and to manage the user’s session.
Redux makes it straightforward to manage the application’s global state and to perform mutations through actions and reducers. However, it gets harder when the actions that should mutate the state are delayed or asynchronous, or if they require information from the application’s store. A typical example is when you need to query an HTTP endpoint and wait for the delayed response to get back and then perform an action, depending on the response status or its content. Redux Thunk, a component of the Redux ecosystem, is the standard way to write asynchronous logic within Redux-based applications. Redux Toolkit includes the Thunk component and several additional functions that help create thunks with less boilerplate code.
We’ll start by creating an auth directory beneath the src folder. This is where we’ll create all of the auth-related services and components. Then, we’ll create a new redux.js file in this directory where we’ll implement the code to manage the auth state. Now, let’s analyze some of the code snippets in this file (you can find the complete code in this book’s GitHub repository at https://github.com/PacktPublishing/Full-Stack-Development-with-Quarkus-and-React/tree/main/chapter-08/src/main/frontend/src/auth/redux.js):
export const login = createAsyncThunk(
  'auth/login',
  async ({name, password}, thunkAPI) => {
    const response = await fetch(`${process.env.
      REACT_APP_API_URL}/auth/login`, {
      method: 'POST',
      headers: {
        'Content-Type': 'application/json',
      },
      body: JSON.stringify({name, password}),
    });
    if (!response.ok) {
      return thunkAPI.rejectWithValue({
        status: response.status, statusText: response.
          statusText, data: response.data});
    }
    return response.text();
  }
);
In the previous piece of code, we’re initializing a login Redux action creator function that takes advantage of the createAsyncThunk function provided by Redux Toolkit. Notice that Redux Toolkit provides an even simpler approach to fetching data from a remote HTTP API that we’ll take advantage of for the rest of the modules. However, the login logic has some additional complexities that require us to use this more involved approach.
In the first parameter, we’re providing the ‘auth/login’ value, which will be used as a prefix to create the Redux action constant names (since we’re using Redux Toolkit, which deals with Redux configuration for us, these constant names are not important and remain transparent to us; we just need to make sure they are unique).
In the second argument, we’re providing the payloadCreator function, an asynchronous function that performs the login logic. The first parameter of this function is the argument that will be passed to the resulting action creator function – in our case, the user’s credentials. The second parameter, thunkApi, is an object provided by Redux Toolkit that can be used to access the Redux store functions (getState and dispatch) or to complete the action by fulfilling or rejecting it.
In our payloadCreator function implementation, we start by performing a POST request to the login endpoint we defined in Chapter 4, Securing the Application. Notice how we use the REACT_APP_API_URL environment variable to get the base URL of our backend server. If the request fails, we return the result of invoking the rejectWithValue function with the response details. If the request is successful, we return the promise that was received when invoking the response.text() function.
Now, let’s continue by implementing the store slice that will manage the authentication state. The following code snippet contains the most relevant part:
const authSlice = createSlice({
  name: 'auth',
  initialState: {
    jwt: sessionStorage.getItem('jwt')
  },
  reducers: {
    logout: state => {
      sessionStorage.removeItem("jwt");
      state.jwt = null;
    }
  },
  extraReducers: {
    [login.fulfilled]: (state, action) => {
      sessionStorage.setItem('jwt', action.payload);
      state.jwt = action.payload;
    }
  }
});
In the Managing the layout’s state section of Chapter 7, Bootstrapping the React Project, we learned about Redux Toolkit’s createSlice function and how the global application’s store can be divided into separate slices for better organization. In the preceding snippet, we’re creating a new slice to store the auth-related data, namely the JWT token that holds the user’s session. However, to be able to keep the token even if the user refreshes the browser page, we’ll be storing the JWT in the browser’s session storage too.
For the initialState values, we try to load the token from the browser’s storage API: sessionStorage.getItem(‘jwt’). In the reducers object, we define a logout reducer that clears the JWT both from the application’s state and the browser’s session storage.
For this slice, we’re providing an additional extraReducers configuration. This object allows a slice to respond to actions that don’t belong to itself. In this case, we’re configuring a reducer that responds to the result of the action of the login thunk we created previously in this section. The reducer logic persists the JWT obtained from a successful (fulfilled) request both in the browser’s session storage and in the application’s state.
We have now fully implemented the Redux part for the auth module. However, we’re going to export an additional function in the src/auth/redux.js file that will be used by the rest of the application’s modules to perform authorized HTTP requests. The following snippet contains the code for this function:
export const authBaseQuery = ({path}) => {
  const baseQuery = fetchBaseQuery({
    baseUrl: `${process.env.REACT_APP_API_URL}/${path}`,
    prepareHeaders: (headers, {getState}) => {
      headers.set('authorization', `Bearer ${getState().
        auth.jwt}`);
      return headers;
    }
  });
  return async (args, api, extraOptions) => {
    const result = await baseQuery(args, api,
      extraOptions);
    if (result.error && result.error.status === 401) {
      api.dispatch(logout());
    }
    return result;
  };
};
authBaseQuery is a function that wraps the fetchBaseQuery function provided by Redux Toolkit, which, in turn, is a wrapper around the standard JavaScript fetch function, which simplifies the process of preparing and performing HTTP requests.
In the first part, we’re invoking fetchBaseQuery with our predefined base URL and including the JWT as a Bearer authorization HTTP request header. Notice how we retrieve the token for the header value using the provided getState() function to access the auth slice and the current jwt. In the Letting users change their password section of Chapter 4, Securing the Application, we learned how to authorize the requests in cURL using the bearer authentication. The resulting HTTP request dispatched by the authBaseQuery function should be similar to those.
In the second part, we’re wrapping the original baseQuery function to be able to inspect the HTTP response before passing it on to the reducer. If the response is not successful, then we dispatch a logout() action. In case we wanted to implement some additional functionality to renew expired tokens in the future, this would be a good place to fit in that logic. If the response is successful, then we just return and pass on the original result. From now on, whenever we need to perform an authorized HTTP API request, we can use the authBaseQuery convenience function we just defined instead of the regular fetchBaseQuery function.
The redux part of the auth module is ready. Next, we need to set it up in our task manager application store. Let’s edit the src/store.js file to do so. The following code snippet contains the relevant parts of the required changes:
const appReducer = combineReducers({
  auth: authReducer,
  layout: layoutReducer
});
const rootReducer = (state, action) => {
  if (logout.match(action)) {
    state = undefined;
  }
  return appReducer(state, action);
};
In the first block, we’re adding the reducer for the auth module slice to the global appReducer by adding a new entry to the combineReducers function. We’ll repeat the same process for each of the slices we implement in the future.
In the second block, we’re adding logic to clear the complete application’s state in case a logout action is dispatched. In the Setting up the global store section of Chapter 7, Bootstrapping the React Project, we initiated rootReducer but we didn’t implement any functionality. The purpose of this function is now clearer – whenever we need to react to actions that affect the whole application state, this is the place where we’ll locate the required code. The alternative would be to implement similar logic in the extraReducers section of each slice, but that would be repetitive and hard to maintain.
We’ve now completed the required functionality to create and manage a user session in React. Let’s continue by implementing a login page to be able to start the authentication workflow.
Creating the Login page
The first step of initiating the authentication workflow for our application is to request a JWT from the backend by performing a login request. For this purpose, in our task manager application, we’ll create a login page where users will be redirected whenever they don’t have an active session or their token has expired. The resulting page should look like this when rendered:

Figure 8.1 – A screenshot of the rendered Login page
To implement the component, let’s create a new file in the src/auth directory called Login.js, which will contain its source code. Let’s analyze some of the relevant parts (you can find the complete code in this book’s GitHub repository at https://github.com/PacktPublishing/Full-Stack-Quarkus-and-React/blob/main/chapter-08/src/main/frontend/src/auth/Login.js):
export const Login = () => {
  const dispatch = useDispatch();
  const navigate = useNavigate();
  const {values, isValid, error, setError, onChange} =
    useForm({
    initialValues: {username: '', password: ''}
  });
  const sendLogin = () => {
    if (isValid) {
      dispatch(login({name: values.username,
        password: values.password}))
        .then(({meta, payload}) => {
          if (meta.requestStatus === 'fulfilled') {
            navigate('/');
          } else if (payload?.status === 401) {
            setError('Invalid credentials');
          } else {
            setError('Error');
          }
        });
    }
  };
We start by defining and exporting a React functional component named Login that contains a component composition to render the form shown in Figure 8.1. Next, we initialize the dispatch and navigate variables from their corresponding React Router and React Redux hooks, just like we learned in the Creating the Layout component section of Chapter 7, Bootstrapping the React Project.
Then, we initialize several variables and functions using a useForm hook. You can check its complete implementation in this book’s GitHub repository in the src/useForm.js file. This hook provides common functionality when dealing with forms in our application. It’s a combination of React hooks that allow you to manage the state of the form data through the values and onChange variables, and also its validation and error reporting.
In the last part, we’re defining a sendLogin function. This function contains the logic that will be processed when the user presses the SIGN IN button. In the implementation, first, we check whether the form data is valid. If it’s valid, we dispatch the result of the login action creator function invocation with the credentials from the form data. We also subscribe to the asynchronous result of the dispatch invocation. If the result is fulfilled, we redirect the user to the home page (navigate(‘/’)). If it isn’t, we set the applicable error message.
Now, let’s focus on the return statement of the login page. The following snippet contains its code:
return (
  <Container maxWidth='xs'>
    <Box sx={{mt: theme => theme.spacing(8), display:
     'flex', flexDirection: 'column', alignItems:
       'center'}}>
      <Avatar sx={{m: 1}}>
        <LockOutlinedIcon />
      </Avatar>
      <Typography component='h1' variant='h5'>
        Sign in
      </Typography>
      <Box noValidate sx={{ mt: 1 }}>
        <TextField margin='normal' required fullWidth
          autoFocus
          label='Username' name='username' onChange=
            {onChange} value={values.username}
        />
        <TextField type='password' margin='normal' required
          fullWidth
          label='Password' name='password' onChange=
            {onChange} value={values.password}
          onKeyDown={e => e.key === 'Enter' && sendLogin()}
        />
        <Button fullWidth variant='contained'
          onClick={sendLogin} sx={{ mt: 3, mb: 2 }}>
          Sign In
        </Button>
      </Box>
    </Box>
    <Snackbar
      open={Boolean(error)} message={error}
      autoHideDuration={6000} onClose={() =>
        setError(null)}
    />
  </Container>
);
We’ve already learned about some of these components; let’s study the most relevant and those we haven’t covered yet:
- <Avatar>: In Material Design, avatars are a type of imagery that focuses on a single subject that represents a user, a brand, or a single entity. <Avatar> is the MUI component used to define them. In our case, we’re using it as a handy way to display a rounded lock icon.
- <TextField>: This MUI component lets users enter and edit text. In our case, we’re using two types: a regular text field and a password text field that obscures the user input. Both are controlled components that read their data from the values variable we obtained from the useForm invocation. Notice that the name attribute value must match the name of the variable where the data is persisted so that the onChange function works accordingly.
- <Button>: In Material Design, buttons are used by users to perform actions and make choices with a single click or tap. <Button> is the MUI component used to define them. In our case, we’re using the button to trigger the sendLogin function and start the login process.
- <Snackbar>: In Material Design, Snackbars are used to display temporary short messages near the bottom of the screen. The messages should provide information about a process that the application has performed or that will be performed in the future. <Snackbar> is the MUI component used to define them. In our case, we’re using it to display any of the error messages produced when dispatching the login action. The following screenshot shows the message that’s displayed when introducing invalid credentials:

Figure 8.2 – A screenshot of the rendered login page with a visible snackbar
Now that we’ve defined the login page, we need a way for users to be redirected to this page when they don’t have an active session. For this purpose, we’ll complete the following steps:
- Open the src/App.js file in your editor and add the following entry to the <Routes> children:
<Route exact path='/login' element={<Login />} />
This defines a new application route called /login, which will display our login page whenever the browser points to this URL.
- Open the src/layout/Layout.js file in your editor and add the following lines after the dispatch variable definition:
const jwt = useSelector(state => state.auth.jwt);
useEffect(() => {if (!jwt) {navigate('/login');}
}, [navigate, jwt]);
Here, we’re checking the current application’s state to see whether a JWT has been set in the auth slice. If one hasn’t, we redirect the user to the /login route, which displays the login page. Since the Layout component is reused for all of the application pages, it’s a good way to share this logic and ensure that a user with no session or an invalid one is always redirected to the login page.
So far, we’ve covered how to manage the user frontend session by persisting the JWT, and how to request it using a login page. However, our application defines two user roles (admin and user), and we still need to make sure that users with a specific role can only access those parts of the application they are authorized to. Now, let’s create a user management page to demonstrate how to achieve this.
Adding a protected user management page
In this section, we’ll define a user management page for users with the admin role that displays the application’s registered users. Let’s start by defining the user module API service.
Defining a user API Redux slice using Redux Toolkit’s createApi function
We’ll begin by creating a users directory beneath the src folder, where we’ll create all of the user management-related services and components. Next, we’ll create a new api.js file where we’ll implement the required functionality. The following snippet contains the most relevant part of the code (you can find the complete code in this book’s GitHub repository at https://github.com/PacktPublishing/Full-Stack-Development-with-Quarkus-and-React/tree/main/chapter-08/src/main/frontend/src/users/api.js):
export const api = createApi({
  reducerPath: 'users',
  baseQuery: authBaseQuery({path: 'users'}),
  tagTypes: ['User'],
  endpoints: builder => ({
    getUser: builder.query({
      query: id => `/${id}`,
      providesTags: ['User']
    }),
    getUsers: builder.query({
      query: () => '/',
      providesTags: ['User']
    }),
    deleteUser: builder.mutation({
      query: user => ({
        url: `/${user.id}`,
        method: 'DELETE'
      }),
      invalidatesTags: ['User']
    }),
    getSelf: builder.query({
      query: () => '/self',
      providesTags: ['User']
    }),
    changePassword: builder.mutation({
      query: passwordChange => ({
        url: `/self/password`,
        method: 'PUT',
        body: passwordChange
      })
    })
  })
});
createApi is the main function provided by Redux Toolkit Query and allows you to define and configure a set of endpoints to retrieve data from an HTTP API and then use it to populate and mutate a Redux store slice. In this case, we’re using it to define a slice for users and retrieve data from the backend user resource. Let’s analyze the parameters of the configuration object we used in the previous snippet:
- reducerPath: Redux Toolkit uses this value internally to define the unique path within the global application’s state where the created slice reducer will be processed. Besides the requirement to provide a unique path, the value is not important and remains transparent to us unless we access the application’s state directly.
- baseQuery: This is the base query or HTTP request configuration that will be used to fetch each endpoint. Since these endpoints are secured, we’ll be reusing the authBaseQuery function we created in the Managing the frontend session section, which adds the required authorization headers for us. In the path configuration argument, we’re providing a users value, which means that the resulting base URL will be ${process.env.REACT_APP_API_URL}/users.
- tagTypes: Redux Toolkit Query provides a caching mechanism for the data retrieved from each endpoint. Tag types are an optional setting that will enable us to persist and invalidate the cache associated with a given type. In our case, we’re just setting a generic User tag.
- endpoints: Here, we define each of the server endpoints we want to consume and the kind of operation we want to perform. For those endpoints where we are just retrieving data (read), we use query operations. These only require setting the URL path through the query field, and the tag that the cached data should be associated with through the providesTags field.
For those operations that perform changes (create, update, or delete), we can use mutation operations. The configuration is very similar to the one for query operations. Here, in addition to the path, we’re also providing the HTTP method and the request body if applicable. Notice how the delete endpoint has an invalidatesTags setting, which will remove all the cached data and force Redux Toolkit to re-fetch it.
So far, we’ve learned that the createApi function defines endpoint-triggering functions and a Redux store slice that holds the state of the result of querying these endpoints. As a final step, we need to configure our application’s store to account for this slice by editing the src/store.js file and making the following changes:
const appReducer = combineReducers({
  auth: authReducer,
  layout: layoutReducer,
  [userApi.reducerPath]: userApi.reducer
});
// …
export const store = configureStore({
  reducer: rootReducer,
  middleware: getDefaultMiddleware => getDefault
    Middleware()
    .concat(userApi.middleware)
});
In the first part, we’re adding the exported slice reducer to the global appReducer. In the second block, we’re configuring the store’s middleware to take the API’s middleware into account by adding it to the default set provided by Redux Toolkit. Middleware is an advanced concept that’s useful for asynchronous API calls. Luckily enough, Redux Toolkit Query hides the complexity for us and only requires this simple setup.
Now that the user API module is ready, let’s create a page to learn how to consume it.
Creating the Users page
The Users page is a very simple page that lists the registered users and their roles in a table and provides an action item to delete them.
To implement this component, we must create a new file in the src/users directory called Users.js, which will contain its source code. You can find the complete code for this component in this book’s GitHub repository at https://github.com/PacktPublishing/Full-Stack-Quarkus-and-React/blob/main/chapter-08/src/main/frontend/src/users/Users.js. The implementation is very similar to the other components we’ve already created. Let’s analyze the API consumption part:
const {data: allUsers} = api.endpoints.getUsers.useQuery
  (undefined, {pollingInterval: 10000});
const {data: self} = api.endpoints.getSelf.useQuery();
const [deleteUser] = api.endpoints.deleteUser.
  useMutation();
The first two statements take advantage of the useQuery hook, which triggers the data fetch from an endpoint to initialize some variables. The returned data variable will contain the data from the cache if it exists, and the updated data from the endpoint once the response has been processed. In addition, for the first statement, we’re configuring a pollingInterval, which will force a new fetch every 10 seconds. This means that if new users were created in the backend, the user list would automatically update with the new additions. The last statement takes advantage of the useMutation hook. This hook provides a function to dispatch the deleteUser endpoint action.
Now, let’s check how these variables and functions are used in the following snippet to form the Users page component:
{allUsers && allUsers.map(user =>
  <TableRow key={user.id}>
    <TableCell>{user.name}</TableCell>
    <TableCell>{new Date(user.created).toLocaleDateString
      ()}</TableCell>
    <TableCell>{user.roles.join(', ')}</TableCell>
    <TableCell align='right'>
      <IconButton
        disabled={user.id === self?.id} onClick={() =>
          deleteUser(user)}
      >
        <DeleteIcon/>
      </IconButton>
    </TableCell>
  </TableRow>
)}
We start by iterating the array of users (allUsers) that was returned by the query hook. For each user, we present the user’s name, its creation date, and a comma-separated list of its roles in different table cells. In the last table cell, we provide IconButton that, when clicked, causes the deleteUser function to supply the user as an argument. In addition, this icon is only enabled if the user is not the same as the user performing the query (self). In the following screenshot, you can see what the table looks like when rendered:

Figure 8.3 – A screenshot of the rendered Users table
The page is ready; however, it is still unreachable for users. Just like we did for the login page, we need to add a new entry to the <Routes> definition in the src/App.js file:
<Route exact path='/users' element={<Users />} />This defines a new application route called /users, which will display our Users page whenever the browser points to this URL.
Now, let’s modify MainDrawer so that it displays a link for users with the admin role.
Adding a link to the Users page in MainDrawer
We want our application to provide a great user experience. For that purpose, we want to show a link to the user management page but only if the user has the admin role. Let’s create a new HasRole.js file in the src/auth directory to implement a component that will help us achieve this. The following snippet contains the most relevant parts of its content (you can find the complete code in this book’s GitHub repository at https://github.com/PacktPublishing/Full-Stack-Quarkus-and-React/blob/main/chapter-08/src/main/frontend/src/auth/HasRole.js):
export const HasRole = ({role, children}) => {
  const {data} = api.endpoints.getSelf.useQuery();
  if ((data?.roles ?? []).includes(role)) {
    return children;
  }
  return null;
}
This component can be used to wrap other components and show them only if the currently logged-in user has the specified role. In its implementation, we’re taking advantage of the getSelf endpoint to get the information of the current user and check whether any of its roles match the provided role. The child components will be rendered only if there is a match.
Now, we can edit the src/layout/MainDrawer.js file so that it includes the new link to the user management page. The following code snippet contains the required changes:
<List>
  <Item disableTooltip={drawerOpen} Icon={InboxIcon}
    title='Todo' to='/'/>
  <HasRole role='admin'>
    <Divider/>
    <Item disableTooltip={drawerOpen} Icon={PersonIcon}
      title='Users' to='/users'/>
  </HasRole>
</List>
The main change is we’re adding a new Item entry to link the /users route with the particularity that it’s wrapped with a HasRole component with the role=’admin’ attribute. If everything works as expected, this item will only be visible to admin users.
Now, let’s start the application to see all of the changes in action.
Running the application
We’re still in the development phase, so we need to start both the frontend and backend applications in dev mode. To start the Quarkus backend, just as we’ve done previously, we’ll execute the following command from the project root:
./mvnw quarkus:devThe backend server should start and be ready to serve requests. Next, in a different terminal, and from the frontend project location (src/main/frontend), we’ll execute the following command:
npm startThe frontend application should start and a browser window should open automatically at http://localhost:3000. The page should load and automatically redirect us to http://localhost:3000/login:

Figure 8.4 – A screenshot of a browser pointing to http://localhost:3000/login
Now, let’s log in with the administrator credentials by entering admin in the username field, quarkus in the password field, and pressing the SIGN IN button. The process should complete successfully and we should be redirected to http://localhost:3000/initial-page:

Figure 8.5 – A screenshot of a browser pointing to http://localhost:3000/initial-page for the admin user
Notice how the drawer displays a link to the Users page. Let’s click on it:
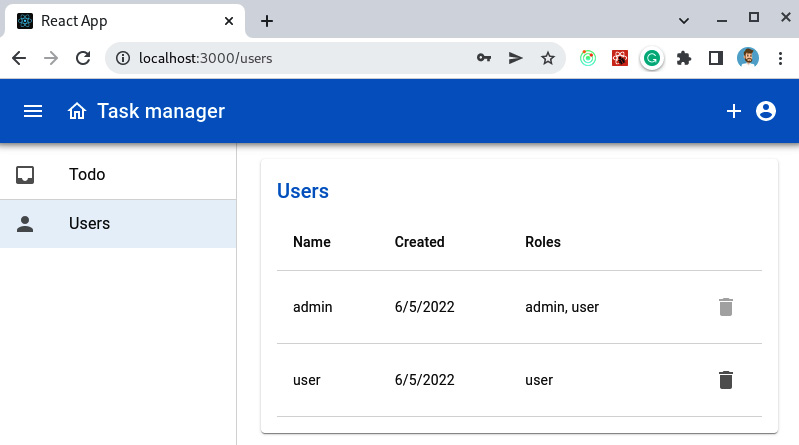
Figure 8.6 – A screenshot of a browser pointing to http://localhost:3000/users
The Users page should load, and we should be able to see a table containing the list of registered users. We’ve now verified that the application works fine for an admin user and that you can access and interact with the parts of the task manager that are only intended for this kind of user.
Since we haven’t implemented a logout mechanism yet, let’s close this browser tab and open a new one and navigate to the application’s root: http://localhost:3000. We should be redirected to the login page – let’s log in, but with a regular user instead. We’ll repeat the previous process, but now, we’ll use user as the username. Once again, the process should complete successfully and we should get redirected to http://localhost:3000/initial-page:

Figure 8.7 – A screenshot of a browser pointing to http://localhost:3000/initial-page for the regular user
The layout is the same as for the admin user, but now, the link to the Users page is missing from the drawer.
Summary
In this chapter, we learned how to configure Quarkus and React to be able to consume the secured HTTP APIs from our application’s backend. Then, we used Redux Toolkit to implement the infrastructure to manage the frontend session. Next, we implemented a login page to be able to create new sessions, and a user management page to showcase how to protect components from users who don’t have authorized roles. Finally, we learned how to start the backend and the frontend applications in development mode to be able to check that everything works accordingly.
You should now be able to use Redux Toolkit to implement the authentication and authorization infrastructure for React applications to be able to consume secure HTTP APIs based on JWT.
In the next chapter, we’ll learn how to implement the main logic of the frontend application. We’ll replace the main screen and implement some CRUD operations that will make use of the backend HTTP API.
Questions
- What is CORS?
- What’s the recommended and easiest approach to consuming an HTTP API and persisting its results in a Redux store?
- What kind of operations does Redux Toolkit Query support for endpoints?
- What’s a snackbar in Material Design?
- What’s the default URL for React’s development server?