13
Deploying Your Application to Fly.io
In this chapter, we’ll learn how to deploy our task manager application to Fly.io, one of the most popular cloud Platform-as-a-Service (PaaS) providers, where we’ll make it publicly available to the rest of the world. We’ll start by learning about Fly.io and why it’s a good choice for deploying our application. Then, we’ll study how to configure and build our project to be able to deploy it to Fly.io. Finally, we’ll learn how to deploy the application along with its required services, and we’ll test that everything works as expected.
By the end of this chapter, you should be able to deploy applications to Fly.io and make them available to the rest of the world. Being able to deploy your application to multiple platforms will give you flexibility and the ability to choose from multiple options when it comes to publishing your applications on the internet.
We will be covering the following topics in this chapter:
- Introducing Fly.io
- Configuring the project for Fly.io
- Deploying the task manager
Technical requirements
You will need the latest Java JDK LTS version (at the time of writing, this is Java 17). In this book, we will be using Fedora Linux, but you can use Windows or macOS as well.
You will need the latest Node.js LTS version (at the time of writing, this is 16.15).
You will need a working Docker environment to create a container image. There are Docker packages available for most Linux distributions. If you are on a Windows or macOS machine, you can install Docker Desktop.
You can download the full source code for this chapter from https://github.com/PacktPublishing/Full-Stack-Quarkus-and-React/tree/main/chapter-13.
Introducing Fly.io
In Chapter 12, Deploying Your Application to Kubernetes, we learned how to containerize our application and deploy it to Kubernetes. In this case, we leveraged a local Minikube Kubernetes cluster since getting access to a public Kubernetes cluster might be difficult or expensive for you. Knowing how to deploy the application to Kubernetes is a valuable asset considering it’s becoming the standard cloud platform these days. However, unless you used a public cluster instead of Minikube, so far, your application can only be consumed from your local machine.
In this chapter, we’ll learn how to deploy the application to Fly.io, a new cloud PaaS provider that is becoming very popular thanks to its free plans. The main reason for choosing this platform is that it offers a free plan suitable for our application’s needs. By the end of this chapter, our application will be publicly exposed and accessible from anywhere in the world.
Fly.io is a platform focused on running full-stack applications and their dependent services close to their target users. The platform runs physical servers in many cities across the globe, which allows developers to deploy their workloads close to where their users are, improving the latency and performance of the applications. Fly.io has been around for a few years now, but it became more relevant in the middle of 2022 when Heroku decided to stop offering its free plans. Similar to Heroku, Fly.io allows you to deploy and scale container-based images very easily, and offers a very good developer experience, so it’s a perfect and almost transparent replacement for Heroku.
Heroku
Heroku was originally founded in 2007 and publicly launched in 2009, years before containers and Docker were a thing. It first provided support for Ruby, but more programming languages were soon added. By then, it became a very popular choice for deploying applications, mostly due to its simplicity, developer friendliness, easy scalability, and its free offerings for hobbyists. With the rise of Kubernetes and other platforms, its popularity is stagnating, and by the end of 2022, Heroku no longer has a free offering.
Fly.io has a free-tier plan that, at the time of writing, will allow you to run a small application, such as our task manager, and a persistence service, such as PostgreSQL, for free. Their billing requirements to consume the free tier have changed during the past months, so you might be required to provide a credit card to be able to consume it, though no charges should be applied.
Now, let’s continue by learning how to configure our project to be able to deploy the application to Fly.io.
Configuring the project for Fly.io
When it comes to deployment options, Fly.io is a flexible platform that offers multiple alternatives. There are integrations with several programming languages and frameworks, and quick start guides with detailed documentation on how to deploy applications based on each of these technologies. Most of these choices involve Fly.io performing a container image build from your application or project sources. In addition, there’s also the possibility to deploy a pre-built container image that is publicly available in Docker Hub. This is the most appropriate choice for our application’s requirements since it is based on multiple programming languages and none of the Fly.io suggested approaches would work for us.
In the Pushing the container image to Docker Hub section of Chapter 12, Deploying Your Application to Kubernetes, we pushed a container image of the task manager packaged for JVM mode to Docker Hub. You might be wondering, why not just reuse this image instead of building a new one? If you recall, when we created the cluster configuration manifests, we provided additional configuration to propagate the database credentials to the application container. Fly.io doesn’t have an option to set custom dynamic runtime environment variables, so we need to create a modified image that allows us to read these credentials from the Fly.io-specific environment variables and secrets that are provided at runtime by the platform.
In addition, considering that the free plan of Fly.io is restricted in terms of resources, creating a container image of a native binary is better suited for this deployment. The lower application memory footprint and size will help keep the virtual machine resource consumption low.
Since we already configured Eclipse JKube in our project to create the container images, and to deploy the task manager into Kubernetes, we’ll also use it to create a Fly.io-adapted container image for our application. For the sake of simplicity, and to experiment with additional features of the Kubernetes Maven Plugin, we’ll configure the build to use an adapted Dockerfile.
Creating a Dockerfile for Fly.io
Eclipse JKube supports building and pushing container images based on Dockerfiles too. Let’s start by creating a new file named Dockerfile.fly in the project’s root directory. You can find the content for this file at https://github.com/PacktPublishing/Full-Stack-Quarkus-and-React/blob/main/chapter-13/Dockerfile.fly. Let’s analyze the most relevant parts:
FROM quay.io/quarkus/quarkus-micro-image:1.0This statement sets the base image for our container. quarkus-micro-image is an image maintained by Quarkus and is the most suitable to containerize and run native binary executables.
In the following snippet, we are configuring the assembly for our image by copying the generated native executable to a file named application in the deployments directory. We also change the mode of this file to make it executable:
COPY fly/target/*-runner /deployments/application
RUN chmod a+x /deployments/*
The last statement contains the CMD instruction. For this base image, we just need to provide the invocation of the executable, along with some system property flags, to configure the application’s behavior:
CMD ./deployments/application
 -Dquarkus.http.host=0.0.0.0
 -Dquarkus.datasource.reactive.url=$DATABASE_URL
 -Dquarkus.hibernate-orm.database.generation=create
Let’s take a closer look at these properties:
- quarkus.http.host: With this property, we instruct Quarkus to serve traffic from all network interfaces.
- quarkus.datasource.reactive.url: This property overrides the database connection URL. Fly.io will populate the $DATABASE_URL environment variable at runtime with the attached PostgreSQL database service URL.
- quarkus.hibernate-orm.database.generation: This property configures Quarkus to create the database schema upon its first connection to the database.
To improve the docker build performance, we need to limit the number of files that JKube will send to the Docker-compatible daemon for the assembly process. For this purpose, we need to create a new file called .jkube-dockerinclude in the project’s root directory. The following code snippet shows its content:
target/*-runnerWith this entry, we configure JKube to only account for files whose filenames end with the -runner suffix in the target directory. Now that we’ve created the required configuration files, let’s continue by configuring the application’s Maven project to build and push the Fly.io container image to Docker Hub.
Setting up a Maven profile for Fly.io
To deploy an application to Fly.io using a remote Docker container image approach, we’ll need to create a new Maven profile with the required JKube configuration to account for the Dockerfile.fly file we just created. Let’s open the project’s pom.xml file and create a new profile with a fly id. You can find the updated content for this file at https://github.com/PacktPublishing/Full-Stack-Development-with-Quarkus-and-React/tree/main/chapter-13/pom.xml. Let’s analyze the most relevant part:
<configuration>
  <images>
    <image>
      <name>marcnuri/task-manager:fly</name>
      <build>
        <dockerFile>${project.basedir}/Dockerfile.fly
          </dockerFile>
        <assembly>
          <name>fly</name>
        </assembly>
      </build>
    </image>
  </images>
</configuration>
The previous code snippet has two main purposes:
- Configuring the image name: We configure the resulting image name with the marcnuri/task-manager:fly value. In the Pushing the container image to Docker Hub section in Chapter 12, Deploying Your Application to Kubernetes, we created a Docker Hub repository marcnuri/task-manager and pushed the image to the latest tag, which is the one that gets pulled by default. Since we’re publishing an image to be consumed specifically by Fly.io, we’ll tag and push the image with fly instead.
- Configuring JKube to use the Dockerfile.fly file: The <build><dockerFile> configuration instructs JKube to use a Dockerfile instead of analyzing the project and automatically generating one for us.
Image name
Note that the image name should contain your Docker Hub username instead of marcnuri.
The project configuration and required files are ready. Now, let’s continue by building the container image and pushing it to the Docker Hub registry by repeating the steps we followed in the Pushing the container image to Docker Hub section of Chapter 12, Deploying Your Application to Kubernetes.
We will start by logging into Docker Hub from the command line by running the following command:
docker loginThen, we will build and push the container image by executing the following Maven command from the project’s root directory:
./mvnw -Pnative,frontend,fly clean package k8s:build k8s:pushThis command is moderately more complex than other Maven commands we’ve executed so far. Let’s examine it closely:
- -Pnative,frontend,fly: With this flag, we instruct Maven to use the native, frontend, and fly defined profiles. The native profile forces Quarkus to perform a GraalVM native build. The frontend profile is the one we defined in the Configuring the Quarkus application to build the frontend section of Chapter 11, Quarkus Integration. Finally, fly enables the Maven profile we just defined in this section.
- clean package k8s:build k8s:push: This is the list of Maven goals to execute. We’ll clean up any residual files from previous executions, repackage the application using a native binary, and build and push the container image using the Kubernetes Maven Plugin goals.
The command should complete successfully and the image tag should now be available and visible in the Docker Hub dashboard:
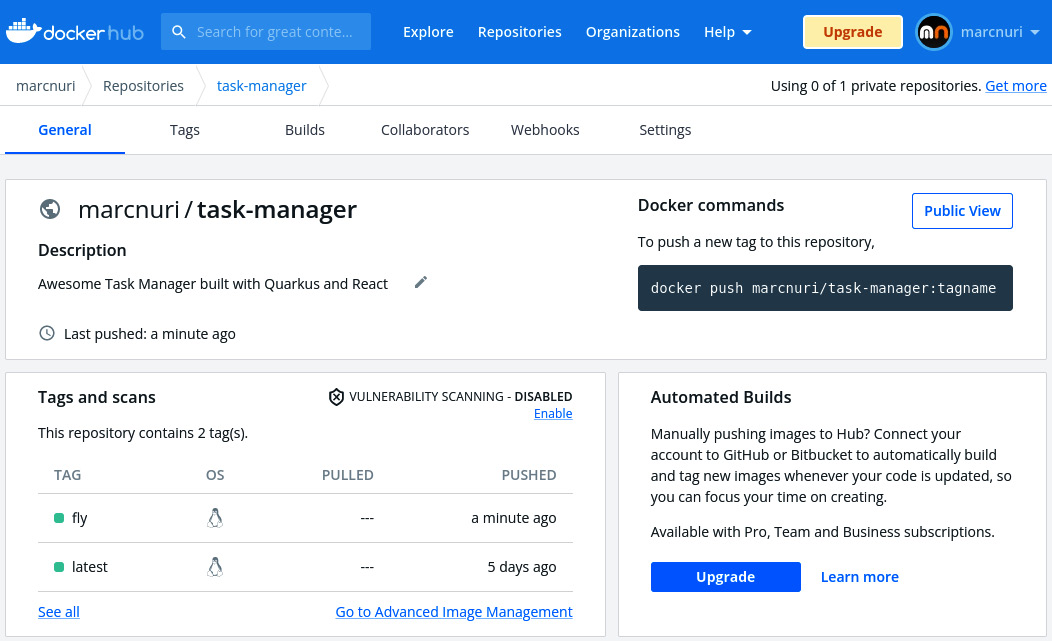
Figure 13.1 – A screenshot of the Docker Hub task manager repository user interface
Now, let’s continue by creating a Fly.io account and publishing the application to the world by deploying the container image we just built and published.
Deploying the task manager
The main requirement to perform any operation in Fly.io is having its command-line interface (CLI) tool, flyctl, installed and available in your path. The installation process is straightforward and involves running just one or two commands in your operating system’s terminal. You can find instructions for your specific platform at https://fly.io/docs/hands-on/install-flyctl/. Now, let’s use this tool to create a new account or to log in to our existing account.
Creating a Fly.io account
There are several ways to create a Fly.io account. However, since we already have its CLI tool available, we’ll use it for this purpose. The process is straightforward; the only requirement is having a valid email account. We can create a new account by running the following command:
flyctl auth signupThe command will open a new browser window where you should fill in your details:
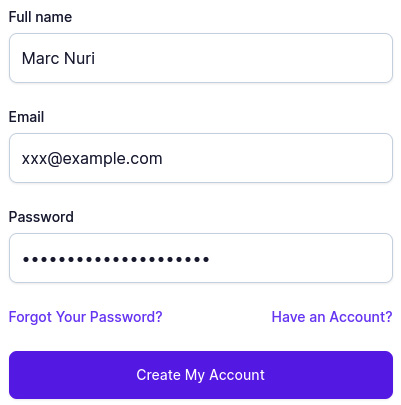
Figure 13.2 – A screenshot of Fly.io’s create new account form
Once you’ve filled in your details and pressed the Create My Account button, the command execution should complete successfully and you should be logged in to your new account. You should also receive an email with a link to verify your account; you should complete this step before deploying the application.
If you already have a Fly.io account or the session you created with the new account expired, you can log into Fly.io with flyctl. Let’s learn how.
Logging in to Fly.io
If you already have a Fly.io account, you should log in with your existing credentials. For that purpose, you need to run the following command:
flyctl auth loginThe preceding command will open a new browser window where you should fill in your credentials:
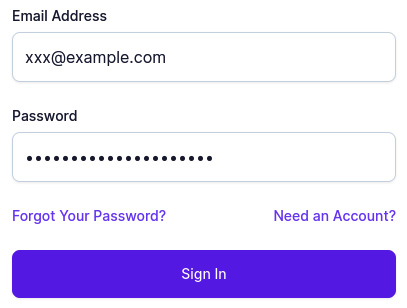
Figure 13.3 – A screenshot of the Fly.io login form
Once you’ve filled in your email and password and pressed the Sign In button, the command execution should complete successfully and you should be logged in to your account.
Creating a new application
The main requirement for deploying a workload to Fly.io is creating a new app. We can start this process by running the following command from the project root:
flyctl launch --image marcnuri/task-manager:flyThis command instructs flyctl to create a new application based on the marcnuri/task-manager:fly container image available from Docker Hub. You should replace the image name with the one applicable to your repository ($dockerHubUserName/task-manager:fly).
The process will start by prompting for an application name. This name must be unique for the entire Fly.io platform. In my case, I will use task-manager:

Figure 13.4 – A screenshot of flyctl launch prompting for an app name
Next, we need to select the region where the application will be deployed. One of the main features of Fly.io is that it can deploy your application to be close to where its users are. In my case, I’ll select the mad region (Madrid).
You will also be prompted to optionally create a PostgreSQL database. Since our application relies on PostgreSQL, we’ll confirm and create it by selecting the Development cluster which, at the time of writing, should be free:
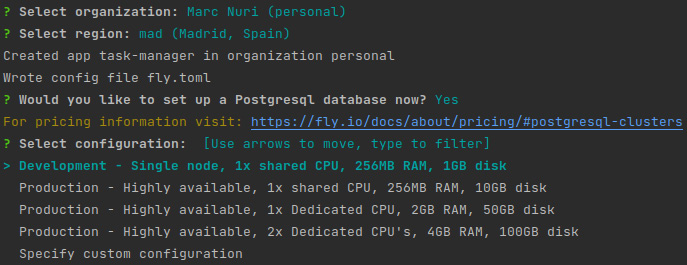
Figure 13.5 – A screenshot of flyctl launch prompting you to set up a PostgreSQL service
After you’ve confirmed the desired configuration, flyctl should start the database deployment process. Once it’s ready, the database credentials will be logged into the console. Unless you intend to connect manually to the database, you don’t need them since they will be automatically injected into the task-manager application when deployed.
Finally, you will be asked whether you would like to deploy the application now. We’ll answer no since, before deploying the application, it’s convenient to go over the fly.toml file that the flyctl launch command execution has generated (we’ll continue with the deployment phase later on in the Deploying the app section):
Figure 13.6 – A screenshot of flyctl launch prompting to deploy the application
Now, let’s take a closer look at the fly.toml file that was generated as a result of the execution of the flyctl launch command.
Analyzing the fly.toml app configuration
Fly.io uses the fly.toml file to configure an application’s deployment. In our case, we used the flyctl launch command to automatically generate one for us. However, you can manually create and edit this file too. You can find the complete source of this file at https://github.com/PacktPublishing/Full-Stack-Development-with-Quarkus-and-React/tree/main/chapter-13/fly.toml. Let’s go over the most relevant parts:
app = "task-manager"The app name is the most important part of the configuration and is used to identify your application. It’s also used to create the fly.dev hostname, which will make your application publicly available. The deployment of my application is available at task-manager.fly.dev.
The following snippet contains the build section of the configuration:
[build]
  image = "marcnuri/task-manager:fly"
We don’t need Fly.io to build a container image for us since we already published a specially tuned image for this platform in Docker Hub. In our case, we just need to configure the image field with the name of our Fly.io-specific public image, which in my case is marcnuri/task-manager:fly (remember to replace this value with the name of your image). Fly.io will use this image instead of inferring our project configuration and building an opinionated container image.
The last important part of the configuration file is the services section, which contains the port mapping configuration for the application. The following snippet contains the relevant parts that affect the behavior of the task manager:
[[services]]
  internal_port = 8080
  [[services.ports]]
    force_https = true
    handlers = ["http"]
    port = 80
  [[services.ports]]
    handlers = ["tls", "http"]
    port = 443
The internal_port field is used to configure the port where the application will listen for connections. For Quarkus, 8080 is the default value, which is also the same value that flyctl uses as a default. If your application port doesn’t match this value, you could either configure your application to listen on 8080 or modify the internal_port value.
The service.ports settings are used to publicly expose the internal port to the outside world. flyctl will automatically expose the application in the 80 (HTTP) and 443 (HTTPS) ports by adding two service.ports entries. Note that the port configuration for the http handler exposed at port 80 has a force_https = true that will automatically redirect the user to the tls handler and enforce an HTTPS connection.
Secure sockets layer/Transport layer security access
Secure sockets layer (SSL) and its successor, Transport layer security (TLS), are cryptographic protocols that provide communications security by establishing authenticated and encrypted links between networked computers. Although SSL has been deprecated for years, it is still common to refer to these technologies using the SSL or SSL/TLS acronyms. You should always access the application through a TLS-protected endpoint (HTTPS URL) to avoid exposing passwords or leaking any other sensitive information through non-encrypted standard HTTP connections.
We have now analyzed the most important settings of the fly.toml file and learned about their purpose. flyctl initialized the file with a few more settings that we didn’t cover but they aren’t relevant to our deployment. Of course, you are free to provide additional configurations that might be suitable for your application. You can learn more about these settings in the official Fly.io documentation at https://fly.io/docs/reference/configuration. Now, let’s continue by deploying the application.
Deploying the app
The last step before our application becomes publicly available and accessible from the internet is deploying it to Fly.io. This process is as simple as running the following command from the project root directory:
flyctl deployThis command should verify the application configuration, start the release process, and monitor its progress. After a few seconds, the execution should complete successfully and we should be able to see the following message logged to the console:

Figure 13.7 – A screenshot of the result of executing flyctl deploy
You should also be able to see the deployment of the database and the application in the Fly.io dashboard for your organization. If you are using a personal organization, it will be available at https://fly.io/dashboard/personal:

Figure 13.8 – A screenshot of the Fly.io dashboard showing the deployed application
Let’s click on the task-manager (or the name of your app) entry to see the overview for this app:
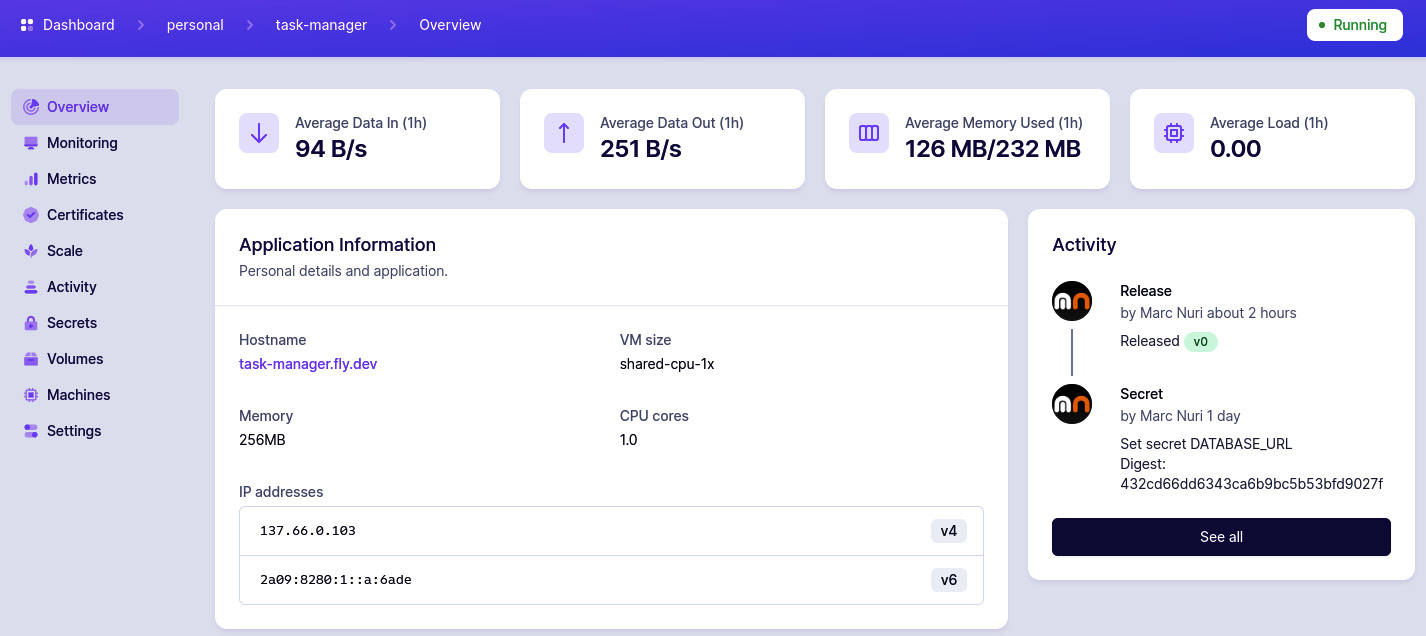
Figure 13.9 – A screenshot of the Fly.io application’s overview interface
From this interface, we can see an overview of the most important details of our application. We can use it to check the application logs from the Monitoring tab, check the application health and metrics, scale the application, configure volumes, and so on.
The Application Information card shows the public URL for our application – in my case, this is task-manager.fly.dev. Let’s click on this link to verify that our application is up and running and publicly available:

Figure 13.10 – A screenshot of the task manager deployed at Fly.io
The link should open a new tab and redirect you to the task manager login page (https://task-manager.fly.dev/login). You should be able to log into the application by providing the admin credentials (admin/quarkus) in the form and pressing the SIGN IN button. The application should let us in and we should be redirected to the task manager’s landing page at https://task-manager.fly.dev/tasks/pending. We should now be able to use all of the application’s features, such as creating new projects, creating new tasks, assigning priorities, setting tasks as completed, and so on. Most importantly, we should be able to play with the application from anywhere in the world with an internet connection. After a few minutes of using it, our application’s dashboard should look more complete:

Figure 13.11 – A screenshot of the task manager after creating a few tasks and projects
With that, we have successfully deployed our application to Fly.io, but most importantly, we’ve made it publicly available to the world. After a few minutes of playing with the task manager, I’m sure that you’re getting tons of ideas on how to improve it and add more features. The best part is that you can also ask for feedback from others since the application is online.
Summary
In this chapter, we learned how to deploy our task manager application to Fly.io. We started by learning about Fly.io, and why its free plan and its specific features make it a very good choice for deploying our application. Then, we learned how to configure our project to build and push a container image to Docker Hub specially tuned for Fly.io. Finally, we deployed the application and made sure everything worked as expected.
You should now be able to deploy applications to Fly.io and, most importantly, be able to share them with the rest of the world by exposing them on the internet. In the next chapter, we’ll learn how to create a continuous integration (CI) pipeline for our application.
Questions
- What’s one advantage of Fly.io compared to other PaaS providers?
- How can you override the configured database URL when running a Quarkus native application?
- Does Eclipse JKube support Dockerfiles?
- Where does flyctl read the app configuration from?
- Can you deploy existing container images to Fly.io?