Chapter 11. Operating and interoperating
As demonstrated in Chapter 10, Greenstone makes it very easy to build collections, although it is a little harder to format them to your own requirements. If the Librarian interface does everything you need, ignore this chapter and start working on your collections! However, if you are going to build and serve digital libraries for public consumption rather than private use, you will probably need to know more. This chapter describes the general structures that make Greenstone work and—most importantly—how to learn more when you need to.
As demonstrated in Chapter 10, Greenstone makes it very easy to build collections, although it is a little harder to format them to your own requirements. If the Librarian interface does everything you need, ignore this chapter and start working on your collections! However, if you are going to build and serve digital libraries for public consumption rather than private use, you will probably need to know more. This chapter describes the general structures that make Greenstone work and—most importantly—how to learn more when you need to.
First you need to learn about your Greenstone installation: where to find it on your computer, how to update to new versions, and how to move collections from one computer to another. We also describe how to create self-contained Greenstone CD-ROMs and DVDs, which is very easy—and really belongs in Chapter 10. We have left it until now because it's also useful to know how to take these self-contained collections and move them into your Greenstone installation if necessary.
The next section describes how to run your Greenstone installation. There are many configuration options; what you get when you install the software is just a plain default version. You need to know how to keep user logs (and where they are) and how to add users with different privileges—for, although we have not seen it yet, there is a built-in authentication facility with which you can build protected collections, or collections in which certain documents are protected. The configuration files contain detailed information on the available options: the most important thing is to be able to find them in the first place.
Particularly for large digital libraries, it helps to understand the processes involved in building collections outside the Librarian interface. The Librarian interface gives you access to underlying processes in a convenient form, but you gain extra flexibility by accessing these processes directly. First we walk you through the operations involved in building a collection, and then we describe what happens under the hood.
We call this chapter “Operating and interoperating” because Greenstone has a rich set of facilities for accessing other sources of information, library standards, and digital library systems. The Librarian interface can bring in information by downloading Web pages or whole Web sites. It can retrieve data from protocols like Z39.50 (Section 7.1), the OAI Protocol for Metadata Harvesting (Section 7.2), and SRU (Section 7.4). You can also arrange for any of your collections to be served over OAI so that others can see it using this protocol. And you can export collections to different formats so that they can be loaded into other digital library systems like DSpace and Fedora (Section 7.6).
Section 11.6 is for those who need to work together on more than one computer to build collections and to add documents to them. A remote version of the Librarian interface allows different workstations to access the same central Greenstone server, with all the facilities of the regular Librarian interface. (Only one person can operate on the same collection at any given time, however.) And an institutional repository subsystem lets authorized users add documents and metadata to collections from a Web browser.
Finally, we consider scalability. How large can Greenstone collections be? This is a difficult question to answer because there are many different dimensions in which collections can be large, and also because it depends on both your computer and your patience. Being a Java application, the Librarian interface is good for only about 10,000 to 20,000 documents, depending on the amount of metadata—and the amount of computer memory. However, the underlying Greenstone programs can cope with a thousand times this amount. We close this chapter by looking inside the National Library of New Zealand's Papers Past collection (described in Section 3.1 and illustrated in Figure 3.4), which is based on Greenstone. It's big: 6.5 million documents, 2 billion words, 20 GB of raw text, and 50 GB of metadata, along with a terabyte of page images.
This chapter, like Chapter 10, describes the production version of Greenstone. Most of what we say here applies equally well to the upcoming new version, Greenstone3, except that its file structure is organized differently. For more information about this, see the last section of Chapter 12.
11.1. Inside Greenstone
Where does the digital library system live on your computer disk? And, why would you want to know? Sometimes you need to find certain configuration files in order to control various options and facilities. Since the software is open source, you can examine any part of the system—including the programs themselves.
Most likely you are not interested in the program code, but you probably will want to know where the collections themselves are kept. Greenstone collections are self-contained nuggets of information. You can give them to others by placing them on a USB flash drive or CD-ROM and having the recipient copy them into the appropriate part of
their digital library installation.
But suppose they don't have the Greenstone software? It's possible—trivial, in fact—to take any collection or set of collections and write them to CD-ROM or DVD in such a way that users with no Greenstone installation and no Internet connection can access them just as though they were on the Web. These disks contain a mini version of the software that installs on any Windows computer in a matter of moments and includes all the searching, browsing, and multi-lingual interface facilities that the full system offers.
But before we begin, here's a brief plea: Please keep your Greenstone installation up to date!
Updating the software
In contrast to commercial software, open source software is characterized by frequent releases containing bug fixes and new features. New releases of Greenstone are typically issued every few months. If you can't wait to get your hands on a new feature, a snapshot of the system is generated automatically every day.
It is very easy to upgrade to a newer version. Before doing so, however, ensure that the computer is not running the Librarian interface or the Greenstone server. Close the Greenstone server by selecting the disk icon in the task bar (to bring the window to the front) and then clicking the exit hotspot—usually marked as a red cross. The re-installation procedure is exactly the same as the original installation. Greenstone installers check for the existence of previous versions and ask you to uninstall them if necessary—on Windows uninstalling is done either through the Control Panel or by selecting the relevant Greenstone item on the Start menu. At the end of the uninstall procedure you will be asked whether you want all your collections removed: say
no if you wish to preserve your work.
Occasionally, problems are encountered if older installations are not fully removed. To clean up your system—having already run the installer—move Greenstone's
collect folder, which contains all your collections, to the desktop (or somewhere else that is convenient for you, such as
My Documents). Then check any places where Greenstone has been installed previously and delete them.
Files and folders
Before going any further, you need to learn how to find your way around the software. Figure 11.1 shows the structure of the Greenstone home directory, including one collection, the Demo collection.

First, locate your Greenstone installation. On Windows, by default it is installed in
C:Program FilesGreenstone if the user had full administration rights when it was installed, otherwise
C:Documents and Settings<username>Greenstone is used for Windows XP and
C:Users<username>Greenstone for Windows Vista. Comparable logic applies to Mac and Linux distributions:
/usr/local/Greenstone is used by default when a system administrator installs the software, otherwise
/home/<username>/Greenstone is used. We call this the GSDLHOME folder. It contains several sub-folders, illustrated in Figure 11.1. The most important one is called
collect, which holds all the collections in your installation. Inside it is a folder called
demo, and many other folders, too, if you have worked through the exercises in the previous chapter. Each collection is self-contained and corresponds to a single sub-folder of
collect. We describe the
collect folder soon.
Before we do so, check out the remaining folders of Figure 11.1. Some hold program code. For example,
bin (short for executable binary) contains the programs that are used in the building process. Binary programs are held in the folder
linux for Linux,
windows for Microsoft Windows, and
darwin for MacOS X (which is the name Apple gave to its version of Unix). Typically, installations contain binaries only for the platform they are running on—except when an installation, say on a USB flash drive, is set up to run on multiple platforms. Figure 11.1 is based on a Linux installation.
The
script sub-folder holds the programs used to create, build, and rebuild collections, which are written in the Perl programming language and therefore platform independent. The same is true for the programs in the
java folder. The
perllib folder near the end contains program modules that are used by the building scripts. Plug-ins and classifiers are placed in the corresponding sub-folders. (Plug-ins are discussed further in Section 11.4.) The
cgi-bin folder contains the Greenstone runtime system that works with a Web server. In the Local Library version of Greenstone on Windows, the necessary runtime executable (
server.exe) is placed in the top-level GSDLHOME folder.
What about the source code? The runtime system is written in the C++ language. The build-time code is primarily written in Perl but calls upon some external C modules. The source code is distributed across three folders:
build-src,
runtime-src, and
common-src, the last containing code that both parts of Greenstone need. Code specifically written for Greenstone is located within each of these folders in a sub-folder called
src, and any third-party software (all distributed under the GNU Public License and other compatible licenses) is located in a sub-folder named
packages.
The main Greenstone source code in the
runtime-src folder comprises the “collection server” (
colservr in Figure 11.1), the “receptionist” (
recpt), and the “protocol” they share (not shown). An example of source code in
build-src is
hashfile, used to compute document IDs, and in
common-src a general purpose library
lib is provided that reads Greenstone configuration files and represents and manipulates strings in Unicode format, among other things.
The functions of third-party packages vary widely. The
packages folder of
build-src contains (among many other things) a program that converts from HTML to XML (
html-tidy in Figure 11.1), a Web mirroring program (
wget), and a utility that converts PDF documents to HTML (
pdf2html). The
packages folder of
common-src contains Expat, a utility for parsing XML, and GDBM, a standard database manager program. The
packages folder of
runtime-src contains software related to the Apache Web server (
apache-httpd in Figure 11.1) and a package dealing with the Z39.50 protocol (
yaz). Each package is stored in a folder of its own, with a
readme file that gives more information about the package. Resulting executable programs are placed in
bin—in the sub-folder corresponding to their underlying operating system—when the software is compiled.
Full-text indexing is central to Greenstone. There are three alternative indexers, called MG, MGPP, and Lucene; near the end of Section 11.4 we show how to switch between them within the Librarian interface. They are stored in a top-level folder of the
common-src folder called
indexers (not shown). Within this is a
packages folder that contains any third-party software that the indexers use.
The
mappings folder contains Unicode translation tables. The
etc folder holds configuration files for the system. It also includes initialization and error logs, and the user authorization database. Inside the top-level
web folder,
images stores images for the user interface, among them icons like those shown in Table 10.1 and
style stores the cascading style sheet (CSS) files. The user interface is constructed by small code fragments called
macros, and these are placed in the
macros folder. Depending on the type of installation and how it has been configured you may also have the following top-level folders:
apache-httpd which contains a Web server,
gli which contains the Librarian interface,
tmp for storing temporary files,
docs which contains the documentation for the system, and
packages which contains a Java runtime environment.
The Librarian interface maintains a small amount of information that is specific to each particular user. This includes the user's Preferences (accessed from its File menu) and the cache that is used when downloading (see Section 11.5). You will find this information in
C:Documents and Settings<username>Application DataGreenstoneGLI on Windows XP and
C:Users<username>Application DataGreenstoneGLI on Windows Vista. (This is for Windows; on Mac and Unix systems it is in a folder called .
gli within the user's home directory.)
Collections
Each collection corresponds to a sub-folder of
collect. Collections are completely self-contained. For example, if you have created a collection—perhaps one of the examples in Chapter 10—and you want to give it to someone else who is also running Greenstone, just locate the appropriate
collect sub-folder, put it on a USB flash drive, take it to their computer, and transfer it into their
collect folder. It will appear right away on their Greenstone home page. (Windows Local Library users will have to restart Greenstone first.)
You may also need to move collections around if the software has previously been installed in a non-standard place. Old collections can be transferred to the new installation by moving them from the
collect folder in the old place into the folder
GSDLHOMEcollect. (We use Windows terminology because this is the most popular platform for Greenstone in practice.)
Figure 11.1 shows the structure of the Demo collection—it's the same for all collections. The
import folder is where the original source material is placed, and the
archives folder is where the result of the import process goes (the first stage of building a collection). The
building folder is used temporarily during building (the second stage), whereupon its contents are moved into
index. The
index folder is where the result of the entire building process is placed, and contains all the information that is served to readers. The
etc folder contains miscellaneous files, such as configuration and mapping files, and logging information. The metadata sets used by the collection go into a folder of the same name, as do any log files that are written every time the collection is built. Some collections have additional folders: one for images that are used in the collection, another for collection-specific macros, and a third for any special Perl modules that pertain to this collection.
Some of these folders may be absent. Most can be deleted once the collection is built; all the information required to serve the collection is in
index and
etc (and, if present,
images and
macros). However, then the collection could not be rebuilt—nor loaded into the Librarian interface. Section 11.3 describes the building process in more detail and also gives further information about the role of the various folders.
Just as the top-level
etc folder in the Greenstone file structure holds configuration information for the system as a whole, there is an
etc folder for each collection. Configuration information for the collection is recorded in a file there called
collect.cfg, along with other miscellaneous information. It records the result of the collection design and formatting process—indeed the details displayed in the main panel of the Librarian interface about a collection's plug-ins, indexes, classifiers, and format statements are exactly what make up this file. It is plain text: choose any collection and take a look at its
etccollect.cfg.
Greenstone CD-ROM/DVDs
You can give out a Greenstone collection on a USB flash drive, or even as a zipped e-mail attachment containing the
etc and
index folders if the collection is small. Of course, the recipient must be running the Greenstone software in order to make use of it.
Alternatively, collections can also be published as
self-installing Windows CD-ROMs or DVDs. These are disks that begin the installation process as soon as they are placed in the drive. They do not install the full Greenstone software, just a mini version that allows users to view existing collections but not build new ones. An installation option lets you choose whether to install all the collection files onto your computer disk, or just the software, in which case the CD-ROM/DVD must be present in the disk drive whenever the collections are used. The former option takes more time to install but responds more quickly to the reader's requests. Either way, interaction—including all browsing and searching, changing preferences, switching languages, etc.—is just the same as on the Web, except that response times are more consistent.
It is very easy to create a self-installing disk containing your own collections. Enter the Librarian interface and choose
File→Write CD/DVD image. Select the collections you wish to export by ticking their check boxes in the window that pops up. If you enter a name for the disk it will appear in the menu when the CD-ROM/DVD is run, otherwise it will be called “Greenstone Collections.” You can choose whether the CD-ROM/DVD runs directly from the disk drive or installs some files onto the computer first.
Click
Write CD/DVD image to start the export process. This puts files into a temporary folder called
exported_xxx (or some such); the interface tells you where it is. The process involves copying many files and may take a few minutes. You need to use your own computer's software to write the generated files to CD-ROM/DVD. On modern computers this capability is built into the operating system: just insert a blank disk into the drive and drag the contents of
exported_xxx into the folder that represents the disk. It is equally simple to plug in your USB flash drive or portable media player and use it in disk-mode.
Collections installed from prepackaged Greenstone disks do not reside in the standard
collect folder but in
C:GSDLcollect. To amalgamate them with your main Greenstone installation, move them into
GSDLHOMEcollect. After you’ve done this, the mini version of the software that runs the prepackaged collections is no longer necessary: you can uninstall it from the Greenstone section of the Windows Start menu.
11.2. Operational Aspects
Certain aspects of a digital library site need to be determined individually for each installation. When Greenstone is installed, default values are given to many parameters. Some, like the directory where the software is kept and the HTTP address of key folders, define the whereabouts of the system—what logical space it occupies. Others control what users can do with the system—such as the languages that the user interface makes available—and switch on various components. You need to know what facilities exist and how to turn them on and off.
Whether logs of user activity are kept and whether Web browser cookies are used to identify users are other important operational aspects. Greenstone has a full logging capability, but it is switched off by default to avoid the creation of large, growing files. In many environments it is essential to record usage logs in order to justify the existence of the system.
Greenstone includes a Web-based administration facility that gives information about the entire system, including all collections it offers. This facility is off by default. Perhaps its most useful function is to allow the system administrator to define users and groups of users who are allowed different privileges—such as access to protected collections and documents within collections. Password protection is just one of many techniques used to bolster security when operating in a network environment, especially if the computer is connected to the Internet. Depending on the level of sensitivity of the digital library content, you may wish to consider using additional measures, such as protecting the computer behind a firewall and streaming all communication over HTTPS rather than HTTP.
Configuration files
There are two configuration files: a site configuration file (
gsdlsite.cfg), which is found in Greenstone's
cgi-bin folder, and a main configuration file (
main.cfg), found in the top-level
etc folder. Both are ordinary text files that can be edited to tailor the individual installation. Moreover, they contain extensive comments that describe what the options are and how to use them.
Once the software has been installed and is working, you are unlikely to need to change the site configuration file—unless you move all the files or change HTTP addresses. The options available in the main configuration file are more interesting. We will not go into details here—you can easily look at the actual file itself for this information—but here is a synopsis of what can be done:
• Log all usage (see next subsection).
• Use cookies to identify users in the logs.
• Enable the administration facility (see next subsection).
• Enable the institutional repository component (see Section 11.6).
• Enable the Remote Librarian applet (see Section 11.6).
• Select which languages are enabled in the user interface.
• Determine the encodings to be used for the user interface.
• Set defaults for built-in CGI arguments—for example, the default interface language.
The best way to learn about the configuration options is to experiment with the
main.cfg file itself. Changes take effect immediately unless you are using the Windows Local Library version (the default for Windows), in which case the server must be restarted before configuration changes take effect.
Encoding statements specify different types of character encoding that can be selected. The UTF-8 version of Unicode (see Sections 4.1 and 8.2), which has standard ASCII as a subset, is handled internally and should always be enabled. But there are many other possible encodings—for example, traditional Chinese text is often represented in “Big-5.” The main configuration file specifies many encodings; most are disabled but can be restored by removing the comment character (#). The main configuration file also contains detailed documentation about the structure of encoding statements.
Logging
Three kinds of log are maintained in the
etc folder: a usage log, an error log, and an events log. The first is the most interesting. The error log, which is permanently enabled, contains messages relating to initialization and operational errors: it is of interest only to people maintaining the software. The events log relates to an obsolete subsystem and will not be discussed.
All user activity—every page that each user visits—can be recorded in the usage log (
etcusage.txt), although no personal names are included. Each action is effectively defined by the arguments in the URL (“CGI arguments”) that characterize it, and these are what are logged. Disabled by default, logging is enabled by switches: one switch turns logging on and off, and another assigns unique identification codes (cookies) to users, which enables their interactions to be traced through the log file.
Each line in the log file records a single page visit. Entries have a time-stamp, the address of the user's computer, details about Web browser used, and the arguments that the CGI mechanism transmits to Greenstone. The main configuration file also includes a switch that sets the format used for the time-stamp: local time in the format “Fri Oct 17 15:57:28 NZDT 2008,” Greenwich Mean Time (UTC) in the same format, or an integer representing the number of seconds since 01/01/1970 GMT.
Figure 11.2 shows a sample entry, split into these components. On 17 Oct 2008 a user at
massey.ac.nz displayed a page (action
a=p) that is the home page (page
p=home) of the Māori newspaper collection (collection
c=niupepa). Many of the other arguments have default values—for example, the language is English (
l=en) and 20 search results will be displayed per page (
o=20). The user's browser is Firefox. The last argument,
z, is a cookie generated by the user's browser: it contains the computer's IP number followed by the time that the user first accessed the digital library. (The z argument appears only if cookies are enabled in Greenstone.)

When logging is enabled, every action by every user is logged—even the Web pages generated to inspect the log files.
Administration facility
Greenstone's administration pages display the installation's configuration files and allow them to be modified. They let you examine the log that records usage and the log that records internal errors. They are available over the Web, so you can use them anywhere. However, the facilities are rudimentary, because Web forms are used for interaction. If you need to edit or examine these files, it is probably best to log into the computer that is serving Greenstone and work with an ordinary text editor. If the hyperlinked button
Administration Page does not appear on the home page (beneath the available collections), then you must edit the main configuration file
main.cfg to enable the administration facility—simply locate the appropriate line (search for
Administration) and change the status value from
disabled to
enabled.
The facility is most useful when you need to define user groups with different privileges. For example, it is possible to restrict access to certain documents, or to certain collections, to particular users. Also, the Remote Librarian interface authenticates users before allowing them to alter the structure and content of particular collections, as does the institutional repository facility (both are described in Section 11.6). Of course, the ability to define new users and user groups is restricted to people who have been authorized to act as system administrator.
Authentication
When the Greenstone software is installed, there is the option to create a user called
admin and set its password. Since this means that a malicious user (from anywhere in the world) who has been able to crack the password has the potential to wreak havoc with your digital library, we advise caution in using this feature. This is also why the feature is off by default in the installer, requiring a conscious decision by the person installing the software to activate it.
In order to investigate the authentication scheme, enable it by editing the main configuration file, go to the Greenstone home page, and refresh the browser window or restart the Local Library server if that is what you are using. A new line appears on the home page, beneath the collections, that refers to the administration facility. Click the button that leads to the Administration page.
On the left of this page are menu items for configuration files, logs, user management, and technical information. User management is the most useful: it allows you to list users, add new users, and change your password. If you attempt any of these, you will need to sign in as the admin user. If not set at installation time, the default password is
admin.
Each user can belong to any number of groups. When the software is installed, there are three groups:
administrator,
all-collections-editor, and
demo. Members of the first group can add and remove users and change their groups; the second group is connected with the Remote Librarian facility discussed in Section 11.6; while the third group is mentioned in the next section. Groups are simply text strings, and you can add them at will: just type them into the “groups” box associated with each user. The admin user can also disable users if they misbehave. Information about users, passwords, and groups is recorded in a database in the Greenstone file structure (
etcusers.gdb); passwords are encrypted using the well-known
crypt utility.
Protecting a collection
It is sometimes necessary to protect digital library collections, or certain parts of them, from the public eye. For example, it may be necessary to restrict PDF files to use only within an organization but allow open access to the extracted HTML, or to keep images private but provide open access to thumbnails. The safest way to do this is to use the authentication facilities of your Web server. Most popular Web servers (e.g., Apache) can be configured to protect parts of the file system so that private files placed there cannot be accessed unless users authenticate themselves first.
Greenstone's authentication scheme is another way of controlling access to particular documents or collections. While less powerful than the capabilities provided by a Web server like Apache, it does have the advantage that it is much easier to learn. Authentication works in two stages. First determine what to restrict access to; second, if access is to be restricted, determine which users are to have it. Access can be restricted either to the collection as a whole or to individual documents in it. In the latter case, the documents are specified individually.
The Librarian interface does not yet provide this ability; instead, you have to edit the relevant collection's configuration file manually (
collect.cfg in the collection's
etc folder). Authentication is activated by a line that begins with the directive
authenticate and is followed by
collection or
document depending on whether it applies to the full collection or to individual documents (the default is
collection). If authentication is by document, you can specify a list of private documents or a list of public documents. In the former case, all other documents are public; in the latter, all others are private. This is done using directives
private_documents or
public_documents—use one or the other, but not both. The documents themselves are specified using identifiers separated by spaces.
Figure 11.3 shows an example of the per-document authentication. It uses Greenstone document identifiers, but other identifiers can be specified when building the collection (see Section 11.4). The easiest way to determine the identifier for a given document is to locate it in the collection and look at the
d argument in its Greenstone URL.

The second part of the process uses the
auth_groups directive to specify the groups that are permitted access. It is followed by a group name (or a list of group names separated by spaces). The lines from the collection configuration file in Figure 11.3 restrict access to all documents except two to members of the
demo group; those two documents are public. As noted above, you can define groups and add members to them from the administration pages.
When users try to access a protected document, they are asked for a user name and password as shown in Figure 11.4. This screenshot, and Figure 11.3, are taken from the Authentication Demo collection, available at
nzdl.org. Specifying access control this way is a clunky feature that is little used in practice. Instead of having to specify an explicit list of document identifiers, it would be better to control authentication using a metadata value, and this facility is planned for a future version of the Librarian interface.

11.3. Command-Line Operation
Collections can be built without involving the Librarian interface at all. It simply provides a user-friendly way of working. The Gather panel copies documents into the appropriate
import folder. The Enrich panel edits metadata files (
metadata.xml, described in Section 10.5). The Design and Format panels edit the collection configuration file
collect.cfg. Most importantly, the Create panel invokes standalone programs that do the actual work.
Walking through the operations involved in building a collection without using the Librarian interface at all will show you what is going on behind the scenes. We use the Small HTML collection that we built in Section 10.3 as an example, and on the way we take the opportunity to explain some general features and design principles, as well as the specific steps involved.
Building a collection is the process of taking a set of documents and metadata and creating all the indexes and data structures that support whatever searching, browsing, and viewing operations the collection offers. It breaks down into four phases. First, a skeleton framework is made for the collection. Then documents are imported into a standard representation from whatever format they are provided in. Next the required indexes are built, and finally the collection is installed, so that it becomes operational.
We refer to these operations as
make,
import,
build, and
install, respectively, and each one is performed by a simple computer command. The terminology is potentially confusing: we say
make because the English language does not have a specific verb for creating a skeleton framework, and—worse still—
build is used in two different senses, one that encompasses the whole process and another that refers to the particular sub-process of building indexes. Provided the distinction is kept in mind, it should be clear from the context whether
build refers to the general process of building-in-the-large or the specific one of building-in-the-small.
Getting started
We recommend that you follow this walk-through on your own computer. We use Windows terminology, but the process for Mac and Linux is nearly identical. Some operations may seem unnecessary, but their role becomes clear later. Remember that our purpose is not to provide a streamlined way of building collections—for that, use the Librarian interface—but to explain the collection-building process. Table 11.1 summarizes the procedure, for reference, and also mentions any differences between Windows and Mac/Linux.
| Step | Function |
|---|---|
| 1. cd "C:Program FilesGreenstone" | Assumes that Greenstone is installed in the default location. |
| 2. setup.bat | This makes Greenstone programs available. On Mac or Linux, use source ./setup.bash instead. |
| 3. perl –S mkcol.pl –creator [email protected] mydemo | Create a skeleton framework of initial files and directories. |
| 4.
Copy source files into
C:Program FilesGreenstonecollectmydemoimport | Populate the collection with sample documents. On Windows, select the files and drag them. On Mac or Linux use the cp command—and if you are copying files from a CD-ROM, you may have to use the mount command first. |
| 5.
Edit the file
C:Program FilesGreenstonecollectmydemoetccollect.cfg | Customize the collection by editing the collection-level metadata in the configuration file. Alter collectionname, collectionextra, and collectionicon. |
| 6. perl –S import.pl –removeold mydemo | Convert the source documents and metadata specifications to the Greenstone standard form. |
| 7. perl –S buildcol.pl –removeold mydemo | Build the indexes and data structures that make the collection work. |
| 8. Replace the contents of the collection's index directory with that of the building directory | On Windows, select the files and drag them. On Mac or Linux, use the mv command. |
First locate the
command prompt, which is where you type commands. This differs from one system to another, but on Windows XP look in the Start menu. Invoke the Run entry and type
cmd in the dialog box. Change into the directory in which the software was installed by typing
cd "…"
where … is the actual installation folder, which we have been calling GSDLHOME. (The quotation marks are there to protect any spaces in the folder name, which is necessary on some systems.) Next, type
setup.bat
This batch file (which is quite short—read it if you like) tells the system where to look for programs and other parts of the digital library file structure by setting the system variable
GSDLHOME to the Greenstone home directory. To return to this place later, type
cd "%GSDLHOME%"
(again, the quotation marks are there to protect spaces in the file name). If you close the command window and open another one, you must invoke
setup.bat again.
Making a framework
Now you are in a position to make, import, build, and install collections. The first operation, accomplished by the Perl program
mkcol.pl—the name stands for “make a collection”—creates an empty framework. Program names have cryptic abbreviations because Greenstone has traditionally run on ancient versions of Windows that impose an eight-character limit on file and folder names.
Run the program by typing
perl –S mkcol.pl. (If your computer is set up to associate the Perl interpreter with files ending in .
pl, drop the preamble and simply type
mkcol.pl.) All Greenstone programs take at least one argument—the name of the collection being operated on—and running them without arguments prints a helpful message on the screen. This convention has the added bonus of providing up-to-date documentation for an evolving system.
As this message explains,
mkcol requires you to specify the collection name. As for the other programs, there is an extensive list of options, which are preceded by the minus sign (–), but all have default values so that only a minimum of information needs to be given explicitly.
Use
mkcol.pl to create a framework of initial files and folders for the new collection. Assign the collection the name
mydemo by typing
perl –S mkcol.pl mydemo
To examine the new file structure, move to the newly created collection directory by typing:
cd "%GSDLHOME%collectmydemo"
List the directory's contents by typing
dir. The
mkcol.pl program has created six folders:
etc (which contains the default collection configuration file),
images (for any collection specific images),
import (ready for the collection's source material),
macros (containing a default collection-specific macro file),
script (for any Web browser JavaScript enhancements), and
style (for any collection-specific CSS files). The other files depicted in Figure 11.1 for the Demo collection are created automatically later, when they are needed.
In the new collection's
etc directory is a collection configuration file called
collect.cfg, shown in Figure 11.5. The collection name appears in one of the
collectionmeta lines, which give metadata concerning the collection as a whole. The file shows the same selection of plug-ins that the Librarian interface includes—not surprisingly, because behind the scenes the Librarian invokes exactly the same program.

Importing documents
The next step is to populate the collection with documents. In our case, the source material resides in the
simple_html folder in the sample files that you downloaded when working through Chapter 10. All the source material should be placed in the new collection's
import folder. Just copy the
simple_html folder (or its contents—it doesn't matter which) and paste it into the
mydemo collection's
import folder. This is precisely what the Librarian interface does in the Gather panel.
Now you are ready to perform the import process. This brings the documents into the system, standardizes their format, and extracts metadata from them and from any
metadata.xml files that are present. It invokes plug-ins to process the files and extract metadata.
Type
perl –S import.pl at the prompt to get a long list of options for the import program, with a brief explanation of each. In fact, if you switch the Librarian interface to Expert mode and go to the Create panel, you will find a list of import options that includes all those implemented by the Perl program—and the tool-tips contain the same explanatory text too. (A few that do not make sense from within the Librarian interface are omitted.) When the build button is pressed, the Librarian interface initiates
import.pl (followed by
buildcol.pl, described next) to do the work, with the specified set of options.
Next type
perl –S import.pl –removeold mydemo
Text scrolls past, reporting the progress of the import operation, just as it does when you use the Librarian interface. You do not have to be in any particular folder when the
import command is issued because the software works out where everything is from the Greenstone home folder and the collection's name. The –
removeold option forces the collection to be built from scratch. Greenstone also supports incremental building (described below). For now, however, we rebuild collections in their entirety to keep things simple—in fact, this is common practice.
Building indexes
The next step is to build the indexes and data structures that make the collection work. This is building-in-the-small (as opposed to building-in-the-large, which refers to the whole process of making, importing, building, and installing). With a small nod toward the ambiguity of the term
build, the relevant program is called
buildcol.pl.
This is the stage at which you would most likely customize the new collection by editing its configuration file, as you have done in the Librarian interface's Design and Format panels. However, just as in the first exercise of Section 10.3, we’ll go straight ahead and “build” the collection.
First type
perl –S buildcol.pl at the command prompt for a list of collection-building options (again, a superset of those available to Expert users of the Librarian interface). Then, sticking to the defaults, type
perl –S buildcol.pl –removeold mydemo
Progress-report text scrolls past again, which under normal conditions can be ignored. (Any serious problem will cause the program to be terminated immediately, with an error message.) The –
removeold option causes the indexes to be built from scratch.
Installing the collection
Although it has been built, the collection is not yet live—you cannot see it in your digital library. When the
buildcol.pl command is used, the files that are generated are located in a special area, and the result must be moved to the proper place before the collection can be used. This is because (once you scale up your digital library operations) some collections may take hours—even days—to build, and during that period the existing version of the collection continues to serve users. Building is done in the
building folder, whereas collections are served from the
index folder.
To make the collection operational, select the contents of the
mydemo collection's
building folder and drag them into the
index folder. If
index already contains some files, remove them first.
The newly built collection can now be invoked from the digital library home page. If you are using the Local Library version, you will have to restart the library program. Otherwise you need only reload the home page (although caching may conceal the change, in which case a forced reload should be sufficient; alternatively you could close and restart the browser). To view the new collection, click on its icon. If it doesn't appear on the home page, you’ve probably forgotten to move the contents of the
building folder into
index.
With the Web Library version, nothing needs to be restarted. What happens if a reader is actually using the previous version of the collection at the very instant the collection is moved from
building to
index? Basically, nothing. If she has just done a search, and then repeats it, the results list may change. The worst that can happen is that she clicks on a document in the search results that is absent from the new version of the collection. Then she will see a blank Greenstone page and, after she re-executes the search, the document will have disappeared from the search results.
11.4. Under the Hood
Now that you know how to invoke the underlying programs that build collections, you are in a position to learn a little more about what happens under the hood. This information could prove useful if you need to dig deeper into the structure of the
archives folder, or to evaluate the pros and cons of different ways of choosing document identifiers, or to learn a little more about plug-ins and what they do, or to understand the many options that are available for searching.
Importing and building
The two main components of the collection-building process are importing (
import.pl) and building in the narrow sense (
buildcol.pl). The former brings documents and metadata into the system in a standardized XML format that is used internally. The latter creates the indexes and data structures needed to make the collection operational. Both components have many options, which can be viewed from the command line or in the Create panel in Expert mode.
The import process takes the information in the
import folder (including
metadata.xml files, if any), converts it to a standardized XML format (see next section), and puts the result into the
archives folder. If desired, the original material can then be safely deleted, because the collection can be rebuilt from the archive files. If it is deleted, new material can be added to the collection by placing it in
import and re-executing the process, this time using –
keepold instead of –
removeold: the new material will find its way into
archives along with what is already there. If following the route of removing source documents from the import folder once they have been processed, then to retain a collection in a form that can be augmented and rebuilt later, do not delete the
archives.
Each document's archive file occupies its own folder in the archives structure, along with any files associated with the document—such as image files included in it. The folder name is based on the document's object identifier. The structure is rather arcane, because it is designed to work on primitive computers (e.g., early versions of Windows) that restrict the length of file names, the number of files in a folder, and the maximum nesting depth of folders.
You will also notice two files at the top level of the archives folder:
archiveinf-doc.gdb and
archiveinf-src.gdb. These are database files that support incremental building. The former stores information about where each document is located within
archives (and what files comprise the document); the latter records where these files came from in the
import folder.
Incremental building
Documents can be added, removed, or changed incrementally using the
incremental option of the import and build processes. In the Librarian interface, this is enabled by clicking the
Minimal Rebuild check-box in the Create panel. Although the import process can always work incrementally, whether or not the building process can do so depends on the indexer being used. The indexers MG and MGPP are non-incremental, but the Lucene indexer supports true incremental building, and both building and importing are performed incrementally if the Librarian interface's Minimal Rebuild is enabled.
When incrementally building with Lucene, the files generated should no longer be placed in a
separate area—the indexer needs to be able to find the current indexes and change them incrementally. In other words, there is no “install” step to perform. This can be accomplished by adding the option
–builddir "%GSDLHOME%collect<collectionname>index"
to the
buildcol.pl command (as well as –
incremental), substituting the actual name of the collection for <collectionname>. As this is rather tedious to type, Greenstone provides two extra commands:
incremental-import.pl and
incremental-buildcol.pl, which set these options for you. A complementary pair,
full-import.pl and
full-buildcol.pl, are provided for rebuilding from scratch.
A long-standing historical deficiency of Greenstone, now rectified, has been that the
build process needed to be re-run from scratch when documents are added, modified, or deleted. This limitation arose because the original MG and MGPP indexers are optimized for maximum compression, which requires non-incremental operation to ensure that the word statistics on which compression is based reflect the collection as a whole. However, Lucene, which Greenstone now incorporates as an option, is capable of operating incrementally.
Scheduled rebuilding
Greenstone incorporates a user-oriented module for scheduled maintenance of collections. This automates the construction of any existing collection and schedules rebuilding to occur periodically. At the command-line level, daily rebuilding of a collection called
pics is accomplished by invoking
perl –S schedule.pl pics "incremental-import.pl pics" "full-buildcol.pl pics" daily
for MG- and MGPP-based collections, and
perl –S schedule.pl pics "incremental-import.pl pics" "incremental-buildcol.pl pics" daily
for a Lucene-based collection.
This generates a script for rebuilding according to the specified options. It also inserts a record into a configuration file for time-based scheduling that calls the generated script using an operating system service called
cron (for chronograph), set to be executed daily. (Cron is standard on Unix systems: Greenstone includes a port to Windows to make scheduled rebuilding work there too.) It is important that scheduled builds are completed in their entirety without interference from another scheduled build. To handle this, the Perl script first checks for the presence of a lock file, which indicates that a build is already underway, and ensures that multiple builds do not occur concurrently.
Scheduled rebuilding can be specified within the Librarian interface. In Expert mode, in addition to Import options and Build options, the Create panel contains a Schedule Options tab where scheduling parameters can be specified. Collections can be built hourly (on the hour), daily (at midnight), or weekly (at midnight on Sundays), and the user can request e-mail notification of each build. The output of the script is kept in a log file. Before setting up an automatic scheduled rebuild, the user can manually build and configure the collection as many times as necessary to confirm that the correct sequence is being performed.
Archive formats
When you import documents and Greenstone puts them in the
archives folder, there are two standard forms in which they can be represented:
• Greenstone Archive format
• METS (see Section 6.4), using the Greenstone METS profile.
An option to the import process (
saveas), which is only visible in the Librarian interface's Expert mode, dictates which one is used; the former is the default.
The building (building-in-the-small) process uses plug-ins to process documents just as the import process does, and for this to work, the list of plug-ins must include one that processes whatever archive format is being used. This is why the Greenstone Archive format plug-in (called GreenstoneXMLPlugin) is specified at the top of the list, and it cannot be deleted by Librarian-level users. However, Expert-level users can specify METS as the save format for the import process and replace GreenstoneXMLPlugin in the plug-in list by Greenstone's METS plug-in.
Using METS is a worthwhile experiment. Open any collection in the Librarian interface and switch to Expert mode. In the Create panel, change the import process's
saveas option to Greenstone METS, and in the Design panel delete GreenstoneXMLPlugin and replace it by GreenstoneMETSPlugin. Build the collection, and locate its
archives folder in the Windows file browser (in
Greenstone→collect→<collection name>→archives). Two files are generated for each document:
docmets.xml, the core METS description; and
doctxt.xml, a supporting file. (Depending on how you view
doctxt.xml, you may need to be connected to the Internet, because it refers to a remote resource.) Depending on the source documents, there may be additional files, such as images used in a Web page. One of the many features of METS is the ability to reference information in external XML files. This is used to tie the content of the document, which is stored in the file
doctxt.xml, to its hierarchical structure, which is described in the core METS file
docmets.xml.
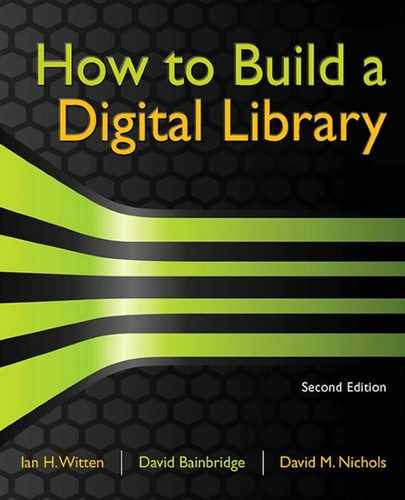
The remainder of this section describes the Greenstone Archive format, which is used by default. (Readers may first wish to reacquaint themselves with Section 4.3, which reviews HTML and XML.) Documents are divided into sections and metadata is stored at the document or section level. One design requirement is the ability to represent any previously marked-up document that uses HTML tags, even if the markup is sloppy. Another is that archive documents must be parsed rapidly. The archive format is an XML-compliant syntax that contains explicit top-level markup for sectioning and metadata and can also embed HTML-style markup that is not interpreted at the top level.
In XML, tags are enclosed in angle brackets for markup, just like HTML tags. The archive format encodes documents that are already in HTML by escaping any embedded left or right angle bracket (<, >), or quote (") characters within the original text using the standard codes &
lt;, &
gt;, and &
quot;. A <
Section> tag signals the start of each section of the document, and the corresponding closing tag marks its end. Sections begin with a block that defines pertinent metadata. Metadata specifications give the metadata name and its value. In addition to regular metadata, the file that contains the original document is specified as
gsdlsourcefilename, and files that are associated with the document, such as image files, are specified as
gsdlassocfile.
Figure 11.6a shows the XML document type definition for the Greenstone Archive format. Documents are divided into sections, which can be nested. Each section has a description part that comprises zero or more metadata items, and a content part that holds the document's contents. (The content may be null, e.g., for image files, audio files, or the dummy documents that are created by exploding metadata-only files, as described in Section 10.5). A name attribute and some textual data are associated with each metadata element. In XML, PCDATA stands for “parsed character data”—Unicode text in this case.

Figure 11.6b shows a simple document comprising a short book with two associated images. The book has two sections, called
Preface and
First and only chapter; the latter has two subsections. Chapters are simply top-level sections. Metadata is stored at the beginning of each section.
This structure serves two purposes. First, it allows readers to browse around inside documents once they have been located. When you open a book, the table of contents shows the section hierarchy. Figure 3.1 (Chapter 3) illustrates browsing within a book that has a hierarchical table of contents showing chapters, sections, and subsections. In some collections, documents are split into pages instead, and Figure 3.2 shows (at the top right) a page selector for such a document. Chapters, sections, subsections, and pages are all “sections.”
The second use of document structure is for searchable indexes. There are two levels of index:
document and
section, and most collections use them both. The first relates to complete documents—you use it to find all documents that contain a particular set of words. When a
section index is created, each portion of text that is indexed stretches from one
Section tag to the next—thus a chapter that immediately begins with a new section will produce an empty document in the index (such documents are hidden from the user). Sections and subsections are treated alike: the hierarchical structure is flattened for the purposes of creating searchable indexes. The MG indexer (but not MGPP or Lucene) provides a third level,
paragraph, which treats each paragraph as a separate document and is useful for more focused searches.
Document identifiers
The import process assigns object identifiers (OIDs) to documents, which are then stored as a metadata element in the document's archive file (Figure 11.6b). If the import process is re-executed, documents should receive the same identifier. The method of obtaining identifiers can be specified as an option to the import process (this option is available to Librarian-level users). There are four possibilities:
• hash the contents of the file
• use the value of a particular metadata item
• use a simple document count
• use the name of the parent folder.
The first, which is the default method, calculates a pseudo-random number based on the content of the document—called
hashing. This ensures that identifiers will be the same every time a given document is imported: if the content changes, so does the identifier; if not, the identifier remains the same. Identical copies of a document will be assigned the same identifier and thereafter treated by the system as one. The same document can appear in two different collections: if so, searching both collections will return just one copy of the document. These identifiers are character strings starting with the letters HASH: for example, HASH0158f56086efffe592636058. They are long enough that the chance of different documents receiving the same one is vanishingly small, and this possibility is ignored in the system.
For the second method of assigning OIDs, the user specifies a metadata element that holds the document's unique identifier (havoc will ensue if it is not unique). If that metadata value is unspecified for a particular document, the hash value will be used instead. (The value is preceded by
D if the identifier is purely numeric, to prevent confusion with document numbers, used internally). The third method is significantly faster than hashing, but does not necessarily assign the same identifier to the same document when the collection is rebuilt from scratch with additional documents. The fourth is intended for situations where there is only one document per folder, and folder names are unique (the folder name is preceded by
J).
Identifiers are extended to individual sections of a document using integers separated by periods. For example, since the OID of the document in Figure 11.6b is HASH015…058, the OID of the first subsection of the
First and only chapter is HASH015…058.2.1—because that chapter is the second in its enclosing section, and the relevant subsection is the first in
its enclosing section. Section-level identifiers are not stored explicitly but are used internally to represent individual document sections that are returned as the result of a search. They do not necessarily coincide with the logical numbering of chapters and sections—documents often include unnumbered chapters, such as a Preface—but are only for internal use.
Plug-ins
Most of the import process's work is accomplished by plug-ins. These operate in the order in which they appear in the collection's configuration file. Each input file is passed to the plug-ins in turn until one is found that can process it—thus earlier plug-ins take priority over later ones. Document formats are usually determined by filename extensions—for example,
foo.txt is processed as a text file,
foo.html as HTML, and
foo.doc as a Word file. It is also possible for a plug-in to open a file and inspect its contents before deciding whether to process it. This is the norm for XML files with the generic extension
.xml, whose type can only be determined by opening them up and examining the root element. If there is no plug-in that can process the file, a warning is printed and attention passes to the next file.
Plug-ins can inherit the functionality of other plug-ins to perform common tasks, such as converting images and extracting key phrases, dates, and e-mail addresses; these are visible as separate parts of the plug-in configuration panel in the Librarian interface. Also, the Word and PDF plug-ins work by converting source documents to an intermediate HTML form and passing this to the HTML plug-in.
Plug-ins are used for both importing and building, and both processes use the same plug-in list. Importing generates files that are processed by a special plug-in (GreenstoneXMLPlugin) that recognizes Greenstone Archive format documents. These do not occur in the
import folder, but they certainly do occur in the
archives folder. ArchivesInfPlugin is also used during building only: it processes the document OIDs that were produced during importing and stored in the
archiveinf-doc.gdb file mentioned earlier.
DirectoryPlugin is another special plug-in that is included in every collection. It traverses the folder structure in the
import directory. You place the whole file structure containing the source material into
import, and DirectoryPlugin recurses through this structure. It only processes folders, and it operates by creating a list of all the files they contain (including sub-folders) and passing the name of each back through the plug-in list. The effect is to expand all directories in the hierarchy. DirectoryPlugin is the last member of the list in all collection configuration files. In the Librarian interface, MetadataXMLPlugin, DirectoryPlugin, and ArchivesInfPlugin are all invisible unless you are in Expert mode, and even then they cannot be removed. Librarian-level users are prevented from removing GreenstoneXMLPlugin, because they do not see the
saveas option to the import process.
Greenstone has over 30 plug-ins—and the number is growing. It is impossible to cover them all here. Descriptions, along with a list of all their options and a brief account of each one, can be obtained using the program
pluginfo.pl—just specify the plug-in name as the argument. The most useful options can be seen in the Librarian interface, with tool-tips that give the same information as the
pluginfo program (including translations into different languages).
Here is a summary of the plug-ins for widely used document formats that are included in the default collection configuration file, along with the file names processed by each.
HTMLPlugin (.htm, .html; also .shtml, .shm, .asp, .php, .cgi)
HTMLPlugin processes HTML files. It extracts title metadata based on the <title> tag; other metadata expressed using HTML meta-tags can be extracted too. This plug-in has many options, some of which are discussed in Chapter 10.
WORDPlugin (.doc) and RTFPlugin (.rtf)
WORDPlugin and RTFPlugin import Microsoft Word documents. There are many different variants on the Word format—and even Microsoft programs sometimes make conversion errors. As mentioned in Chapter 10, independent programs are used to convert Word files to HTML. For some older Word formats, the system resorts to a simple extraction algorithm that finds all text strings in the input file.
PDFPlugin (.pdf)
PDFPlugin imports documents in PDF, Adobe's Portable Document Format. Like the Word plug-in, it uses an independent program to convert PDF files to HTML. Note that encrypted PDF files cannot be processed.
PostScriptPlugin (.ps)
PostScriptPlugin imports documents in PostScript. It uses an independent program called Ghostscript, which is included as an option when installing Greenstone.
ImagePlugin (.jpg, .jpeg, .gif, .png, .bmp, .xbm,.tif, .tiff)
ImagePlugin handles images of many different kinds, using an external program called ImageMagick. It (optionally) computes thumbnail and screen-size versions of the image and extracts metadata giving its type, size, height, and width.
TextPlugin (.txt, .text)
TextPlugin interprets a plain text file as a simple document. It adds title metadata based on the file's first line.
EmailPlugin (.email)
EmailPlugin imports files containing e-mail and deals with open e-mail formats, such as those used by the Thunderbird, Eudora, and Unix mail readers. Each source document is examined to see if it contains an e-mail, or several e-mails joined together in one file, and if so, its contents are processed. The plug-in extracts
Subject,
To,
From, and
Date metadata. However, it does not handle MIME-encoded e-mails properly—although legible, they often look rather strange.
ZIPPlugin (.gz, .z, .tgz, .taz, .bz, .zip, .jar, .tar)
ZIPPlugin handles compressed and/or archived document formats: gzip (.
gz, .
z, .
tgz, .
taz), bzip (.
bz), zip (.
zip, .
jar), and tar (.
tar).
NulPlugin (.nul)
NulPlugin handles the dummy files generated by the metadata database exploding process explained in Section 10.5.
ISISPlug (.mst)
ISISPlug handles metadata in CDS/ISIS format (popular in developing countries but almost unknown elsewhere). Along with the master file
(.mst), CDS/ISIS databases also have field definition files
(.fdt) and cross-reference files (
.xrf). The Greenstone wiki contains a comprehensive document that explains how to deal with CDS/ISIS in Greenstone.
Search indexes
There are three indexers that can be used for full-text searching: MG, MGPP, and Lucene. The MG search engine, implemented in the C programming language, is described in the classic book
Managing Gigabytes (mentioned in Section 3.7). It can produce separate indexes that operate at the document, section, or paragraph level—meaning that when several search terms are specified, the combination is sought in the entire document, or in an individual section, or in an individual paragraph. Searches can be either Boolean or ranked (but not both at once). A separate physical index is created for each index specified in the collection. For phrase search, MG uses a post-retrieval scan, which is potentially slow (Section 3.4). It is otherwise very fast and has been extensively tested on large collections.
MGPP, which is the default indexer for new collections, is a reimplementation of MG in the C++ programming language, with some enhancements. Behind the scenes, it operates at the word level, which allows fielded, phrase, and proximity searching to be handled efficiently. Boolean searches can be ranked. Different document/section levels, and text and metadata fields, are all handled in a single data structure, which reduces the collection size compared with MG for collections with many indexes. Phrase searching is much faster than for MG, but ordinary searching may be slightly slower due to the word-level, rather than section-level, indexing.
Lucene was developed by the Apache Software Foundation and is written in Java. It handles field and proximity searching, but only at a single level—which means that documents and sections require separate indexes. Its range of functionality is similar to that of MGPP, with the addition of single-character wildcards, range searching, and sorting of search results by metadata fields. It also has a “fuzzy search” option that allows approximate searching. It was added to facilitate incremental collection building, which MG and MGPP do not provide.
Adding and configuring indexes
Indexes are added in the Search Indexes section of the Librarian interface's Design panel. A configuration panel pops up allowing you to determine whether the index should include the full text of documents, along with any selection of metadata fields. (See the discussion of building the Word and PDF collection in Section 10.3.) As well as allowing selection of any set of metadata fields, MGPP and Lucene provide an Add All button as an easy way of adding all metadata and text sources as individual indexes. Also, a special index is available for MGPP and Lucene (called
allfields) that searches over all specified indexes without having to specify a separate index that contains all sources. To add this, check the
Add combined searching over all assigned indexes box on the index configuration panel and click
Add Index.
The top right of the Search Indexes panel shows which indexer will be used when the collection is built. When the indexer is changed, a window pops up with a list of three options: MG, MGPP, and Lucene. Changing indexers affects how the indexes are built and may affect search functionality. The default structure creates three indexes: full text, titles, and file names (the last is rarely useful). Indexes can be at document, section, or (for MG only) paragraph level.
With MGPP and Lucene, the levels are document, section, or both. Levels are determined globally for all indexes, and the two possibilities are shown as check-boxes on the main Search Indexes panel. With MG, each index has its own level—document, section, or paragraph—which is chosen by the Indexing level selector on its configuration panel.
For MGPP, stemming, case-folding, and accent-folding are determined by check-boxes on the main Search Indexes panel. For MG, only stemming and case-folding can be selected. For Lucene there is no choice. There is also a check-box for the Chinese-Japanese-Korean (CJK) languages, which separates ideographs by spaces for searching—it is a place-holder for more sophisticated schemes for word segmentation, described in Section 8.4.
Partitioning indexes
Indexes are built on particular text or metadata sources. As you learned when building the large HTML collection in Section 10.3, the search space can be further controlled by partitioning the indexes. In Section 10.3, you designed a filter based on a metadata value, but indexes can also be partitioned based on the language of the documents.
Note that for MG collections, the total number of partitions generated is a combination of all indexes, sub-collection filters, and languages chosen. Two indexes with two subcollection filters in two languages would yield eight index partitions, which would result in eight separate index data structures (that is, eight separate physical indexes) when the collection was built. For MGPP, all logical indexes are created in one physical index, so there would only be four separate index partitions. For Lucene, the number of physical indexes is determined by the number of levels assigned to the collection, one index per level. In the above situation, if one level were assigned, there would be four physical indexes, while with two levels there would be eight.
Experimenting with MGPP and Lucene
To experiment with the search options for the MGPP indexer, start a new collection (File→New) and base it on the Greenstone Demo collection. In the Gather panel, drag all the folders in
sample_files→ demo→HTML into the new collection. In the Search Indexes section of the Design panel, note that the MGPP indexer is being used. This is because the original Demo collection on which this collection is based uses MGPP. Note the three options at the bottom of the panel—stem, case-fold and accent-fold. Enabled options appear on the collection's Preferences page. Under Indexing Levels, select section as well as document. Build and preview the collection.
To use the Lucene indexer, click the
Change button at the top right corner of the panel and select Lucene in the window that pops up. Build the collection and experiment with searching. Lucene provides range searching and single- and multi-letter wildcards. The full query syntax is quite complex (see http://lucene.apache.org/java/docs). To get a brief taste, here is how to use wildcards. The character * stands for any sequence of letters—a multi-letter wildcard—and can be appended to any query term. For example,
econom* searches for words like
econometrics, economist, economical, and
economy. The character ? is a single-letter wildcard. For example, searching for
economi?? will match words like
economist, economics, and
economies that have just two more letters. Note that Lucene uses stopwords by default, so searching for words like
the returns no matches (an appropriate message appears on the search results page).
MGPP does not support wildcards, but unlike Lucene it can optionally stem, case-fold, and accent-fold, as noted above. Both are enabled by default during the building process (but on the collection's Preferences panel stemming is enabled and case-folding disabled by default). Change the indexer back to MGPP and rebuild the collection. Note that searching for
econom returns no documents, while searching for
fao and
FAO give the same result—78 words; nine matched documents. Go to the Preferences page and change “whole word must match” to “ignore word endings.” When you return to the search page and seek
econom again, several documents are found. To avoid confusion later on, revert to the original Preferences setting. To differentiate upper-case from lower-case, set the “ignore case differences” option appropriately and search for
fao and
FAO again. This time the results are different. Again, revert to the original setting.
Behind the scenes, these effects are achieved by appending modifiers to the query. Appending #s to a query explicitly enables the “ignore word endings” option—if you search for
econom#s, you will find several matches, even though the mode on the Preference page has been restored to “whole word must match.” These modifiers override the Preferences settings. Likewise, appending #u makes the current query explicitly match whole words, irrespective of the Preferences setting. Modifiers #i and #c control case sensitivity. Appending #i to a query term ignores case differences, while appending #c takes them into account. For example, searching for
fao#c returns no documents. Modifiers can be used in combination. Appending #uc to a query term will match the whole term (without stemming) in its exact form (differentiating upper- from lower-case).
MG also supports stemming and case-folding, but in a more primitive way, and these options cannot be chosen for individual query terms as they can with MGPP.
11.5. Interoperating
Greenstone can bring in information from many other sources apart from the files on your computer disk. It can download pages from the Web—and from wikis. It can harvest information using the Open Archives Initiative Protocol for Metadata Harvesting (OAI-PMH) and use the Z39.50 and SRU protocols. All of these facilities are provided in the Librarian interface's Download panel.
Greenstone is also able to write out the contents of a collection in many different formats. Perhaps most importantly, a server is included that can serve any collection using the OAI-PMH. As discussed in Section 11.4, METS can be used as the internal format instead of the default Greenstone Archive format. That is one way of exporting the entire content of a collection in a standard form. Collections can also be exported in other forms: MARCXML, the DSpace archive format, and the variant of METS used by the Fedora digital library system.
Downloading Web sites
The Librarian interface's Download panel gives access to a comprehensive facility for downloading (or
mirroring) files from the Web, as well as ways of downloading information from other sources.
For Web mirroring, you enter a URL and then set options that govern how the download process proceeds. To see an option's description, hover the mouse over it until the tool-tip appears. You can determine how many hyperlinks deep to go while downloading, whether to follow all links or just to mirror files below this URL or within this Web site, and whether to download only HTML files or to include associated files, such as images and style sheets, as well.
If your computer is behind a firewall and needs to go through a proxy server, you will need to specify the proxy settings in the Librarian interface. They are available from the Preferences item of the File menu. In the Connection tab, you can switch on the use of a proxy and enter its server address and port number.
For example, suppose you want to download the Citizens section of the Tudor collection that you built in Section 10.3, which is on a Web site called
englishhistory.net. Enter http://englishhistory.net/tudor/citizens into the Download panel's URL box. The
Server Information button will obtain information about this Web site. To copy just this section of the Web site, set the depth option to 1 and switch on both
below this URL and
within this site by checking their boxes. If you do not, the downloading process may follow links to other areas of the Web site and to other Web sites—including, perhaps, sites with advertisements—and grab those as well.
Now click
Download. If you have set proxy information in Preferences, a pop-up will request your user name and password. Once the download has started, a progress bar appears in the lower half of the panel that indicates how the process is doing; more detailed information can be obtained by viewing the log. The process can be paused and restarted as needed, or terminated altogether—it is often useful to pause it occasionally and check the log to ensure that nothing untoward is happening.
Web documents are downloaded using a third-party program for mirroring called
wget, which retrieves files using HTTP, HTTPS, and FTP, the most widely used Internet protocols. It uses local file time-stamps to determine whether documents need to be re-downloaded on subsequent visits. Thus, if you click the
Download button again, it will probably download fewer files, unless everything has changed in the meantime (or you have cleared the download cache). It will probably download some files—folders, for example, that are necessary in order to explore the Web site—but not all of them. Note that this incremental downloading mechanism only works for files to which the server gives a time-stamp.
Downloading can be a lengthy process involving multiple sites, and so additional downloads can be queued up. When new URLs are entered into the box and Download is clicked, a new progress bar appears beneath those already present in the lower half of the panel. When the currently active download item completes, the next is started automatically.
Downloaded files are stored in an eponymous folder that appears on the left-hand side of the Librarian interface's Gather panel. You choose which ones you want by dragging them into the collection area. The downloaded files can be cleared by clicking
Clear Cache on the Download panel. Incidentally, the cache is per-user and appears in the user's filespace, not in the central Greenstone installation. You will find it in
C:Documents and Settings<username>Application DataGreenstoneGLIcache on Windows XP, * and in
~<username>/.gli/cache on Unix.
* You may need to change your Windows settings to “show hidden files and folders” to see the
Application Data folder. On Windows Vista the folder is
C:Users<username>Application DataGreenstoneGLIcache.
The full content of wikis in the MediaWiki format can be downloaded in exactly the same way. Here you can specify a list of URL types that are to be ignored in the download process using regular expressions; you can also exclude certain directories. The MediaWiki plug-in allows you to create a Greenstone collection from the downloaded information in a way that preserves all the wiki's internal links.
Metadata protocols
Metadata and, if available, documents can be downloaded over three different protocols: Z39.50 (Section 7.1), the OAI Protocol for Metadata Harvesting (Section 7.2), and SRU (Section 7.4).
For OAI, you specify the source URL, then you can obtain general information about the server by clicking the appropriate button. This includes the repository name, the version of the protocol that is being used, and details of each of the sets of information that are available for download. You can restrict downloading to a certain set in the repository (for this, use the set specification—
setSpec—in the Server Information rather than the set name). You can specify the maximum number of records to download. If the Dublin Core section of the OAI records follows the standard convention of including an identifier element that contains a URL, you can ask for the documents themselves to be downloaded too. Again, you should ensure that any proxy server is specified in the Preferences panel, if needed. The metadata records, and the documents as well if there are any, are again placed in the Gather panel's Downloaded Files folder.
For Z39.50, you specify the host, port, and database in the boxes on the Download panel. For example, the Library of Congress's Z39.50 server is at
Host: z3950.loc.gov
Port: 7090
Database: Voyager
You specify a search term and the maximum number of records; the information is downloaded as a file of MARC records.
For SRU, the same source specifies that the base URL is
Serving OAI
Greenstone incorporates a server that can serve any collection over the OAI Protocol for Metadata Harvesting. (However, it does not operate on the Windows Local Library server.) The address of the server is the same as the address of your digital library installation, but using the program
oaiserver.cgi instead of the program
library.cgi. For example, if your digital library is at
the following URL will produce a response from the OAI
Identify request (Figure 7.2):
Other basic requests that the server responds to are
… cgi-bin/oaiserver.cgi?verb=ListSets
… cgi-bin/oaiserver.cgi?verb=ListIdentifiers&set=xxx (OAI 1.1 only)
… cgi-bin/oaiserver.cgi?verb=ListIdentifiers&set=xxx
&metadataPrefix=oai_dc
(OAI 2.0 only)
… cgi-bin/oaiserver.cgi?verb=ListRecords&set=xxx&metadata
Prefix=oai_dc
… cgi-bin/oaiserver.cgi?verb=GetRecord&identifier=xxx
&metadataPrefix=oai_dc
The List verbs (ListSets, ListIdentifiers, and ListRecords) all return sequences of items. A server parameter called
resumeafter indicates how many records to return, and if the request produces more, a resumption token is returned. To retrieve the next set of documents, issue the same request again with an additional parameter:
resumptionToken=xxx. For example,
… cgi-bin/oaiserver.cgi?verb=ListRecords
&set=demo&metadataPrefix=oai_dc
&resumptionToken=gsdloai:demo,,11–
where
gsdloai:demo,,11– is the resumption token returned by the previous request.
You configure the server and determine what collections it should serve using the configuration file
oai.cfg in the main Greenstone
etc folder. By default, collections are
not made available. Figure 11.7 shows an extract from this file (the actual file is more liberally commented). The first few lines give administrative information, followed by parameters of the OAI installation. Then comes a list of collections to be served. Each line starts with
oaicollection, followed by one or more collection names—the relevant folders in the
collect directory.

Greenstone's OAI server supports only the (unqualified) Dublin Core metadata format, and metadata in other formats must be mapped to it. Both general and collection-specific mappings can be specified, and mappings can be placed in the OAI configuration file or in an individual collection's own configuration file (
collect.cfg). In either case, the format is
oaimapping <Greenstone field-name> <OAI field-name>
The Greenstone field name can be qualified by a collection name to make the mapping collection-specific, as illustrated in Figure 11.7 for the Demo collection. Mappings specified in a particular collection's configuration name do not need the collection qualifier.
Exporting collections
The documents and metadata in any collection can be exported to several standard formats. This is done from the Export item on the Librarian interface's File menu, which brings up a panel with these choices:
• METS, using the Greenstone METS profile.
• METS, using the Fedora METS profile.
• DSpace archive format.
• MARCXML format (an XML version of MARC 21).
METS using the the Greenstone METS profile is explained in Section 11.4 in the discussion of document formats that can be used for the Archives that the
import process produces. The next two options are included so that the Librarian interface's facilities can be used to prepare documents and metadata for the Fedora and DSpace digital library systems described in Section 7.6. The final option provides compatibility with systems that use the MARC standard, for MARCXML can easily be converted (losslessly) into the original MARC format.
Figure 11.8 shows the Export panel. You can select any collection for exporting by checking it in the list. You give a folder name for the result, and the files end up in the Greenstone
tmp directory under that name. If desired, you can specify an XSLT file (see Section 4.4) that will be applied to the resulting documents in order to transform the exported information into a suitable format.

The other options differ slightly depending on which format you choose. For example, when exporting to MARCXML, the metadata is mapped to Dublin Core, but you can specify a custom file that maps Greenstone metadata to MARC fields in a different way. You can also choose whether records should be exported one at a time or grouped together in a single file.
Interoperating with DSpace
The DSpace repository system uses an internal archive format for batch importing and for exporting documents or collections to other systems. The format is straightforward: one folder per document, with a manifest specifying the files that make up the document, a Dublin Core metadata file in XML format, a handle file containing the DSpace identifier, and the files themselves. This is precisely the form in which Greenstone exports collections when the DSpace option is chosen.
The DSpace plug-in enables DSpace repositories to be digested in their entirety by reading the same archive format. It seeks out manifest files and their associated Dublin Core records. These records are parsed to form a partial document object model. This is attached to a list of the file names that are specified in the manifest as primary forms of the document. Nothing more is necessary: Greenstone's existing mechanism for binding metadata to documents automatically performs the rest of the work.
Consider a DSpace repository that comprises a single PDF document. When exported, the manifest lists just one file: the PDF document. Accompanying it is an XML file that encodes its Dublin Core metadata. To import the repository into Greenstone, the collection is configured with both the DSpace and PDF plug-ins. During the import process, the DSpace plug-in causes the metadata in the Dublin Core record to be associated with the named PDF document, but it is not until the PDF plug-in processes the primary document that the information is actually bound to the file and the full document object is formed.
DSpace distinguishes between primary and secondary files. For example, for a Web page with supporting image files, the HTML file is marked as primary and the images are secondary. Secondary files must be blocked to prevent them from being treated as independent documents with the same metadata attached. This is easily arranged in Greenstone by using its block expression feature. To cover the possibility of a DSpace collection including a document type that Greenstone does not support, the UnknownPlug plug-in is used as a catchall.
The DSpace plug-in is able to fuse the alternative forms of a document together. To do this, it uses Greenstone's notion of
associated files. A document can have any number of associated files, and format statements can be used to allow readers to access them. Optionally, the DSpace plug-in can treat documents with the same file name but different extensions as a single entity within a collection. The plug-in options provide three ways of determining which version is the primary document:
• treat a document's first occurrence in the metadata file as the primary version
• give a list of file extensions; the first one that matches becomes the primary version
• give a list of mime types; again the first to match is the primary version.
The primary version of a document is the one that is indexed, and—if possible—metadata is extracted from it, while the other versions are treated as associated files. Extracted metadata called
equivlink gives a list of the associated files in a form that is ready for use in format statements.
The right-hand side of Figure 11.9 shows a Greenstone collection that has been built from information exported from the small DSpace repository on the left. DSpace allows readers to browse by title and author, and the Greenstone collection has been configured to offer the same facilities—although the interface layout differs. The lower screenshot shows the result of clicking the
titles button in the navigation bar. From here, various source documents can be viewed, in multiple representations where available. For example, the icon for the Word transcript of the Bob Dylan interview is displayed to the left, and the MP3 icon is shown under “also available as.”
11.6. Distributed Operation
Everything we have done so far in terms of building collections has been undertaken on the same computer. Documents may be downloaded from elsewhere using a variety of protocols, but all the collection design, configuration, building, and formatting takes place locally. However, sometimes distributed operation is necessary. In some cases, the full facilities of the Librarian interface need to be made available to different users working in different places. In others, documents and their metadata must be added to collections from remote locations using a Web interface.
Remote Librarian interface
Suppose several librarians need to work on the same set of collections. Typically there is a central Greenstone installation and each librarian wants to update collections from her own office workstation—adding new documents, editing the metadata, adjusting the collection design and formatting, and even creating brand new collections.
Greenstone contains just such a facility. There is a modified version of the Librarian interface that can run on local workstations—say in librarians’ offices—and connect with a standard Greenstone installation on a remote server—say in the library's server room. The local version is called the GLI Client; the remote installation is the GLI Server. It is not necessary to have Greenstone running locally: the remote server does all the collection building on command from the client. Multiple users can collaborate on the same collections, although not at the same time. A lot of data may be transferred between client and server, which makes the scheme impractical unless high-speed connections exist. One important caveat is that for all this to work, the server's
collect folder must be writable by the Web-server user, which is a potential security risk and may be regarded as a show-stopper by system administrators.
Of course, authentication is essential to assure the server that clients who communicate with it are legitimate users with the authority to access individual collections. Greenstone's user account system, described in Section 11.2, serves this purpose, and users are added and removed, and their permissions changed, on the administration pages. The following user groups underpin the remote Librarian interface:
• all-collections-editor
• personal-collections-editor
• X-collection-editor, for any collection X.
Users in the first group can edit all collections and create new ones. Users in the second can create and edit personal collections, that is, ones whose internal collection name begins with their user name. Such collections are created by ticking a “this is a personal collection” box in the New Collection dialog (which only appears on the GLI Client version of the Librarian interface). Users in the third kind of group can create and edit the named collection. For example, someone who needs to create and edit his own collections and collaborate with others on a shared collection called
papers should be placed in the
personal-collections-editor and
papers-collection-editor groups.
For further protection (and, perhaps, for other reasons), the GLI Server can be configured to e-mail the system administrator whenever a collection is built or rebuilt. This is done by editing the
cgi-bingliserver.pl file to set a
mail_enabled variable, with an associated e-mail address and e-mail server information.
To prevent synchronization problems, each collection can be opened by only one person at a time. When the server receives a request to perform some action on a collection, it checks the collection directory for a lock file (
gli.lck). This contains the user name of whoever has locked the collection, and it is deleted when the collection is closed. If the collection is locked by someone other than the person making the request, the action fails. The GLI Client reports this information to the user, who is given the option of stealing the lock. This is not recommended, because work may be lost, and it should only be done in cases where the lock file was not deleted because the Librarian interface exited abnormally. To ascertain the situation, consult the user who is locking the collection.
The GLI Client is identical to the regular Librarian interface except for some minor details. The file menu does not contain options to write CD-ROM/DVDs and export collections; and there is no Download panel by default, although this is automatically activated by adding in the Greenstone binary applications for building (see the Greenstone wiki for details).
There is also a Java applet version of the GLI Client, which eliminates the need to install any software in advance on the client computer. However, the GLI Server still needs to be installed and configured, as described below.
Setting up the GLI Server
Install the Greenstone Web Library version (the Local Library does not have this remote facility). Use the Apache v2.0 Web server or higher: v1.3 is not suitable for this application, and IIS is not recommended. Check that Greenstone is communicating properly with the Web server by visiting http://<your-machine-name>:<port>/greenstone/cgi-bin/library.cgi (the port number can be omitted from the URL if the default value, port 80, is used).
Next, in a Web browser, visit this URL:
http://<your-machine-name>:<port>
/greenstone/cgi-bin/gliserver.pl?cmd=check-installation
A message should be returned indicating that Java was found and the installation is OK. However, there are many reasons why it might not be—and there is no point in continuing with these instructions until this check succeeds. If the message says that Java has failed, check that the Java runtime environment is installed and is on the Web server's path. If it reports a
500 Internal Server Error, check that Perl has been located correctly by the GLI Server program. Otherwise, on Mac or Linux, failure may indicate that the Web-server user is unable to execute the
gliserver.cgi program, in which case you must change its file permissions. If all else fails, check the last few lines of the Web server's error log (a file called
apachelogserror_log) for the cause of the problem.
Having passed this test, ensure the
collect folder writable by the Web-server user. Then check the main configuration file (
etcmain.cfg) to ensure that the Administration page is enabled, and add user accounts as described in Section 11.2.
Using the GLI Client
The GLI Client runs on Windows, Mac, or Linux computers. To use it, download it from the Web (www.greenstone.org/download) or transfer the
gli folder from an existing Greenstone installation to the required client computer (or computers) and then run
client-gli.bat (Windows) or
client-gli.sh (Mac/Linux). The first time it runs it asks for the URL of the remote Greenstone server. This is,
You can now use the GLI Client to edit or update collections on the server and to create new ones. The full facilities of the Librarian interface are available (with the minor exceptions noted above). The first time a collection is opened on a particular machine the plug-in and classifier information is read from the server, which may take a minute or two. If you encounter Premature EOF (end of file) errors when building collections, the Web server has timed out before seeing the next bit of output generated by the building process. The solution is to increase the timeout setting in the Web server configuration file.
Using the GLI Applet
Setting up the applet requires a little more work on the server side. You need to create a trusted version of the program in order to prevent other people from writing rogue applets that spoof the Greenstone server. To do this, use the Java Software Development Kit to generate an appropriate key by running
keytool –genkey –alias privateKey –keystore appletstore –storepass greenstone
in Greenstone's
gli folder, entering the appropriate details for your organization. Then “sign” the applet by running
jarsigner –keystore appletstore –signedjar SignedGLI.jar GLI.jar privateKey
Move the
SignedGLI.jar file that this creates into Greenstone's
binjava folder. Finally, edit the main configuration file to enable the GLI Applet.
Now visit the home page of your Greenstone installation from a browser on the client computer and click the Librarian interface link part-way down the page. The applet begins loading, and soon a button appears that launches the Librarian interface.
Institutional repositories
A facility called the Depositor lets librarians turn any Greenstone collection into an institutional repository into which authorized personnel can place new items and metadata through an ordinary Web interface. Users belonging to the
all-collections-editor group have access to this facility. The caveat noted above for the remote Librarian interface applies here, too: in order for the Depositor to work, certain folders must be writable by the Web-server user.
A key issue is the fact that, unlike most repository systems, collections have different metadata sets and there is no restriction on how extensive such metadata can be. Therefore, when metadata is entered through Web pages, the content of these pages and the metadata items that each one requests must be customizable. Whereas a single Web form may suffice for a simple collection, another may require a long sequence of different forms, so the number of pages in the sequence should be customizable too. And to make matters more complicated, this variable amount of data—which is entirely dependent on the metadata set—must be remembered by the Web browser in case the user returns to correct an entry in an earlier step.
The Depositor accomplishes all this and more besides. It is a kind of generalized institutional repository:
• The collection can use any metadata set.
• Depositing an item can involve any number of steps.
• The stages involved in depositing are individually designed.
• The workflow is flexible.
• Roles like reviewer, approver, or editor for deposited items can be integrated into the workflow using, for instance, client GLI.
As a small example, Figure 11.10 shows the submission process for an image collection. To reach this point the user has already logged in. In Figure 11.10a, the collection is selected. Then the user launches a file browser (using the Browse button in Figure 11.10b) to locate an image and enters its title, artist, date, and notes metadata. Along the bottom is a progress bar with a marker showing the current position, which is Specify Metadata. Clicking
Deposit Item takes the user to Figure 11.10c, where the new information is digested into the collection—this occurs in a matter of seconds. The final step is to view the collection. In Figure 11.10d, the user is browsing it by title, and the newest addition,
The Bower Meadow, is at the top. Incidentally, several documents can be added at once by zipping them together—and metadata to be assigned to each document can be included by placing it in a
metadata.xml file (Section 10.5).
 |
 |
| Figure 11.10: |
This example is intentionally minimalist, with only two steps in the submission process and hardly any metadata. Developing more sophisticated features, such as checking the content of forms and manipulating their layout (by incorporating previous values, etc.) are typically accomplished by splicing in JavaScript and DOM manipulation. We explain how this is done in Chapter 12.
Figure 11.11 shows edited highlights of the collection-specific macros that produce this example. A macro (called
numsteps) defines the number of steps in the submission process. In this case it is 1, corresponding to Figure 11.10b, because the final step, Figure 11.10c, is mandatory. For each step, a different macro (called
step1content,
step2content, …
stepNcontent, and
laststep for the final one) is used to define the content of the page that is displayed at that step, along with another macro (
step1text, …) that dictates what appears in the progress bar. In this example, the progress-bar text (
step1text) is defined through a further macro (
textmeta, defined at the bottom of Figure 11.11) and resolves to the words
Specify Metadata when viewed in English—you can see this at the bottom of the screenshots in Figures 11.10b and c. The
laststep macro controls how the workflow ends. For example, the new item may be automatically built into the online collection, or it may be sent to the collection's editor for review.
 |
| Figure 11.11: Excerpt from macro file for the first step of the submission process in Figure 11.10 |
The progress bar is shown by a macro (
depositorbar) defined in the Greenstone runtime system. It is formed by composing the information represented in the separate steps (
step1text,
step2text, …). The final step (
laststep) specifies which of a predefined set of endings terminates the submission process (in this case
textbuild). Since all this information is stored in the macro files, it can be altered as needed.
This scheme is very flexible, although you need a thorough understanding of the macro language to design and implement a new workflow. As a further example, Figure 11.12 shows the first step in a far more complex sequence that mimics the DSpace workflow. DSpace users will be familiar with this sequence. It has eight steps. In this case they are shown at the top of the page, which involves a trivial change to a macro definition. Basic information is entered at the first step (Figure 11.12), while the second is for descriptive metadata. The document file is requested in the next step, following which information is displayed about the file transfer from the user's computer to the server. Then a checksum is shown so that the user can confirm that no transmission errors occurred. (This is accomplished in Greenstone using AJAX technology to retrieve the information from the server in an extensible manner, as described in Section 12.2, Design pattern 5.) The fifth step provides an opportunity to review and edit all information entered so far.

At any time, the user can return to a previous stage by clicking the progress bar. Making the system remember existing fields—even when they may have arbitrary sets of values, as with authors—is tricky but possible with a little assistance from JavaScript. On the final input page the user decides whether to grant the distribution license. If so, the submitted information (including metadata) is time-stamped and deposited into the collection's
import folder. The collection's editor is notified by e-mail, and/or the collection is rebuilt, depending on the settings in the collection configuration file.
To use the Depositor, first adjust the file permissions to ensure that the sub-folders of
collect that contain the relevant collections, and the top-level Greenstone
tmp folder, are writable by the user account used by the Web-server. Edit the main configuration file and change the relevant line to enable the Depositor. If you are using the Windows Local Library, restart the server. A new button for the Depositor appears on the Greenstone home page. After signing in, you will see a drop-down list of all the available collections, and authorized users may add documents to these. In practice, to get the Depositor to operate according to a particular workflow, it is necessary to design and implement an extensive set of collection-specific macros, which is beyond the scope of this book.
11.7. Large-Scale Usage
How big can Greenstone collections be? It is a little unrealistic to expect general-purpose digital library software, suitable for a wide variety of users and applications, to vie with a purpose-built system designed specifically for a very large information collection (like, say, a Web search engine). However, Greenstone can be pushed reasonably far in the size of collections that can be built.
Limitations of the Librarian interface
For large collections, it is not feasible to use the Librarian interface. For one thing, you may need better control over the files it generates. For another, there is a limit to the amount of metadata that can be handled. With a standard amount of memory allocated to Java (128 MB), the Librarian interface can handle about 8,000 largish (500-character) metadata records; with double the memory, it can handle up to 20,000 records. (These experiments were done in 2006, on a computer with 1 GB of memory.) Larger amounts of memory allocated to the Java process will enable correspondingly larger volumes of metadata.
Without going through the Librarian interface, Greenstone can handle far larger volumes of data—perhaps a thousand times greater. In practice, however, it may be expedient to develop a small-scale version of your collection using the Librarian interface and then build the whole thing manually by issuing
import and
buildcol commands as described in Section 11.3.
Large collections
Limits on collection size can be measured in many ways. From a technical point of view, one possible limitation is the full-text indexer. Collections with up to 10 GB of text have been built using the standard MG and MGPP indexers, while Lucene has been tested on 100 GB of raw text. Note that these sizes are for text alone: this corresponds to a far larger collection of PDF documents. Another possible limitation is the amount of metadata. Collections have been built with many millions of metadata records—for example, 10 to 20 million records totaling 3 GB of text. A further possible limitation is the amount of image data. However, Greenstone only processes images in order to extract metadata and to create other versions of the images, such as thumbnails (which can be switched off), so the file system itself is most likely to be the greatest limitation. The metadata for a collection of 20 million photographs could be handled with modest resources, but the images themselves might occupy 100 TB.
One potential solution for a massive volume of data is to partition it into subcollections and use Greenstone's cross-collection search facility (Section 10.4), which allows users to search in a seamless way across subcollections. However, this only amalgamates the results of
searching sub-collections, not
browsing them. Of course, alphabetical lists and date lists and the like aren't really much use with very large collections; it is more likely that the metadata will be searched rather than browsed linearly.
As a particular example of a large collection, some years ago the Argentinian organization Archivo Digital built a collection called Archivo Nacional de la Memoria (National Memory Archive) that contains sequences of page images with associated OCR text. They used an old version of Greenstone (2.52) and a 1.8-GHz Pentium processor with 512 MB RAM running Windows XP. There were 20,000 documents, having a total of 1,000,000 pages in TIFF format and 3.2 GB of text files. The Paged Image plug-in was used, and there were five classifiers.
Importing the collection took almost a week (no image conversion was done). Building (building-in-the-small) took 24 hours. The
archive and
index folders were placed on separate disks to increase access speed. At run time, it took 2–5 seconds to search the collection regardless of the number of search terms, and 30 seconds to find exact phrases. For unknown reasons, it took an excessive 25 seconds to open a hierarchy node containing 1,000 objects.
A very large collection
Here's a more recent, and far larger, collection. In 2008, DL Consulting (www.dlconsulting.com), a company that specializes in digital library solutions using Greenstone, built a collection called Papers Past for the National Library of New Zealand that contains over a million pages of historic newspapers (http://paperspast.natlib.govt.nz). Featured in Chapter 3 (see Section 3.1), it contains nearly 20 GB of raw text: two billion words, with 60 million unique terms, and it is full-text searchable. There are a total of over 6.5 million newspaper articles, each with its own metadata—most of it automatically generated. The total volume of metadata is 50 GB—three times as much as the raw text! Before being built into a digital library collection, the metadata is stored in XML format, which occupies around 600 GB—slightly less than 1 MB per newspaper page.
The collection is growing. Only 60 percent of the newspapers have been OCR'd: when the project is complete, all pages will be searchable. (The company has developed a similar system for Singapore's National Library Board, which is projected to grow to four times the size of the fully realized NZ collection, or seven times the figures mentioned above.) To operate at this scale, Greenstone software developments were rather modest. All that was necessary was to extend the software to support multiple instances of the flat-file database (GDBM) used for metadata. The extension was needed to surpass an inherent 2-GB limit in the database system. This arrangement adequately satisfies the needs of these projects.
Full-text index
The page images in Papers Past were digitized from microfilm, but the paper originals were of poor quality, which inevitably confounded the OCR software. This yielded a much larger number of unique terms than would normally be expected. The two billion words of running text include 60 million unique terms (2.8 percent), and this is expected to continue to increase linearly as further content is added. By contrast, clean English text typically contains no more than a few hundred thousand terms, and even dramatic increases in size add a relatively small number of neologisms.
Enormous vocabularies challenge search engine performance. Moreover, the high incidence of OCR errors makes an approximate search capability attractive. For this reason it was decided to use the Lucene indexer, because of its fuzzy search feature and proven scalability—it has been tested on collections of 100 GB of raw text.
Metadata database
The Papers Past collection involves a massive amount of metadata. Newspaper articles can be viewed individually as well as in their original context on the page. The 600,000 pages that have been OCR'd so far comprise 6.5 million individual articles, each with its own metadata. The physical coordinates that specify an article's position on the page are stored as metadata to allow article-level images to be clipped from pages. A further requirement is that search terms be highlighted directly within images. In order to do so, the bounding-box coordinates of each and every word in the collection must be stored. These word coordinates represent 50 GB of metadata—nearly three times as large as the collection's full text.
As mentioned previously, Greenstone uses the GNU database management system (GDBM) for storing and retrieving metadata. Fast and reliable, GDBM does this simple job very well. Crucially—and of particular importance for librarian users—GDBM can be installed on Windows, Mac, and Unix computers without requiring any special configuration. However, the design of Papers Past exposed limitations. GDBM files are restricted to 2 GB; moreover, look-up performance degrades noticeably once the database exceeds 500 MB. A simple extension was to modify Greenstone to make it automatically spawn new databases as soon as the existing one exceeds 400 MB: currently, Papers Past uses 188 of them. With this multiple database system, Greenstone can retrieve word coordinates and other metadata very quickly, even when running on modest hardware.
Image server
The archival master source files for Papers Past are compressed bi-tonal TIFF images averaging 800 KB each. The full collection of a million images occupies 850 GB. (The Singapore collection uses grayscale JPEG 2000 master source files, which average 4.5 MB per page; the existing 600,000 pages consume 2.5 TB of storage.) A project goal is that no special viewer software is required other than a modern Web browser: users should not need browser plug-ins or downloads. However, neither TIF nor JPEG 2000 is supported by all contemporary browsers. Consequently, the source images are converted to a Web-friendly format before being delivered. Also, processing is required to reduce image file size for download, and in the case of individual articles, to clip the images from their surrounding context.
Greenstone normally pre-processes all images when the collection is built, stores the processed versions, and serves them to the user as required. However, it would take nearly two weeks to pre-process all the pages of Papers Past, at a conservative estimate of 1 page/sec. To clip out all articles and save them as pre-prepared Web images would take a further two weeks, assuming the same rate. The pre-processed images would consume a great deal of additional storage. Furthermore, if in the future it became necessary to change the size or resolution of the Web images, they would all need to be re-processed. Hence it was decided to build an image server to convert archival source images to Web-accessible versions on demand and to maintain a cache for frequently viewed items.
A major strength of Greenstone is its ability to perform well on modest hardware. This design philosophy has proven immensely valuable in supporting large collections under heavy load. The software is fast and responsive and on modern computers can service a large number of concurrent users. However, the image server is computation-intensive and consumes significant system resources. The overall system was found to perform satisfactorily with moderately heavy loads using a single quad-core server.
Building the collection
From the original TIFF source files, the OCR process generates information in the METS/ALTO format. ALTO (Analyzed Layout and Text Object) is an XML format for encoding OCR-recognized text and the position of that text in the source image. The METS/ALTO representation includes all the word and article bounding-box coordinates, as well as the full text, article-level metadata, and issue-level metadata. The result includes 92,000 METS files, one per newspaper issue, and 600,000 ALTO files, one per newspaper page. Together, these amount to a total of 570 GB of XML, slightly under 1 MB per page. All this XML is imported into Greenstone, the text is indexed with Lucene, and the metadata and bounding-box coordinates are stored by Greenstone in GDBM databases.
It takes significant time to ingest such a large collection, even without the need to pre-process the source images. Section 11.4 describes the
import and
build processes. In this case, the former converts all the METS/ALTO data into the Greenstone Archive format, while the latter creates the Lucene search index and the GDBM metadata databases.
The import phase processes approximately 100 pages/min (on a dual quad-core Xeon processor with 4 GB of main memory), taking four days to import 600,000 pages. This stage of the ingest procedure can be run in batches and spread over multiple servers if necessary. The building phase processes approximately 300 pages/min, taking around
 days to build the collection. At the time the collection was originally created, the second step could not be executed incrementally, and the complete collection had to be rebuilt whenever data was added. However, this has been rectified: Greenstone supports fully incremental building providing the Lucene indexer is used, as described in Section 11.4.
Distributed serving
Incremental building improves scalability of the building process. However, the only way to obtain arbitrary scalability of the runtime system is to distribute it over multiple servers. It is already possible for the image server and the core Greenstone system to run on separate computers; indeed, multiple image servers can easily be used. But for true scalability the search index and metadata databases must also be distributed.
Greenstone's cross-collection search facility (Section 10.4) allows users to search in a seamless way across subcollections running on different servers. But this facility is limited and does not fully support distributed operation. In particular, it does not allow distributed metadata databases to be accessed in a simple and uniform way. Buried deep in the code are structures that could be extended to improve support for this. However, here we take a different tack.
The performance of IBM's DB2 platform is being evaluated as both indexer and metadata database for Greenstone. When designing collections, future users may have the option of using this third-party software instead of the default document index and metadata database. DB2 has known scalability and distributed functionality: the ability to distribute a single database over multiple servers is built in. DB2 is a mature, enterprise-scale database application. Implemented as a client/server architecture, a single instance of the server can scale to support 3.5 TB databases with little loss in performance. More importantly, multiple servers can be federated, with a single front-end providing transparent access to a farm of databases. If Greenstone were augmented with an underlying DB2 database, it would be possible to create distributed indexes using this built-in federation technology.
What about the use of a commercial module in an open source system intended for wide distribution? An important factor is the availability of a free version of this software. The DB2 C-Express database has the same basic functionality as the commercial version, but with a restriction on the number of servers. It also allows several key text-search components to be integrated, including the Net Search Extender module, which allows full-text, wildcard, and fuzzy searching. We cannot redistribute this software because it is not issued under the GPL-compatible license, but it should be possible to make it easy for users to download it themselves and hook it into Greenstone.
DL Consulting has demonstrated a proof-of-concept version of Greenstone that uses the DB2 distributed database. Further work is required to make it run smoothly in a production environment. Informal experiments suggest that runtime performance remains unchanged as the size of the underlying collection grows. However, the DB2 version generally took longer to generate a page of results than MG, MGPP, or Lucene, suggesting that optimization is required.
..................Content has been hidden....................
You can't read the all page of ebook, please click here login for view all page.