

CICS Explorer navigation walkthrough
The intent of this chapter is to provide insight into CICS Explorer navigation. The hands-on approach provides a script that can be followed in real-life. Whether doing the actual walkthrough or just reading through the chapter, the result is a firm understanding of CICS Explorer navigation.
5.1 Navigation topics covered
In this section, we discuss how to:
•Manipulate views, columns, filters, and perspectives. This discussion includes positioning the views and their components, positioning, adding, and deleting columns, filters, and perspectives, and also creating perspectives.
•Perform common operations functions against CICS resources.
•Perform common resource administration functions against traditional CSD and CICSPLex Business Application Services (BAS) resources.
5.2 Manipulating views
In this section, we discuss how to manipulate views.
5.2.1 Adding a view
To add a view:
1. Start CICS Explorer and connect using a CMCI connection. You can use the CICSPlex SM Data Interface connection, but CMCI is needed for other sections of the walkthrough.
2. Add the Programs view by going to the Operations Menu and clicking Programs, as shown in Figure 5-1 on page 111.

Figure 5-1 Add a view selection
The Programs view is added, as shown in Figure 5-2.
Figure 5-2 Add a view result
|
Note: If you click the X (on the Programs view tab) the Programs view is removed.
|
5.2.2 Zooming in and out of a view
To zoom in and out of a view:
1. To zoom in on the Programs view, double-click the Programs tab. Avoid the X. The Programs view now fills the entire window, as shown in Figure 5-3.

Figure 5-3 Zoom in
2. To zoom out, double-click the Programs view tab again. Avoid clicking the X.
5.2.3 Refreshing a view
To refresh a view, either click Refresh for the view, as shown in Figure 5-4 on page 113, or press Enter.
Figure 5-4 Refresh Icon locations
|
Refresh icons: The Refresh icon on the left refreshes the currently selected CICSplex Explorer view. The Refresh icon on the right refreshes the currently selected Programs view.
|
5.2.4 Resizing a view
To resize a view:
1. Position your cursor at the border of a view, as shown in Figure 5-5. When positioned correctly, your cursor becomes a vertical or horizontal double arrow.

Figure 5-5 Resize a view
2. Click and drag to achieve the desired size.
5.2.5 Repositioning a view
To change the position of a view:
1. Click the View tab and drag it to the desired location. As you are dragging the view, your cursor will change to one of the following icons in Figure 5-6.
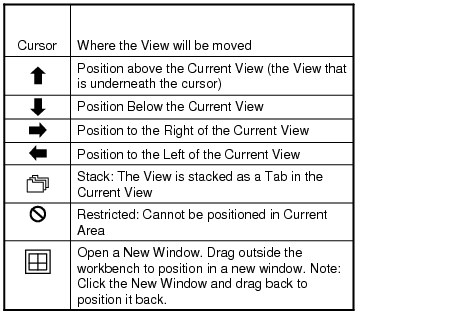
Figure 5-6 Cursor designations
2. Click the Programs tab, as shown in Figure 5-7 on page 115, and drag it to the right of the window. When your cursor becomes a right arrow, release it.

Figure 5-7 Repositioning of the Programs view
The Programs view is now next to the Regions view.
|
Returning the Programs view: To put the Programs view back in its original position, click the Programs tab, and drag it to the center of the Regions view. When your cursor changes to a stack, release it.
|
5.3 Manipulating columns
In this section, we discuss how you can manipulate columns.
5.3.1 Customizing columns
To customize columns:
1. Select the Programs view.

Figure 5-8 View Menu location
The Customize Columns dialog box is displayed, as shown in Figure 5-9.

Figure 5-9 Customize Columns dialog box
4. Click Add. The Change User ID is added to the end of the Programs view columns.
5. Under Current viewer columns, select Share Status.
6. Click Remove. The Share Status is removed from the Programs view columns.
7. Click Reset. The default columns, for the Programs view, are now restored, and the:
– Change User ID is no longer there
– Share Status has been added back
8. Click Close to close the dialog box.
5.3.2 Repositioning columns
To change the order of the columns:
1. Click and drag the column to the desired location.
2. From the Programs view, click the Language column, and drag it between the Name and Status columns, as shown in Figure 5-10. The Language column is now positioned between the Name and Status columns.

Figure 5-10 Reposition Language column
5.3.3 Resizing columns
To resize a column:
1. Position your cursor at the border of the column. When your cursor turns into a horizontal double arrow, bisected by a vertical line, you can click and drag the column border to the desired width.
2. From the Programs view, position your cursor on the border of the Use Count column, as shown in Figure 5-11.
3. Click and drag the column border, expanding the column width.

Figure 5-11 Resize Use Count column
5.3.4 Equalizing column widths
To make all of the columns the same width:
1. From the Programs view, click the View menu.
2. Select Equalize Column Widths. All the columns are now of equal width, including the Use Count column.

Figure 5-12 Equalize column widths
5.3.5 Resetting columns
Resetting the columns will restore all of the columns to the default location, size, and so on:
1. From the Programs view, click the View menu.
2. Select Reset columns. All the columns are back in their starting state, including the location of Language
5.4 Manipulating filters
In this section, we show you how to filter your information.
5.4.1 Using filters
Filters set the search criteria for the CICS resources that you want to display. To use the filters:
1. Click the Programs tab.
2. In the Name field, type DFH*, as shown in Figure 5-13 on page 119, and either press Enter or click Refresh. Now, only programs beginning with DFH* are displayed.
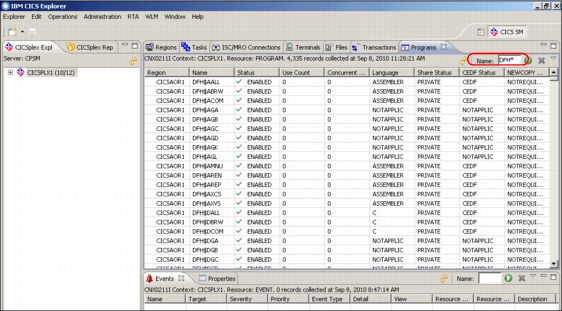
Figure 5-13 Using a program name filter of DFH*
5.4.2 Customizing filters
To customize filters:
1. In the Programs view, click the View Menu, and select Choose filter attributes, as illustrated in Figure 5-14.

Figure 5-14 Choose filter attributes
In Figure 5-14 on page 119, notice that:
– The Region is unavailable, indicating that it cannot be used as a filter for the Programs view.
– Name has a check mark next to it, indicating that the Name filter is already part of the view.
– You can see a list of the other, currently available filters.
2. Click the available Language filter, and notice that:
– The Language filter now has a check mark next to it.
– The Language filter is next to the Name filter in the view.
3. Leave the Name filter set to DHF*, and set the Language filter to Cobol. Use the Language filter drop-down menu to set it.
4. Refresh the window. Use the Refresh icon, Enter, or the Apply filter icon, shown in Figure 5-15, to refresh.
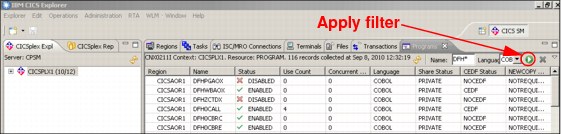
Figure 5-15 Add Language filter
As a result, only COBOL programs that start with DFH* are displayed.
5. To remove an existing filter, go to the View Menu, click Filter Attributes, and deselect it.
5.5 Manipulating perspectives
If you log off of CICS Explorer, all of the settings (view additions/deletions, column settings, filters, and so on) that are in place at logoff time are preserved in your individual CICS Explorer workspace file. At logon time you return to the exact same display configuration.
Perspectives can be used to save a set of screen settings, so that you can manipulate your working screen settings, but still return to a desired screen configuration at any time. As with any customization, perspectives are saved to the your individual workspace file.
5.5.1 Creating a perspective
To create a perspective:
1. Click the Programs tab, open the Window menu, and select Save Perspective as.

Figure 5-16 Save Perspective As dialog box
5.5.2 Opening a perspective
The current perspective is highlighted in the shortcut bar. There are three ways that you can open a perspective:
•Access the Open Perspective screen by selecting the Window tab → Open Perspective → Other.
•Access the Open Perspective screen by clicking the Open Perspective Icon, and selecting Other.
•Click the desired perspective button from the shortcut bar.
The new CICS NavLab perspective might not show up on the shortcut bar until you toggle to the CICS SM (default) perspective, as shown in Figure 5-17.
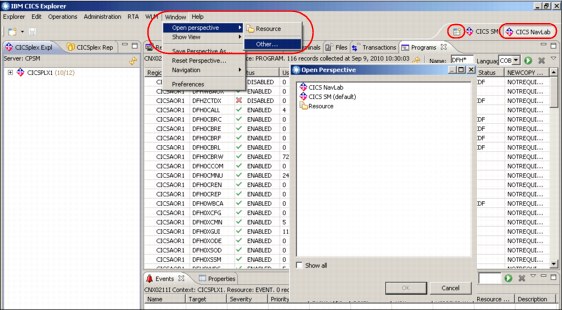
Figure 5-17 Methods for opening a perspective
When you open the CICS SM (default) perspective, notice that the CICS SM (default) perspective is now in the state it was in prior to the walkthrough, for example, the Programs view is no longer there.
Reopen the CICS NavLab Perspective. All of the customization you applied during the walkthrough is still included in that perspective.
5.5.3 Resetting a perspective
You can reset a perspective, to its default settings by selecting the Window menu and choosing Reset Perspective.
1. From the CICS NavLab Perspective, select the Operations menu, and add the RPL List view.
2. Reset the CICS NavLab Perspective by selecting the Window menu and choosing Reset Perspective. The RPL List view is removed and all other customization (Programs view, filters, and so on) in place, at the time the CICS NavLab perspective was created, are still there.
5.5.4 Deleting a perspective
To delete a perspective:
1. Make a copy of the CICS NavLab perspective
a. From the CICS NavLab perspective, select the Window menu and choose Save Perspective As.
b. Enter a Name of “CICS NavLab2”.
2. Reopen the CICS NavLab perspective
a. We are going to delete the new CICS NavLab2 perspective and it shouldn’t be active at the time of deletion.
3. Select the Window menu, and choose Preferences.
4. Expand Eclipse Platform.
5. Select Perspectives.
6. Select the CICS NavLab2 perspective.
7. Click Delete.
8. Click Yes to confirm deletion.
9. Click OK to close the Preferences dialog
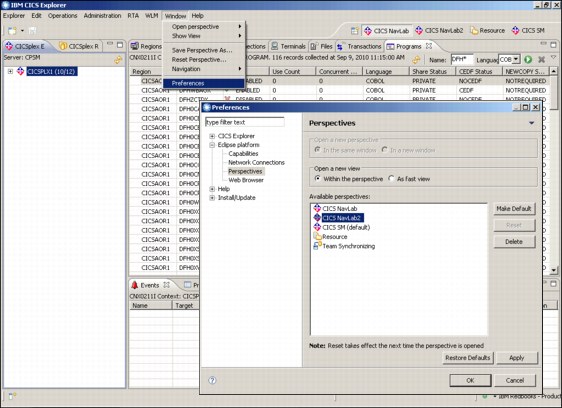
Figure 5-18 Delete perspective
5.6 Performing operations functions
You must be connected using a CMCI connection, and have security authorization to perform the following tasks.
5.6.1 Performing a program Newcopy
In this section, we work with resources that are associated with the IBM NACT sample application:
1. From the Programs view:
a. Set your Name filter to DFH0CNA1.
b. You can use a Language filter of COBOL or leave that field empty.
2. Refresh your window.
3. Select all instances/region entries for the DFH0CNA1 program:
a. Click the first entry.
b. Hold down the Shift key, and click the last entry.
c. To select individual entries, that are not next to each other
i. Click the first entry.
ii. Hold down the Ctrl key, and click each subsequent entry to select it.
4. With all desired instances selected, right-click, and select New Copy.
5. From the Perform Operation dialog window, click OK to confirm that you want to Newcopy all the entries, as shown in Figure 5-19.

Figure 5-19 Perform Operations dialog box
Individual Newcopy results:
•A green check mark appears next to each successful Newcopy.
•A red X appears next to each unsuccessful Newcopy. Associated error details are provided.
5.6.2 Altering CICS region MAXTASKS
To alter CICS region MAXTASKS:
1. Select the Regions view.
2. Double-click to select a desired Region. A window is displayed that details the Region Attributes.
3. Scroll down to the Transaction Activity attributes, and increase Maximum Tasks by 5.
4. Press Enter. As soon as you press Enter a “>” is displayed next to Maximum Tasks, which indicates that there is a pending change.
5. Click Save to make the change, as shown in Figure 5-20.
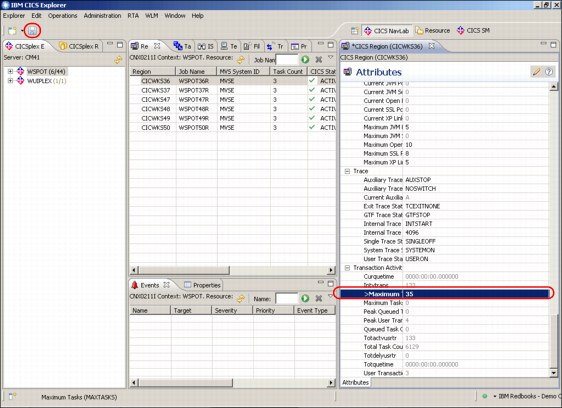
Figure 5-20 Change CICS region MAXTASKS
5.7 Performing administration functions
In this section, we work with CICS resources that are contained in the CSD and resources housed in the CICSPlex Data Repository as part of the CICSPlex BAS component.
CICSPlex BAS (Business Application Services) is an alternative method for deploying CICS resources. Resources are housed in the CPSM Data Repository and installed through EXEC CICS CREATE commands.

Figure 5-21 Resource Repository: CICS CSD versus CPSM BAS
|
Note: The Scope you choose determines where the resources are with which you are working:
•If scope equals the entire CICSplex you are working with BAS resources.
•If scope equals an individual CICS region, you are working with resources contained within that specific region CSD.
|
You must be connected using a CMCI connection and have security authorization.
In this section, CICSPlex BAS resources are dynamically installed. To set up the install of BAS resources, at region startup time, additional BAS resources must be defined. See the CICS TS Manual for full details.
5.7.1 Viewing CSD resources
To view CSD resources:
1. Choose a scope that is equal to an individual region.
2. Add the Group List Definition view:
a. Open the Administration menu, and select Group List Definitions. With the scope set to an individual region, the display shows CICS group lists in the region CSD (CSDLIST).
3. Add the Resource Group Definition view:
a. Open the Administration menu, and select Resource Group Definitions. The display shows CICS groups in the individual region CSD (CSDGROUP)
4. Add the Program Definitions view:
a. Open the Administration menu, and select Program Definitions.
b. From the View menu, select Customize Columns.
c. Select the CSDGroup attribute, and click Add, to add it to the Program Definitions view.
d. Click Close to close the Customize Columns dialog.
Figure 5-22 on page 129 shows the CSD resources views.

Figure 5-22 View CSD resources
5.7.2 Creating CSD resources
To create resources, use the CICS Explorer New Wizard:
1. There are a few methods for opening the New Wizard:
– Click the down arrow for the New Wizard icon.
– From the CICSplex Explorer view, select a scope, right-click, and select New.
– Open a resource definition view (example: The Program Definitions view), right-click (in the view), and select New.

Figure 5-23 New Wizards
2. Create a CSD Program definition in a New CSD Group:
a. Confirm that your scope is still set to an individual region.
b. Select Explorer → New Wizards → Program Definition.
c. Set the values for the Program definition, as shown in Figure 5-24.
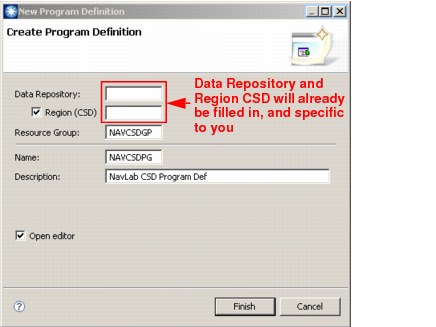
Figure 5-24 New Program Definition dialog box
d. Click Finish.
3. View the results, as shown in Figure 5-25 on page 131:
a. Click X to close the Program Definition Overview.
b. Set the Program Definitions view Name filter to NAV*.
c. Set the Resource Group Definitions view filter to NAV*.
d. Refresh the views.

Figure 5-25 Program definition overview
Figure 5-26 on page 132 shows the display of new CSD program definition.

Figure 5-26 Display of new CSD program definition
5.7.3 Installing CSD resources
To install CSD resources:
1. Verify that you have the same single region scope selected that was used during the creation of the NAVCSDPG Program Definition.
2. From the Program Definitions view, right-click the NAVCSDPG Program Definition, click install, as shown in Figure 5-27 on page 133, and select the Single Region Target. Click OK.

Figure 5-27 Perform CSD program definition install
3. From the Programs view:
a. Set the Name filter to NAV*.
b. Set the Language filter to NOTDEFINED.
c. Refresh the view. You will see the NAVCSDPG Program installed in the single, target scope region
5.7.4 Creating BAS resources
In the event that there are no BAS resources currently defined, you can create new BAS resources, prior to viewing:
1. Set the scope to an appropriate CICSplex, rather than an individual region.
2. Create a New BAS resource group. Unlike the creation of CSD Resources, the BAS resource group must exist before resources can be added to it:
a. From the Resource Group Definitions view:
i. Right-click inside the view, and select New.
ii. Select Resource Group Definition.
iii. Set the Create Resource Group Definition attributes to the those shown in Figure 5-28, and click Finish. The Resource Group Definition attributes view is displayed, confirming the creation of the new BAS Resource Group. NAVBASGP is displayed in the Resource Group Definitions view.

Figure 5-28 Create Resource Group definition
3. Click X to close the Resource Group Definition (NAVBASGP) Attributes view.
4. Create the new BAS program definition in the new BAS NAVBASGP Resource Group:
a. Select Explorer → New Wizards → Program Definition:
i. Set the Data Repository to the CICSplex scope.
ii. Do not select the Region CSD option.
iii. Set Resource Group to NAVBASGP.
iv. Set Name to NAVBASPG.
v. Set Description to NavLab BAS Program Def.
vi. Click Finish.
b. Notice that:
i. The Program Definition (NAVBASPG) Overview is displayed, confirming creation of the new BAS Program Definition.
ii. When you select the Program Definitions view, the new NAVBASPG program definition will be displayed.
5. Click X to close the Program Definition (NAVBASPG) Overview.
5.7.5 Viewing the BAS resources
To view the BAS resources:
1. Confirm that you still have the appropriate CICSplex selected, as your scope.
2. Refresh your views, as shown in Figure 5-29.
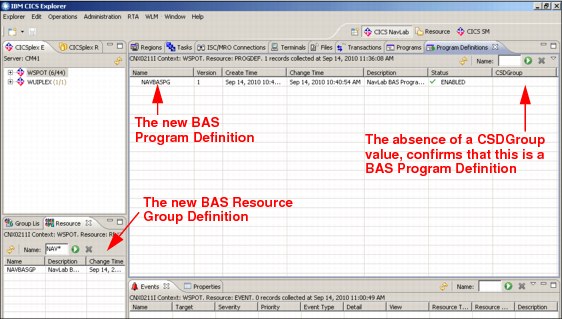
Figure 5-29 BAS program definition display
5.7.6 Installing BAS resources
To install BAS resources:
1. Confirm that you still have the CICSplex set as your scope.
2. From the Program Definitions view, right-click the NAVBASPG Program Definition, and select Install. You are presented with a list of CICS Regions that are currently active in the CICSplex.
3. Select the appropriate Target(s), and click OK.
4. Select and refresh the Programs view.
5. Confirm that the Name filter is still set to NAV*.
6. Confirm that the Language filter is still set to NOTDEFINED.
The NAVBASPG Program Definition is now installed in the Target(s) you selected.
5.8 Summary
You now have a solid working knowledge of CICS Explorer Navigation.
The walkthrough provided detailed information regarding:
•View manipulation
•View column manipulation
•View filter manipulation
•Perspective manipulation
•Performance of operations functions
•Performance of administration functions, against CSD and BAS Resources
..................Content has been hidden....................
You can't read the all page of ebook, please click here login for view all page.