

Implementing IBM CICS Explorer
In this chapter, we discuss how to install the CICS Explorer. We focus on local and remote installation and CICS Explorer Security.
3.1 Installing CICS Explorer
CICS Explorer offers a range of installation options. In this section, we discuss the various options. When deciding on the best approach for installing the CICS Explorer within an organization it is important to consider your corporate guidelines and security requirements for client applications.
CICS Explorer can either be installed on each users local client machine or on a remote server for all users to access. Regardless of which option you choose, a users own customized data can be saved to the user private storage area.
Both local and remote installations of CICS Explorer start with the download of the appropriate distribution for your operating system. CICS Explorer is provided as an archive file:
•Windows file is a compressed file
•Linux is a tar file
To download CICS Explorer, visit the following web location, and then click the appropriate link under Downloads.
3.1.1 Installing CICS Explorer locally
We are going to show you two styles of installing CICS Explorer
•Simple Install
•Private Workspace Install
The Simple install gets you up and running with minimal set up. The Private Workspace install takes a little more set up but gives you more flexibility. Review each style, and use the one that meets your needs. Both install styles can be used for the Local and Remote installs.
Simple install
The idea behind the Simple install is just that, simplicity. Basically all you do is download the install package, and extract the distribution file as appropriate for the operating system. Because there is no set up application required to install CICS Explorer, it is recommended that you expand the archive file to a suitable location on the system’s file system, for example c:program files on Windows and /opt/ on linux.
Figure 3-1 on page 47 shows the structure for Windows.

Figure 3-1 Windows view
Figure 3-2 on page 48 shows the structure for Linux.
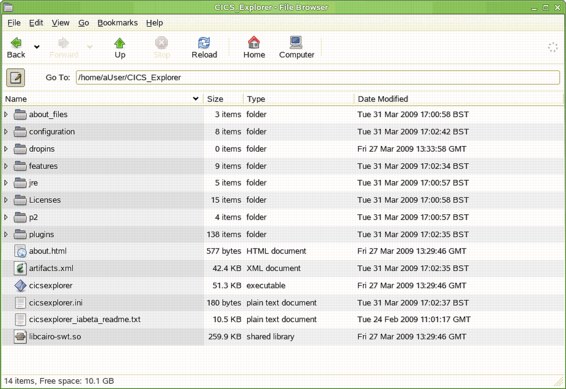
Figure 3-2 Linux view
You can create a desktop shortcut for the CICS Explorer executable file; however, essentially at this point basic installation is complete.
Along with the distribution code at run time, CICS Explorer creates a separate directory, known as the workspace, where user specific settings and customizations are written. By default this workspace is in your home directory:
•On Windows, the location is usually c:Documents and Settings<<User Name>>.cicsexplorer
•On Linux, the location is /home/<<User Name>>/.cicsexplorer
|
Note: On some operating systems, folders that begin with a dot are not shown by default.
|
Figure 3-3 on page 49 through Figure 3-7 on page 51 illustrate the process.
1. From the download site, select and download the appropriate package to your workstation:
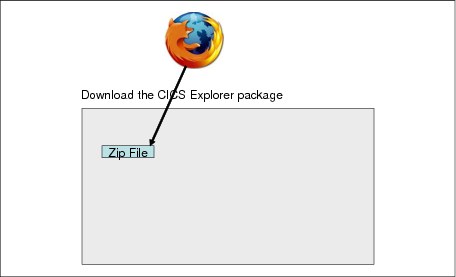
Figure 3-3 Download the CICS Explorer package
2. Choose a Folder or Directory to unpackage the CICS Explorer binaries into, and extract the files, as shown in Figure 3-4.
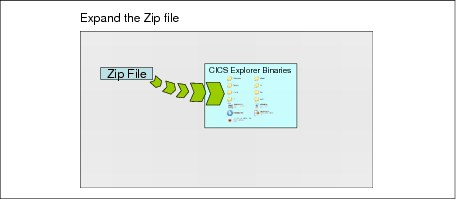
Figure 3-4 Expand the Zip file
3. Create a Shortcut icon that references the cicsexplorer.exe file, as shown in Figure 3-5 on page 50.
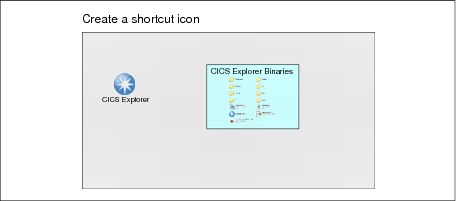
Figure 3-5 Create a shortcut icon
4. Start the CICS Explorer, set up a connection, and start Exploring your systems.
Figure 3-6 shows how a workspace named .cicsexplorer is created and is used from now on to store information about your CICS Explorer session.

Figure 3-6 Start exploring
All changes, connections, and customization results in data being stored in the .cicsexplorer workspace; therefore, back up for recovery purposes.
Figure 3-7 on page 51 shows you that all instances of the CICS Explorer attempt to use this same workspace.
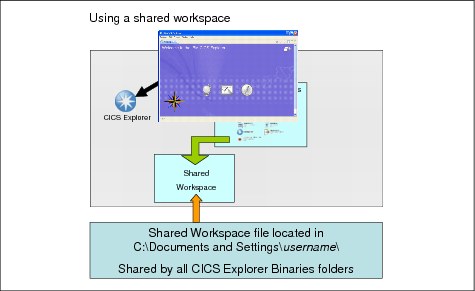
Figure 3-7 Using a shared workspace
If you upgrade the CICS Explorer, the upgraded binaries start to use the shared workspace, thus you might experience problems if you attempt to run the older version due to changes made to your workspace.
Additionally, if you try to start a second instance of the CICS Explorer, it will also try and use the same workspace but will encounter a sharing failure message, as shown in Figure 3-8.

Figure 3-8 Workspace Sharing Lockout Exception
The Simple install method is designed to get you up and running quickly, but if you require more flexibility, such as the ability to run multiple CICS Explorers at the same time or want to run more than one version at a time, you might want to explore using the Private Workspace install option that we describe in the next section.
Installing the private workspace
This private workspace install option is also simple. It just includes an extra step to set up a parameter to create and uses a private workspace that allows you to run multiple instances and versions of the CICS Explorer:
Figure 3-9 through Figure 3-16 on page 57 walk you through the set up process to create and use a Private Workspace:
1. Select and download the appropriate package to your workstation from the following download site:

Figure 3-9 Download the CICS Explorer package
2. Choose a Folder or Directory to unpackage the CICS Explorer binaries into, and extract the files, as shown in Figure 3-10 on page 53.

Figure 3-10 Expand the Zip file

Figure 3-11 Create a shortcut icon
4. Display the Properties for the shortcut icon that you just created. Figure 3-12 on page 54 shows you the format of the -data parameter that is used to point the CICS Explorer to a private copy of the workspace.

Figure 3-12 Edit the icon adding the -data parameter
5. In the Target field, add the -data parameter followed by the location and custom name of your workspace, which are enclosed in parenthesis. In Figure 3-12, we use the version name in the binaries folder and the same version name in the workspace file name, so that the two can be recognized as a pair.

Figure 3-13 Start exploring
When you start your explorer, it uses the directory and name that are provided in the -data parameter to create your private workspace.
|
Tip: At this point the .cicsexplorer workspace used by the Simple install method can exist at the same time; therefore, you can use both install methods simultaneously, and any additional CICS Explorer that is started without the -data parameter will attempt to use the shared .cicsexplorer workspace.
With each additional install or shortcut icon that you create, use a different version of the workspace through the -data parameter, which allows multiple versions and running instances.
|

Figure 3-14 Using a private non-shared workspace
If you copy a shortcut icon or create a new one, you must modify the Target information to always point to a new private workspace; otherwise, you will end up with the same issues as the Simple install where you share the workspace.
Figure 3-15 on page 56 shows a new shortcut icon being created using a different binaries folder and workspace. Comparing the shortcut icon in Figure 3-12 on page 54 and the one in Figure 3-15 on page 56 you can see that if we start both CICS Explorers up simultaneously, they use different Binaries and workspaces.

Figure 3-15 Setup of the -data parameter
6. Finally Figure 3-16 on page 57 shows how two different versions can be managed and run simultaneously. We recommend that you backup the binaries and workspaces as a pair because if one is, lost, damaged, or corrupted, you can easily recover it.

Figure 3-16 Binaries / Workspace pairs
If you recover a Binary/Workspace pair, you must create a new shortcut icon using an appropriately configured -data parm to link the two together.
3.1.2 Installing CICS Explorer remotely
You can also install CICS Explorer on a remote server for clients to access. The benefits of this remote server include only having one single copy of the binary to update; however, execution might be a little slower than running the client locally.
The simplest way to install CICS Explorer remotely is to install CICS Explorer onto a shared drive. Each client machine can then access the shared drive. Individual users can then start the CICS Explorer by directly running the executable file or by creating a local shortcut for the remote executable on the local machine. When CICS Explorer is run this way, the user’s workspace is written to their local machine, unless explicitly specified. (See 3.1.1, “Installing CICS Explorer locally” on page 46). When CICS Explorer is run from a remote drive there might be a delay in the time that it takes for CICS Explorer to start because the binary data is copied over the network.
The benefits of running CICS Explorer remotely are that maintenance needs only to be applied to a single copy of the application binary, and it also removes the overhead of rolling the application out to every workstation. The disadvantage of running CICS Explorer remotely is that the initial start time of CICS Explorer can be longer than if it were running locally.
You can run CICS Explorer remotely regardless of which operating system is used because the remote server is just acting as a file store. All of the processing is performed on the local machine.
You can also run CICS Explorer from a shared Linux server using any windows system to allow the GUI to be displayed on a user’s local terminal by installing the CICS Explorer onto a Linux server in a location that is readable by logged on users. Users can log onto the remote system using their preferred Windows package. After the users log on, they can run CICS Explorer on the remote system. When CICS Explorer is being run from a remote Linux server in this manner, the CICS Explorer binary executes on the server using the server’s memory and CPU resources. The user’s workspace is stored in the user’s home directory and not on the local workstation.
3.2 CICS Explorer security
There are several areas to consider in regards to the CICS Explorer and Security depending on which type of connection you are using. Regardless of your connection type, Link Security and Credential Authorization are also available.
In this section, we address the following four areas:
•Link Security
•Credential Authorization
•Security for a stand-alone CICS Region connection
•Security for a CICSPlex SM connection
3.2.1 Link Security
When CICS Explorer connects to any CICS system it can encrypt the link between it and the remote system. By default CICS Explorer uses unsecured HTTP requests, which means that system information flows over the network as plain text.
Secure Sockets Layer (SSL) encryption can be used to encrypt the data flow between CICS Explorer and CICS, which are both supported by changing the TCP/IP Service that is used by the CICS Explorer to connect to the CICS system.
3.2.2 Credential authorization
When connecting to a CICS System through CICS Explorer users must use the same credentials they use to log directly into either the CICS region for a stand-alone CICS Region (SMSS) connection or into the CICSPlex SM Web User Interface for a CICSPlex SM connection. When the user makes a request against the system, CICS or the CMAS verifies that the credentials are correct and that the user has the correct authority to make that request.
3.2.3 Security for a stand-alone CICS Region (SMSS) connection
When connecting to a single CICS region through a stand-alone CICS region (SMSS) connection, CICS Explorer uses existing CICS Command and Resources security profiles to allow or reject requests; therefore, the same level of security that is available within your existing CICS environment is available through the CICS explorer.
3.2.4 Security for a CICSPlex SM connection
When connecting to a CICSPlex through a CICSPlex SM connection, CICS Explorer uses CICSPlex System Manager to process or reject requests using CICSPlex SM security. The same level of security that is available in your existing CICSPlex SM environment is available through the CICS explorer.
|
Tip: CICSPlex SM security uses the CPSMOBJ profiles on top of existing Command and Resource level profiles to secure a CICSPlex SM environment; whereas, only Command and Resource level profiles are used to secure stand-alone CICS region (SMSS) connections.
|
3.2.5 Using SSL
CICS Explorer can use SSL to encrypt the link between it and the CICS system. However CICS Explorer cannot use a private certificate to affirm a user ID. The process is slightly different depending on if you are connecting CICS Explorer to a WUI server or a single CICS region.
SSL connection to a WUI server
Add the following WUIPARMS:
•TCPIPSSL(YES)
•TCPIPSSLCERT(NAME)
The name of the TCPIPSSLCERT must be the name of a certificate that is attached to the keyring that is specified in the keyring SIT parameter. If TCPIPSSLCERT is omitted, the default certificate that is attached to the keyring is used instead.
Setting this parameters ensures that when CICS defines the TCP/IP Service resource definition for the CMCI port that the correct attributes are set for SSL operation.
SSL connection to a single CICS region
Change the TCPIPService resource that you are using to connect to the CICS region:
SSL = YES
You also must ensure that you have a default certificate specified in the keyring that CICS is using.
3.2.6 Using HTTP Basic Authentication
When using HTTP Basic Authentication, when you attempt to make a connection to the TCP/IP port, you are prompted to provide a username and password before the connection is established. HTTP basic authentication can be used to provide a level of DOS attack protection because only users with valid credentials are allowed to make a connection.
To use HTTP basic authentication in your environment, you must specify the value basic for the Authenticate property of the TCP/IP Service that is used as the entry point for the CICS Explorer.
During a connection attempt, CICS Explorer uses the same credentials that you specified in the connection preferences in response to a HTTP Basic Authentication Challenge.
|
Tip: If the system you are connecting to does not require you to sign on, you must enter a username into the connection preferences panel, but you can leave the password field blank.
|
3.2.7 CICSPlex Security Scenario
Full details regarding CICSPlex security definitions are in the CICSPlex SM security section, in the CICSPlex manual.
RACF® security profiles can be created based on function.type.context.scope:
•Function: CICSPlex function impacted by the RACF Profile, for example, ANALYSIS – Real Time Analysis, OPERATE – Operations, and so on.
•Type: Valid subgroup of the function, for example, for function OPERATE, a valid type is PROGRAM.
•Context: Either the fully qualified or generic name of a CMAS or CICSplex:
• In the case of CONFIG or TOPOLOGY, the context must be a CMAS.
• For all other definitions, the context must be a CICSplex.
•Scope: Either the fully qualified or generic name of a CICS system:
• In this context, scope cannot be used to specify a CICSPlex Topology group or CICSPlex BAS logical scope.
• You cannot specify scope when context is a CMAS or type is DEF unless you are defining security rules for CSD resources.
Details regarding the use of READ, ALTER, and UPDATE:
•READ allows users to VIEW resources.
•In the case of the OPERATE and BAS functions:
– UPDATE allows NEWCOPY, SET, OPE, CLO, and MODIFY (including Shutdown on OPERATE.REGION).
– ALTER allows INSTALL, DISCARD, CREATE, and DELETE.
•For all functions other than OPERATE and BAS:
– UPDATE allows INSTALL, DISCARD, CREATE, DELETE, and MODIFY.
– ALTER only applies to OPERATE and BAS definitions.
Details regarding the CICSPlex Security Scenario. The company Redbooks is creating CICSPlex RACF security profiles, which must achieve the following objectives:
•Give all users READ access to all resources.
•Limit administration of the following CICSPlex functions to the Company CICS team members:
– ANALYSIS
– BAS
– CONFIG
– CSD
– MONITOR
– TOPOLOGY
– WORKLOAD
•Allow the same resource access, within the CICSPlex OPERATE function rules, as currently defined within their RACF command-level security rules. This access currently differs between their Test and Production environments.
•Set up a rule to allow READ only access for any other CICSPlex functions and types that were not secured. This rule is intended as a fail-safe for anything not covered in their new security profiles.
•Create rules that can be shared across all their Test and Production environments. Currently all of their Production CICSplex environments begin with PLXP, and all of their Test environments use PLXT.
In Figure 3-17 on page 63, we can see that the following techniques were used to achieve all of the Company Redbooks objectives:
•User * was given READ access in all cases.
•The ANALYSIS, BAS, CONFIG, CSD, MONITOR, TOPOLOGY, and WORKLOAD functions were left generic with regard to type.context.scope, allowing those security rules (restricting administration access to the CICS team) to be used across all environments:
– The OPERATE function was broken down by type.
– In cases where the rules for the OPERATE function type are the same for all environments, no context is used.
– In cases where the rules for the Test and Production environments differ, a generic context (representing the Production PLXP* and Test PLXT* environments) was used.
– Company RedBooks associated the RACF user groups, appropriate to the function.type.context, based on their current RACF command level security rules.
•The ** rule allows READ-only access for anything that is not covered, which provides a fail-safe.

Figure 3-17 Company Redbooks CICSPlex security matrix
3.3 Updating the CICS Explorer
Because CICS Explorer is built on Eclipse technology, you can automatically update it using the same mechanism that is used to update Eclipse.
3.3.1 Updating from the Internet
You can update CICS Explorer directly from a Web server. IBM hosts an update site that contains updated versions of the CICS Explorer. Alternatively, your enterprise might provide an internal site.
|
CICS Explorer updates: All CICS Explorer updates are available from:
|
To update the CICS Explorer from the IBM site:
1. From the Help menu, select Software Updates.
3. Click Update.
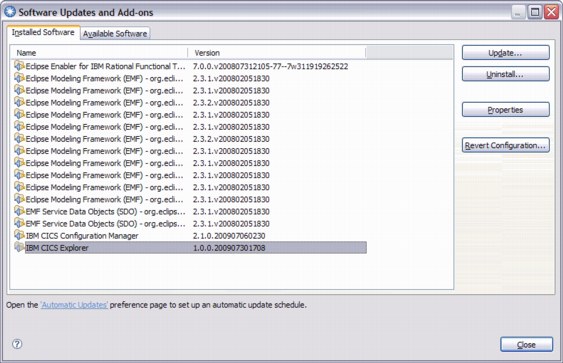
Figure 3-18 Software Updates window
CICS Explorer downloads and installs the updates.
If your system administrator supplied you with a URL to use as an internal mirror of the IBM update site, alter your configuration to remove the IBM update site, and add the internal one:
1. From the Help menu, select Software Updates.
2. From the Available Software tab, select Manage Sites.
3. Select the site that points to:
4. Click Remove. The IBM site is now removed from the list of update sites. Now add your internal site, and click Add.
5. In the next dialog, enter the name of the update site as provided to you by your system administrator, and click OK.
You can now update the CICS Explorer as shown. If the Web server that is hosting the update site requires authentication, you are prompted for your credentials.
|
Restriction: Because of issues surrounding the update mechanism, we do not recommend that you allow CICS Explorer to save your password when connecting to an update site.
|
3.3.2 Updating from an archive file
If you cannot connect to the Internet to update CICS Explorer, it is possible to update from a local archive file. An archive file is a compressed file that contains the same content that the update site contains.
To update CICS Explorer from an archive file:
1. Download the archive file to your local machine. Put the file in a location that you can remember.
2. From the Help menu, select Software Updates.
3. From the Available Software tab, select Manage Sites.
4. Click Add → Archive.
5. On the next dialog, navigate to the archive file that you downloaded.
6. Click Open → OK.
You can now update the CICS Explorer, as we discussed in 3.3.1, “Updating from the Internet” on page 64.
3.3.3 Updating automatically
After you configure CICS Explorer with an update site that the software can access, you can configure CICS Explorer to automatically search for updates on a regular basis, which ensures that you are kept up-to-date with new features of the CICS Explorer:
1. From the Help menu, select Software Updates.
2. Expand Install/Update.
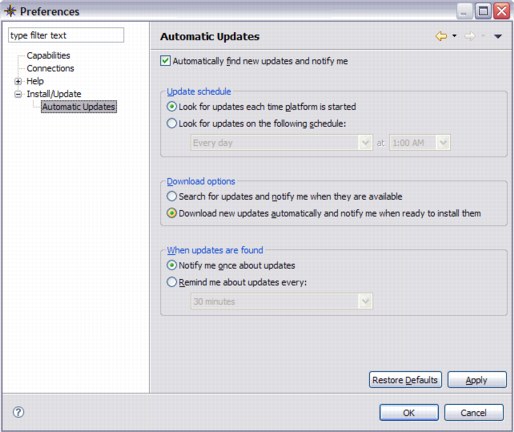
Figure 3-19 Automatic Update dialog
4. The dialog in Figure 3-19 gives options that allow you to specify when to check the update site for new updates. After you make your selections, click Apply → OK.
3.4 Enterprise deployment
In this section, we discuss enterprise deployment of CICS Explorer.
3.4.1 Providing local mirrors
If your enterprise does not allow for users to access the Internet, it is possible to set up an internal mirror of CICS Explorer. Users can install and receive updates from the local mirror.
The CICS Explorer installation archive file can be freely downloaded and stored on an internal server to allow internal downloads. Alternatively it can be incorporated into an automated software delivery system.
|
Archive sites: The archive site files are stored separately on the main update site:
CICS Explorer is under the product group WebSphere.
|
If you are providing a local mirror for users, you might also want to provide a local mirror of the IBM update site so that users can update their copy of CICS Explorer. This can either be a local copy of the update archive file or a copy of the entire update site.
The best practice is to provide a mirror of the IBM update site that is regularly updated. Using this method users can automatically update CICS Explorer from the local mirror with little intervention, ensuring that users are always using the most up-to-date version of the software.
Obtaining an archive site file
To download an archive site file:
1. Go to the IBM Fix Central web site at:
http://www.ibm.com/support/fixcentral/

Figure 3-20 Fix Central site
Set the Installed Version to your current CICS Explorer release. Set the Platform to the one that is appropriate for your installation.
3. Click Continue.
4. Identify the fixes that you want to include in the archive site file, as shown in Figure 3-21 on page 69.

Figure 3-21 Fix Central Fix Identification panel
5. Click Continue. You are presented with a fix pack containing all of the fixes that match your selection criteria, as shown in Figure 3-22 on page 70.

Figure 3-22 Fix Central Fix pack panel
You can get more information, regarding the fix pack by following the link provided. You can also choose to select the fix pack provided, or use the Refine results drop-down to further refine your search criteria.
6. Select the desired fix pack and click Continue. You are asked to specify your download options, as shown in Figure 3-23 on page 71.
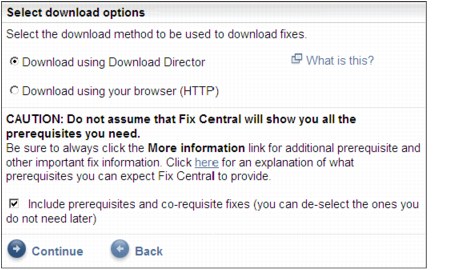
Figure 3-23 Fix Central Download Options panel
7. After selecting your download options, click Continue. You are provided with the link to download the fix pack.
3.4.2 Pre-installation customization
When considering implementing CICS Explorer within an enterprise you might want to provide some customizations that are specific to your organization, for example, pre-configured connection information to your CICS systems and custom panel layouts for specific user groups.
CICS Explorer saves customization and preferences within a folder known as the workspace. If you want to provide pre-installation customizations to the CICS Explorer, you must also provide a copy of the workspace that contains the customizations and ensure that your users start CICS Explorer correctly to use this workspace:
1. Install CICS Explorer using -data <<folder name>> to specify a new workspace.
|
Workspace Location: Record the location of the workspace folder because you will need it later.
|
2. Make your customizations.
3. Export the created workspace to an archive.
Customizing perspectives
You can customize the CICS Explorer to create new perspectives. Custom perspectives can be useful to complete certain tasks, for example, when investigating why a certain resource is failing, it is useful to only see the views that are associated with that resource. Working with CICS Web services might only require the web service, pipeline, urimap, and TCP/IP operational views. Creating new application definitions require the definitional views.
|
Restriction: You cannot add internal update site locations to a customized workspace.
|
To create a new perspective, change and arrange the number of views on display by:
•Opening new views
•Closing open views
•Changing the position and size of a view
•Changing the columns that are displayed as part of a view
After the window is arranged as required:
1. On the menu bar, click Window.
2. Click Save Perspective As.
3. Enter a useful name for the new perspective, and click OK.
The perspective is now saved and available from the Window, Open Perspective dialog.
Customizing connection details
You can pre-customize CICS Explorer to have predefined connection definitions to the CICS systems that your users want to connect to:
1. On the menu bar, click Window.
2. Select Preferences → Connections.
3. Enter the connection details.
|
Tip: When entering connection details do not enter your own user ID and password; however, you must enter some text in the userID field to ensure that CICS Explorer saves the connection. We suggest that you enter USER.
|
4. Click Apply, and then click OK.
After you finish customizing the CICS Explorer, you must close it before you can successfully export the workspace.
Now you can compress the workspace into an archive file to share with your users.
|
Important: Ensure the integrity of the archive after you create it. Some compression programs omit folders and files that begin with the ‘.’ character. Such files exist in the workspace.
|
To consume the customizations, extract the workspace to your local machine. When starting the CICS Explorer, specify where to extract the workspace to.
3.5 Using plug-ins
The individual plug-ins are downloaded from the appropriate support sites in the form of a site compressed file that contains the executable code and the necessary licence agreements. After the file is downloaded onto your machine, it can be integrated into the installation:

Figure 3-24 Software Updates menu

Figure 3-25 Available Software tab
3. Click Add. In the Add Site pop-up, shown in Figure 3-26 on page 75, click Archive to select the compressed file that you downloaded.

Figure 3-26 Add Site window
4. Click OK to close the pop-up.
5. Click OK to close the Available Software Sites window.
6. In the Available Software tab, select the plug-in that you want to install, as shown in Figure 3-27 on page 76.

Figure 3-27 Plug-in check box
7. Click Install. Eclipse ensures that your selection is compatible with your installation. If everything is fine, Eclipse prompts you to accept the terms of the license agreement.
8. Agree to the terms of the license, and then click Finish.
9. After the installation is finished, you are prompted to restart CICS Explorer. Click Yes. After the installation is complete, the Welcome window is displayed to show the new functionality that was added to CICS Explorer.
..................Content has been hidden....................
You can't read the all page of ebook, please click here login for view all page.