

Getting started with CICS Explorer
In this chapter, we describe the steps that are required to implement CICS Explorer for those who want to execute independently-managed CICS regions (the single system set up) and for those who want to use CICSPlex SM to enable you to take advantage of CICS Explorer.
2.1 Using CICS Explorer with CICS TS 4.1
CICS TS 4.1 introduces a new facility called the CICS Management Client Interface (CMCI). This interface is exploited by CICS Explorer to provide Create, Read, Update, and Delete capabilities.
In this section, we tell you how to use CICS Explorer with CICS TS 4.1.
2.2 CICS Explorer connection to CICS
CICS Explorer operates in two distinct ways:
•Connected to a CICS region
•Connected to CICSPlex SM
2.2.1 Connecting CICS Explorer to a CICS region
Small-scale users can connect CICS Explorer directly to individual CICS regions, which provides access to basic operational capabilities and resources definitions through the CSD, as shown in Figure 2-1 on page 21. Small enterprises can therefore benefit from a modern-management interface and integration with the CICS tools. Set up is minimal requiring only a few minutes with CMCI initializing the first time a request is made to the region. All that is required to gain access is a TCP/IP Service definition and the addition of the appropriate Library.
This type of usage scenario is described as a System Managed Single Server or SMSS. This term is also sometimes referred to as Single Server.
CICS Explorer lets you work with the resources on just this single system. The SMSS capabilities of CICS cannot be used if the CICS is managed by CICSPlex SM.

Figure 2-1 Connected to a CICS region
If you have multiple CICS regions, each region requires a TCP/IP Connection and you must connect CICS Explorer to each CICS, in turn, to work with it.
2.2.2 Connecting CICS Explorer to CICSPlex SM
For those who exploit the extensive capabilities that CICSPlex SM provides, you can use CICS Explorer to access the CICSPlex SM environment, as shown in Figure 2-2 on page 22. In contrast to the previous support pack edition, this interface now gives you the ability to take actions on resources. Establishing access requires, again, a simple set of actions, even for a first time CICSPlex SM user. For existing CICSPlex SM users, access is virtually immediate.
If the system is managed by CICSPlex SM, you cannot use the CICS SMSS / Single Server capabilities.

Figure 2-2 Connected to CICSPlex SM
As users migrate to the advanced facilities of CICSPlex SM, the CICS Explorer experience expands into this new set of capabilities, eliminating the relearning curve that often occurs when introducing new management tools.
2.3 Setting up single-server access
To set up a single server to access CICS Explorer:
1. Copy the IBM-supplied group DFH$WU to a user-defined group. You need one group for each CICS system that you want to manage.
2. In your user-defined group, update TCPIPService definition DFH$WUTC and the Portnumber (each CICS requires a unique value for the TCP/IP Stack being used). If the CICS is running with security (SEC=YES in the SIT), change Authenticate to Basic.
3. Install the user-defined group (URIMAP definition DFH$WUUR is installed alongside the DFH$WUTC.TCPIPSERVICE).
4. Add the CICS TS SEYULOAD data set to the CICS DFHRPL concatenation and the CICS TS SEYUAUTH data set to the STEPLIB concatenation in the CICS JCL. (Make sure that the CICS TS SEYUAUTH data set is APF authorized).
Example 2-1 on page 23 shows a JCL that needs updating, and Example 2-2 on page 23 shows an updated JCL.
Example 2-1 Update the CICS JCL (before update)
//CICS EXEC PGM=DFHSIP,REGION=240M,
// PARM=('SIT=6$',
// 'START=AUTO,SI')
//SYSIN DD *
GRPLIST=(DFHLIST,userlist1,userlist2),
APPLID=CICSHTH1,
.END
//STEPLIB DD DSN=CICSTS41.CICS.SDFHAUTH,DISP=SHR
// DD DSN=CICSTS41.CICS.SDFJAUTH,DISP=SHR
//DFHRPL DD DSN=CICSTS41.CICS.SDFHLOAD,DISP=SHR
// DD DSN=your.prog.library,DISP=SHR
// DD DSN=your.table.library,DISP=SHR
//DFHCSD DD DSN=CICSTS41.CICS.DFHCSD,DISP=SHR
…
Example 2-2 Updated JCL
//CICS EXEC PGM=DFHSIP,REGION=0K,
// PARM=('SIT=6$',
// 'START=AUTO,SI')
//SYSIN DD *
GRPLIST=(DFHLIST,userlist1,userlist2),
APPLID=CICSHTH1,
.END
//STEPLIB DD DSN=CICSTS41.CPSM.SEYUAUTH,DISP=SHR
// DD DSN=CICSTS41.CICS.SDFHAUTH,DISP=SHR
// DD DSN=CICSTS41.CICS.SDFJAUTH,DISP=SHR
//DFHRPL DD DSN=CICSTS41.CPSM.SEYULOAD.DISP=SHR
// DD DSN=CICSTS41.CICS.SDFHLOAD,DISP=SHR
// DD DSN=your.prog.library,DISP=SHR
// DD DSN=your.table.library,DISP=SHR
//DFHCSD DD DSN=CICSTS41.CICS.DFHCSD,DISP=SHR
Figure 2-3 on page 24 shows the Explorer connection to a single server. The Connection type to specify is CICS Management Interface. The Server address to use is the IP address of the TCP/IP stack that the CICS will use, and the Portnumber corresponds to the port number that is specified on the DFH£WUTC tcpipservice that you installed. The interface initializes when the CICS region receives the first request.

Figure 2-3 Explorer connecting to a single server
Before a Connection can be created at least one Credential must exist, Figure 2-4 on page 25 shows the Credentials Preferences window where you define the UserID and Password pair to be used by the Connections profiles that you create.

Figure 2-4 Credentials Preferences window
2.4 Setting up CICSPlex SM for CICS Explorer
In this section, we describe the steps that are required to set up CICSPlex SM to take advantage of CICS Explorer.
2.4.1 Basics of setting up CICSPlex SM for CICS Explorer
To set up CICSPlex SM, you need two new CICS systems. In this document, we turn one of these systems into a CMAS and the second into a Web User Interface (WUI) server.
A CMAS is a CICS system that manages a CICSplex. It is a dedicated system; therefore, no other workloads run inside it.
A CICSplex is a set of CICS systems that CICSPlex SM manages. You might have a number of CICSplexes in your enterprise, but an individual CICS system can only belong to (be managed by) one CICSplex.
A WUI server is a CICS system that acts as a Web server for the Web User Interface into CICSPlex SM. If you use the CICS Explorer with CICS TS 4.1 the Explorer uses this to acquire information about your CICS systems and resources. This is a dedicated system, so no other workloads run inside it.
As a first step, create two new CICS systems. Figure 2-5 shows an example of our environment. The assumptions that we made are:
•CICS systems are on a single LPAR
•CICSPlex SM Libraries are downloaded
•You have JCL for existing CICS regions

Figure 2-5 Example of existing setup
Figure 2-6 on page 27 shows our environment plus WUI and CMAS regions.

Figure 2-6 Existing setup plus WUI and CMAS regions
2.4.2 Changing a System into a CMAS
Figure 2-7 on page 28 shows an example of creating a CMAS Repository.
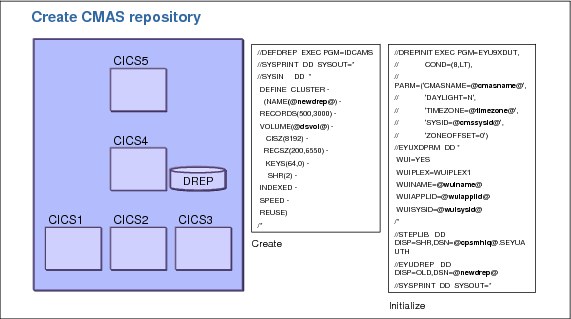
Figure 2-7 Create CMAS repository
Creating a data repository
To change one of your systems into a CMAS you must first create and initialize a data repository. A data repository is a VSAM file that CICSPlex SM uses to store definitions, which is a bit like a CICS CSD. Example 2-3 shows sample syntax for creating a data repository, and Example 2-4 on page 29 provides sample JCL syntax to initialize the repository.
Example 2-3 Create the CMAS repository
//DEFDREP EXEC PGM=IDCAMS
//SYSPRINT DD SYSOUT=*
//SYSIN DD *
DEFINE CLUSTER -
(NAME(@newdrep@) -
RECORDS(500,3000) -
VOLUME(@dsvol@) -
CISZ(8192) -
RECSZ(200,6550) -
KEYS(64,0) -
SHR(2) -
INDEXED -
SPEED -
REUSE)
/*
Example 2-4 Initialize the repository
//DREPINIT EXEC PGM=EYU9XDUT,
// COND=(8,LT),
// PARM=('CMASNAME=@cmasname@',
// 'DAYLIGHT=N',
// 'TIMEZONE=@timezone@',
// 'SYSID=@cmssysid@',
// 'ZONEOFFSET=0')
//EYUXDPRM DD *
WUI=YES
WUIPLEX=WUIPLEX1
WUINAME=@wuiname@
WUIAPPLID=@wuiapplid@
WUISYSID=@wuisysid@
/*
//STEPLIB DD DISP=SHR,DSN=@[email protected]
//EYUDREP DD DISP=OLD,DSN=@newdrep@
//SYSPRINT DD SYSOUT=*
There are two variables that you must specify in the JCL for creating the repository (Example 2-3 on page 28):
•The data set name (@newdrep@) that you want the repository to have (make a note of this name, you will need it later)
•The volume (@dsvol@) on which you want the data set created
Initializing the data repository
Next, we must initialize the data repository, which loads the repository with some definitions that are needed for the CICSPlex to work. Example 2-4 contains some sample JCL to initialize the data repository.
There are a number of variables that you must set in the JCL. Let us start with the simplest:
1. Where @cpsmhlq@ appears, enter in the High Level Qualifier for the release of CICS TS that you are working on, for example: CTS410.CPSM.SEYUAUTH.
2. Populate @newdrep@, which this is the name that you gave to your Data Repository when you created it with IDCAMS, as shown in Example 2-3 on page 28.
3. Populate the @cmasname@ variable. This entry is simply a name that CICSPlex SM uses to identify the CMAS. You can use up to eight characters (A-Z and 0-9) for the name. You might want to use the APPLID of the system as a name for simplicity. Make a note of the CMAS name because you will need it later.
4. Set @timezone@ to the letter A to use your local timezone.
5. Set @cmssysid@, which is the system ID of the CICS system that you are turning into a CMAS:
a. Find the SYSIDNT SIT parameter in your CICS JCL, and copy its value into this variable. If you do not have a SYSIDNT SIT parameter, create a four character identifier. The last four characters of the system's APPLID can be used for this. The value must be unique.
The next set of variables help define a CICSplex for your WUI server and tell the CMAS a bit about the CICS system that you are using as a WUI server:
•@wuiapplid@ is the APPLID of the CICS system that you are turning into a WUI server. This is not the same system that you are turning into a CMAS. In your CICS JCL, find the APPLID SIT parameter, and copy its value into the @wuiapplid@ variable.
•@wuisysid@ is the system ID of the CICS system that you are turning into a WUI server. This is not the same system that you are turning into a CMAS. In your CICS JCL, find the SYSIDNT SIT parameter, and copy its value into the @wuisysid@ variable. If you do not have a SYSIDNT SIT parameter, you must create a four character identifier. Use the last four characters of the system's APPLID. This value must be unique.
•@wuiname@ is a name that CICSPlex SM uses to identify the WUI server. You can use up to eight characters (A-Z and 0-9) for the name. You can use the APPLID of the system as a name. Make a note of the name because you will need it later.
|
Note: There is also a parameter called WUIPLEX that, in this example, was set to WUIPLEX1 because the WUI is managed inside of its own CICSplex. For this exercise, it is not important to understand why this is the case, so it is fine to just use the WUIPLEX1 value.
|
Both the data repository creation and initialization can be JOBSTEPS inside a single JOB.
When the JCL is submitted, you will get a return code of 0, which means that your data repository data set is created and initialized.
Modifying the CICS JCL
Now we must modify the JCL of the CICS system that we are turning into a CMAS. Example 2-5 shows a CMAS JCL before modification.
Example 2-5 Update CMAS JCL (before)
//CICS EXEC PGM=DFHSIP,REGION=240M,
// PARM=('SIT=6$',
// 'START=AUTO,SI')
//SYSIN DD *
GRPLIST=(DFHLIST,userlist1,userlist2),
APPLID=CICSHTH1,
.END
//STEPLIB DD DSN=CICSTS41.CICS.SDFHAUTH,DISP=SHR
// DD DSN=CICSTS41.CICS.SDFJAUTH,DISP=SHR
//DFHRPL DD DSN=CICSTS41.CICS.SDFHLOAD,DISP=SHR
// DD DSN=your.prog.library,DISP=SHR
// DD DSN=your.table.library,DISP=SHR
//DFHCSD DD DSN=CICSTS41.CICS.DFHCSD,DISP=SHR
…
Example shows the JCL after modification.
Example 2-6 Update CMAS JCL (after)
//CICS EXEC PGM=EYU9XECS,REGION=0K,
// PARM=('SIT=6$',
// 'START=AUTO,SI')
//SYSIN DD *
GRPLIST=(DFHLIST,userlist1,userlist2),
APPLID=CICSHTH1,
MXT=300,
CPSMCONN=CMAS,
EDSALIMIT=100M,
ICVR=20000,
SEC=NO, You can switch it on later
SPOOL=YES,
WRKAREA=2048,
.END
//STEPLIB DD DSN=@[email protected],DISP=SHR
// DD DSN=CICSTS41.CICS.SDFHAUTH,DISP=SHR
// DD DSN=CICSTS41.CICS.SDFJAUTH,DISP=SHR
//DFHRPL DD DSN=@[email protected]=SHR
// DD DSN=CICSTS41.CICS.SDFHLOAD,DISP=SHR
// DD DSN=your.prog.library,DISP=SHR
// DD DSN=your.table.library,DISP=SHR
//DFHCSD DD DSN=CICSTS41.CICS.DFHCSD,DISP=SHR
//EYUDREP DD DISP=SHR,DSN=@newdrep@
//EYUPARM DD *
NAME(@cmasname@)
SEC(NO)
/*
To modify the JCL:
1. In the JOBSTEP for the CICS system, change the program from DFHSIP to EYU9XECS. Also, add REGION=0K to this line.
2. Add the following data set to your STEPLIB (as before, the variables used depend on the release of CICS TS that you are using):
3. Add the following data set to DFHRPL:
4. Add the following SIT parameter:
CPSMCONN=CMAS
5. Add or change the MXT SIT parameter, which is the minimum MAXTASKs value for a CMAS. (For a basic set up, 300 is an appropriate value):
MXT=300
6. Change the EDSALIMIT SIT parameter, which is the minimum DSA size for a CMAS. (For a basic set up this is an appropriate value):
EDSALIMIT=100M
7. Add or change the ICVR SIT parameter:
ICVR=20000
8. Add or change the SEC SIT parameter. Initially we run with security off. You can run with security on at a later date:
SEC=NO
9. Add or change the SPOOL SIT parameter:
SPOOL=YES
10. Reserve 2048 bytes for the Common Work Area (CWA):
WRKAREA=2048
11. Change the START SIT parameter:
START=AUTO
You might want to force a COLD/INITIAL start on the first startup, but an AUTO restart is fine after that.
12. Add the following DD card to the JCL, where @newdrep@ is the name of the Data Repository that you created earlier:
//EYUDREP DD DISP=SHR,DSN=@newdrep@
13. Add the following DD card:
//EYUPARM DD *
NAME(@cmasname@)
SEC(NO)
/*
The example here assumes that the IBM supplied SIT 6$ is used. If you use an installation-defined SIT, you might need to modify other values that are not shown here; otherwise, incorrect results can occur.
Example on page 31 is an example of all of these changes. You are now ready to start your CMAS.
Starting the CMAS
Submit the JCL you just modified. If the CMAS starts successfully, in the logs, you will see the following messages:
•EYUXL0007I IYK3ZDD1 CMAS Phase III initialization complete.
•EYUXL0007I IYK3ZDD1 CMAS Phase IV initialization complete.
•EYUXL0010I IYK3ZDD1 CMAS initialization complete.
If CMAS initialization does not complete, go back and make sure that all of the names, APPLIDs, and system IDs that you defined are correct.
2.4.3 Changing a system into a WUI server
The first step to creating a WUI server is to create a WUI repository, as shown in Figure 2-8 on page 34.

Figure 2-8 Create a WUI repository
The WUI repository is a VSAM data set that holds all of the Views and Menus that the WUI serves to a browser. Example 2-7 contains some sample JCL to create a WUI repository.
Example 2-7 Create WUI repository
//DEFWREP EXEC PGM=IDCAMS
//SYSPRINT DD SYSOUT=*
//SYSIN DD *
DEFINE CLUSTER ( -
NAME(@newwuirep@) -
VOLUME(@dsvol@) -
STORCLAS( STANDARD ) -
RECORDS( 5000 5000 ) -
CONTROLINTERVALSIZE( 8192 ) -
SPANNED -
INDEXED -
SHAREOPTIONS( 2 ) -
) -
DATA ( -
NAME(@[email protected] ) -
KEYS( 20 20 ) -
RECORDSIZE( 8192 32000 ) -
) -
INDEX ( -
NAME(@[email protected] ) -
)
/*
The data set name that you want the WUI repository to have is @newwuirep@.
We are now ready to modify our CICS system's JCL to turn it into a WUI server.
Modifying the CICS JCL
Example 2-8 shows the changes to make to CICS JCL to make it a WUI server.
Example 2-8 Change CICS JCL to make it a WUI
//CICS EXEC PGM=DFHSIP,REGION=0K,
// PARM=('SIT=6$',
// 'START=AUTO,SI')
//SYSIN DD *
GRPLIST=(DFHLIST),
APPLID=CICSHTH1,
CPSMCONN=WUI
INITPARM=(EYU9VWAN=‘ENU1’,EYU9VKEC=‘ENU’),
EDSALIM=100M,
MXT=120,
TCPIP=YES,
SEC=NO, You can switch it on later
WRKAREA=2048,
CWAKEY=CICS,
.END
/*
//STEPLIB DD DSN=@[email protected],DISP=SHR
// DD DSN=CICSTS41.CICS.SDFHAUTH,DISP=SHR
// DD DSN=CICSTS41.CICS.SDFJAUTH,DISP=SHR
//DFHRPL DD DSN=@[email protected]=SHR
// DD DSN=CICSTS41.CICS.SDFHLOAD,DISP=SHR
// DD DSN=your.prog.library,DISP=SHR
// DD DSN=your.table.library,DISP=SHR
//DFHCSD DD DSN=CICSTS41.CICS.DFHCSD,DISP=SHR
//EYUWREP DD DISP=SHR,DSN=@newdrep@
//EYUPARM DD *
NAME(@wuiname@)
CICSPLEX(WUIPLEX1)
CMASSYSID(@cmassysid@)
SEC(NO)
/*
//EYUWUI DD *
TCPIPHOSTNAME(@hostname@)
TCPIPPORT(@portnumber@)
DEFAULTCONTXT(@mainlex@)
DEFAULTSCOPE(@mainplex@)
DEFAULTCMASCTXT(@cmasname@)
AUTOIMPORTDSN(@[email protected])
AUTOIMPORTMEM(EYUEA*)
CMPIPORT=@portnumber@
/*
Now we must modify the JCL of the CICS system that we are turning into a WUI server:
1. Add the following data set to your STEPLIB (as before, the variables that are used depend on the release of CICS TS that you are using):
2. Add the following data set to DFHRPL:
3. Add the following SIT parameter:
INITPARM=(EYU9VWAN='ENU1',EYU9VKEC='ENU')
4. Reserve 2048 bytes of CICS key storage for the Common Work Area (CWA):
WRKAREA=2048
CWAKEY=CICS
5. Make sure that the TCPIP SIT parameter is set to YES and that the CICS system can run as a Web server.
6. Add the following DD card:
//EYUPARM DD *
NAME(@wuiname@)
CICSPLEX(WUIPLEX1)
CMASSYSID(@cmssysid@)
SEC(NO)
|
Note: @wuiname@ must match the WUI name you specified when creating the CMAS Data Repository. @cmssysid@ must match the system ID of the CMAS, not the WUI server system ID.
|
//EYUWUI DD *
TCPIPHOSTNAME(@hostname@)
TCPIPPORT(@portnumber@)
DEFAULTCMASCTXT(@cmasname@)
DEFAULTCONTEXT(@mainplex@)
DEFAULTSCOPE(@mainplex@)
AUTOIMPORTDSN(@[email protected])
AUTOIMPORTMEM(EYUEA*)
CMPIPORT(@cmciportnumber@)
•@hostname@ is the TCP/IP host name for the IP stack that CICS will use. This value is also used when configuring the connection to this WUI server in CICS Explorer.
•@portnumber@ is a port number that was allocated for the use of the WUI server. This value is used by web browser users.
•@cmasname@ is the name of the CMAS you are connecting to (for example, the name of the CMAS that you created earlier).
•@mainplex@ is the name of the CICSplex to which you must add your existing CICS systems. It can be any eight-character string (A-Z and 0-9). You will create this CICSplex later. In this example, we use a CICSplex name of TESTPLEX, so in our WUIPARM we will have:
DEFAULTCONTEXT(TESTPLEX)
DEFAULTSCOPE(TESTPLEX)
•@cpsmhlq@ is the High Level Qualifier for the release of CICS TS that you are working on, for example: CICSTS41.CPSM.SEYUVIEW.
•@CMCIPORTNUMBER@ is the port number that is allocated for the use of the CICS Management Client interface for this WUI server. This value must not be the same as the value specified in @portnumber@. This value is used when configuring the connection to this WUI server on a CICS Management Interface connection in CICS Explorer.
Example 2-8 on page 35 is an example of all of these changes. You are now ready to start the WUI server.
Starting the WUI Server
Submit the JCL you just modified. If the WUI starts successfully, in the system log you will see messages similar to the following messages:
EYUXL0030I IYK3ZDD4 ESSS connection in progress to CICSPLEX(WUIPLEX1) for SYSID(@cmssysid@)
EYUXL0004I IYK3ZDD4 ESSS connection complete.
EYUCL0006I IYK3ZDD4 ESSS link to IYK3ZDD1 established.
EYUXL0007I IYK3ZDD4 LMAS Phase II initialization complete.
EYUNL0099I IYK3ZDD4 LMAS LRT initialization complete.
At the top of the EYULOG you will see messages similar to the following messages. There will also be additional messages after these, but do not worry about them because they mostly relate to the WUI loading the Views and Menus that it is going to use:
EYUVS0101I IYK3ZDD4 Parameter service initialization complete.
EYUVS0200I IYK3ZDD4 Starting CICS Web Interface.
EYUVS0204I IYK3ZDD4 TCP/IP service (EYUWUI) installed successfully.
EYUVS0206I IYK3ZDD4 CICS Web Interface enabled on TCP/IP port number @portnumber@.
EYUVS0204I IYK3ZDD4 TCP/IP service (EYUCMCIT) installed successfully.
EYUVS0209I IYK3ZDD4 URI map (EYUCMCIU) installed successfully.
EYUVS0211I IYK3ZDD4 CICS Management Client Interface enabled on TCP/IP port number @cmciportnumber@.
EYUVS0002I IYK3ZDD4 CICSPlex SM Web User Interface initialization complete.
EYUVS0010I IYK3ZDD4 Server connected to CMAS, SYSID(@cmssysid@).
If WUI initialization does not complete, go back and make sure that all of the names, APPLIDs, and system IDs that you defined are correct.
You are now ready to create a CICSplex for all of the CICS systems that you want to manage.
2.4.4 Creating a CICSplex to manage your systems
We are now going to define a CICSplex that will be used to manage your existing CICS systems. We also define your CICS systems to the CICSplex, so that when you start those systems, CICSPlex SM knows which CICSplex they are being managed by. Example 2-9 on page 39 shows a sample JCL for creating the CICSplex and defining your CICS systems.
Example 2-9 Sample JCL to create CICSplex
//CPSMDEFN EXEC PGM=EYU9XDBT
//*
//STEPLIB DD DISP=SHR,DSN=@[email protected]
// DD DISP=SHR,DSN=@[email protected]
//*
//SYSTSPRT DD SYSOUT=*
//EYUTRCF DD SYSOUT=*
//*
//EYUCPDEF DD DISP=SHR,DSN=@[email protected](EYUCPDEF)
//EYUCSDEF DD DISP=SHR,DSN=@[email protected](EYUCSDEF)
//EYUCSGRP DD DISP=SHR,DSN=@[email protected](EYUCSGRP)
//*
//EYUSYSIN DD DDNAME=SYSIN
* Set CONTEXT to CMAS
CONTEXT @cmasname@
* Define the CICSplex
DEFINE CICSPLEX @plexname@
* Set CONTEXT to the CICSplex
CONTEXT @plexname@
* Define a CICS region
DEFINE REGION @systemname@ -
APPLID @systemapplid@ -
SYSID @systemsysid@ -
CMASID @cmasname@
To create a CICSPlex that manages your systems:
1. @cpsmhlq@ is the High Level Qualifier for the release of CICS TS that you are working on, for example: CICSTS41.CPSM.
2. @cmasname@ is the name of the CMAS you are connecting to (for example, the name of the CMAS that you created earlier).
3. @plexname@ is the name of the CICSplex that is going to manage your systems, which is any name up to eight characters long (A-Z and 0-9). For this example, TESTPLEX is a valid name to enter here.
4. @systemapplid@ is the APPLID of a CICS system that you want to manage in your CICSplex. Find the APPLID SIT parameter in the JCL for the system you want to manage, and copy its value into this variable.
5. @systemsysid@ is the system ID of the CICS system that you want to manage in your CICSplex. Find the SYSIDNT SIT parameter in your CICS JCL, and copy its value into this variable. If you do not have a SYSIDNT SIT parameter, create a four-character identifier. The last four characters of the system's APPLID can be used for this. This value must be unique.
6. @systemname@ is simply a name that CICSPlex SM uses to identify the system. You can use up to eight characters (A-Z and 0-9) for the name, and you can use the APPLID of the system as a name. Make a note of the name because you will need it later.
7. Repeat the DEFINE REGION statement for every CICS system that you want to manage in your new CICSplex. Do not forget to change that variable to match the APPLID of each system.
8. Submit the job, which causes all of your new definitions to be created.
You are almost ready to manage your CICS systems through CICSPlex SM. The last step before starting your systems is to alter the JCL of your CICS systems to allow them to connect to CICSplex SM.
2.4.5 Modifying your existing CICS system JCL
Take the JCL that you have for an existing CICS system that you want to be managed by CICSPlex SM, and make the following modifications to it:
1. Add the following data set to your STEPLIB (as before the variables used depend on the release of CICS TS that you are using:
2. Add the following to DFHRPL:
3. Add the following SIT parameter:
CPSMCONN=LMAS
4. Add or change the SEC SIT parameter (you can turn on security at a later date):
SEC=NO
5. Add the following DD card:
//EYUPARM DD *
NAME(@cicsname@)
CICSPLEX(@plexname@)
CMASSYSID(@cmssysid@)
The variable @cicsname@ is the name of the CICS system that we defined in the WUI, which must match the name defined in the WUI; otherwise, the system will not connect to the CICSplex. In our example, our system names are the same as our systems' APPLIDs. The variable @plexname@ is the name of the CICSplex that we created in the WUI; however, in our example, this was TESTPLEX. The variable @cmssysidcmssysid@ is the system ID of the CICS system that is acting as out CMAS.
After you make these changes, submit your JCL, and start your managed CICS system. If the CICS system successfully connects to the CICSplex, you will see the following messages in the system log:
EYUXL0030I IYK3ZDD4 ESSS connection in progress to CICSPLEX(DWDPLEX1) for SYSID(DANA).
EYUXL0004I IYK3ZDD4 ESSS connection complete.
EYUCL0006I IYK3ZDD4 ESSS link to IYK3ZDD1 established.
EYUXL0007I IYK3ZDD4 LMAS Phase II initialization complete.
EYUNL0099I IYK3ZDD4 LMAS LRT initialization complete.
If the connection to the CICSplex fails, check that the NAME in the EYUPARM in your JCL matches the CICS system definition name for the definition you defined through the WUI.
Repeat this step for all of the CICS systems that you want CICSPlex SM to manage.
2.4.6 Conclusion
To set up CICSplex SM, you:
1. Turned a CICS system into a CMAS.
2. Turned a CICS system into a WUI server.
3. Created a CICSplex.
4. Defined your CICS systems to the CICSplex.
5. Modified your existing CICS systems to allow them to connect to the CICSplex.
You can now view information about your systems through the CICSPlex SM Web User Interface.
To test the Web browser functionality, use a URL of http://@hostname@:@portnumber@, where:
•@hostname@ is the value that you specified on the TCPIPHOSTNAME option of the EYUWUI DD
•@portnumber@ is the value of @portnumber@ that you specified on the TCPIPPORT option of the EYUWUI DD
2.5 Updating an existing CICSPlex SM setup for CICS Explorer
If you are already a CICSPlex SM user, to enable the CICS Management Client interface in your CICSPlex SM Web User Interface (WUI) server, update your WUI system parameters to include the new CMCIPORT parameter. The value specified is a TCP/IP port number to use for the CMCI. Each WUI server that is to provide CMCI support needs a unique (per TCP/IP Stack) port number for the CMCIPORT.
Example 2-10 shows a WUI System Parameter file that needs updating.
Example 2-10 Update the WUI system parameters (before update)
//EYUWUI DD *
TCPIPHOSTNAME(MYHOST.EXAMPLE.COM)
TCPIPPORT(60666)
DEFAULTCONTEXT(MYPLEX)
DEFAULTSCOPE(MYSCOPE)
DEFAULTCMASCTXT(MYCMAS)
AUTOIMPORTDSN(CTS41.CPSM.SEYUVIEW)
AUTOIMPORTMEM(EYUEA*)
//
Example shows an updated parameter file.
Example 2-11 Updated WUI system parameters
//EYUWUI DD *
TCPIPHOSTNAME(MYHOST.EXAMPLE.COM)
TCPIPPORT(60666)
CMCIPORT(50666)
DEFAULTCONTEXT(MYPLEX)
DEFAULTSCOPE(MYSCOPE)
DEFAULTCMASCTXT(MYCMAS)
AUTOIMPORTDSN(CTS41.CPSM.SEYUVIEW)
AUTOIMPORTMEM(EYUEA*)
//
To use CICS Explorer, set up a new CICS Management Interface connection. The host name must be the value of @hostname@ that you specified on the TCPIPHOSTNAME option of the WUI system parameters. The port number to use is the value of @cmciportnumber@ that you specified on the CMCIPORT option of the WUI system parameters. See Figure 2-9.
Before a Connection can be created, at least one Credential must exist. Figure 2-4 on page 25 shows the Credentials Preferences window where you define the UserID and Password pair that will be used by the Connections profiles you create.

Figure 2-9 Explorer connecting to CICSPlex SM CMCI
..................Content has been hidden....................
You can't read the all page of ebook, please click here login for view all page.