
CHAPTER 3 System Administration (Part 2)
Overview
In the previous chapter, we introduced system administration and described the role that system administrators play in information security. This chapter continues the discussion of system administration by introducing a core set of technical operations used by system administrators. These operations are demonstrated using the Linux virtual machine created in the previous chapter. At the end of this chapter, you should know:
- The core components of a modern operating system
- How to use the command-line interface (CLI)
- Basic operations to navigate the filesystem
- File permissions for users and groups
- User account management
- Software management
Operating system structure
Computer operating systems are software that manage computer hardware and provide common services to user applications. Modern operating systems are made up of many separate programs (or processes) that all work together to produce the desired results. At the core, the kernel is the software which provides controls for hardware devices, manages memory, executes code on the computer's CPU, and hides the details of the underlying physical hardware from user applications. This allows application developers to ignore the details of the underlying hardware when developing applications, greatly simplifying application development.
The shell is a text-based program that allows the user to interact directly with the kernel. Common operations performed using the shell include starting and stopping programs, controlling the execution of programs, and starting or stopping the computer. The shell hides the complexity of the kernel from the user so that the user can enter commands in plain English and rely on the shell to translate these commands into the binary code necessary for the kernel to execute them.

While graphical operating systems such as Windows keep the shell hidden, Unix-based operating systems like Linux or Mac OSX automatically start a shell on start-up. This shell runs behind the scenes, starting and stopping programs in response to GUI operations. The shell is also accessible directly as a terminal. This terminal is the preferred environment used by administrators for most system administration tasks. Unless otherwise specified, all system administration tasks in this book will be performed using the terminal window in a Linux operating system.

Like all software, shells have evolved over time. Table 3.1 provides an overview of the common shells available. Most administrators prefer the Bash shell, the shell used in this book.
Running a Shell on Windows
There are several options for running a shell on Microsoft Windows. Microsoft's basic command shell (COMMAND.COM or cmd.exe depending on the Windows version) has not changed much since the mid-1990s. It provides the ability to execute commands and supports a few basic tools for manipulating the filesystem. Later versions added the ability to connect to the local network for file transfers and remote administration, but overall the abilities of the shell are limited.
Microsoft now includes an alternative shell and scripting language called Windows Powershell.5 Powershell was designed primarily for scripting and is relatively unique in shells in that it is an object-oriented language that can interact directly with .NET objects and classes. It has quickly become the main scripting language on Windows, and several major applications, such as Microsoft Exchange 2010, rely on it heavily.6
For enthusiasts, in addition to the shells provided by Microsoft, open-source developers have re-created much of the UNIX environment on Windows – including the popular Unix shells. The Cygwin project was developed in the 1990s to allow programs compiled on a Unix system to run on Windows. It has evolved into a collection of software that provides a complete Unix-like environment, including command shells and graphical programs. Bash is the default shell in Cygwin, but virtually all of the popular shells used in Linux distributions are now available through the Cygwin installer.
The command-line interface
Before proceeding to system administration tasks, this section introduces the command-line interface and the rudiments of using the interface (Figure 3.2).
The Bash prompt
To start a terminal window in the version of CentOS Linux provided with this text, open the “System Tools” panel under the “Applications” menu as shown in Figure 3.2. When you open the terminal window, you are presented with a prompt from the Bash shell. The Bash prompt is the entry point for all commands that you type, but it can also provide information about the account and server you are using and the environment Bash is running in. Here is a typical Bash prompt:
[alice@sunshine usr]$
Files and directories
Files and directories in all operating systems are organized in a hierarchical structure. In UNIX, each “layer” of the hierarchy is separated by a slash (/). The top of the hierarchy is referred to as the filesystem root and is represented as a single slash. Each directory can contain files or sub-directories, or a combination of both (Figure 3.3).
The location of a file or directory in the hierarchy is referred to as its path. There are two ways to express the path of a file, as given in Table 3.2.


Case Sensitivity
Almost all UNIX filesystems are case sensitive, so hello.txt and HELLO.TXT are two distinct files. An exception to this rule is the default filesystem used in Mac OSX (HFS+), which is case insensitive. On Mac OSX, hello.txt and HELLO.TXT would be interpreted as the same filename. For this reason, when copying files from a case-sensitive filesystem to case-insensitive one, it is necessary to check for possible filename conflicts.
Moving around the filesystem–pwd, cd
The first thing you need to know is where you are and the pwd command provides that to you. pwd stands for “print working directory” and returns the absolute path of the directory you are currently in. When you login to a UNIX system or open a terminal window, you will normally be placed in your home directory. Your home directory is your personal space on the UNIX system, analogous to the Documents folder in Windows.
[alice@sunshine ~]$ pwd
/home/alice
Now, to move to another directory, we can use cd. cd, the change directory command, allows us to switch to another directory. The target folder name is specified as the argument to the command.
[alice@sunshine ~]$ cd /usr
[alice@sunshine usr]$ pwd
/usr
Thus, the command “cd /usr” takes us to the /usr folder. In this instance, we used the absolute path of the directory. We can also use relative paths.
[alice@sunshine usr]$ cd bin
[alice@sunshine bin]$ pwd
/usr/bin
What about moving “up” the tree? In other words, what if we want to move from /usr/bin to /usr? We can use the absolute path as above, but there is also an alternative. The parent directory, the directory directly about the current one in the hierarchy, is represented by two periods (..)
[alice@sunshine bin]$ pwd
/usr/bin
[alice@sunshine bin]$ cd ..
[alice@sunshine usr]$ pwd
/usr
Similarly, the current directory is represented by a single period (.) This isn't very useful when changing directories since “cd .” would instruct the shell to change directories to the current directory (i.e., don't do anything), but it will be very useful with some of the other commands we will learn.
Listing files and directories
To list the contents of the current directory, use ls.
[alice@sunshine usr]$ cd /home/alice
[alice@sunshine ~]$ ls
Desktop  Documents  Downloads  hello.txt Music Pictures Public
Templates  Videos
Depending on the version and particular configuration of the operating system you are using, the results may be in multiple colors to represent the different types of files or directories shown. (In this instance, items in blue are directories and those in black are files.) Because these colors can vary from version to version of each operating system, it is best not to rely on them. There is an alternative setting, or switch, that can be passed to ls that prints results in a more standardized format: -F.
[alice@sunshine ~]$ ls -F
Desktop/  Documents/  Downloads/ hello.txt Music/ Pictures/
Public/  Templates/  Videos/
ls -F appends a slash (/) to each directory. You can now easily differentiate between files and directories. However, the ls command does not list hidden files in this directory by default. All files and/or directories whose names begin with a period (.) are considered hidden files. Hidden files are files whose existence is hidden from users by default. To list all files, including the hidden ones, you must use the -a switch:
[alice@sunshine  ~]$ ls -aF
./              .bash_logout   Desktop/    hello.txt  Public/
../             .bash_profile  Documents/  Music/     Templates/
.bash_history   .bashrc        Downloads/  Pictures/  Videos/
As you can see, several hidden files (bash_history, .bash_logout, etc.), are now visible. Also two hidden directory entries, / (current directory) and ./ (parent directory) are now visible. Since all directories in the Unix filesystem have both a current directory and parent directory entry, there will always be at least two hidden directory entries in each directory.
When auditing a system, watch out for hidden directories. A common trick that attackers use after compromising a system is to camouflage their directory of tools by naming it … (three periods). It's an effective way of hiding in plain sight – it can be very easy to miss unless you are watching for it.
[alice@sunshine compromised]$ ls -aF
./   .../      Documents/  hello.txt Pictures/ Templates/
../  Desktop/  Downloads/  Music/    Public/   Videos/
Shell expansions
Expansions are special characters or strings that the shell will use to build the list of files or directories a command will be run on. There are several different types of expansions recognized in the Bash shell.
Tilde expansion
The Bash shell interprets the tilde character (˜) as the user's home directory.
[alice@sunshine Expansion]$ cd ~
[alice@sunshine ~]$ pwd
/home/alice
If you follow the tilde with a username, Bash expands it to the location of that user's home directory. You will not be able to cd into their home directory unless that user has granted you permission to do so, but this is an example of this type of expansion in use:
[alice@sunshine Expansion]$ cd ~bob
[alice@sunshine ~]$ pwd
/home/bob
File name expansion (wildcards)
To simplify command entry, the Bash shell offers some wildcards, as listed in Table 3.3. The , [..], and * characters are the available wildcards. Bash expands words containing these characters by replacing the word with a list of files or directories that match the filter created by the wildcard.
[alice@sunshine ~]$ cd /opt/book/system-admin/shell_expansion
[alice@sunshine shell_expansion]$ ls
goodbye.doc  heap.txt  helicopter.txt  hello.doc hello.txt help.txt
[alice@sunshine shell_expansion]$ ls *.doc
goodbye.doc  hello.doc
[alice@sunshine shell_expansion]$ ls he?p.txt
heap.txt  help.txt
File management
Now that you know how to move around the filesystem, let's learn how to modify files and folders.
Creating and deleting directories
mkdir and rmdir are used to create and remove directories.
[alice@sunshine ~]$ cd /opt/book/system-admin/work
[alice@sunshine work]$ mkdir new_directory
[alice@sunshine work]$ ls -aF
./  ../ new_directory/
[alice@sunshine work]$ rmdir new_directory/
[alice@sunshine work]$ ls -aF
./  ../
rmdir will only work on empty directories. An error will be given if you attempt to run rmdir on a directory containing files and/or directories

Copying and moving files
Use the cp command to copy files and mv to move them from one directory to another. To change the name of a file, simply “move” it from the old filename to the new one. The syntax is <cmd> <source> <target>.
[alice@sunshine work]$ cp ../shell_expansion/hello.txt hello_world.txt
[alice@sunshine work]$ ls -aF
./  ../  hello_world.txt
[alice@sunshine work]$ mv hello_world.txt HELLOWORLD.TXT
[alice@sunshine work]$ ls -aF
./ ../   HELLOWORLD.TXT
Adding the -r (recursive) switch allows cp to work with directories as well as files (mv always works recursively). Recursion is the act of defining a function in terms of itself.
[alice@sunshine work]$ cd ~
[alice@sunshine ~]$ ls -F
Desktop/  Documents/  Music/  Pictures/  Public/  Videos/
[alice@sunshine ~]$ cp -r Documents/ Documents-copy
[alice@sunshine ~]$ ls -F
Desktop/   Documents/   Documents-copy/  Music/    Pictures/  Public/
Videos/
[alice@sunshine ~]$ mv Documents-copy Documents-moved
[alice@sunshine ~]$ ls -F
Desktop/ Documents/ Documents-moved/ Music/ Pictures/ Public/ Videos/
[alice@sunshine ~]$ ls -aF Documents
./ ../   notes.txt  readme  sample_file.mp3
[alice@sunshine alice]$ ls -aF Documents-moved/
./ ../   notes.txt  readme  sample_file.mp3
As you can see, the directory Documents/ and all of its contents were first copied to Documents-copy/ and then moved to the new name Documents-moved/; the directory name was changed but the contents were unaffected.
Deleting files
To delete a file, use the rm command.
[alice@sunshine ~]$ cd Documents-moved/
[alice@sunshine Documents-moved]$ ls -aF
./  ../  notes.txt  readme sample_file.mp3
[alice@sunshine Documents-moved]$ rm notes.txt
[alice@sunshine Documents-moved]$ ls -aF
./  ../  readme  sample_file.mp3
To help prevent accidental data loss, use the -i switch for cp, mv, and rm. You will be prompted for confirmation before deleting a file or copying/moving a file that would overwrite an existing file.
[alice@sunshine Documents-moved]$ rm -i readme
rm: remove regular file ‘readme’? n
[alice@sunshine Documents-moved]$ cp -i sample_file.mp3 readme
cp: overwrite ‘readme’? n
[alice@sunshine Documents-moved]$ ls -aF
./ ../   readme  sample_file.mp3
Recursive delete
As with cp, the recursive switch (-r) can be used with rm to delete directories, however, using the recursive switch with rm is potentially much more dangerous. rm -r works by first deleting each and every file in the directory, then deleting the directory itself. The potential for disaster here should be obvious. Always check and recheck the path that you enter when using rm –r
[alice@sunshine ~]$ ls -F
Desktop/   Documents/   Documents-moved/   Music/   Pictures/   Public/
Videos/
[alice@sunshine ~]$ rm -r Documents-moved/
[alice@sunshine ~]$ ls -F
Desktop/  Documents/  Music/  Pictures/  Public/  Videos/
Viewing files
So now you can make your way through the filesystem, move things around, and change their owners, but how do you see what is in a file? The vast majority of files on a Linux server are text files, so they can be viewed using a few simple commands.
less
less allows you to view text files one screen at a time.
[alice@sunshine ~]$ less /usr/share/doc/openssl-1.0.0/FAQ
Table 3.4 gives the keys you can use to navigate and search the file. The search term will be highlighted and the file will scroll down until the first occurrence of the term will be at the very top of your terminal.
head and tail
If you only need to see a few lines from the beginning or end of a file, use head and tail. The –n switch controls the number of lines the program displays – the default is 10 lines.
[alice@sunshine ~]$ head /etc/passwd
root:x:0:0:root:/root:/bin/bash
bin:x:1:1:bin:/bin:/sbin/nologin
daemon:x:2:2:daemon:/sbin:/sbin/nologin
adm:x:3:4:adm:/var/adm:/sbin/nologin
lp:x:4:7:lp:/var/spool/lpd:/sbin/nologin
Table 3.4 Commonly used vi keyboard shortcuts (also used in less)
Note: Some of these shortcuts have carried over to Gmail. For example, typing/while reading mail puts the cursor in the search box.7
sync:x:5:0:sync:/sbin:/bin/sync
shutdown:x:6:0:shutdown:/sbin:/sbin/shutdown
halt:x:7:0:halt:/sbin:/sbin/halt
mail:x:8:12:mail:/var/spool/mail:/sbin/nologin
uucp:x:10:14:uucp:/var/spool/uucp:/sbin/nologin
[alice@sunshine ~]$ tail -n5 /etc/group
sales_grp:x:504:
engineering_grp:x:505:
marketing_grp:x:506:
eric:x:507:
accounting_grp:x:508:
Searching for files
A typical Linux server contains thousands of files and looking through them for one, specific file can seems like searching for a needle in a haystack. However, a very powerful file search tool, find, is there to help. In its most basic form, find takes two arguments: the directory that the search should start from and the name of the file to search for. Here is an example of searching for the Apache (webserver) configuration file:
[alice@sunshine ~]$ find /etc -name httpd.conf
/etc/httpd/conf/httpd.conf
As you may have noticed, find uses a slightly different syntax than the other commands we have worked with so far. In all the other commands you have seen, the command switch has followed the command name. However with find, the -name switch comes after the first argument (/). The find manual refers to the -name httpd.conf part of the command as an expression. There are many operators that can be used in an expression such as -user (finds files owned by a particular account) or -empty (finds empty files). Multiple expressions can also be combined to narrow search results:
[alice@sunshine ~]$ find /opt -user alice -empty
/opt/book/system-admin/my_file.txt
Access control and user management
Permissions
Linux and most other Unix-based operating systems control access to files through two mechanisms: file permissions and Access Control Lists (ACL). File permissions are the traditional method of controlling access to files and has been in use since the early days of Unix. They are fully supported by all shell commands and work consistently across the different operating systems. ACLs are a more recent addition and provide much finer-grained control of not only who can access a file, but also what can be done with it. Unfortunately, there is little standardization yet among the multiple ACL implementations on different OSes and limited tool support. ACLs are therefore usually passed over in favor of file permissions. We will look at both mechanisms, focusing primarily on file permissions, but demonstrating where the extra control provided by ACLs is useful.
ls (again)
To view the current file permissions, use the -l switch for ls. This switch returns the directory listing in the ‘long’ format, broken up into 7 columns. Table 3.5 describes the information provided in each column:
[alice@sunshine ~]$ cd /home/shared
[alice@sunshine shared]$ ls -laF
total 56
drwxr-xr-x.  5 root root       4096  Jan 29  2012 ./
drwxr-xr-x. 12 root root      36864  Feb 15 19:57 ../
drwxr-xr-x.  6 root root       4096  Jan 29  2012 academic_affairs/
drwxr-xr-x.  5 root root       4096  Jan 29  2012 business_finance/
drwxr-xr-x.  2 root legal_grp  4096  Jan 29  2012 legal/

Symbolic notation
Let's take a closer look at the file/directory permissions in column 1. ls -l reports file permission in symbolic notation:8 See table 3.7 for examples.
The first character indicates the type of file:
d Directory
- Regular file
b Block/special file
c Character/special file
l Symbolic link
p Named pipe
s Socket
The next nine characters are broken up into three groups of three characters:
- What the owner can do
- What the members of the group that owns the file can do
- What all users (the world) can do
Each group is broken into three columns:
r – Read
w – Write
x – eXecute
In addition to execute, the third column can also represent special attributes that can be applied to a file:
s – setuid/setgid – Instead of using the permissions of the user executing the file, this file will “run as” the owner (setuid) or group (setgid) specified here.
T – sticky bit – When a directory has this attribute set, any user with write access can create files in the directory, but only the owner can move or delete them.
Octal notation
In addition to symbolic notation, some commands use octal notation to represent file permissions. Octal notation consists of 3 octal (base-8) numbers, each represents one component of the permission: user, group, and world. The values are calculated by adding the 3 octal bits together (see Table 3.6):
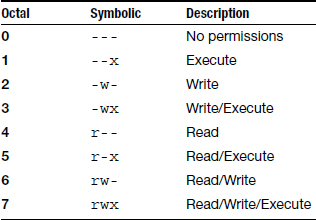

- The read bit adds 4 to the total (binary: 100)
- The write bit adds 2 (binary: 010)
- The execute bit adds 1 (binary: 001)
Changing Permissions
The chmod command is used to change the permissions on a file or directory. chmod uses octal notation when entering permissions. In the next example, we will change the permissions of the /home/shared/legal directory to give read/write/execute permissions to the owner of the directory, read/write/execute permissions to everyone in the legal_grp group and read/execute permissions to everyone else.
Many of the following commands must be run with super-user privileges. The super-user account usually has the username of root and is the most powerful administrative user on a Unix-based system. The super-user has the ability to view, modify, and delete any file on the system. Obviously, access to the super-user account must be guarded very closely. We will discuss ways to share some of these privileges with other user accounts later, but for now, we will be switching user accounts with the su command and using the super-user account.
[alice@sunshine shared]$ su -
Password: thisisasecret
[root@sunshine ~]#
Notice that the command prompt has changed – it shows your current username (root) and the dollar sign ($) has been replaced with a hash (#). The hash sign is used as root's command prompt in many operating systems and shells – whenever you see it, be extremely careful with the commands you type. A simple mistake can be disastrous when using the super-user account.
[root@sunshine ~]# [cd /home/shared
[root@sunshine shared]# [ls -laF
total 56
drwxr-xr-x.  5 root root        4096 Jan 29  2012  ./
drwxr-xr-x. 12 root root       36864 Feb 15 19:57  ../
drwxr-xr-x.  6 root root        4096 Jan 29  2012  academic_affairs/
drwxr-xr-x.  5 root root        4096 Jan 29  2012  business_finance/
drwxr-xr-x.  2 root legal_grp   4096 Jan 29  2012  legal/
-rw-r--r--   1 root root        3969 May 29 10:20  README
[root@sunshine shared]# [chmod 775 legal
[root@sunshine shared]# [ls -laF
total 56
drwxr-xr-x.  5 root root        4096 Jan 29  2012  ./
drwxr-xr-x. 12 root root       36864 Feb 15 19:57  ../
drwxr-xr-x.  6 root root        4096 Jan 29  2012  academic_affairs/
drwxr-xr-x.  5 root root        4096 Jan 29  2012  business_finance/
drwxrwxr-x.  2 root legal_grp   4096 Jan 29  2012  legal/
-rw-r--r--   1 root root        3969 May 29 10:20  README
The permissions on the legal directory have been changed from drwxr-xr-x to drwxr-wxr-x In simple terms, the group write permission has been added, so any member of the legal_grp group can now read and write files in this directory.
Access control lists
The standard UNIX file permissions are very powerful, but their main weak point is that each file can only be owned by one user and group at a time. If you have multiple people that need to have differing levels of access to a file, UNIX file permissions are not enough. You must take advantage of the filesystem Access Control Lists (ACLs) provided by most modern UNIX operating systems. Here is an example: say you have a file that you want to give two users read and write access to and you also want to give read-only access to a separate group of users, all other users should have no access. With standard file permissions, this isn't possible but it is relatively easy using the setfacl command.
[root@sunshine ~]# cd /opt/book/system-admin/access_control
[root@sunshine access_control]# ls -laF
total 52
drwxr-xr-x  5 root root       4096 Jan 29  2012 ./
drwxr-xr-x 12 root root      36864 Feb 15 19:57 ../
-rw-r--r--  1 root root      43836 May 29 10:06 document.txt
[root@sunshine access_control]# chmod 600 document.txt
[root@sunshine access_control]# ls -laF document.txt
-rw-------  1 root root      43836 May 29 10:06 document.txt
[root@sunshine access_control]# setfacl -m u:alice:rw document.txt
[root@sunshine access_control]# setfacl -m u:bob:rw document.txt
[root@sunshine access_control]# setfacl -m g:legal_grp:r document.txt
[root@sunshine access_control]# setfacl -m o-: document.txt
The setfacl -m command takes two arguments, the first is the ACL to apply and the second is the file that the ACL should be applied to. The ACL entry is broken up into three fields separated by colons.
The first field indicates what type of entry this ACL is:
u User – modifies file access for a single user
g Group – modifies file access for a group of users
o Others – modifies file access for all users that have not been granted access through a user or group ACL
The second field indicates whom this ACL applies to. In the case of user and group ACLs, this will be the name of the user or group, respectively. In the case of an ACL applied to “others,” this field is left empty.
Finally, the third field is the list of permissions that should be granted by this ACL. Like the chmod command, setfacl uses symbolic notation for expressing read (r), write (w), and execute (x) access.
The getfacl command lists the ACLs that have been set on a file.
[root@sunshine access_control]# getfacl document.txt
# file: document.txt
# owner: root
# group: root
user::rw-
user:alice:rw-
user:bob:rw-
group::---
group:legal_grp:r--
mask::rw-
other::---
You can also see if ACLs have been applied to a file using ls -l
[root@sunshine access_control]# ls -laF document.txt
-rw-------+ 1  root root      43836   May  29 10:06 document.txt
The plus symbol in the final column of the permissions indicates the presence of ACLs.
File ownership
Let's take another look at the output from ls –l
[root@sunshine ~]# cd /home/shared
[root@sunshine shared]# ls -laF
total 56
drwxr-xr-x.  5 root root       4096 Jan 29   2012  ./
drwxr-xr-x. 12 root root      36864 Feb 15  19:57  ../
drwxr-xr-x.  6 root root       4096 Jan 29   2012  academic_affairs/
drwxr-xr-x.  5 root root       4096 Jan 29   2012  business_finance/
drwxr-xr-x.  2 root legal_grp  4096 Jan 29   2012  legal/
-rw-r--r--   1 root root       3969 May 29  10:20  README
Column 3 reports the file owner, the user that either created the file or had ownership transferred to him/her by the previous owner or an administrator. Similarly, the fourth column lists the group that file belongs to. This normally defaults to the creator's group when a file is created; however, we will learn how to affect what default group is used later in the chapter.
Changing ownership
To change the owner and group of a file, you will use the chown and chgrp commands, respectively. In this example, we will change the ownership of /home/share/README to the user dave and group library_grp
[root@sunshine shared]# cd /home/shared
[root@sunshine shared]# chown dave README
[root@sunshine shared]# chgrp library_grp README
[root@sunshine shared]# ls -laF
total 56
drwxr-xr-x.  5 root root         4096 Jan 29  2012 ./
drwxr-xr-x. 12 root root        36864 Feb 15 19:57 ../
drwxr-xr-x.  6 root root         4096 Jan 29  2012 academic_affairs/
drwxr-xr-x.  5 root root         4096 Jan 29  2012 business_finance/
drwxr-xr-x.  2 root legal_grp    4096 Jan 29  2012 legal/
-rw-r--r--   1 dave library_grp  3969 May 29 10:20 README
Editing files
Now that you can see the contents of file, you need to know how to create and edit files yourself. There are literally hundreds of programs available for editing files,9 from the simplest command-line text editors to graphical programs that can rival Microsoft Word in features. However, over the course of your career, you will be using many different types and versions of Unix-based operating systems and your favorite editor may not be available on all of them. There is only one editor that is included with all Unix-based systems: vi
The six editor?
The first thing you must know about vi is how to pronounce it. Don't try to pronounce it like the word ‘vie’ and never read it as a roman numeral six (VI), just say each letter separately (vee-eye). One more thing – Unix users typically use vi as a verb (“vi this file”) instead of a noun (“open this file in vi”).
vi was written by Bill Joy in 1976 and has been an integral part of Unix operating systems since it was released with BSD Unix in 1979. It's gone through many changes and rewrites since then and has been ported (rewritten to work on another hardware or operating system) to every major operating system released since then. Because it exists on so many systems, vi is the de facto standard for text editing. Although features have been added to the various versions of vi, there are a standard set of functions that all versions employ.
This text will stay within those standard functions, but all examples will be drawn from the main version of vi used on Linux, vim (vi improved).
vi basics
Many people are intimidated when they open vi for the first time. There are no menus or help of any kind and there is generally very little information displayed. To help first time users of vi, a short tutorial program (vimtutor) was developed. It takes you through all of the basic vi functions and introduces you to some of features that make vi an indispensible tool even 35 years after its initial development. It is highly recommended that you complete the vimtutor exercise for your own personal benefit.10
[alice@sunshine ~]$ vimtutor
This command will bring up vimtutor, as shown in Figure 3.4.
vi and Gmail
Many users are not aware of the many keyboard shortcuts available in Gmail.11 On closer inspection, some of these keyboard shortcuts seem to have been inspired by the corresponding vi shortcuts. Examples include / to search, k to move to newer conversation, and j to move to older conversation.
Software installation and updates
In the Linux world, applications are often called packages. Some of the most important day-to-day functions of a system administrator are to install new software and keep the software packages on all servers upgraded. The can be a challenge because of the sheer number of packages that make up a typical server operating system. Even a relatively basic Linux installation, such as the one used for the exercises in this book, includes well over a thousand separate packages.

Package formats
If you have never worked with UNIX-based operating systems, you may not be familiar with software packages. In Microsoft Windows and Mac OSX, operating system updates are commonly distributed as large bundles, which update many pieces of the operating system at one time. Similarly, application updates on those platforms are distributed as one installer file that replaces multiple files contained in the old version of the application.
Linux and most of the other UNIX-based operating systems distribute operating system and application updates as software packages. Instead of packaging all of the files needed by an application into a single file, applications are split into smaller components that could be reused by other applications. These components are then turned into software packages. Each package includes a list of dependencies – packages that must be installed before this package can be installed correctly. These dependency lists can get extensive, even for applications that seem fairly simple. As an example, enter this command to see the list of dependencies for the Firefox browser. You will see that firefox depends on many other packages:
[alice@sunshine ~]$ repoquery --requires firefox
The YUM package manager
CentOS Linux includes the yum package manager to assist the system administrator in the tasks of installing new packages, tracking dependencies, and updating packages. Yum works by building a database of the currently installed RPM packages on the system and then comparing them to online package repositories, HTTP or FTP sites that contain all of the packages that have been released. To ensure that repositories are always available and packages can be downloaded quickly, the files are replicated between hundreds of servers around the world.12 Each of these “mirrors” of the main repository contains all of the files of the original and can be used for all installation or update procedures. Before downloading any files, yum automatically tests the download speed for the mirrors that are available and selects the one that is the fastest.
yum install and yum remove
yum install downloads the requested package(s) and any package dependencies from a package repository. As an example, let's install the gnome-games package, which includes a few games such as Solitaire and Sudoku.
[root@sunshine ~]# yum install gnome-games
Loaded plugins: fastestmirror, refresh-packagekit, security
Loading mirror speeds from cached hostfile
 * base: mirrors.gigenet.com
 * extras: mirrors.gigenet.com
 * updates: centos.mirror.choopa.net
Setting up Install Process
Resolving Dependencies
--> Running transaction check
---> Package gnome-games.i686 1:2.28.2-2.el6 will be installed
[Output shortened to conserve space]
Dependencies Resolved
=============================================================
==================================
 Package         Arch              Version
Repository        Size
=============================================================
==================================
Installing:
 gnome-games     i686              1:2.28.2-2.el6            base
3.3 M
Installing for dependencies:
 clutter         i686              1.0.6-3.el6               base
320 k
 ggz-base-libs   i686              0.99.5-5.1.el6            base
189 k
 guile           i686              5:1.8.7-5.el6             base
1.4 M
Transaction Summary
=============================================================
==================================
Install       4 Package(s)
Total download size: 5.1 M
Installed size: 18 M
Is this ok [y/N]: y
Downloading Packages:
(1/4): clutter-1.0.6-3.el6.i686.rpm
| 320 kB     00:00
(2/4): ggz-base-libs-0.99.5-5.1.el6.i686.rpm
| 189 kB     00:00
(3/4): gnome-games-2.28.2-2.el6.i686.rpm
| 3.3 MB     00:03
(4/4): guile-1.8.7-5.el6.i686.rpm
| 1.4 MB     00:01
----------------------------------------------------------------------
------------------------
Total                                                         744 kB/s
| 5.1 MB     00:07
[Output shortened to conserve space]
Installed:
  gnome-games.i686 1:2.28.2-2.el6
Dependency Installed:
   clutter.i686  0:1.0.6-3.el6   ggz-base-libs.i686   0:0.99.5-5.1.el6
guile.i686 5:1.8.7-5.el6
Complete!
[root@sunshine ~]# gnome-sudoku
The three default package repositories (base, extras, and updates) are listed along for the mirror that was chosen as the fastest for that repository. yum then downloaded the list of dependencies for gnome-games and compares that list to the packages that are already installed on this system. Then a list of all the packages that will be installed is presented to the system administrator. If the system administrator wishes to continue, the packages are installed and the application is ready to be used.
If a package is no longer needed, the yum remove command will delete the package and any packages that depend on it. Obviously, great care must be taken while using the yum remove command to ensure that packages that are necessary to the function of the server are not affected.
[root@sunshine ~]# yum remove gnome-games
Loaded plugins: fastestmirror, refresh-packagekit, security
Setting up Remove Process
Resolving Dependencies
--> Running transaction check
---> Package gnome-games.i686 1:2.28.2-2.el6 will be erased
--> Finished Dependency Resolution
Dependencies Resolved
=============================================================
==================================
 Package                  Arch                Version
Repository      Size
 =============================================================
==================================
Removing:
 gnome-games              i686               1:2.28.2-2.el6         @base
14 M

Transaction Summary
=============================================================
==================================
Remove        1 Package(s)

Installed size: 14 M
Is this ok [y/N]: y
Downloading Packages:
Running rpm_check_debug
Running Transaction Test
Transaction Test Succeeded
Running Transaction
  Erasing     : 1:gnome-games-2.28.2-2.el6.i686
1/1
Removed:
  gnome-games.i686 1:2.28.2-2.el6
Complete!
yum list and yum search
We've seen that the yum install command allows you to install new packages, but how do you know what packages are available? The yum list command will display all of the packages that are available and yum search allows you to search for packages whose title and/or description contain your search terms.
[root@sunshine ~]# yum list
Loaded plugins: fastestmirror, refresh-packagekit, security
Loading mirror speeds from cached hostfile
 * base: mirrors.gigenet.com
 * extras: mirrors.gigenet.com
 * updates: centos.mirror.choopa.net
Installed Packages
ConsoleKit.i686               0.4.1–3.el6                    @anaconda-
CentOS-201112130233.i386/6.2
ConsoleKit-libs.i686          0.4.1–3.el6                    @anaconda-
CentOS-201112130233.i386/6.2
ConsoleKit-x11.i686           0.4.1–3.el6                    @anaconda-
CentOS-201112130233.i386/6.2
[Output shortened to conserve space]
zlib-static.i686                             1.2.3-27.el6
base
zsh.i686                                     4.3.10-4.1.el6
base
zsh-html.i686                                4.3.10-4.1.el6
base

[root@sunshine ~]# yum search games
Loaded plugins: fastestmirror, refresh-packagekit, security
Loading mirror speeds from cached hostfile
 * base: mirrors.gigenet.com
 * extras: mirrors.gigenet.com
 * updates: centos.mirror.choopa.net
=== N/S Matched: games
=====================================================
gnome–games.i686 : Games for the GNOME desktop
gnome–games–extra.i686 : More games for the GNOME desktop
gnome–games–help.noarch : Help files for gnome-games
kdegames.i686 : KDE Games
kdegames–libs.i686 : Runtime libraries for kdegames
kdegames–devel.i686 : Header files for compiling KDE 4 game applications
yum update
The yum update command provides a simple way to scan all of the packages installed on a system, compare their versions to the latest available and report on the ones that need to be updated.
[root@sunshine ~]# yum update
Loaded plugins: fastestmirror, refresh–packagekit, security
Determining fastest mirrors
 * base: mirrors.gigenet.com
 * extras: mirrors.gigenet.com
 * updates: centos.mirror.choopa.net
base                                                   | 3.7 kB
00:00
extras                                                 | 3.5 kB
00:00
updates                                                | 3.5 kB
00:00
updates/primary_db                                     | 2.8 MB
00:03
Setting up Update Process
Resolving Dependencies
--> Running transaction check
---> Package firefox.i686 0:10.0.3-1.el6.centos will be updated
[Output shortened to conserve space]
Transaction Summary
=============================================================
=========================
Install       1 Package(s)
Upgrade      23 Package(s)
Remove        1 Package(s)
Total download size: 92 M
Is this ok [y/N]: y
Downloading Packages:
(1/24): firefox–10.0.4–1.el6.centos.i686.rpm           | 20 MB
00:24
(2/24): kernel–2.6.32–220.13.1.el6.i686.rpm            | 22 MB
00:30
(3/24): kernel–firmware–2.6.32–220.13.1.el6.noarch.    | 6.2 MB
00:07
(4/24): kpartx-0.4.9–46.el6_2.2.i686.rpm               | 45 kB
00:00
(5/24): libpng-1.2.49-1.el6_2.i686.rpm                 | 184 kB
00:00
[Output shortened to conserve space]
Complete!
As you'll notice, the output is very similar to yum install. One interesting thing to note is that yum update can install and remove packages in addition to upgrading them. As software packages are developed and updated, they may change the packages that they depend on or the packages may change names, requiring the old package to be removed and be replaced by the new one.
Account management
Depending on the environment that the system administrator is working in, account management may take up a large part of his/her time or almost no time at all. Some of the factors that impact the amount of user management that must be done are the total number of user accounts and the percentage of users that are added or removed on a regular basis. With organizations such as universities and large corporations, the number and complexity of account management tasks is much too great to process manually. In these situations, an Identity Management solution is used to build account management rules that can be applied automatically to all current and potential users. We will cover Identity Management in depth in a later chapter, but for now we will look at the procedures for manual account management.
User manager
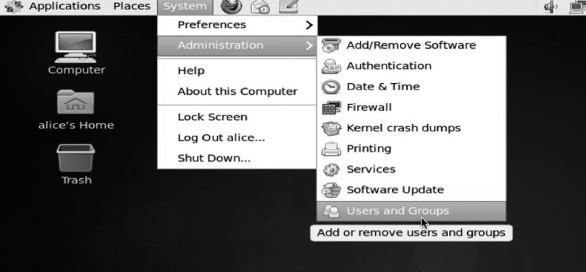
The easiest way to manage user accounts and group memberships in CentOS is to use the User Manager, a graphical tool included with a typical CentOS installation. You can start it by selecting “User and Groups” from the Administration menu (Figure 3.5).
The interface is very similar to the user administration pages included with Windows and Mac OSX (Figure 3.6). To add a new user, just click the “Add User” button and fill out the new user form. By default, the tool will generate a home directory for the user in the /home filesystem and issue the next available user and group id numbers. However, you can override this behavior and input custom values if needed. You can also delete a user by selecting the “Delete” button.
Finally, you can edit an existing account by selecting the account from the list and clicking on the “Properties” button. In the account editor, you can change any of the values set when the account was created. In addition, you can also modify some access control settings for the account, such as:
- Account Expiration – After this date, the account will not be allowed to authenticate. A system administrator must unlock the account for the user to regain access.
- Lock Local Password – If this setting is enabled, the user will not be able to authenticate with the password in /etc/passwd. However, external authentication (LDAP, Kerberos, NIS, etc.) is still allowed.
- Password Expiration – Settings for the minimum and maximum amount of time that can pass between changing passwords. Once the maximum amount of time has elapsed, a system administrator must unlock the account for the user to regain access.


- Force password change on next login – Action is self-explanatory. This setting is used frequently for new accounts. The system administrator creates an account with a known, simple password. When the user logs in for the first time, he/she is asked to change the password to a more secure one.
In addition to users, the “groups” tab in User Manager allows you to manage group creation, deletion, and membership changes (Figure 3.7). To add a new group, just select the “Add Group” button and input a name for the new group. You can also specify a custom group id number if necessary. Once a group is created, you'll need to add members to it. Select the group name from the list in the “Groups” tab and click on the “Properties” button. The window shown on the right will be displayed. Click on the checkbox next to each user that should be added as a member and then click OK. Your new group is now ready to be used.
Command-line user administration
The graphical interface of User Manager is very easy to use and could be used for virtually all user administration tasks; however, what can you do if that package isn't available or you are working on a system remotely over a dial-up connection? In these cases, the command-line-only terminal interface is the best option. The good news is that, on Unix, everything has a command-line equivalent. In fact, many graphical tools on Unix are just frontends to collect data from the user, run a command-line program and display the results.
The useradd, usermod, and userdel commands can be used in place of most of the user administration tasks in User Manager. Like several of the other commands we've discussed in this chapter, these commands have different capabilities depending on which operating system you are working on. The versions that are included with CentOS have a few advanced features that we could take advantage of, but we will demonstrate the features that are available across multiple platforms.
In this example, we will create a new user with the username “fred” and a home directory (-d) of “/home/fred.” We will also save their full name in the comment field of the password file (-c “Fred Flintstone”).
[root@sunshine ~]# useradd -c “Fred Flintstone” -m -d “/home/fred” fred
[root@sunshine ~]# ls -laF /home/fred
total 28
drwx------. 4 fred fred 4096 May  4 19:48 .
drwxr-xr-x. 9 root root 4096 May  4 19:48 ../
-rw-r--r--. 1 fred fred   18 May 10  2012 .bash_logout
-rw-r--r--. 1 fred fred  176 May 10  2012 .bash_profile
-rw-r--r--. 1 fred fred  124 May 10  2012 .bashrc
drwxr-xr-x. 2 fred fred 4096 Nov 11  2010 .gnome2/
drwxr-xr-x. 4 fred fred 4096 Jan 22 18:48 .mozilla/
Before the new user can login to the account, we'll need to set a password. When you use the useradd command, it leaves the password field blank, which effectively locks the account until a password is set. The passwd command allows you to set the password on an account to which you have the appropriate permissions to do so. While the example below shows the password, in practice, for security reasons, the password is not displayed. Also, since you will probably need to write the password down (on paper or in a email/file) to give it to the new user, you should require the user to change their password during their first login. In CentOS, you do this with the “-e” flag to the passwd command:
[root@sunshine ~]# passwd fred
Changing password for user fred.
New password: NewPasswordGoesHere
Retype new password: NewPasswordGoesHere
passwd: all authentication tokens updated successfully.
[root@sunshine ~]# passwd -e fred
Expiring password for user fred.
The user “fred” can now log into the system and access his files. Along with the “-e” flag, there are several useful access controls that the passwd command allows, such as locking (-l) and unlocking (-u) an account and setting the minimum (-n) and maximum (-x) password ages.
[root@sunshine ~]# passwd -l fred
Locking password for user fred.
[root@sunshine ~]# passwd -u fred
Unlocking password for user fred.
[root@sunshine ~]# passwd -n 1 -x 180 fred
Adjusting aging data for user fred.
To add the user as a member to existing groups, you can use the usermod command with the “-aG” flags and a comma-separated list of groups.
[root@sunshine ~]# groups fred
fred : fred
[root@sunshine ~]# usermod -a -G
coll_fine_arts_grp,vp_academic_aff_grp fred
[root@sunshine ~]# groups fred
fred : fred vp_academic_aff_grp coll_fine_arts_grp
You can also use the usermod command to modify several other options on the account, such as an expiration date (-e) and move their home directory (-md):
[root@sunshine ~]# usermod -e 2013-08-01 -md “/home/flintstone” fred
[root@sunshine ~]# ls -laF /home/flintstone
total 28
drwx------. 4 fred fred 4096 May  4 19:48 .
drwxr-xr-x. 9 root root 4096 May  4 19:48 ../
-rw-r--r--. 1 fred fred   18 May 10  2012 .bash_logout
-rw-r--r--. 1 fred fred  176 May 10  2012 .bash_profile
-rw-r--r--. 1 fred fred  124 May 10  2012 .bashrc
drwxr-xr-x. 2 fred fred 4096 Nov 11  2010 .gnome2/
drwxr-xr-x. 4 fred fred 4096 Jan 22 18:48 .mozilla/
Finally, userdel deletes a user account. By default, the user's home directory is not removed, but to remove it, add the “-r” flag.
[root@sunshine ~]# userdel -r fred
[root@sunshine ~]# ls -laF /home/flintstone
ls: cannot access /home/flintsone: No such file or directory
[root@sunshine ~]# groups fred
groups: fred: No such user
Group management
Along with the useradd, usermod, userdel commands, there are matching groupadd, groupmod, and groupdel commands for group management. Because groups have very few configurable options, these commands have fewer switches that are used. Groupadd and groupdel do not typically need any extra parameters other than the group to work on and the only option for usermod is for renaming (-n) a group. Group membership can be managed with groupmems, which includes switch for adding (-a), removing (-d), and listing all (-l) members of a group.
[root@sunshine ~]# groupadd new_group
[root@sunshine ~]# groupmems -a alice -g new_group
[root@sunshine ~]# groupmems -a bob -g new_group
[root@sunshine ~]# groupmems -l -g new_group
alice  bob
[root@sunshine ~]# man groupmod
[root@sunshine ~]# groupmod -n improved_group new_group
[root@sunshine ~]# groupmems -l -g improved_group
alice  bob
[root@sunshine ~]# groupmems -l -g new_group
groupmems: group ‘new_group’ does not exist in /etc/group
[root@sunshine ~]# groupdel improved_group
Example case–Northwest Florida State College
In October 2012, it was announced that personal information of over 300,000 people had been stolen from Northwest Florida State College. The institution, formerly a community college, serves about 17,000 students annually. Since its founding in 1963, the college has awarded almost 30,000 degrees.13
The affected population includes almost 200,000 people who may have had no connection to the college. Others affected include over 75,000 former or current students, and 3,200 current or retired employees. The 200,000 people unaffiliated with the institution are students who were eligible for Bright Futures scholarships in the school years beginning in 2005 and 2006. The compromised data included names, Social Security numbers (SSN), birthdates, gender, and ethnicity. In the case of employees, stolen data also included direct deposit routing and account numbers. At the time of the announcement, the school acknowledged that approximately 50 employees, including the college president, had reported issues with identity theft.
According to the college's investigations, conducted with the assistance of an outside consultant and an Okaloosa County Sheriff's Office cybercrimes expert, the breach occurred between May 21 and September 24, 2012. The college speculated that the breach was a “professional, coordinated attack by one or more hackers.”
The breach included a folder from the school's main server that included several files. While the institution had ensured that no one file had a complete set of personal information regarding individuals, once the hackers had access to the single server containing the files, they were able to piece together all the required information for at least 50 college employees.
The attackers used the stolen identities to take out payday loans from PayDayMax, Inc., as well as Discount Advance Loans (iGotit.com, Inc.), and used the stolen bank credentials to repay those loans. Both payday loan services are located in Canada. In addition, the stolen data were also used to apply for Home Depot credit cards under the employees’ names.
REFERENCES
Ragan, S. “Northwest Florida State College says clever attackers were successful in data breach,” SecurityWeek, October 10, 2012.
Bolkan, J. “Northwest Florida State College data breach compromises 300,000 students and employees,” Campus Technology, October 17, 2012.
SUMMARY
This chapter demonstrated many of the basic utilities used by system administrators. Reasonable familiarity with these utilities is a prerequisite for professional success in the information security field. It provided concrete examples of the system administration tasks discussed in the last chapter. The goal of this chapter was to provide a good understanding of Unix administration in general and the CentOS Linux distribution in particular. This knowledge will be the foundation of the technical discussions used throughout the rest of this course.
CHAPTER REVIEW QUESTIONS
- What is the function of the kernel?
- What is the shell? What shell program is present in all versions of UNIX? What is a shell prompt?
- What is the top of a filesystem hierarchy called? How is it represented in UNIX systems?
- What is a path? What is the difference between a relative and absolute path?
- What is the pwd UNIX command used for? What are some useful options with the command?
- What is the cd UNIX command used for? What are some useful options with the command?
- What is the ls UNIX command used for? What are some useful options with the command?
- What is the rm UNIX command used for? What are some useful options with the command?
- What is the mkdir UNIX command used for? What are some useful options with the command?
- List two commands you could use to change back to your home directory.
- What are wildcards (file name expansions)? Provide an example of how you may use one.
- What is recursion in the context of file operations? How is it helpful? Why should you be specially careful when using recursion in file commands?
- What would be a useful way to use the tail command to view log files?
- How would you use the find command to search for the “messages” folder, which you know exists in the /var folder?
- Given the following ls –l output, what do you know about the ownership and access permissions for the accounting folder?
drwxr-xr-x.  2   root  accounting_grp
4096 Jan 28 19:07 accounting/
- Given the ls output above, how can you use the chmod command to give write permissions to all members of “accounting_grp” to the “accounting” folder?
- What are access control lists? How are they used?
- What is the setfacl command used for?
- What is the getfacl command used for?
- Why is working knowledge of the vi editor important for IT administrators?
- Describe how a setuid executable file behaves when running.
- What would the owner of the .bashrc file have to do in order to be able to edit the file if its current permissions are 444?
- What is a software package? What are some common formats in which software packages are distributed?
- How can you search for all installed software packages on your system?
- How can you use the yum command to update all the software on your system?
EXAMPLE CASE QUESTIONS
- The college maintains a link to a web page detailing the college's ongoing response to the breach on its home page at http://www.nwfsc.edu/.14 Based on that information, what facts can you add to those detailed in the case description provided here?
- If your identity is compromised, what damage is possible to your personal life?
- What are the recommendations of the Federal Trade Commission (FTC) regarding the steps you should follow if your personal information has been compromised?
- What in your opinion are the three most important steps you can take to prevent identity theft in the first place?
HANDS-ON ACTIVITY–BASIC LINUX SYSTEM ADMINISTRATION
These activities are included to demonstrate your knowledge of the commands learned in this chapter. Using the Linux virtual machine you configured in Chapter 2, open a terminal window by selecting the “System Tools” panel under the “Applications” menu. After completing each exercise, submit the deliverables listed to your instructor.
1. Exercise 1
1.1. Change directories to /opt/book/system-admin
1.2. List all directory contents (including hidden files)
Deliverable: Take a screenshot of the directory contents
2. Exercise 2
2.1. Change directories to /opt/book/system-admin/ex2
2.2. Rename jeklyll.txt to hyde.txt
2.3. Make a copy of prince.txt named pauper.txt
2.4. Delete the directory Jacob.marley and all of its contents
Deliverable: Take a screenshot of the directory's contents
3. Exercise 3
3.1. Find the file named gettysburg.txt
3.2. Display the last three lines of text in gettysburg.txt
3.3. Find the file named declaration.txt
3.4. Display the first five lines of declaration.txt
Deliverable: Take a screenshot that contains the requested lines from gettysburg.txt and declaration.txt
4. Exercise 4
4.1. Create three new users:
- Name: Thomas Jefferson
- Username: thomas
- Password: Monticello
- Name: Abraham Lincoln
- Username: abe
- Password: 4score&7years
- Name: Benjamin Franklin
- Username: ben
- Password: Early2bedEarly2rise
4.2. Create three new groups:
- presidents (members: thomas, abe)
- continental_congress (members: thomas, ben)
- us_currency (members: thomas, ben, abe)
4.3. Make thomas the owner of the declaration.txt file from the previous exercise
4.4. Make abe the owner of the gettysburg.txt file from the previous exercise
4.5. Change the group ownership of declaration.txt to the continental_congress group and make it writable by that group. It should also be readable by all users
Deliverable: Take a screenshot of the owner/group file permissions for both files
5.1. Install the “xorg-x11-apps” package, a collection of common GUI tools
5.2. Run the command “xclock”
5.3. Open a new terminal window and run the command “yum list xorg-x11-apps”
Deliverable: Take a screenshot of the terminal and xclock windows
6. Exercise 6
6.1. Update all the RPM packages currently installed on the system
Deliverable: Take a screenshot of the first line from /etc/issue
CRITICAL THINKING EXERCISE–OFFENSIVE CYBER EFFECTS OPERATIONS (OCEO)
Among the documents that Edward Snowden, the contractor working at the NSA, released after quitting the agency was Presidential Policy Directive 20 (PPD20), issued on October 2012. Among other things, 18-page top-secret memo defined the role of “offensive cyber effects operations” (OCEO). OCEO was defined as “Operations and related programs or activities other than network defense, cyber collection, or DCEO – conducted by or on behalf of the United States Government, in or through cyberspace, that are intended to enable or produce cyber effects outside United States Government networks.”
The description of OCEO in PPD 20 states the following:
OCEO can offer unique and unconventional capabilities to advance US national objectives around the world with little or no warning to the adversary or target and with potential effects ranging from subtle to severely damaging. The development and sustainment of OCEO capabilities, however, may require considerable time and effort if access and tools for a specific target do not already exist.
The United States Government shall identify potential targets of national importance where OCEO can offer a favorable balance of effectiveness and risk as compared with other instruments of national power, establish and maintain OCEO capabilities integrated as appropriate with other US offensive capabilities, and execute those capabilities in a manner consistent with the provisions of this directive.
You are entering into the professional world operating in this environment.
REFERENCES
Bruce Schneier's Cryptogram, July 15, 2013
Schneier, B. “Has U.S. started an Internet war?”, CNN, 2013, http://www.cnn.com/2013/06/18/opinion/schneier-cyberwar-policy (accessed 07/16/2013)
The Guardian, “Obama tells intelligence chiefs to draw up cyber target list – full document text”, 2013.
CRITICAL THINKING QUESTIONS
- In plain terms, what is OCEO?
- What are some activities that may constitute OCEO?
- What are some likely repercussions to information security professionals working within the United States (and probably also outside the United States), now that everyone is aware of PPD20?
DESIGN CASE
You are called to take a look at a professor's Linux workstation. The machine is brand new, with a fast processor and lots of memory, but it has been running extremely slow the past week or so.
One of the first things you know to do when looking at performance issues on a UNIX box is to run a ps command, which stands for “processor status.” The command output lists all the processes running on the workstation and some additional information about their status.
The output of the ps command lists all the standard operating system processes you expect to see running, but you also see a few more processes look a bit out of the ordinary:
- /home/taylor/.sh, running as root
- /home/taylor/…/ncftpd, using up a lot of CPU and disk I/O
The /home/taylor directory is the home directory of the professor, Dr. Taylor. Here is some additional information you gathered during your investigation:
- Permissions on /home/taylor/.sh are set to 7551
- The file is owned by root
- It's “MD5 hash” is identical to /bin/bash, which means the files are the exactly same.
- The /home/taylor/… directory contains two files:
- the ncftpd file you found running previously with the ps command
- general.cf file, owned by taylor, permission 644
- domain.cf file, owned by taylor, permission 644
- The general.cf file contained, among other lines:
- log-xfers = yes
- port = 80
- The domain.cf file led you to a log file. Here is the output of the “head -7” command on the log file:
2012-04-20 23:30:59 ### | S,/var/tmp/pub/
StarWars.avi, ...
2012-04-20 23:35:59 ### | S,/var/tmp/pub/
Conan.avi, ...
2012-04-20 23:37:59 ### | S,/var/tmp/pub/
Avatar.avi, ...
2012-04-21 00:37:59 ### | R,/var/tmp/pub/
Avatar.avi, ...
2012-04-21 00:37:59 ### | R,/var/tmp/pub/
Avatar.avi, ...
2012-04-21 01:37:59 ### | R,/var/tmp/pub/
Avatar.avi, ...
2012-04-21 02:35:59 ### | R,/var/tmp/pub/
Conan.avi, ...
Write a report on what you believe was the issue with the workstation and suggested steps to resolve the problem, based on what you know.
Guiding questions
The workstation was definitely hacked. Dr. Taylor claims he has no idea who put the programs there. There are two different issues with what you found. One affects the performance of the machine. The other is a bit more serious and should impact your final advice on what to do with the box.
- Discuss the .sh program you found in his home directory.
- What happens when a “standard” user such as taylor runs that program.
- Is a non-administrator user able to change the ownership of a file to root?
- Is a non-administrator user able to change the permission of a file to add setuid?
- What does that say about the user who put the file there in the first place?
- What is the ncftpd program? Do some research on the web if you have to.
- What do you think was the purpose of the program?
- Do you have an educated guess as to when the program was installed or started its operations?
- Based on what you know, what should be done with this workstation, and why?
And the bonus questions:
- What does the port 80 line in the configuration file mean?
- Why was it set that way?
1http://en.wikipedia.org/wiki/Unix_shell
2http://www.faqs.org/faqs/unix-faq/shell/csh-whynot/
3Rosenblatt, B. Learning the Korn Shell. (O'Reilly), 1993.
4http://www.gnu.org/software/bash/manual/bashref.html#What-is-Bash_003f
5http://technet.microsoft.com/en-us/library/bb978526.aspx
6http://social.technet.microsoft.com/wiki/contents/articles/exchange-2010-powershell-scripting-resources.aspx
7http://support.google.com/mail/bin/answer.py?hl = en&answer = 6594
8http://en.wikipedia.org/wiki/Filesystem_permissions#Symbolic_notation
9http://freecode.com/search?q = text+editor&submit = Search
10See vi keyboard shortcuts at http://www.viemu.com/a_vi_vim_graphical_cheat_sheet_tutorial.html
11http://support.google.com/mail/bin/answer.py?hl = en&answer = 6594
12http://www.centos.org/modules/tinycontent/index.php?id = 30
13As of the latest fact-book at the time of this writing (2010–2011)