
Security is an important consideration when designing and implementing a business solution with Microsoft SharePoint. You don’t want users who haven’t been granted the proper permissions to be able to view or edit sensitive pages, items, or documents. At the same time, you need to ensure that users with the proper permissions can access what they need. Although SharePoint goes a long way toward providing out-of-the-box security features that allow site owners to configure access rights within a site collection, a SharePoint developer should know how SharePoint security works behind the scenes, as well as how to extend the SharePoint security model with custom code.
Authentication is the process of determining the identity of a user. The most common mechanism for authenticating users is to use Microsoft Windows accounts stored in Active Directory Domain Services (AD DS). This authentication first happens when a user logs on to the computer and results in an identity for the user on the network known as a security principal. This security principal is subsequently associated with any threads that the user initiates through applications on the desktop. If a user is authenticated against a Windows account, you can use the System.Security namespace in an application to retrieve the identity and the user’s logon name.
WindowsIdentity identity = WindowsIdentity.GetCurrent;
string WindowsLogin = identity.Name;
ASP.NET websites can use AD DS for authentication as well as other repositories through Forms-Based Authentication (FBA). Authentication in these applications is performed by Internet Information Services (IIS) when the user accesses a page. The System.Web.HttpContext.User object provides an IPrincipal interface that abstracts away the dependency on the repository used for authentication. The following code shows how to retrieve the identity of the current user and her logon name.
IPrincipal aspUser = HttpContext.Current.User;
string aspUserName = aspUser.Identity.Name;
Claims authentication, another authentication mechanism, can be used with AD DS or with other repositories in a manner similar to FBA. The difference between FBA and claims authentication is that claims authentication is performed using a Security Token Service (STS) instead of IIS. The value of using an STS is that it separates authentication from the application, thus supporting federation between organizations that are not in the same domain. Claims authentication is covered in more detail later in the chapter, but we introduce it here to enable a broader discussion of authentication and authorization.
IPrincipal interfaces obtained from ASP.NET Web applications that utilize claims authentication may be cast to a Microsoft.IdentityModel.Claims.IClaimsIdentity interface. Using the IClaimsIdentity interface, you may retrieve the name of the current user as shown in the following code.
IClaimsIdentity claimsUser = (IClaimsIdentity)Page.User.Identity;
string claimsUserName =  claimsUser.Name;
SharePoint does not perform any authentication on its own. Instead, SharePoint relies on IIS and STS to perform authentication. When SharePoint is configured to use Classic Mode, IIS and the operating system of the Web server authenticates the user against a Windows user account. When SharePoint is configured to use Claims Mode, an STS authenticates the user against either AD DS or some other repository such as Microsoft SQL Server. Because SharePoint is an ASP.NET application, you will always be able to obtain an IPrincipal interface for the current user. If SharePoint is operating in Claims Mode, then you may also cast this interface to the IClaimsIdentity interface.
Once a user is authenticated and her identity is known, the user needs to be authorized to access resources. Authorization is the process of determining what resources are available to an authenticated user. Authorization is typically performed by the application itself, which maintains some form of access control list (ACL) for each securable resource in the application. The ACL associates some aspect of the authenticated user (such as account name) with permissions defined for a securable resource. Windows applications use the WindowsPrincipal object to create an identity and perform authorization.
WindowsIdentity identity = WindowsIdentity.GetCurrent;
WindowsPrincipal principal = new WindowsPrincipal(identity);
if( principal.IsInRole(@"WINGTIPEMPLOYEES") ){
  // Authorized!
}
The ASP.NET User object also provides a way to check to see if a user belongs to a particular role using the IsInRole method. For Windows users, the IsInRole method lets you see whether the current user is a member of an AD DS group. If you are using FBA accounts along with an ASP.NET role provider, you can also use the IsInRole method to check whether the FBA user has been added to a specific ASP.NET role, as shown in the following code.
IPrincipal aspUser = HttpContext.Current.User;
if(aspUser.IsInRole("Site Administrators") {
  // Authorized!
}
When an STS authenticates a user, it can also issue additional claims that become part of the user’s identity. Issued claims may be accessed through the ClaimCollection class. Each claim in the collection is represented by a Claim object, which has properties such as ClaimType and Value. ClaimType can be thought of as the collection key that retrieves a claim value. Knowing this, authorization can be performed by checking for the existence of a claim, as shown in the following code.
IClaimsIdentity claimsId = (IClaimsIdentity)Page.User.Identity;
if(claimsId.Claims.Exists(C=>C.ClaimType.Equals("http://wingtip/groups")
                          && C.Value.Equals("Employees"))){
  //Authorized!
}
Although SharePoint does not perform authentication, it does manage user identities and perform authorization. The authorization objects in SharePoint abstract away the authentication mechanism so that the same approach works regardless of how authentication was performed. This simplifies security coding within your SharePoint solutions.
After authentication, SharePoint maintains a user security token, which identifies the authentication mechanism and a list of groups, membership roles for the user, or both. SharePoint is able to read the groups and membership roles of the current user very efficiently at run time by examining this token. The structure of this token varies depending on whether the user is authenticated in Classic Mode or Claims Mode.
When code runs within a custom SharePoint component, such as a Web Part or application page, it’s important that you distinguish between the SharePoint security context and the Windows security context. The SharePoint components that you write often must access external resources. Access to these external resources is controlled not by SharePoint, but rather by the application that owns the external resource, such as the Windows operating system itself. This means that you must be aware of the current Windows security context, as well as the SharePoint security context. The standard web.config file for SharePoint Web applications has the following entry.
<identity impersonate="true" />
By setting the impersonate attribute to true, SharePoint instructs the ASP.NET run time to process all requests under the Windows security context of the current user. When you write code for a Web Part or application page that attempts to access an external resource, such as a file system resource, database call, or Web service call, it runs under the impersonated Windows identity of the user initiating the request. This enables the Windows authorization subsystem to determine whether it should grant or deny access.
Understanding the Windows security context is fairly straightforward when you are using Classic Mode because the identity of the user is synchronized to the same user account as the identity of the SharePoint security context. However, things aren’t so obvious when you are using Claims Mode. Because claims authentication can use other repositories besides AD DS, the Windows security context may take on the identity of the IUSR_MACHINENAME account, or, more generically, whichever account is specified in the Authentication Methods dialog of IIS. This can be problematic when accessing external resources because the IUSR_MACHINENAME account typically will not have rights to external resources. In such cases, you may have to use the Secure Store Service (SSS), which is covered in Chapter 13.
SharePoint stores and maintains a user information profile for authenticated users at the site collection level. The user information profile can be seen and updated by selecting the My Settings menu item command from the Welcome menu in the upper-right section of the home page for a site. There is only one user information profile per user that extends across all the sites for a site collection. User profile information is maintained in a hidden list known as the User Information List. You can view this list by browsing to the Uniform Resource Locator (URL) http://[sitecollection]/_catalogs/users/simple.aspx. Here, you will find basic information, such as logon names and display names for the users.
Because the User Information List is just a standard SharePoint list, it may be accessed using the SPList object. Of course, you must have the appropriate permissions to access the list because it is a securable object that can be seen only by site collection administrators. The following code shows how to access the list and retrieve user information.
using (SPSite siteCollection = new SPSite("http://intranet.wingtip.com"))
{
  using (SPWeb topLevelSite = siteCollection.RootWeb)
  {
  foreach (SPListItem user in topLevelSite.Lists["User Information List"].Items) {
    _ID = user["ID"].ToString();
    _ContentType = user["ContentType"].ToString();
    _User = user["Title"] != null ? user["Title"].ToString() : "null";
    _Account = user["Name"] != null ? user["Name"].ToString() : "null";
    _ImnName = user["ImnName"] != null ? user["ImnName"].ToString() : "null";
    _EMail = user["EMail"] != null ? user["EMail"].ToString() : "null";
    _SipAddress = user["SipAddress"] != null ? user["SipAddress"].ToString() : "null";
    _IsSiteAdmin = user["IsSiteAdmin"] != null ? user["IsSiteAdmin"].ToString() : "null";
  }
}
The User Information List maintains only a subset of information about users. If you are using SharePoint Server and have the User Profile Service application configured to import profiles, then this information will be used to fill in the User Information List. Two timer jobs, User Profile to SharePoint Full Synchronization and User Profile to SharePoint Quick Synchronization, run to copy information from the user profiles to the User Information List. User profiles are updated either through synchronization with an external repository like AD DS or when the user manually enters information into the profile through the My Site interface.
You may access the information in the user profiles programmatically through the Microsoft.Office.Server.UserProfiles.UserProfileManager object. This object allows you to manage profiles and the data within them. The following code shows how to retrieve a profile.
using (SPSite site = new SPSite("http://intranet.wingtip.com"))
{
  SPServiceContext ctx = SPServiceContext.GetContext(site);
  UserProfileManager upm = new UserProfileManager(ctx);
  UserProfile profile = upm.GetUserProfile("WINGTIP\Administrator");
  Console.WriteLine(profile[PropertyConstants.WorkEmail].Value);
  Console.WriteLine(profile[PropertyConstants.FirstName].Value);
  Console.WriteLine(profile[PropertyConstants.PreferredName].Value);
  Console.WriteLine(profile[PropertyConstants.LastName].Value);
}There are two types of security principals within SharePoint: users and groups. The SharePoint object model defines the SPPrincipal class, which provides the base functionality for assigning permissions to a principal. The SharePoint object model subsequently defines two classes that derive from SPPrincipal: SPUser and SPGroup. These two classes extend this base class with their own unique methods and properties for working with users or groups.
The request of an authenticated user runs under the context of an SPUser object and carries a security token. When you create an object reference to an SPSite, SharePoint creates an instance of the SPUserToken and the SPUser. This always happens in the context of the site collection, and it is the user who creates the instance reference that SharePoint uses for authorization. As code attempts to access resources, SharePoint checks this user’s security token against ACLs to determine whether it should grant or deny access.
SharePoint objects may either use their own ACL or inherit the ACL of a parent object. By default, most items within the SharePoint object model inherit the parent’s ACL. For example, a newly created document library inherits the ACL of its parent site; and a newly created document automatically inherits the ACL of its parent document library. However, it’s also possible to configure any document with its unique ACL to give it an access control policy that differs from other documents within the same document library. This can be done through either the user interface or custom code. To return the parent object containing the ACL used by any securable object in SharePoint, call its FirstUniqueAncestorSecurableObject property.
It is important to note that SharePoint manages users and groups and enforces authorization at the scope of the site collection. Rights assigned to a user in one site collection never affect what the user can do in another site collection. It is by design that SharePoint treats each site collection as its own independent item with respect to authorization and access control.
The SharePoint object model tracks user identities by using the SPUser class. If you want to access the SPUser object for the current user, you use the CurrentUser property of the SPWeb object associated with the current site. The following simple example shows you how to access some of the properties available through the SPUser class.
SPUser currentUser = SPContext.Current.Web.CurrentUser;
string userName = currentUser.Name;
string userLogin = currentUser.LoginName;
string userEmail = currentUser.Email;
The current user is always the user who was authenticated when the SPSite site collection object was created. If your code is running in the SharePoint website context, this is the authenticated user. If your code is running in the context of a console application, the current user is the user whose Windows principal was used to create the initial SPSite reference. You cannot switch the security context of the site collection or its objects after it is created; it is always the user principal who first accessed the site collection that is the current user. We will look at the elevation of privilege, delegation, and impersonation later in this chapter to further illustrate this point.
Assigning permissions directly to users is usually not a scalable and maintainable solution, especially across large enterprises with many users and sites. Along with complicating user maintenance, as ACLs grow larger, they can decrease the performance of SharePoint significantly. This is not an issue unique to SharePoint; it is the same issue solved by AD DS users and groups for any other application. SharePoint solves the problem in the same way—by defining groups.
SharePoint supports the creation of groups within a site collection to ease the configuration of authorization and access control. Groups are never created in the context of the site—they are always created in the context of the site collection and assigned to a site. For example, assume that we have a site located at /wingtip/sales, and that the /wingtip/sales site reference is the current context returned from SPContext.Current.Web. Given this environment, SPWeb.Groups would return the group collection of the sales site. This would be a subset of the groups available in the site collection, which is available through the SPWeb.SiteGroups property. For example, the following code would return the groups Team Site Members, Team Site Owners, and Team Site Visitors.
using (SPSite siteCollection = new SPSite("http://localhost/wingtip/sales/"))
{
  using(SPWeb site = siteCollection.OpenWeb)
  {

    foreach(SPGroup group in site.Groups)
    {
      Console.WriteLine(group.Name);
    }
  }
}
Groups cannot be added to a site directly—they must be added to the site collection. If you try to add a group to the site’s Groups collection, you get an exception stating, “You cannot add a group directly to the Groups collection. You can add a group to the SiteGroups collection.” This situation occurs because SPGroup is always created at the Site Collection level and assigned to the site. The following code is valid and adds the WingtipSecurityGroup to the site collection groups.
// Adds a new group to the site collection groups
site.SiteGroups.Add("WingtipSecurityGroup",site.CurrentUser,
site.CurrentUser,"A group to manage Wingtip Security");
However, this still does not associate the group with our site, nor would it be useful within the site without any permissions. To add the group to the site, create a new SPRoleAssignment by associating an SPRoleDefinition with the SPGroup, and then add that role assignment to the site, as in the following code sample.
SPGroup secGroup = site.SiteGroups["WingtipSecurityGroup"];
SPRoleAssignment roleAssignment = new SPRoleAssignment(secGroup);
SPRoleDefinition roleDefinition = site.RoleDefinitions["Full Control"];
roleAssignment.RoleDefinitionBindings.Add(roleDefinition);
site.RoleAssignments.Add(roleAssignment);
As with Groups and SiteGroups, multiple collections can be used to access site users. Table 12-1 lists user-related properties of the SPWeb site object and when to use them.
Table 12-1. SPWeb User Properties
The application pool identity plays a large role in SharePoint applications. Besides running the Web application, this account is used as the Windows account that connects to the SharePoint Content and Configuration databases, and it is the Windows account used when running code in the SPSecurity.RunWithElevatedPrivileges method. When you create a new Web application through the SharePoint Central Administration application, you should create it to run inside a new or existing application pool, separate from the Central Administration application pool. Moreover, application pools for Web applications that are accessible to users should be configured with a domain account that is not as privileged as the user account for the Central Administration application pool. For example, there is no reason why SharePoint code running within any application pool other than the Central Administration application pool would ever need to create a new content database or configure database security permissions.
Consider what happens when you create a new Web application through the SharePoint Central Administration application. When you do this, you get to determine whether SharePoint creates a new application pool for this Web application or uses an existing application pool. If you tell SharePoint to create a new application pool, you must supply the name and password of a valid Windows user account. When SharePoint creates the new content database, it grants this user account the dbowner role for that content database. SharePoint also grants the database roles public and SharePoint_Content_Application_Pools to this user account in the configuration database. You should note that user accounts that provide application pool identities must also be added to two local groups named IIS_WPG and SharePoint_WPG, so that they have the proper permissions to access SharePoint system files and specific locations within the Windows Registry and IIS Metabase.
The SHAREPOINTSYSTEM account is an identity to which SharePoint maps internally when code is running under the identity of the hosting application pool. The SHAREPOINTSYSTEM account is not recognized by Windows because it exists only within the content of the SharePoint runtime environment. This enables SharePoint to use a statically named account for system-related activity regardless of which Windows user account has been configured for the hosting application pool.
For example, if you switch the application pool from WINGTIPSP_WorkerProcess1 to WINGTIPSP_WorkerProcess2, code running as system code still acts and is audited as the SHAREPOINTSYSTEM account. However, it is also important to remember that SHAREPOINTSYSTEM is not recognized by the Windows security subsystem. Therefore, code in SharePoint running as system code is recognized by any resource outside of SharePoint under the identity of the hosting application pool when it attempts to access external resources, such as the local file system or a SQL Server database.
The SPSecurity class provides a static method named RunWithElevatedPrivileges, which enables code to execute as system code running under the identity of SHAREPOINTSYSTEM. This allows code to run in an escalated security context to perform actions as the system. This method should be used with care and should not expose direct access to system resources; rather, it should be used when you need to perform actions on behalf of the system. The method is simple. You can either create a delegate to a public void method or simply write code within an inline delegate. The signature looks like the following:
SPSecurity.RunWithElevatedPrivileges(delegate
{
  // Code runs as the SHAREPOINTSYSTEM user
});
Code within the delegate runs under the SHAREPOINTSYSTEM security principal. As covered in the section entitled Application Pool Identities, earlier in this chapter, this account uses the application pool identity when passing credentials to external resources, but it uses the system account internally. To modify SharePoint content under the system credentials, you need to create a new SPSite site collection that generates a new security context for objects referenced from the site, as in the following example. You cannot switch the security context of the SPSite once it has been created, but must instead create a new SPSite reference to switch user contexts. The following code uses the system credentials to add a list item using the profile data of the current Web user.
SPSecurity.RunWithElevatedPrivileges(
  delegate {
    using (SPSite site = new SPSite(web.Site.ID)) {
      using (SPWeb web2 = site.OpenWeb) {
        SPList theList = web2.Lists["visitors"];
        SPListItem record = theList.Items.Add();
        record["User"] = SPContext.Current.Web.CurrentUser;
        record.Update();
     }
   }
);
Code running with the escalated privilege should use a new SPSite object for code running as the system and use the SPContext.Current property to access the actual calling user’s identity. The ElevatedPrivilegeWebPart shown in Example 12-1 demonstrates the importance of the SPSite site collection object in generating a security context.
Example 12-1. The Elevated Privilege Web Part demonstrates the security context of the SPSite object
using System;
using System.Web.UI.WebControls.WebParts;
using Microsoft.SharePoint;
using System.Security.Principal;
using System.Security;
using System.Security.Permissions;

namespace WingtipSecurity {

  [PermissionSet(SecurityAction.Demand)]
  public sealed class ElevatedPrivilegesWebPart : WebPart {

    protected override void RenderContents(System.Web.UI.HtmlTextWriter writer) {
      base.RenderContents(writer);
      SPWeb site = SPContext.Current.Web;
      // Impersonates SHAREPOINTSYSTEM:
      SPSecurity.RunWithElevatedPrivileges(delegate {
        // The windows user is SHAREPOINTSYSTEM:
        writer.Write("Elevated privilege Windows user: {0}<br/>",
          WindowsIdentity.GetCurrent.Name);
        // The site context is still the calling user's:
        writer.Write("site context user: {0}<br/>",
          site.CurrentUser.Name);
        // Open a new site security context using SHAREPOINTSYSTEM:
        using (SPSite siteCollection = new SPSite(site.Site.ID)) {
          using (SPWeb site2 = siteCollection.OpenWeb) {
            // The new site context is now SHAREPOINTSYSTEM:
            writer.Write("New site context user: {0}<br/>",
              site2.CurrentUser.Name);
          }
        }
      });
    }
  }
}
Elevated privilege is useful for either writing to restricted-permission lists or using the application pool credentials to access Windows authentication–secured Web services. Example 12-2 demonstrates the use of the system account to track visitors by writing to a restricted permission list. Regardless of the site privileges of the user, the system enters a visitor record in the Visitor list with the calling user’s identity profile while using the system account security principal for authorization.
Example 12-2. The Visitor Tracker Web Part demonstrates the RunWithElevatedPrivileges security method
using System;
using System.Collections.Generic;
using System.Text;
using System.Web.UI.WebControls.WebParts;
using Microsoft.SharePoint;
using System.Security.Permissions;

namespace LitwareSecurity {

  [PermissionSet(SecurityAction.Demand)]
  public sealed class VisitorTrackerWebPart : WebPart {

    [PermissionSet(SecurityAction.Demand)]
    protected sealed override void OnLoad(EventArgs e) {
      base.OnLoad(e);
      SPWeb site = SPContext.Current.Web;
      SPUser user = site.CurrentUser;
      const string listName = @"visitors";
      SPList visitorList = null;
      foreach (SPList alist in site.Lists) {
        if (alist.Title.Equals(listName,
          StringComparison.InvariantCultureIgnoreCase)) {
          visitorList = alist;
          break;
        }
      }
      if (visitorList == null) {
        // Uses the SHAREPOINTSYSTEM credentials
        SPSecurity.RunWithElevatedPrivileges(
          delegate {
            using (SPSite siteCollection =
              new SPSite(this.Page.Request.Url.ToString)) {
                using (SPWeb systemSite = siteCollection.OpenWeb) {
                  systemSite.AllowUnsafeUpdates = true;
                  Guid listID = systemSite.Lists.Add(listName,
                    "Site Visitors", SPListTemplateType.GenericList);
                visitorList = systemSite.Lists[listID];
                visitorList.Fields.Add("User", SPFieldType.User, true);
                visitorList.WriteSecurity = 4;
                visitorList.Update();
                systemSite.Update();
              }
            }
          });

      }
      // Uses the SHAREPOINTSYSTEM credentials
      SPSecurity.RunWithElevatedPrivileges(delegate {
        using (SPSite siteCollection =
          new SPSite(this.Page.Request.Url.ToString)) {
            using (SPWeb systemSite = siteCollection.OpenWeb) {
              SPList theList = systemSite.Lists[listName];
              SPListItem record = theList.Items.Add;
              record["User"] = user;
              record["Title"] = string.Format("{0} {1} {2}", user.Name,
              DateTime.Now.ToShortDateString(), DateTime.Now.ToShortTimeString());
              record.Update();
            }
          }
      });
    }
  }
}
Within application code running in the SharePoint Web application, the code runs under the credentials of the application pool while impersonating the calling user. This condition enables SharePoint to secure objects, including sites, lists, and list items, by using the calling user’s identity. Identity is configured automatically through the web.config setting <identity impersonate=“true” />. This is true for both the Web application and Web service endpoints. When calling Web services, you can use this identity to authenticate to remote endpoints by setting the credentials to the Default Credentials. Note that to pass credentials to back-end services, the SharePoint server must be set up with the rights to delegate credentials in AD DS. For Web service requests to the same box, delegation is not required. The following code example uses the credentials of the current user to authenticate a Web request against a Web data source.
WebRequest xmlReq = WebRequest.CreateDefault(xmlUri);
xmlReq.Credentials = CredentialCache.DefaultCredentials;
In addition to the current user’s credentials, you can access the application pool identity by using the SPSecurity method RunWithEscalatedPrivileges.
SPSecurity.RunWithElevatedPrivileges(delegate {
  WebRequest xmlReq = WebRequest.CreateDefault(xmlUri);
  // Uses the app pool credentials:
  xmlReq.Credentials = CredentialCache.DefaultCredentials;
});Two primary ways exist to create SPSite as a security context. One is to use the current Windows or claims identity, which is the default method whether you are accessing the site from the SharePoint Web application or an administrative console. This is also the method used with the SPSecurity.RunWithElevatedPrivileges delegate—the current principal, which happens to be SHAREPOINTSYSTEM, is used to create the site security context.
The other way to create SPSite is by using an SPUserToken object. The SPUserToken is the token created upon authentication. It references the principal of the user from the identity store with its groups and roles. In the case of a Windows identity, this token is used to query AD DS for the TokenGroups property. These tokens time out after 24 hours, making them a good candidate for system code that needs to impersonate users in the case of workflow actions or post-processing of list data that happens slightly after the original action (not days later). This token timeout value can be set by using the Windows PowerShell console. Using the user token in the constructor of SPSite enables the code to make changes to the SharePoint object model just as if the actual user were making the changes.
You can request the token for any user in the system by using the UserToken property of the SPUser class. If the current user is not the user requested, SharePoint builds the token independently from the user’s Security ID and group membership. You can then pass this token to the SPSite constructor to create a new impersonated security context.
For example, consider an event receiver attached to a custom list that will fire when new items are created. Each time a new item is created, the code will create an announcement with the credentials of the user in a separate Announcements list. To create the item under the impersonated security context, simply obtain a user token from the SPUser profile that created the object and pass that into the SPSite constructor. When the item is inserted into the Announcements list, it will be as if the impersonated user created the item, even though the event receiver is running under the identity of SHAREPOINTSYSTEM.
public override void ItemAdded(SPItemEventProperties properties) {
  DisableEventFiring();
  string CompanyName = properties.ListItem["Company"].ToString();
  properties.ListItem["Company"] = FormatStringValue(CompanyName);
  properties.ListItem.Update();

  SPUserToken token =
    properties.OpenWeb.AllUsers[properties.UserLoginName].UserToken;

  using( SPSite site = new SPSite(properties.SiteId, token) )
  {
      using(SPWeb web = site.OpenWeb(properties.WebUrl))
      {
        SPListItem announcement = web.Lists["Announcements"].Items.Add();
        announcement["Title"] = properties.ListItem["Company"].ToString();
        announcement["Body"] = "A new company was added!";
        announcement.Update();
      }
  }
Within this code sample, we are using the AllUsers property of the site. Users are available through a reference to the site (the SPWeb class). Three user collections are available within the site, and choosing which one to use may be confusing. See Table 12-1, earlier in this chapter, for a description of the options and guidance on when to use each one.
The SPWeb, SPList, and SPListItem classes in SharePoint inherit from the abstract class SPSecurableObject, which encapsulates the functionality necessary to secure them from unauthorized access. Table 12-2 lists the members of the SPSecurableObject class.
Table 12-2. SPSecurableObject Members
Member | Description |
|---|---|
Creates a unique role that does not inherit from the parent object | |
Checks to see if the current user has a given set of permissions | |
Indicates if a user has a specified set of permissions | |
Returns detailed information about the permissions for a specified user in the current context | |
Gets the effective permissions for a specified user in the current context | |
Removes unique permissions and inherits from the parent | |
Returns the roles for the current user | |
Gets the effective permissions for a specified user in the current object | |
Gets the object where inherited role assignments are defined | |
Indicates whether the object has unique role assignments or inherits from a parent object | |
Gets the access control list for the object | |
Gets the role assignments for the object |
SPSecurableObject provides a method for checking whether permissions exist, as well as a method for demanding that the permissions exist. The first method, DoesUserHavePermissions, is used to query for permissions and returns a Boolean value, whereas the second method, CheckPermissions, throws a security exception if the permission does not exist. Because this interface is common throughout the object model, it is easy to learn how to use it throughout your code. For example, to check whether the current user has permissions to view list items, you can call the DoesUserHavePermissions method of the SPWeb class, passing in the ViewListItems permission flag, as follows:
SPWeb web = SPContext.Current.Web ;
if (web.DoesUserHavePermissions(SPBasePermissions.ViewListItems){
    // Enumerate lists
}
The SPList is also an SPSecurableObject, which means that you can apply the same principles to checking permissions on lists. To check the user’s permission to view list items within a specific list, call the list’s DoesUserHavePermissions method as follows:
foreach(SPList list in web.lists){
  if (list.DoesUserHavePermissions(SPBasePermissions.ViewListItems))
    // Process the list
  }
}
Likewise, the same method is available in other objects, such as the SPListItem class, which can be used to ensure that the user has permissions to the item or document.
foreach(SPListItem item in list.Items){
  if (item.DoesUserHavePermissions(SPBasePermissions.ViewListItems)) {
    // Process the list item
  }
}
Rights within SharePoint are defined by permissions within the SPBasePermissions enumeration. This enumeration is a flags-based enumeration in which multiple permissions can be combined to create a permission set. SPBasePermissions are aggregated into roles with the SPRoleDefinitions within the site context, in which permissions are role-based. You will most likely assign a role when assigning permissions to a security principal; when validating rights for an action on a particular object, you will check the permission itself. To assign roles to a security principal, use the SPRoleDefinition class. By default, each site creates the following role definitions, exposing them through the Web’s RoleDefinition property: Full Control, Design, Contribute, Read, and Limited Access. These roles, along with their aggregated permissions, are listed in Table 12-3.
Table 12-3. Default SharePoint Site Roles
FullMask | |
ViewListItems, AddListItems, EditListItems, DeleteListItems, ApproveItems, OpenItems, ViewVersions, DeleteVersions, CancelCheckout, ManagePersonalViews, ManageLists, ViewFormPages, Open, ViewPages, AddAndCustomizePages, ApplyThemeAndBorder, ApplyStyleSheets, CreateSSCSite, BrowseDirectories, BrowseUserInfo, AddDelPrivateWebParts, UpdatePersonalWebParts, UseClientIntegration, UseRemoteAPIs, CreateAlerts, EditMyUserInfo | |
ViewListItems, AddListItems, EditListItems, DeleteListItems, OpenItems, ViewVersions, DeleteVersions, ManagePersonalViews, ViewFormPages, Open, ViewPages, CreateSSCSite, BrowseDirectories, BrowseUserInfo, AddDelPrivateWebParts, UpdatePersonalWebParts, UseClientIntegration, UseRemoteAPIs, CreateAlerts, EditMyUserInfo | |
ViewListItems, OpenItems, ViewVersions, ViewFormPages, Open, ViewPages, CreateSSCSite, BrowseUserInfo, UseClientIntegration, UseRemoteAPIs, CreateAlerts | |
ViewFormPages, Open, BrowseUserInfo, UseClientIntegration, UseRemoteAPIs |
Permissions are stored in the ACL for each SPSecurableObject and cached in the binary ReusableAcl property. The ACL defines permissions for all users in the site collection on each object. These permissions are always accessed from the object (you will remember that object references always are accessed through the user and always contain permission information). The following code checks for permissions on the list object and, based on the AddListItems permission, decides whether to let the user add items.
if (list.DoesUserHavePermissions(SPBasePermissions.AddListItems)){
    // Let the user add an item
}
The full SPBasePermissions enumeration is included in Example 12-3 for quick reference. You will see that there are both basic and advanced permissions that you can grant, not all of which are available as options in the user interface.
Example 12-3. The SPBasePermissions enumeration
[Flags]
public enum SPBasePermissions {
// Has no permissions on the Web site.
EmptyMask = 0,
// View items in lists and documents in document libraries.
ViewListItems = 1,
// Add items to lists, add documents to document libraries.
AddListItems = 2,
// Edit items in lists, edit documents in document libraries.
EditListItems = 4,
// Delete items from a list or documents from a document library.
DeleteListItems = 8,
// Approve a minor version of a list item or document.
ApproveItems = 16,
// View the source of documents with server-side file handlers.
OpenItems = 32,
// View past versions of a list item or document.
ViewVersions = 64,
// Delete past versions of a list item or document.
DeleteVersions = 128,
// Discard or check in a document which is checked out to another user.
CancelCheckout = 256,
// Create, change, and delete personal views of lists.
ManagePersonalViews = 512,
// Create and delete lists, add or remove columns or public views in a list.
ManageLists = 2048,
// View forms, views, and application pages. Enumerate lists.
ViewFormPages = 4096,
// Allows users to open a Web site, list, or folder.
Open = 65536,
// View pages in a Web site.
ViewPages = 131072,
// Add, change, or delete HTML pages or Web Part Pages.
AddAndCustomizePages = 262144,
// Apply a theme or borders to the entire Web site.
ApplyThemeAndBorder = 524288,
// Apply a style sheet (.CSS file) to the Web site.
ApplyStyleSheets = 1048576,
// View reports on Web site usage.
ViewUsageData = 2097152,
// Create a Web site using Self-Service Site Creation.
CreateSSCSite = 4194304,
// Create subsites such as team sites.
ManageSubwebs = 8388608,
// Create a group of users that can be used anywhere within the site collection.
CreateGroups = 16777216,
// Create and change permission levels on the Web site and users and groups.
ManagePermissions = 33554432,
// Enumerate files and folders in a Web site using Microsoft SharePoint Designer
// and Web DAV interfaces.
BrowseDirectories = 67108864,
// View information about users of the Web site.
BrowseUserInfo = 134217728,
// Add or remove personal Web Parts on a Web Part Page.
AddDelPrivateWebParts = 268435456,
// Update Web Parts to display personalized information.
UpdatePersonalWebParts = 536870912,
// Grants the ability to perform all administration tasks for the Web site as
// well as manage content.
ManageWeb = 1073741824,
UseClientIntegration = 68719476736,
// Use SOAP, Web DAV, or Microsoft SharePoint Designer interfaces.
UseRemoteAPIs = 137438953472,
// Manage alerts for all users of the Web site.
ManageAlerts = 274877906944,
// Create e-mail alerts.
CreateAlerts = 549755813888,
// Allows a user to change his or her own user information, such as adding a picture.
EditMyUserInfo = 1099511627776,
// Enumerate permissions on the Web site, list, folder, document, or list item.
EnumeratePermissions = 4611686018427387904,
// Has all permissions on the Web site.
FullMask = 9223372036854775807,
}You will generally secure objects, including sites and lists, by using the members of the SPSecurableObject class. If you need a simple check for permissions, you could also check properties of the current user, such as IsSiteAdmin, to ensure that the user is the site administrator. By default, the CheckPermissions method of the SPSecurableObject throws a security exception and sends an “Access Denied” message to the user; however, you may want to handle authorization failures yourself. The SPUtility class has several methods that are useful for handling authorization failures, including the SPUtility.Redirect method. The SPUtility.Redirect method can be used to send users to the Access Denied page by using the following syntax.
SPUtility.Redirect(SPUtility.AccessDeniedPage,
                 SPRedirectFlags.RelativeToLayoutsPage,
                 Context);
SPUtility also has a method that handles “Access Denied” exceptions and redirects the user to the “Access Denied” page. The SPUtility.HandleAccessDenied method takes an exception as a parameter and is used to handle SecurityExceptions.
try {
   // authorization code
} catch (SecurityException securityException) {
   SPUtility.HandleAccessDenied(securityException);
}
To check whether the user is a site administrator, you can use the EnsureSiteAdminAccess method of SPUtility. If the user is not a site administrator, SharePoint prompts for a site administrator credential. If the site administrator credential is not supplied, the user is transferred to the “Access Denied” page. Alternatively, you can also check the current user’s IsSiteAdmin property and redirect elsewhere.
Finally, SPUtility has a simple method to send an HTTP 401 (Access Denied) header to the user. To send a 401 message to the user, enabling the user to either supply new credentials or end up at the “Access Denied” page, use the SendAccessDeniedHeader method, as in the following code.
try {
   // authorization code
} catch (SecurityException securityException) {
   SPUtility.SendAccessDeniedHeader(securityException);
}Although Windows authentication is still the most widely used mechanism for authenticating users, it presents several challenges to developers and IT professionals. As users increasingly need to cross system and network boundaries, new standards are emerging to simplify authentication and identity management. These standards are embodied in claims authentication.
Each of the classic authentication mechanisms, such as NTLM, Kerberos, and FBA, has limitations that directly affect the design and implementation of SharePoint solutions. Furthermore, these limitations have a larger impact on the maintenance and operation of SharePoint sites in general. Specifically, classic authentication mechanisms present the following challenges, which are explained in more detail in the following sections:
Within any organization, custom ASP.NET Web applications, services, and SharePoint extranets often use forms-based authentication and have their own SQL Server database acting as a user repository. As a result, multiple user repositories can exist throughout an organization, which severely limits the interoperability of these systems. Furthermore, user maintenance can be extremely challenging because users must be added and removed from multiple repositories when staff changes.
In response to the challenges of multiple user repositories, many organizations have implemented AD DS as a single user repository. AD DS improves user management, but it still presents several limitations. These limitations involve the efficiency of querying AD DS and the management of identity between systems.
If AD DS is set up as the single user repository in an organization, then every application must query AD DS directly to authenticate users. Hopefully, these queries are efficient, but it would be easy for developers to write custom code inadvertently against the AD DS application programming interface (API) that causes performance problems for other applications. In addition, significant code rewrites may be necessary if directories from other organizations come into play, such as through a merger or acquisition.
Beyond simply querying for authentication, it can be difficult to manage user identity across systems and networks. It is quite common, for example, to see SharePoint use Windows authentication for users inside the firewall, but FBA for users outside the firewall. This is problematic because each authentication mechanism results in a separate identity. So if an employee logs on from home using FBA, he or she will not have the same identity as when logging in from work using Windows authentication.
Several workarounds exist today to solve various identity problems. Organizations can use a virtual private network (VPN) to allow users at home to access SharePoint using their Windows credentials. Organizations can also set up a Microsoft Internet Security and Acceleration (ISA) server that provides a forms-based logon while creating a true Windows identity. Third-party solutions, such as Citrix, can also be used to give remote users access to the network. These workarounds, however, fall short of a comprehensive solution to identity management across systems and networks. The answer to these problems lies in the implementation of claims authentication.
Claims authentication was introduced in the Microsoft .NET Framework 3.5 SP1 and is newly supported in SharePoint 2010. It is not a replacement for Windows authentication or FBA; rather, it is an authentication mechanism that can be used to federate identities across system and network boundaries. When a new Web application is created through Central Administration that uses Claims Mode authentication, the resulting IIS website is configured to be claims-aware. Claims-aware websites can still use classic repositories such as AD DS or SQL Server, but the user is also issued another claims token as part of the authentication process.
Claims authentication overcomes the current limitations of multiple repositories and centralized repositories by taking the task of authentication out of the application altogether. Under a claims authentication model, applications no longer need to worry about querying a user repository. Instead, the user arrives at the application with authentication already completed.
A common metaphor for claims authentication involves the issuing of a license and the purchase of alcohol. In this metaphor, a person (the user) wants to purchase alcohol from a store (the application). To purchase alcohol in the United States, the person must be 21 years old (the claim). At the point of purchase, the user presents a license (the token) to the clerk, who verifies the person’s age and sells the alcohol to him or her.
The key to understanding this metaphor is recognizing that the license was issued not by the store, but by the state. The authentication authority is completely independent of the application that uses the token to allow access. Of course, the entire transaction hinges upon the fact that the store trusts the state to issue a valid license with a correct birth date. Furthermore, the license can be used for authentication in multiple scenarios, like cashing a check or boarding a plane.
There are several advantages to this authentication model over the current models. First, a single authentication authority can be used across multiple applications. Second, applications do not have to query a repository. Third, the authentication authority can span systems and networks. Fourth, new authentication scenarios are supported that are simply not possible with current models.
Consider the following metaphor to understand how new scenarios are enabled by claims authentication. Instead of purchasing alcohol at a store, imagine that the person wants to gain access to a club that sells alcohol. In this case, the person presents the license to the bouncer, who trusts the license and its claim that the person is 21. In response, the bouncer stamps the person’s hand upon entry, so now the person can simply show the hand stamp to the bartender when ordering a drink.
The key to understanding this metaphor is that the hand stamp now represents a new claim added to the user upon authentication. The point here is that the central authority cannot know all the claims that every application wants to retain about a user. So the claims model allows for new claims to be added to the user after authentication. In subsequent resource requests, the application can simply look for the presence of the new claim and grant or deny access.
Microsoft’s claims authentication architecture is based on the Windows Identity Foundation (WIF). WIF is a set of managed classes available in .NET Framework 3.5 SP1. WIF provides the foundation for creating STS. An STS authenticates a user and issues the claims token that will be used to gain access to resources that trust the STS. WIF can also be used to create claims-aware sites and services.
At the enterprise level, an organization can implement Active Directory Federation Services (AD FS) 2.0. AD FS 2.0 can issue tokens and establish trust with other organizations and systems. Organizations that share trusts can share identities across network boundaries. AD FS also supports existing authentication mechanisms, so a move to claims authentication does not stop existing applications from functioning.
The claims-aware capabilities in SharePoint 2010 are built on WIF. SharePoint can use tokens issued by an STS to grant access to SharePoint resources. In addition, SharePoint has its own STS that can add claims to a token. This is the SharePoint version of the hand stamp token discussed earlier. Figure 12-1 shows the authentication process used with claims.

Authentication begins when the user makes a request to access a resource inside SharePoint. If the request does not already contain an appropriate token, SharePoint responds by redirecting the user to authenticate with the appropriate identity provider. Authentication could be done via a forms-based logon screen, a Live ID logon, or Windows authentication could authenticate the user, as described earlier in the chapter. In any case, successful authentication results in the identity provider’s issuing a token to the user with a given set of claims. Once this token is issued, a service request is made to the SharePoint STS, which responds by adding claims to the token. The token is then used to access the requested resource and the response is sent to the user. Future requests for resources can simply use the previously issued token. The issued token is implemented as a persistent, encrypted cookie named “FedAuth.” After authenticating to a claims-aware SharePoint site, you will see this cookie in the Temporary Internet Files on the client.
A user claim is represented by the Microsoft.IdentityModel.Claims.Claim object. This object defines critical properties that specify the issuer of the claim, the type of claim, the value type of the claim, and the value of the claim. Claims are essentially key-value pairs, with the key represented by the ClaimType property and the value represented by the Value property. A claim can hold any key-value pair, such as “Group”/“Employees,” “Age/21OrOlder,” and “ShowSize/10.” The set of claims is completely arbitrary and based on the needs of an application. The data type of the claim is further defined by the ValueType property. Along with the key and value, the claim contains information about the issuing authorities in the OriginalIssuer and Issuer properties. To understand claims better, it is helpful to display the claims of the current user. The following code shows how to access the claim types and values (known as the claim set) for the current user.
IClaimsIdentity claimsId = (IClaimsIdentity)Page.User.Identity;
writer.Write("<p>The current User is " + claimsId.Name, string.Empty + "</p>");

foreach (Claim claim in claimsId.Claims)
{
  writer.Write("<p>ClaimType" + claim.ClaimType + ": ClaimValue" +claim.Value);
}
This code can be implemented in a Web Part that can be dropped on a SharePoint page. Table 12-4 shows a typical output from such a Web Part, listing the claim types and values associated with a user accessing a site using Claims Mode against AD DS. Notice that claim types typically take the form of a Uniform Resource Indicator (URI), although that is not strictly necessary, and the values vary widely.
Table 12-4. A Typical Claim Set
Several of the claims in Table 12-4 are worthy of further examination. First, take note of the claims http://schemas.microsoft.com/sharepoint/2009/08/claims/userlogonname, http://schemas.microsoft.com/sharepoint/2009/08/claims/userid, and http://schemas.xmlsoap.org/ws/2005/05/identity/claims/name. The “userlogonname” looks familiar because it represents the Windows account that was used to authenticate the user and subsequently issue the token. Remember that the STS authenticates against a repository before the user is granted access to SharePoint. Once the user authenticates, however, SharePoint can add additional claims to the token. In this case, the “userid” and “name” claims were added, among others. These claims are used to create the SPUser object. Note, however, that the value for these claims seems very strange. In the table, we see it as “0#.w|wingtipadministrator.” In fact, if you programmatically access SPUser.LoginName, you will see it has exactly the same value. What’s going on?
Under claims authentication, the SPUser.LoginName is a claim. Also, remember that a claim is an object with multiple properties, such as ClaimType, ValueType, OriginalIssuer, and Value. The problem is that the Claim object must be stored in the LoginName property, but the property does not accept a Claim object. The solution is to encode the Claim and store it in the property. So what you see in the LoginName property is an encoded claim representing the identity of the current user.
The SharePoint object model provides several classes for working with claims. The Microsoft.SharePoint.Administration.SPClaim class is a SharePoint-specific class for creating and encoding claims. The constructor accepts four strings: claim type, value type, value, and issuer. The ToEncodedString method will encode the claim so that it can be compared to the LoginName of an SPUser. Alternately, an encoded claim may be decoded into an SPClaim object by using the DecodeClaim method of the SPClaimProviderManager. This is useful for taking the value of the SPUser.LoginName property and creating a SPClaim object.
In addition to the user identity, also note that the SharePoint security token is encoded as a claim value in the claim token. You can also see the references to membership in AD DS groups, as well as a specific claim indicating that the user was authenticated successfully.
For developers who are used to maintaining the security repository within the application, claims-based security can be disorienting initially. This is because much of the information necessary to perform authorization is maintained in the claims token, which is available only for the current user; you cannot access tokens for users who are not returned through SPContext.Current.Web.CurrentUser. Furthermore, you cannot query the user repository directly for information about users. Remember that the whole point of claims authentication is to remove authentication from the application. If you want information about other users, then you must retrieve it through the profiles or the AllUsers, SiteUsers, or Users collection.
When discussing the claims authentication process, we noted that applications may add other claims to a token following the initial authentication. We then showed the claim set for a typical token showing additional SharePoint claims. When making your own SharePoint solutions, you may also want to add more claims to the token that are specific to your needs. This can be accomplished by creating a custom claims provider. Custom claims providers are registered with SharePoint and called after a user successfully logs on to SharePoint, allowing you to add claims to the token. In addition, custom claims providers can be used to provide name resolution in the People Picker.
As an example of a custom claims provider, we are going to create a provider that will augment the user’s claim set with information about the audiences to which they belong. Having this information in the claim set will allow custom applications to make decisions based on audience membership. For the sample, the additional claims will look something like the following.
Claim Type: http://www.microsoft.com/identity/claims/audience
Claim Value: All site users
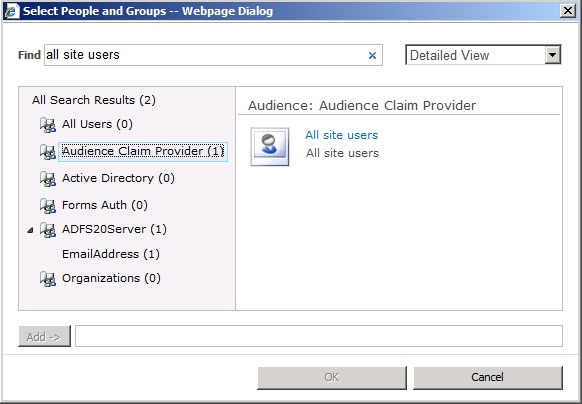
In addition to augmenting the claim set, the custom claim provider will also allow the People Picker to resolve audiences. This will allow the claim to be used as the basis for securing objects in SharePoint. Figure 12-2 shows how the provider allows you to search for audience claims and use them to secure objects just as you would with a standard SharePoint group.
A custom claims provider is created using a class that inherits from the abstract class Microsoft.SharePoint.Administration.Claims.SPClaimProvider. The class interface has several methods that must be implemented to get the provider working. You may create a provider that supports claims augmentation, name resolution, or both. You designate what features you support through the SupportsEntityInformation, SupportsHierarchy, SupportsResolve, and SupportsSearch methods. Returning true from SupportsEntityInformation means that your provider will augment claims. Returning true from SupportsHierarchy, SupportsResolve, and SupportsSearch means that your provider will define a new node in the People Picker, resolve claims, and search for claims based on wildcards, respectively.
Claims augmentation is implemented through the FillClaimsForEntity, FillClaimTypes, and FillClaimValueTypes methods. The FillClaimTypes and FillClaimValueTypes methods specify the claim types and value types that your provider will use. The following code shows the implementation for the sample.
protected override void FillClaimTypes(List<string> claimTypes) {
    if (claimTypes == null)
        throw new ArgumentException("claimTypes");
    claimTypes.Add(RoleClaimType);
}

protected override void FillClaimValueTypes(List<string> claimValueTypes) {
    if (claimValueTypes == null)
        throw new ArgumentException("claimValueTypes");
    claimValueTypes.Add(ValueType);
}
private static string RoleClaimType {
    get { return "http://www.microsoft.com/identity/claims/audience"; }
}

private static string ValueType {
    get { return Microsoft.IdentityModel.Claims.ClaimValueTypes.String; }
}
The FillClaimsForEntity method is called by SharePoint after an authenticated user is granted access. This method creates a new claim for each of the audiences and adds it to the claim set. All these claims will be added to the user’s claims token. If the only thing you need is claims augmentation, you are finished at this point.
protected override void FillClaimsForEntity(System.Uri context,
                                            SPClaim entity,
                                            List<SPClaim> claims)
{
    if (entity == null)
        throw new ArgumentNullException("entity");
    if (claims == null)
        throw new ArgumentNullException("claims");
    //Add audience claims
    using (SPSite ca = new SPSite(CentralAdminUrl))
    {
        SPServiceContext ctx = SPServiceContext.GetContext(ca);
        AudienceManager mgr = new AudienceManager(ctx);

        foreach (Audience audience in mgr.Audiences)
        {
            if (audience.IsMember(entity.Value))
                claims.Add(CreateClaim(RoleClaimType, audience.AudienceName, ValueType));
        }
    }
}
If you want to have the provider also support the People Picker, then you must implement FillSchema, FillHierarchy, and FillResolve. FillSchema is used by the People Picker to control the display of the entity. FillHierarchy is used to add nodes to the People Picker. FillResolve is used to search for claims and resolve them. The FillSchema method specifies the schema of the claim provider so that it may be properly displayed, as in the following code.
protected override void FillSchema(SPProviderSchema schema)
{
    schema.AddSchemaElement(new SPSchemaElement(
        "Audience", "Audience", SPSchemaElementType.Both));
}
The FillHierarchy method creates a new node in the People Picker. In this sample, we are not creating any new nodes. We are simply using the root node for the provider, which we get for free. The FillResolve method has two overloads. One is used when a term is entered into the keyword box, and the other is used in the advanced search interface shown previously in Figure 12-2.
protected override void FillResolve(System.Uri context, string[] entityTypes,
                                      SPClaim resolveInput, List<PickerEntity> resolved)
{
    if (resolveInput.ClaimType == (RoleClaimType))
        resolved.Add(CreatePickerEntityForAudience(resolveInput.Value));
}
protected override void FillResolve(System.Uri context,
                                      string[] entityTypes, string resolveInput,
                                      List<PickerEntity> resolved)
{
    List<string> audiences = new List<string>;
    using (SPSite ca = new SPSite(CentralAdminUrl))
    {
         SPServiceContext ctx = SPServiceContext.GetContext(ca);
        AudienceManager mgr = new AudienceManager(ctx);

        foreach (Audience audience in mgr.Audiences)
        {
            if (audience.AudienceName.StartsWith(resolveInput,
                  StringComparison.CurrentCultureIgnoreCase))
                audiences.Add(audience.AudienceName);
        }
    }

    foreach (string audienceName in audiences)
        resolved.Add(CreatePickerEntityForAudience(audienceName));
}
The key to implementing the FillResolve method is to add Microsoft.SharePoint.WebControls.PickerEntity objects to the generic list named resolved. PickerEntity objects added to this collection will appear in the People Picker interface. The following code shows a helper function for creating the appropriate PickerEntity object.
private PickerEntity CreatePickerEntityForAudience(string audience)
{
    PickerEntity entity = CreatePickerEntity;
    entity.Claim = CreateClaim(RoleClaimType, audience, ValueType);
    entity.Description = ProviderDisplayName + ":" + audience;
    entity.DisplayText = audience;
    entity.EntityType = SPClaimEntityTypes.FormsRole;
    entity.IsResolved = true;
    entity.EntityGroupName = "Audience";
    entity.EntityData["Audience"] = audience;
    return entity;
}
The FillSearch method allows users to enter a partial text string and return matching claims in the People Picker. The string is sent in as the searchPattern parameter, and the method adds matching claims to the searchTree. The following code shows the implementation for the sample.
protected override void FillSearch(System.Uri context, string[] entityTypes,
                 string searchPattern, string hierarchyNodeID, int maxCount,
                 SPProviderHierarchyTree searchTree)
{
    if (EntityTypesContain(entityTypes, SPClaimEntityTypes.FormsRole))
    {
        List<string> audiences = new List<string>;
        using (SPSite ca = new SPSite(CentralAdminUrl))
        {
            SPServiceContext ctx = SPServiceContext.GetContext(ca);
            AudienceManager mgr = new AudienceManager(ctx);

            foreach (Audience audience in mgr.Audiences)
            {
                if (audience.AudienceName.StartsWith(searchPattern,
                      StringComparison.CurrentCultureIgnoreCase))
                    audiences.Add(audience.AudienceName);
            }
        }

        foreach (string audienceName in audiences)
            searchTree.AddEntity(CreatePickerEntityForAudience(audienceName));
    }
}
To deploy and register the new claim provider with SharePoint, you must create a feature receiver. Unfortunately, the feature receiver created by the SharePoint developer tools in Visual Studio 2010 will not work with custom claims providers. Instead, you must create a separate class that inherits from Microsoft.SharePoint.Administration.Claims.SPClaimProviderFeatureReceiver. The thing to note here is how the FeatureActivated method calls the ExecBaseFeatureActivated method. This maneuver is necessary because there is a bug that will prevent the code from working properly if not wrapped in this way. The following code shows the implementation.
public class ProviderFeatureReceiver : SPClaimProviderFeatureReceiver
{
    private void ExecBaseFeatureActivated(SPFeatureReceiverProperties properties)
    { base.FeatureActivated(properties); }

    public override void FeatureActivated(SPFeatureReceiverProperties properties)
    { ExecBaseFeatureActivated(properties); }

    public override string ClaimProviderAssembly
    { get { return typeof(Provider).Assembly.FullName; } }

    public override string ClaimProviderDescription
    { get { return "Audience Claim Provider"; } }

    public override string ClaimProviderDisplayName
    { get { return "Audience Claim Provider"; } }

    public override string ClaimProviderType
    { get { return typeof(Provider).FullName; } }
}
Because the feature receiver was created by hand, you must also update the Feature.xml file by hand. The changes in the Feature.xml file just reflect the assembly and class that implement the receiver. The following code shows the Feature.xml file for the sample.
<Feature
    xmlns="http://schemas.microsoft.com/sharepoint/"
    ReceiverAssembly="AudienceClaims, [full assembly name]"
    ReceiverClass="AudienceClaims.ProviderFeatureReceiver"
    Id="9c87272e-28fd-473b-ae56-bd1c069a8814"
    Scope="Farm"
    Title="Audience Claims Provider">
</Feature>
Once the receiver is complete, the feature may be built, packaged, and deployed. When using a custom claims provider, it is useful to use a Web part to show the user’s claim set as well. In this way, you can verify that the provider is working correctly. In addition, you can debug the provider by attaching to the W3wp.exe process in Visual Studio.
Security is a major part of any application. In SharePoint 2010, security becomes more complex because of the introduction of claims authentication. SharePoint developers should work to master security at all levels, from the operating system through the application layer. Doing so will save a lot of time when developing and deploying solutions.