
The server-side object model for Microsoft SharePoint has long been sophisticated and fully functional. In fact, there is nothing that can be done in the browser that cannot be done through the server-side object model. When it comes to accessing SharePoint using rich clients, however, there has historically been a large deficit in functionality. In previous versions of SharePoint, client-side programmability was largely accomplished through a set of Web services provided by SharePoint. These Web services exposed basic functions for interacting with lists, performing searches, reading profile data, and the like. However, the scope of these Web services was easily less than a third of the functionality available in the server-side object model. In response, many developers resorted to creating custom Web services that wrapped the server-side object model, but this approach never yielded a complete programming model. As a result, customers have consistently requested improved client-side programmability for future versions of SharePoint.
SharePoint 2010 takes a dramatically new approach to client-side programmability by introducing three new client-side object models: Managed, Silverlight, and JavaScript. Each of the three object models provides an object interface to SharePoint functionality that is based on the objects available in the Microsoft.SharePoint namespace. This approach provides a development experience that is vastly superior to the Web service model used in previous versions of SharePoint. While none of the models is fully equivalent to the server-side model, they are equivalent to each other, so you can use your knowledge of one model with another.
Along with new client object models, SharePoint 2010 also introduces a new Web service interface that uses WCF Data Services. This new interface is primarily used for querying lists from the client. The main advantage of WCF Data Services over the client object models is that it provides an object-relational mapping (ORM) layer over the lists and items so that they are strongly typed in code. You should think of the WCF Data Services interface as a complement to the client object models, and you will often use them together in solutions.
The three client object models are maintained in separate libraries, which are located under the system directory. The Managed object model is contained in the assemblies Microsoft.SharePoint.Client.dll and Microsoft.SharePoint.ClientRuntime.dll, which can be found in the ISAPI folder. The Silverlight client object model is contained in the assemblies Microsoft.SharePoint.Client.Silverlight.dll and Microsoft.SharePoint.Client.Silverlight.Runtime.dll, which are located in the LAYOUTSClientBin folder. The JavaScript client object model is contained in the library SP.js, which is located in the LAYOUTS folder. While each of the models provides a different programming interface, each interacts with SharePoint through a Windows Communication Foundation (WCF) service named Client.svc, which is located in the ISAPI directory. Figure 10-1 shows a basic architectural diagram for the client object models.
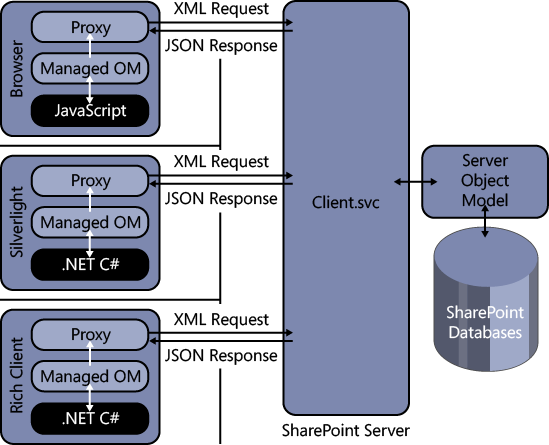
Each of the three object models presents an object interface in front of a service proxy. Developers write client-side code using the object model, but the operations are batched and sent as a single Extensible Markup Language (XML) request to the Client.svc service. When the XML request is received, the Client.svc service makes calls to the server-side object model on behalf of the client. The results of the server-side calls are then sent back to the calling client in the form of a JavaScript Object Notation (JSON) object.
The client object models focus on functionality for objects at and below the site collection level. This focus is sensible because the majority of client-side programming is targeted at improving the user experience. This focus also makes the associated libraries smaller, which is particularly important when scripts must be downloaded for the JavaScript model. In addition, great care has been taken to ensure that the three models return objects that behave similarly. This means that if you know how to write code against one of the models, you can easily port that code to either of the other two models. Table 10-1 shows some of the main objects supported by each model alongside the related object from the server-side model.
Much like the standard code you write against the server-side object model, client object models require a starting point in the form of a context object. The context object provides an entry point into the associated application programming interface (API) that can be used to gain access to other objects. Once you have access to the objects, you may interact with the scalar properties of the object freely (e.g., Name, Title, Url, and so on). Example 10-1 shows how to create a context in each of the models and return an object representing a site collection. Once the site collection object is returned, the Url property is examined. Code for the server model is included for comparison.
Example 10-1. Creating contexts
//Server Object Model
SPSite siteCollection = SPContext.Current.Site;
string url = siteCollection.Url;

//Managed Client Object Model
using (ClientContext ctx = new ClientContext("http://intranet.wingtip.com"))
{
    Site siteCollection = ctx.Site;
    ctx.Load(siteCollection);
    ctx.ExecuteQuery();
    string url = siteCollection.Url;
}

//Silverlight Client Object Model
using (ClientContext ctx = new ClientContext("http://intranet.wingtip.com"))
{
    Site siteCollection = ctx.Site;
    ctx.Load(siteCollection);
    ctx.ExecuteQuery();
    string url = siteCollection.Url;
}

//JavaScript Client Object Model
var siteCollection;
function getSiteCollection
{
    var ctx = new SP.ClientContext("/");
    siteCollection = ctx.get_site;
    ctx.load(site);
    ctx.executeQueryAsync(success, failure);
}
function success {
    string url = siteCollection.get_url;
}
function failure {
    alert("Failure!");
 }
The ClientContext class in both the managed and Silverlight object models inherits from the ClientContextRuntime class. Using the ClientContext class, you can get a valid run-time context by passing in the Uniform Resource Locator (URL) of a site. In addition, this class provides several members that are needed to access data and invoke methods on the server.
The SP.ClientContext class in the JavaScript client object model inherits from the SP.ClientContextRuntime class and provides equivalent functionality to the ClientContext class found in the managed and Silverlight client object models. Like the managed and Silverlight models, you can get a run-time context in the JavaScript model using the SP.ClientContext class and passing a URL. Unlike the managed and Silverlight models, however, you may also get a run-time context to the current site by using a constructor with no arguments, so our example above could be rewritten as simply var ctx = new SP.ClientContext.
The ClientContextRuntime class used by Managed and Silverlight clients defines two methods for loading objects: Load and LoadQuery. The load methods are used to designate objects that should be retrieved from the server. The Load method specifies an object or collection to retrieve, while the LoadQuery method allows you to return collections of objects using a LINQ query.
See Also The material in this chapter assumes that you are familiar with LINQ queries and concepts such as method syntax, query syntax, and lambda expressions. LINQ is covered in detail in Chapter 9.
Executing the Load or LoadQuery method does not cause the client to communicate with the server. Instead, it adds the load operation to a batch that will be executed on the server. In fact, you may execute multiple load methods (as well as other operations) before calling the server. Each operation is batched, waiting for your code to initiate communication with the server. To execute the batched operations, your code must call the ExecuteQuery or ExecuteQueryAsync method. The ExecuteQuery method creates an XML request and passes it to the Client.svc service. The client then waits synchronously while the batch is executed and the JSON results are returned. The ExecuteQueryAsync method, which is used in the Silverlight client object model, sends the XML request to the server, but it returns immediately. Designated success and failure callback methods receive notification when the batch operation is complete.
The JavaScript model works like the managed and Silverlight models by loading operations and executing batches. In the case of the JavaScript model, however, all batch executions are accomplished asynchronously. This means that you must call the executeQueryAsync method and pass in the name of functions that will receive success and failure callbacks, as shown in Example 10-1.
The sample code in Example 10-1 uses the Load method to request an object representing the current site collection. Once an object is returned, you may generally access any of the scalar properties associated with the object. In cases where you do not want to return all the scalar properties for a given object, you may designate the properties to return. In the managed and Silverlight object models, properties are designated by providing a series of lambda expressions. In the JavaScript object model, properties are designated by name. This technique helps to minimize the amount of data sent between the client and server. The following code shows how to request only the Title and ServerRelativeUrl properties for a site collection object.
//Managed and Silverlight client object models reference properties via lambda expressions
ctx.Load(site, s=>s.Title, s=>s.ServerRelativeUrl);
//JavaScript client object model references properties by name
ctx.Load(site, "Title", "ServerRelativeUrl");
When working with the client object models, you will quite often be interested in returning collections of items, such as all the lists in a site or all the items in a list. Collections of items may be returned using either the Load or LoadQuery method. When specifying the items of a collection to return, you can use the Load method with a LINQ query formatted using method syntax. In addition, you can use the LoadQuery method with a LINQ query formatted using query syntax. Example 10-2 shows how to return all the list titles in a site where the Title is not NULL.
Example 10-2. Returning collections with LINQ
using (ClientContext ctx= new ClientContext("http://intranet.wingtip.com"))
{
    //Method Syntax
    ctx.Load(ctx.Web,
             w => w.Lists.Include(l => l.Title).Where(l => l.Title != null));
    ctx.ExecuteQuery();
    foreach (List list in ctx.Web.Lists)
    {
        Console.WriteLine(list.Title);
    }

    //Query Syntax
    var q = from l in ctx.Web.Lists
            where l.Title != null
            select l;

    var r = ctx.LoadQuery(q);
    ctx.ExecuteQuery();
}
    foreach (var i in r)
    {
        Console.WriteLine(i.Title);
    }
While the JavaScript client object model supports both a Load and LoadQuery method, the JavaScript model does not support LINQ queries. However, you may use query strings to request that collections be included in the returned results. Example 10-3 shows how to use the JavaScript client object model to return all the list titles in a site, along with the field names and descriptions for each list.
Example 10-3. Returning collections with JavaScript
var site;
var listCollection;
function getListCollection
{
    var ctx = new SP.ClientContext;
    site = ctx.get_web;
    ctx.Load(site);
    listCollection = site.get_lists;
    ctx.load(listCollection, 'Include(Title,Id,Fields.Include(Title,Description))'),
    ctx.executeQueryAsync(success, failure);
}
function success {
    alert(site.get_title);
    alert(listCollection.get_count);

    var listEnumerator = listCollection.getEnumerator;
    while (listEnumerator.moveNext){
        alert(listEnumerator.get_current.get_fields.get_count);
    }
}
function failure {
    alert("Failure!");
}Because the Managed client object model is supported by IntelliSense, is checked at compile time, and can run synchronously, it is by far the easiest of the three models with which to work. Using the Managed client object model is a simple matter of setting a reference to the assemblies Microsoft.SharePoint.Client.dll and Microsoft.SharePoint.ClientRuntime.dll, adding a using statement for the Microsoft.SharePoint.Client namespace, and writing code. The development environment in Microsoft Visual Studio 2010 provides complete support for the Managed client object model, including IntelliSense and debugging. Because it is the easiest model to use, you may often find prototyping solutions are best done in the Managed client object model and then moved to one of the other models as necessary.
Because of the disconnected nature of the client object model, error handling is especially important. Errors may be thrown when you attempt to access an object or value that has not yet been retrieved from the server. You may also see errors if you create a query that is not meaningful in the current context, such as trying to retrieve list items before loading the associated list. Finally, you must deal with errors that happen in the middle of batch operations on the server. In all these situations, you must pay special attention to error handling in your client object model solutions.
If you attempt to access a scalar property that has not been retrieved, then you will receive a PropertyOrFieldNotInitializedException error. If you make a request to the server that is deemed invalid, then you will receive a ClientRequestException error. If your LINQ query is invalid, you will receive an InvalidQueryExpressionException error. General errors thrown on the server during execution of a request will result in a ServerException error. Example 10-4 shows code that will generate the various run-time errors that you may see when working with the Managed client object model.
Example 10-4. Handling request errors
using (ClientContext ctx = new ClientContext("http://intranet.wingtip.com"))
{
    try
    {
        //Fails because the object was not initialized
        //Requires Load and ExecuteQuery
        Console.WriteLine(ctx.Web.Title);
    }
    catch (PropertyOrFieldNotInitializedException x)
    {
        Console.WriteLine("Property not initialized. " + x.Message);
    }

    try
    {
        //Fails because Skip and Take are meaningless
        //in the context of a list collection
        ctx.Load(ctx.Web, w => w.Lists.Skip(5).Take(10));
        ctx.ExecuteQuery();
    }
    catch (InvalidQueryExpressionException x)
    {
        Console.WriteLine("Invalid LINQ query. " + x.Message);
    }

    try
    {
        //Fails because InvalidObject is a meaningless object
        InvalidObject o = new InvalidObject(ctx, null);
        ctx.Load(o);
        ctx.ExecuteQuery();
    }
    catch (ClientRequestException x)
    {
        Console.WriteLine("Bad request. " + x.Message);
    }

    try
    {
        //Fails because the list does not exist
        //The failure occurs on the server during processing
        ctx.Load(ctx.Web,w=>w.Lists);
        List myList = ctx.Web.Lists.GetByTitle("Non-Existent List");
        myList.Description = "A new description";
        myList.Update();
        ctx.ExecuteQuery();

    }
    catch (ServerException x)
    {
        Console.WriteLine("Exception on server. " + x.Message);
    }
}
Of the errors that may occur during operations, ServerException stands out as notable. This is because ServerException is thrown when an operation fails on the server. Furthermore, the failing operation could be in the middle of a large batch of operations, which can lead to unpredictable behavior. The fundamental challenge with the batch model embodied in the client object model is that you need a way to respond to errors that happen on the server so that the remainder of the batch operations can finish processing. The ServerException error is thrown on the client after the batch has failed, which gives you no opportunity to correct the error.
Fortunately, all three client object models provide a mechanism for sending error-handling instructions to the server along with the batch operations. The ExceptionHandlingScope object allows you to define a try-catch-finally block that embodies server-side operations. If errors occur during processing on the server, they are handled on the server by the code embodied in ExceptionHandlingScope. Example 10-5 shows how exception-handling scopes are implemented in the Managed client object model.
Example 10-5. Handling errors in a scope
using (ClientContext ctx = new ClientContext("http://intranet.wingtip.com"))
{
    //Set up error handling
    ExceptionHandlingScope xScope = new ExceptionHandlingScope(ctx);

    using (xScope.StartScope)
    {
        using (xScope.StartTry)
        {
            //Try to update the description of a list named "My List"
            List myList = ctx.Web.Lists.GetByTitle("My List");
            myList.Description = "A new description";
            myList.Update;
        }
        using (xScope.StartCatch)
        {
            //Fails if the list "My List" does not exist
            //So, we'll create a new list
            ListCreationInformation listCI = new ListCreationInformation;
            listCI.Title = "My List";
            listCI.TemplateType = (int)ListTemplateType.GenericList;
            listCI.QuickLaunchOption = Microsoft.SharePoint.Client.QuickLaunchOptions.On;
            List list = ctx.Web.Lists.Add(listCI);
        }
        using (xScope.StartFinally)
        {
            //Try to update the list now if it failed originally
            List myList = ctx.Web.Lists.GetByTitle("My List");
            if(myList.Description.Length==0)
            {
                myList.Description = "A new description";
                myList.Update;
            }
        }
    }

    //Execute the entire try-catch as a batch!
    ctx.ExecuteQuery;
}
The most important aspect of the code shown in Example 10-5 is that the ExecuteQuery method is called only once, and it appears after the code in the exception handling scope. This means that all the operations defined in the exception handling scope are sent to the server in a single batch. Initially, the server will try to update the description of the target list. If this operation fails, the exception handling scope assumes that it is because the list does not exist. Therefore, the exception-handling scope creates a new list with the correct name. Finally, the description is updated for the newly created list.
While the exception-handling scope provides a powerful way for you to deal with errors that occur during batch processing, it requires some additional planning. For example, the code in Example 10-5 assumes that any failure is the result of a nonexistent list. However, there are other reasons that the operation could fail, such as the user not having the rights to update the list. Fortunately, the ExceptionHandlingScope provides properties that help you understand exactly what went wrong on the server. The ServerErrorCode, ServerErrorValue, and ServerStackTrace properties can all be used to analyze the server error and decide about how to proceed.
By default, all Managed client object model code runs under the Windows identity of the person executing the code. This means that the user must have appropriate permissions inside SharePoint to create, read, update, or delete items. If the user does not have appropriate permissions, then your code will throw a ServerUnauthorizedAccessException error.
If your Web application supports Forms-Based Authentication (FBA), then you can change the AuthenticationMode property of the ClientContext to FormsAuthentication. Under Forms Authentication, the code must then supply the logon credentials through the FormsAuthenticationLoginInfo object. The credentials will subsequently be sent as clear text to SharePoint when the batch operations are executed. Because the credentials are sent as clear text, you should use Secure Sockets Layer (SSL) on Web applications using Forms Authentication. The following code shows how to change the authentication mode to Forms Authentication and send the credentials.
using (ClientContext ctx = new ClientContext("http://intranet.wingtip.com"))
{
    ctx.AuthenticationMode = ClientAuthenticationMode.FormsAuthentication;
    FormsAuthenticationLoginInfo loginInfo =
      new FormsAuthenticationLoginInfo("brianc", "pass@word1");
    ctx.FormsAuthenticationLoginInfo = loginInfo;
}
Authorization of actions within the client object model always depends on the rights the user has in SharePoint. When performing operations with the client object model, you will often need to verify the permissions of the user before acting. The client object model has support for users, groups, and roles so that you can add, update, and delete as necessary. Most often, however, you will use the BasePermissions class to check the permissions for a user. You can then use the DoesUserHavePermissions method of the Web object to check them.
Because checking permissions is often a prerequisite to performing a task, the managed and Silverlight client object models support the concept of a conditional scope. A conditional scope uses a ConditionalScope object to establish a set of conditions under which operations should execute on the server. If the conditions are not met, the code does not run. Conditional scopes can be combined with error-handling scopes to create code that can handle many situations on the server without returning to the client.
Within the scope itself, many operations that you will want to perform are not allowed, such as updating properties and calling methods. Fortunately, the conditional scope sets a flag letting you know if the condition was met so you can use that information to run additional operations. Example 10-6 shows a sample that uses a conditional scope to determine if a user has the rights necessary to create a new list. If so, then a new list is created. If not, the operation is skipped.
Example 10-6. Checking permissions in a conditional scope
using (ClientContext ctx = new ClientContext("http://intranet.wingtip.com "))
{
    ctx.Load(ctx.Web);
    ctx.ExecuteQuery;

    List list = null;

    //Set up permissions mask
    BasePermissions permissions = new BasePermissions;
    permissions.Set(PermissionKind.ManageLists);

    //Conditional scope
    ConditionalScope scope = new ConditionalScope(
        ctx,
         => ctx.Web.DoesUserHavePermissions(permissions).Value == true);

    using (scope.StartScope)
    {
        //Operations are limited in scopes
        //so just read
        Console.WriteLine(ctx.Web.Title);
    }

    //Execute
    ctx.ExecuteQuery();

    //Did scope execute?
     Console.WriteLine(scope.TestResult.Value);

    if (scope.TestResult.Value)
    {
        //Create a new list, we have permissions
        ListCreationInformation listCI = new ListCreationInformation;
        listCI.Title = "My List";
        listCI.TemplateType = (int)ListTemplateType.GenericList;
        listCI.QuickLaunchOption = Microsoft.SharePoint.Client.QuickLaunchOptions.On;

        list = ctx.Web.Lists.Add(listCI);
        ctx.ExecuteQuery();

        Console.WriteLine(list.Title);
    }
}In the conditional scope shown in Example 10-6, a new list was created if the user had the appropriate permissions. Creating new lists and items using the Managed client object model is done with creation information objects. ListCreationInformation and ListItemCreationInformation allow you to define all the necessary values for a list or item and then send that data with the batch back to the server. Example 10-7 shows how to use these objects to create a new list and list item.
Example 10-7. Creating a list and list item
using (ClientContext ctx = new ClientContext("http://intranet.wingtip.com "))
{
    //Create a new list
    ListCreationInformation listCI = new ListCreationInformation;
    listCI.Title = "My List";
    listCI.Description += "A list for use with the Client OM";
    listCI.TemplateType = (int)ListTemplateType.GenericList;
    listCI.QuickLaunchOption = Microsoft.SharePoint.Client.QuickLaunchOptions.On;
    List list = ctx.Web.Lists.Add(listCI);
    ctx.ExecuteQuery();

    //Create a new list item
    ListItemCreationInformation listItemCI = new ListItemCreationInformation;
    ListItem item = list.AddItem(listItemCI);
    item["Title"] = "New Item";
    item.Update();
    ctx.ExecuteQuery();
}
Throughout this chapter so far, you have seen several examples of returning objects. In the examples, you have seen how to return a single object and how to use LINQ to specify a collection of objects. The only piece missing is how to return list items. Initially, you might suspect that returning items from lists is similar and should use LINQ queries, but that is not the case. The Managed client object model uses LINQ to Objects, not LINQ to SharePoint, so the LINQ approach outlined in Chapter 8, is not valid for the client object model. Instead, you must use Collaborative Application Markup Language (CAML) queries to return items from a list.
CAML queries are created for the Managed client object model through the CamlQuery object. This object has a ViewXml property that accepts a CAML query designating the items to return. This CAML query follows the same rules that were outlined in Chapter 8. Example 10-8 shows a sample of running a CAML query against a list.
Example 10-8. Using CAML to return list items
using (ClientContext ctx = new ClientContext("http://intranet.wingtip.com "))
{
    //Read the Site, List, and Items
    ctx.Load(ctx.Web);

    List myList = ctx.Web.Lists.GetByTitle("My List");
    ctx.Load(myList);

    StringBuilder caml = new StringBuilder;
    caml.Append("<View><Query>");
    caml.Append("<Where><Eq><FieldRef Name='Title'/>");
    caml.Append("<Value Type='Text'>New Item</Value></Eq></Where>");
    caml.Append("</Query><RowLimit>100</RowLimit></View>");

    CamlQuery query = new CamlQuery;
    query.ViewXml = caml.ToString;
    ListItemCollection myItems = myList.GetItems(query);
    ctx.Load(myItems);

    ctx.ExecuteQuery();
    Console.WriteLine("Site: " + ctx.Web.Title);
    Console.WriteLine("List: " + myList.Title);
    Console.WriteLine("Item Count: " + myItems.Count.ToString);
}
Updating through the Managed client object model is straightforward. In most cases, you will simply set the value of a property and then call the appropriate Update method. Example 10-9 shows samples of updating a site, list, and list item.
Example 10-9. Update operations
//Update the Site, List, and List Items
ctx.Web.Description = "Client OM samples";
ctx.Web.Update();

myList.Description = "Client OM data";
myList.Update();

foreach (ListItem myItem in myItems)
{
    myItem["Title"] = "Updated";
    myItem.Update();
}

ctx.ExecuteQuery();
Console.WriteLine("Site: " + ctx.Web.Description);
Console.WriteLine("List: " + myList.Description);
Console.WriteLine("Item Count: " + myItems.Count.ToString);
Deleting objects with the Managed client object model involves calling the DeleteObject method. This method is the same across most objects that can be deleted. The following code shows how to delete the list created earlier.
myList.DeleteObject;
ctx.ExecuteQuery;
Along with lists, you’ll want to work with libraries. In the Managed client object model, document libraries are handled similarly to lists. Of course, the major difference is in handling documents. Fortunately, uploading documents to libraries using the Managed client object model is very similar to using the server object model; you must upload the document using the URL of the folder where you want to store the document. Example 10-10 shows a full set of create, read, update, and delete (CRUD) operations around a file and a document library.
Example 10-10. Working with document libraries
using (ClientContext ctx = new ClientContext("http://intranet.wingtip.com "))
{
    //Get site
    Web site = ctx.Web;
    ctx.Load(site);
    ctx.ExecuteQuery();

    //Create a new library
    ListCreationInformation listCI = new ListCreationInformation;
    listCI.Title = "My Docs";
    listCI.Description = "A library for use with Client OM";
    listCI.TemplateType = (int)ListTemplateType.DocumentLibrary;
    listCI.QuickLaunchOption = Microsoft.SharePoint.Client.QuickLaunchOptions.On;
    List list =site.Lists.Add(listCI);
    ctx.ExecuteQuery();

    //Create a document
    MemoryStream m = new MemoryStream;
    StreamWriter w = new StreamWriter(m);
    w.Write("Some content for the document.");
    w.Flush;

    //Add it to the library
    FileCreationInformation fileCI = new FileCreationInformation;
    fileCI.Content = m.ToArray;
    fileCI.Overwrite = true;
    fileCI.Url = "http://intranet.wingtip.com/My%20Docs/MyFile.txt";
    Folder rootFolder = site.GetFolderByServerRelativeUrl("My%20Docs");
    ctx.Load(rootFolder);
    Microsoft.SharePoint.Client.File newFile = rootFolder.Files.Add(fileCI);
    ctx.ExecuteQuery();

    //Edit Properties
    ListItem newItem = newFile.ListItemAllFields;
    ctx.Load(newItem);
    newItem["Title"] = "My new file";
    newItem.Update();
    ctx.ExecuteQuery();

    //Delete file
    newItem.DeleteObject();
    ctx.ExecuteQuery();
}Although the ClientContext object does not support the ExecuteQueryAsync method in the managed client object model, you can still perform asynchronous operations using more standard techniques. While asynchronous calls in the Managed client object model are not as critical as in the Silverlight and JavaScript client object models, they are convenient. Using a straightforward approach, you may define callback methods for success and failure. Example 10-11 shows how to return a site collection object asynchronously and display the associated Url property in a console application.
Example 10-11. Asynchronous calls in the Managed client object model
delegate void Async;
ClientContext ctx;
Site siteCollection;

static void Main(string[] args)
{
    Program p = new Program();
    p.Run();
    Console.WriteLine("Waiting...");
    Console.Read();
}

public void Run
{
    ctx= new ClientContext("http://intranet.wingtip.com");
    siteCollection = ctx.Site;
    ctx.Load(siteCollection);
    Async async = new Async(ctx.ExecuteQuery);
    async.BeginInvoke(callback, null);
}

void callback(IAsyncResult arg)
{
    Console.WriteLine("Callback received...");
    Console.WriteLine(site.Url);
    Console.WriteLine("Callback done!");
}Silverlight is a Web browser plug-in that allows for the creation of rich media-centric solutions. Because Silverlight is a plug-in, it runs inside of Internet Explorer directly on the client. Combining SharePoint, Silverlight, and the client object model can result in applications that are both highly responsive and visually appealing. By default, SharePoint provides support for Silverlight through built-in applications like the Media Player as well as support for custom applications through the Silverlight Web Part. In this section, you’ll review an introduction to Silverlight development, learn the tools that are available, and see how to use these tools in client-side programming.
If you have never created a custom Silverlight application, you will find it pleasantly easy to get started. Visual Studio 2010 provides strong support for Silverlight development, including debugging, packaging, and deployment. When you are specifically targeting SharePoint as the platform for your applications, you have a couple of extra steps, but nothing too difficult.
SharePoint ships with the Silverlight Web Part, which is a Web Part that can host any Silverlight solution. In addition, SharePoint ships with several Silverlight applications that you can use right away. The Silverlight Web Part can be found in the Media And Content category of the Web Part catalog. When you drop this Web Part on a page, you are prompted to enter the path to a Silverlight XAP (pronounced “zap”) file. All the Silverlight applications that ship with SharePoint reside in the _LAYOUTS/ClientBin folder. If you wanted to host the HierarchyChart application, for example, you would enter the path /_LAYOUTS/ClientBin/HierarchyChart.xap. In addition, you can use the Silverlight Web Part to host your own applications. Note that you must have the Silverlight run time installed on your client to run Silverlight applications. In addition, Silverlight is supported in only 32-bit browsers.
Creating a Silverlight application begins in Visual Studio 2010. In the New Project dialog, you may select Silverlight from the list of Installed Templates and then select Silverlight Application as the project type. When you create a new Silverlight project, you have the option to include an additional project in the solution for testing. The testing project can either be a Web application project or an actual website. Including a test project in the solution allows you to test and debug easily just by hitting F5. Visual Studio automatically starts the test Web project and loads the Silverlight solution for you. Figure 10-2 shows the New Silverlight Application dialog.

Inside Visual Studio, the development activities necessary to create your Silverlight application are similar to creating any application. First, you must create a user interface; second, you must code the functionality. The biggest difference between Silverlight development and any other type of development is that the user interface is defined through a declarative syntax known as Extensible Application Markup Language (XAML, pronounced “za-mil”). Visual Studio provides both a visual and markup view of the user interface to make development easier. For this walkthrough, Example 10-12 shows the XAML and Figure 10-3 shows the user interface.
Example 10-12. A Silverlight user interface defined with XAML
<UserControl x:Class="HelloSilverlight.MainPage"
    xmlns="http://schemas.microsoft.com/winfx/2006/xaml/presentation"
    xmlns:x="http://schemas.microsoft.com/winfx/2006/xaml"
    xmlns:d="http://schemas.microsoft.com/expression/blend/2008"
    xmlns:mc="http://schemas.openxmlformats.org/markup-compatibility/2006"
    mc:Ignorable="d"
    d:DesignHeight="50" d:DesignWidth="150"
    Height="50" Width="150" >

    <Grid x:Name="LayoutRoot" Background="White">
        <StackPanel Orientation="Vertical">
            <Button x:Name="clicker" Click="clicker_Click" Content="Push Me!"/>
            <TextBox x:Name="output"/>
        </StackPanel>
    </Grid>
</UserControl>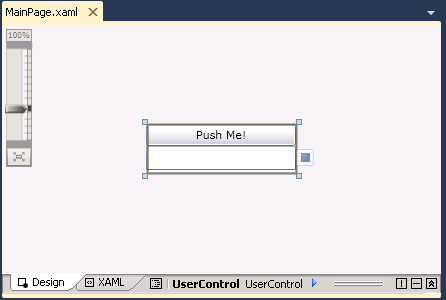
Looking at Example 10-12 and Figure 10-3, you can see that the sample application is a simple solution designed to display a message when a button is clicked. In Example 10-12, note how Button and TextBox are defined in XAML. Take special note of how the click event is defined through the Click attribute. This event handler will appear in code behind the user interface. To code event handlers, you can simply right-click them in the XAML and select View Code from the context menu. This will take you to the event handler, where you can fill in the necessary code. In the sample, a message is entered into the TextBox using the following code.
private void clicker_Click(object sender, RoutedEventArgs e)
{
    output.Text = "Hello, Silverlight!";
}
Once the code is complete, you may build the application in Visual Studio. Building the application will cause Visual Studio to emit a XAP file containing all the necessary assemblies for your application to run. At this point, you can simply copy the XAP file into the /_LAYOUTS/ClientBin directory in SharePoint, drag a Silverlight Web Part to a SharePoint page, point to the XAP file, and use your solution. Figure 10-4 shows the completed solution running in the Silverlight Web Part.

While you are developing your solution, you will undoubtedly want to debug it. Debugging in Silverlight is reasonably straightforward. If you are using a testing Web project, then you can set breakpoints and hit F5 as usual. If the solution is hosted in SharePoint, then you can attach to the IEXPLORER.EXE process and set breakpoints.
One thing to be careful of when debugging is that Internet Explorer will cache any XAP file that you view. The caching is done to improve performance so that additional downloads are not necessary. When debugging, however, this can be frustrating because you are making changes to the assembly constantly. Therefore, you must clear the XAP file from the cache before each debugging run or you will not see the latest changes.
The best way to clear the cache is to select Tools, Internet Options from the Internet Explorer menu. On the General tab, click the Settings button under the Browsing History section. In the Temporary Internet Files and History Settings dialog, click the View Files button. When viewing the files, search for all *.xap files. Locate the one that you are debugging and delete it. Then copy your latest XAP file into the ClientBin directory and begin your debugging session.
Obviously, there is a lot more to Silverlight development than can be covered in this short section. The goal of this walkthrough is simply to give you a head start in developing Silverlight solutions for SharePoint 2010 so that you can focus on how to use the client object model with Silverlight.
The classes and method found in the Silverlight client object model are nearly identical to the ones in the Managed client object model. The single biggest difference is that the Silverlight client object model supports the ExecuteQueryAsync method and the Managed client object model does not. Asynchronous query operations are particularly important in Silverlight applications because the thread that executes a query cannot be used to update the Silverlight user interface. Attempting to update the Silverlight user interface after a synchronous query will result in an error informing you that the user interface thread is potentially blocked, so your operation is not allowed. Therefore, you must make asynchronous calls to the client object model from Silverlight and update the user interface on a separate thread. Example 10-13 shows a simple example of returning the URL for a site collection and displaying it in a Silverlight application. You must follow this pattern whenever you use the Silverlight client object model.
Example 10-13. Asynchronous calls from Silverlight
public partial class MainPage : UserControl
{
    private System.Threading.SynchronizationContext thread;

    public static event ClientRequestSucceededEventHandler succeedListener;
    public static event ClientRequestFailedEventHandler failListener;

    public delegate void succeedDelegate(object sender, ClientRequestSucceededEventArgs e);
    public delegate void failDelegate(object sender, ClientRequestFailedEventArgs e);

    public MainPage
    {
        InitializeComponent;

        //The object to hold the returned site collection
        Site siteCollection;

        //Delegates for the callback methods
        succeedDelegate sd = new succeedDelegate(HandleClientRequestSucceeded);
        failDelegate fd = new failDelegate(HandleClientRequestFailed);

        //Event handlers for the callback methods
        succeedListener += new ClientRequestSucceededEventHandler(sd);
        failListener += new ClientRequestFailedEventHandler(fd);

        thread = System.Threading.SynchronizationContext.Current;
        if (thread == null)
            thread = new System.Threading.SynchronizationContext;
    }

    private void Button_Click(object sender, RoutedEventArgs e)
    {
            ClientContext ctx= new ClientContext(SiteUrl.Text);
            Site siteCollection = ctx.Site;
            ctx.Load(siteCollection);
            ctx.ExecuteQueryAsync(succeedListener, failListener);
    }

    //Delegate implementations
    public void HandleClientRequestSucceeded(object sender,
                                            ClientRequestSucceededEventArgs args)
    {
        thread.Post(new System.Threading.SendOrPostCallback(delegate(object state)
        {
            EventHandler h = OperationSucceeded;
            if (h != null)
                h(this, EventArgs.Empty);
        }), null);
    }

    public void HandleClientRequestFailed(object sender, ClientRequestFailedEventArgs args)
    {
        thread.Post(new System.Threading.SendOrPostCallback(delegate(object state)
        {
            EventHandler h = OperationFailed;
            if (h != null)
                h(this, EventArgs.Empty);
        }), null);
    }

    //Event handler implementations
    public void OperationSucceeded(object sender, EventArgs e)
    {
        Messages.Text = "Success" + site.Url;
    }

    public void OperationFailed(object sender, EventArgs e)
    {
        Messages.Text += "Failure!";
    }
}
Example 10-13 begins by declaring a System.Threading.SynchronizationContext object. The SynchronizationContext object is used to facilitate communication between threads in the Silverlight application. Specifically, it will facilitate communication between the thread that returns data from the server and the thread that displays the data in the user interface.
Next, the code defines a ClientRequestSucceededEventHandler and ClientRequestFailedEventHandler as event delegates. These delegates are the prototypes for the listeners that will be passed as arguments to the ExcecuteQueryAsync method. In addition, a pair of delegates are defined that prototype the methods that will receive the success or failure callback.
In the HandleClientRequestSucceeded and HandleClientRequestFailed callback methods, the SynchronizationContext is used to post a message to the thread that will update the user interface. This results in calling either the OperationSucceeded or OperationFailed method, where the code is free to update the user interface.
Just as you did in the Managed client object model, you will want to handle server errors using ErrorHandlingScope so that batch operations on the server can proceed gracefully when an error occurs. Fortunately, the code for handling errors in the Silverlight client object model is identical to the code in the Managed client object model. The only consideration is to remember that all Silverlight calls to the client object model are asynchronous. Therefore, you will need to combine the asynchronous programming paradigm discussed earlier with the exception-handling scope code shown in the Managed client object model.
As you develop more sophisticated Silverlight applications, you will find it necessary to send configuration parameters to Silverlight. For instance, the Silverlight client object model requires a URL to establish ClientContext. If you want your Silverlight application to be portable across sites, then it must be able to retrieve a configuration parameter that tells it what URL to use. In these cases, you will need to use Silverlight initialization parameters.
Initialization parameters are key-value pairs that can be passed from the hosting website to the Silverlight application. The hosting website creates an instance of a Silverlight application through an object tag in Hypertext Markup Language (HTML), the createObject method in Silverlight.js, or the createObjectEx method also found in Silverlight.js. When the application instance is created, the initialization parameters are sent as a single string. The following code shows a simple example of an object tag in creating an instance of a Silverlight application and passing initialization parameters.
<object id="SLHost" width="300" height="50"
 data="data:application/x-silverlight-2,"
 type="application/x-silverlight-2" >
 <param name="source" value="ClientBin/SilverlightApplication.xap"/>
 <param name="initParams" value="key1=value1,key2=value2"/>
</object>
When either the CreateObject or CreateObjectEx method is used, the initialization parameters are passed as an argument. While the Silverlight Web Part takes the object tag approach, many custom Silverlight hosting Web Parts use JavaScript methods. The following code shows an example of the CreateObject method so you can get an idea of how this works.
<div id="silverlightControlHost">
<script type="text/javascript">
Silverlight.createObject(
"ClientBin/SilverlightApplication1.xap",
silverlightControlHost,
"SLApp",
{
width: "100%", height: "100%"
},
{ onError: onSLError, onLoad: onSLLoad },
"param1=value1,param2=value2",
"context"
);
</script>
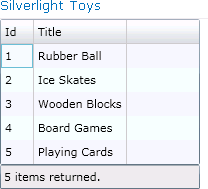
</div>Regardless of how the parameters are passed, you must add some special code to your Silverlight application to accept and use them. For example, consider a Silverlight application that shows a SharePoint list in a grid. In this scenario, the URL of the website and the name of the target list are passed as initialization parameters to the Silverlight application. Inside the application, the Silverlight client object model is used to get a ClientContext, query the list, and display the list items in a grid. Figure 10-5 shows the complete application, displaying items from a list of toys.
To accept and use initialization parameters, you must first edit the MainPage.xaml.cs file. This file contains a single constructor for the Silverlight application that takes no arguments. In this file, you must define a new constructor that accepts the number and type of arguments that you expect. In this case, you expect a string with the URL of the website and a string with the name of the list. In the constructor, you simply save the initialization parameters to member variables so that they are available throughout the scope of the application. The following code shows how the new constructor is defined.
public MainPage(string WebUrl, string ListName)
{
    InitializeComponent();

    //Save initialization parameters
    webUrl = WebUrl;
    listName = ListName;
}
Once the new constructor is created, you must modify the Application_Startup method in the App.xaml.cs file. The Application_Startup method is called when the new instance of the Silverlight application is created. In this code, you must retrieve the initialization parameters and pass them to the new constructor that you created earlier. The following code shows how this is done.
private void Application_Startup(object sender, StartupEventArgs e)
{
    //Code to receive initialization params
    try
    {
        string webUrl = e.InitParams["WebUrl"];
        string listName = e.InitParams["ListName"];
        this.RootVisual = new MainPage(webUrl, listName);
    }
    catch
    {
        this.RootVisual = new MainPage;
    }
}
Once the initialization parameters are passed to Silverlight successfully, you may use them in code. Most often, these values will be used along with the Silverlight client object model to create a context and perform operations. Don’t forget that you must also perform all operations asynchronously.
While the Silverlight Web Part that ships with SharePoint 2010 is useful in many cases, there will undoubtedly be times when you need to create your own Silverlight host Web Part. Creating your own host Web Part gives you much more control over the initialization parameters, configuration, and behavior of Silverlight. Creating your own host is fairly straightforward as well. You can begin by creating a new Web Part project in Visual Studio 2010. Because this is a host, there is no reason to create a Visual Web Part project—a simple Web Part project will suffice.
Once you have created a new Web Part project, you can start by deciding what properties you want to expose. Typically, you’ll want to make the height, width, source, and initialization parameters available for configuration. The following code shows the definition for the Source property, which contains the server-relative URL of the XAP file.
[Personalizable(PersonalizationScope.Shared),
WebBrowsable(true), WebDisplayName("XAP Package"),
WebDescription("The relative URL of the XAP package"),
Category("Silverlight")]
public string Source
{
    get { return source; }
    set { source = value; }
}
Because the object tag, the createObject method, and the createObjectEx method depend on the Silverlight.js library, you need to make sure that your host has loaded it. To load the Silverlight.js library, use ClientScriptManager to load the library, which is located in the LAYOUTS directory. The following code shows how to load the library before rendering the Web Part.
protected override void OnPreRender(EventArgs e)
{
    ClientScriptManager cs = Page.ClientScript;
    if (!cs.IsClientScriptIncludeRegistered("sl_javascript"))
        cs.RegisterClientScriptInclude(this.GetType,
           "sl_javascript", "/_LAYOUTS/Silverlight.js");
}
Once the library is loaded, you can inject markup into the hosting SharePoint page if you want. You can decide to inject the object tag, the createObject method, or the createObjectEx method, in either an external script file or through code. Example 10-14 shows how to create a script within the Web Part code that you can inject into the page. Note how the Web Part properties are used as parameters for the object tag.
Example 10-14. Injecting script to create a Silverlight instance
private string GetCreateScript
{
    StringBuilder script = new StringBuilder;

    script.Append("<div id="customSLHost">
");
    script.Append("  <object data="data:application/x-silverlight-2,"
                                  type="application/x-silverlight-2" width="");
    script.Append(HostWidth);
    script.Append("" height="");
    script.Append(HostHeight);
    script.Append("">
");
    script.Append("    <param name="source" value="");
    script.Append(Source);
    script.Append(""/>
");
    script.Append("    <param name="width" value="");
    script.Append(HostWidth);
    script.Append(""/>
");
    script.Append("    <param name="height" value="");
    script.Append(HostHeight);
    script.Append(""/>
");
    script.Append("  </object>
");
    script.Append("</div>
");

    return script.ToString();
}The JavaScript client object model provides a script-based programming experience that is equivalent to the managed and Silverlight client object models. Using the JavaScript client object model allows you to create SharePoint solutions that are more responsive and browser-agnostic. Also, you can add capabilities such as Asynchronous JavaScript and XML (AJAX) and jQuery to improve the user experience greatly.
When working with the JavaScript client object model, you will find that several areas differ from the managed and Silverlight implementations. For the most part, these differences have to do with either technology limitations or programming conventions used in JavaScript. For example, the method signatures throughout the JavaScript client object model follow a convention that is typical for JavaScript. This means that properties are retrieved through a get method as opposed to a dot operator.
Because the JavaScript client object model does not support all the data types found in the .NET Framework, some of them will be different. You have already seen this in previous examples in this chapter where using lambda expressions is not supported, so the JavaScript client object model uses query strings. Furthermore, JavaScript supports some data types that do not exist in the .NET Framework. These include values such as NaN, which represents a numeric value that is undefined in JavaScript.
Creating a basic page that uses the JavaScript client object model is not difficult, but several requirements must be met for the code to execute successfully. You can begin by creating a new SharePoint feature in Visual Studio 2010 and adding an Application Page. Generally, the Application Pages added by Visual Studio have everything that you need to begin writing JavaScript client object model code immediately. Example 10-15 shows a simple example that displays the title of the current site when a button is clicked.
Example 10-15. An Application Page using the JavaScript client object model
<%@ Assembly Name="$SharePoint.Project.AssemblyFullName$" %>
<%@ Import Namespace="Microsoft.SharePoint.ApplicationPages" %>
<%@ Register Tagprefix="SharePoint" Namespace="Microsoft.SharePoint.WebControls"
Assembly="Microsoft.SharePoint, Version=14.0.0.0, Culture=neutral, PublicKeyToken=71e9
bce111e9429c" %>
<%@ Register Tagprefix="Utilities" Namespace="Microsoft.SharePoint.Utilities"
Assembly="Microsoft.SharePoint, Version=14.0.0.0, Culture=neutral, PublicKeyToken=71e9
bce111e9429c" %>
<%@ Register Tagprefix="asp" Namespace="System.Web.UI" Assembly="System.Web.
Extensions, Version=3.5.0.0, Culture=neutral, PublicKeyToken=31bf3856ad364e35" %>
<%@ Import Namespace="Microsoft.SharePoint" %>
<%@ Assembly Name="Microsoft.Web.CommandUI, Version=14.0.0.0, Culture=neutral, PublicK
eyToken=71e9bce111e9429c" %>
<%@ Page Language="C#" AutoEventWireup="true" CodeBehind="HelloWorld.aspx.cs" Inherits
="JavaScriptClientOMSamples.Layouts.JavaScriptClientOMSamples.HelloWorld" DynamicMaste
rPageFile="~masterurl/default.master" %>

<asp:Content ID="PageHead" ContentPlaceHolderID="PlaceHolderAdditionalPageHead"
runat="server">
    <script type="text/javascript">
        var site;
        function goClientOM {
            //Get Context
            var ctx = new SP.ClientContext;
            //Get site
            site = ctx.get_web;
            ctx.load(site);
            //Execute
            ctx.executeQueryAsync(success, failure);
        }

        function success {
            alert(site.get_title);
        }

        function failure {
            alert("Failure!");
        }

    </script>
</asp:Content>

<asp:Content ID="Main" ContentPlaceHolderID="PlaceHolderMain" runat="server">
    <div id="displayDiv">
        <input type="button" value="Push Me!" onclick="javascript:goClientOM;" />
    </div>
</asp:Content>
For the JavaScript client object model to function correctly, the ASPX page hosting the code must meet several requirements. First, you must register the Microsoft.SharePoint.WebControls namespace on the page. This reference is not required by the JavaScript client object model directly, but it contains controls that will be used in support of the code, as you will see in the following explanation. The pages that you create in Visual Studio 2010 already have the namespace registered using this code.
<%@ Register Tagprefix="SharePoint" Namespace="Microsoft.SharePoint.WebControls"
 Assembly="Microsoft.SharePoint, Version=14.0.0.0, Culture=neutral,
 PublicKeyToken=71e9bce111e9429c" %>
Second, a reference to the script library SP.js must be available. For the pages that you create in Visual Studio 2010, the proper references already exist on the default master page. However, if you need to add the script reference explicitly, you can do it by using a ScriptLink control, which is part of the Microsoft.SharePoint.WebControls namespace. The following code shows how you can load the SP.js library explicitly using ScriptLink.
<SharePoint:ScriptLink ID="SPScriptLink" runat="server" LoadAfterUI="true"
 Localizable="false" Name="sp.js" />
Finally, if the JavaScript code performs any updates to sites or lists, a FormDigest control must be on the page. The FormDigest control is part of the Microsoft.SharePoint.WebControls namespace and generates a security validation, which is necessary when a change is posted that modifies the content database. The FormDigest control is already part of the default master page, but you can add another one explicitly using the following code.
<SharePoint:FormDigest runat="server" />
Once the prerequisites are met, you may write code against the JavaScript client object model. In the sample shown previously in Example 10-15, a button is used to call a function. The function first creates a new SP.ClientContext object without using a URL. Unlike the managed and Silverlight client object models, which require a full URL, the JavaScript client object model takes a server-relative URL when creating a context. This means that using no argument in the constructor results in a context for the site associated with the current page.
Once the context is created, the current site can be retrieved using the get_web method. Notice that the get_web method is equivalent to the Web property found in the managed and Silverlight client object models. This syntax difference is consistent throughout the JavaScript client object model.
Just as in the other models, the object must be loaded and then the query must be executed. In the case of the JavaScript client object model, each query to the server must be performed asynchronously. Therefore, success and failure functions must be defined each time the executeQueryAsync method is called. On success or failure, the sample simply shows an alert with the results.
The JavaScript client object model supports exception-handling scopes just like the managed and Silverlight client object models. Of course, the syntax is a bit different. Example 10-16 shows the implementation of the sample contained in Example 10-4 in the JavaScript client object model.
Example 10-16. Implementing exception-handling scopes in JavaScript
<script type="text/javascript">
    function goClientOM {

        //Get Context
        var ctx = new SP.ClientContext;

        //Start exception-handling scope
        var e = new SP.ExceptionHandlingScope(ctx);
        var s = e.startScope;

          //try
          var t = e.startTry;

              var list1 = ctx.get_web.get_lists.getByTitle("My List");
              ctx.load(list1);
              list1.set_description("A new description");
              list1.update;

          t.dispose;

          //catch
          var c = e.startCatch;

              var listCI = new SP.ListCreationInformation;

              listCI.set_title("My List");
              listCI.set_templateType(SP.ListTemplateType.announcements);
              listCI.set_quickLaunchOption(SP.QuickLaunchOptions.on);

              var list = ctx.get_web.get_lists.add(listCI);

          c.dispose;

          //finally
          var f = e.startFinally;
              var list2 = ctx.get_web.get_lists.getByTitle("My List");
              ctx.load(list2);
              list2.set_description("A new description");
              list2.update;

          f.dispose;

        //End exception-handling scope
        s.dispose;

        //Execute
        ctx.executeQueryAsync(success, failure);

    }

    function success {
        alert("Success");
    }

    function failure {
        alert("Failure!");
    }

</script>In our samples, the JavaScript function is initiated by clicking a button. However, there are many times when you want code to run immediately when the page is loaded. Initially, you may think that you can simply fire the code using an onLoad event, but this will not work. The script-loading model used by SharePoint will load the required libraries on demand to minimize the size of the page download. Because of this, you must use the ExecuteOrDelayUntilScriptLoaded method that will delay your call until the SP.js library is downloaded. To run Example 10-15 immediately when the page loads, the markup in the main placeholder should be replaced with the following code.
<asp:Content ID="Main" ContentPlaceHolderID="PlaceHolderMain" runat="server">
    <script type="text/javascript">
        //Waits until the SP.js script is loaded and then calls our function
        var e = ExecuteOrDelayUntilScriptLoaded(goClientOM, "sp.js");
    </script>
    <div id="displayDiv">
    </div>
</asp:Content>All the JavaScript libraries that ship with SharePoint 2010 have debug versions available that can be used during the development process. In addition, you may debug your own scripts directly in the browser while they run. To debug scripts, open the browser to the page in SharePoint where your solution is located. Next, select Tools, Developer Tools from the browser menu or simply press F12. In the Developer Tools dialog, click the Script tab and you will see your JavaScript. When the script is visible, click Start Debugging. Finally, set a breakpoint in your script, return to SharePoint, and run your solution. Your breakpoints will be hit and you can perform the debug in the SharePoint script libraries.
When you are working with the JavaScript client object model, you will undoubtedly want to incorporate AJAX into your solution. One of the core principles of AJAX is to facilitate as much processing on the client as possible, including data retrieval and user interface rendering. Therefore, AJAX is an excellent choice to complement the JavaScript client object model.
SharePoint 2010 is AJAX-enabled by default. This means that you can take advantage of the client-side AJAX run time in your solutions immediately. The client-side AJAX run time is contained in the script library MicrosoftAjax.js, which is located in the LAYOUTS directory. Scripts are compiled into the System.Web.Extensions namespace and are loaded into each page using the ScriptManager control, which is located on the default master page.
When the AJAX script library is loaded, you will have access to the Sys.Application object, which is the main client-side object and is equivalent to the Page object in ASP.NET. You can use the Sys.Application object to create a true page life cycle for your client-side code including init, load, and disposing events. Life cycle events are added to the page using the add_init, add_load, and add_disposing methods of the Sys.Application object. The designated functions are then called at the appropriate time in the page life cycle. Example 10-17 shows a sample page that implements a page life cycle.
Example 10-17. Implementing a page life cycle with Sys.Application
<asp:Content ID="PageHead" ContentPlaceHolderID="PlaceHolderAdditionalPageHead"
runat="server">

    <script type="text/javascript">
        function ajaxInit {
            $get("displayDiv").innerHTML = "<p>Initialized</p>";
        }
        function ajaxLoad {
            $get("displayDiv").innerHTML += "<p>Loaded</p>";
        }
        function ajaxDisposing {
            $get("displayDiv").innerHTML += "<p>Disposing</p>";
        }
    </script>

</asp:Content>

<asp:Content ID="Main" ContentPlaceHolderID="PlaceHolderMain" runat="server">
    <script type="text/javascript">
        Sys.Application.add_init(ajaxInit);
        Sys.Application.add_load(ajaxLoad);
        Sys.Application.add_disposing(ajaxDisposing);
    </script>
    <div id="displayDiv">
    </div>
</asp:Content>
Another advantage of using the AJAX library is that it has support for shorthand notation. In Example 10-17, note the use of the $get shortcut. The $get shortcut is the equivalent of document.getElementById in the document object model (DOM). Using it in your pages makes them more readable and compact. In the example, it is used to add content to the page each time an event in the life cycle is fired.
You can combine the structure offered by a true page life cycle with the script management offered by SharePoint and make calls to the JavaScript client object model from within the life cycle events. You will still have to wait for the SP.js script to load, but your final code will be more structured and readable. For example, the following code calls a function that accesses the JavaScript client object model from the load event for the page.
<script type="text/javascript">
    function ajaxInit {
    }
    function ajaxLoad {
        var e = ExecuteOrDelayUntilScriptLoaded(goClientOM, "sp.js");
    }
    function ajaxDisposing {
    }
</script>Along with the page life cycle, you can take advantage of AJAX to define client-side controls that you can use to render information returned from the client object model. Client-side AJAX controls are defined using object-oriented JavaScript to wrap user interface elements. These controls may then be incorporated into the overall page model to render information. For example, consider a solution designed to display the titles of all lists from the current SharePoint site. To support the sample, Example 10-18 shows the code for a simple AJAX list control.
Example 10-18. An AJAX list control
//Register namespace
if (typeof (Wingtip) == 'undefined')
    Type.registerNamespace('Wingtip'),

//Constructor
Wingtip.SimpleList = function (element) {
    this.element = element;
    this.element.innerHTML = '<ol></ol>';
    this.items = '';
}

//Prototype
Wingtip.SimpleList.prototype = {
    element: null,
    items: null,
    add: function (text) {
        this.items += '<li>' + text + '</li>';
        this.element.innerHTML = '<ol>' + this.items + '</ol>';
    }
}

//Register the class
Wingtip.SimpleList.registerClass('Wingtip.SimpleList'),
The first part of the code in Example 10-18 registers the namespace Wingtip. The Wingtip namespace in JavaScript fills the same purpose as it does in Microsoft C#; it ensures the uniqueness of class names that you define. The next part of the code defines the constructor for the SimpleList class. The SimpleList class takes an element in the constructor. This element will be a div element, and the list will be rendered inside this element. The constructor initializes the list as an ordered list with no items. Below the constructor is the definition of the class. JavaScript uses the prototype property to mark the definition of properties and methods within the class. Finally, the class is registered with the AJAX framework.
Class definitions are typically done in separate JavaScript files and then loaded at run time. You can load the separate files using the ScriptLink control in the same manner as discussed earlier. For simplicity, you can also include small controls directly on the page. Once you have created the class, it may be instantiated just like any other class. In this sample, we want to use the add method of the class to add the titles of all the SharePoint lists. Therefore, the control must be combined with the AJAX page model, delayed script execution, and the JavaScript client object model to achieve the final result. Example 10-19 shows the complete code for the sample.
Example 10-19. Combining AJAX, SharePoint, and the client object model
<asp:Content ID="PageHead" ContentPlaceHolderID="PlaceHolderAdditionalPageHead"
runat="server">

    <script type="text/javascript">
        var site;
        var listCollection;

        function ajaxInit {
            //Nothing to do here
        }

        function ajaxLoad {

            //Register namespace
            if (typeof (Wingtip) == 'undefined')
                Type.registerNamespace('Wingtip'),

            //Constructor
            Wingtip.SimpleList = function (element) {
                this.element = element;
                this.element.innerHTML = '<ol></ol>';
                this.items = '';
            }

            //Prototype
            Wingtip.SimpleList.prototype = {
                element: null,
                items: null,
                add: function (text) {
                    this.items += '<li>' + text + '</li>';
                    this.element.innerHTML = '<ol>' + this.items + '</ol>';
                }
            }

            //Register the class
            Wingtip.SimpleList.registerClass('Wingtip.SimpleList'),

            //Call JavaScript Client OM
            ExecuteOrDelayUntilScriptLoaded(doClientModelOps, "sp.js");
        }

        function ajaxDisposing {
            //Nothing to do here
        }

        function doClientModelOps {

            //Get Context
            var ctx = new SP.ClientContext;

            //Get site
            site = ctx.get_web;
            ctx.load(site);

            //Get lists
            listCollection = site.get_lists;
            ctx.load(listCollection,
                    'Include(Title,Id,Fields.Include(Title,Description))'),

            //Execute
            ctx.executeQueryAsync(success, failure);

        }

        function success {

            //Create instance of control
            var displayList = new Wingtip.SimpleList($get("displayDiv"));

            //Show names of lists
            var listEnumerator = listCollection.getEnumerator;
            while (listEnumerator.moveNext) {
                displayList.add(listEnumerator.get_current.get_title);
            }
        }

        function failure {
            $get("displayDiv").innerHTML = "<p>Failure!</p>";
        }
    </script>

</asp:Content>

<asp:Content ID="Main" ContentPlaceHolderID="PlaceHolderMain" runat="server">
    <script type="text/javascript">
        Sys.Application.add_init(ajaxInit);
        Sys.Application.add_load(ajaxLoad);
        Sys.Application.add_disposing(ajaxDisposing);
    </script>
    <div id="displayDiv">
    </div>
</asp:Content>jQuery is a popular JavaScript framework that simplifies JavaScript development by providing cross-browser support and simplified ways for developers to perform common tasks. Using jQuery, developers can find, select, and manipulate elements of the DOM more easily. In addition, jQuery supports several plug-ins that easily create responsive user interfaces like tabs, accordions, and dialogs. Complete coverage of jQuery is beyond the scope of this book, but you can learn more at the official jQuery site, which is www.jquery.com. In this section, you will learn how to integrate jQuery with SharePoint and use it with the JavaScript client object model.
jQuery is an open-source framework that is available from www.jquery.com in the form of JavaScript libraries. To use jQuery with SharePoint, you can download the libraries and deploy them to the LAYOUTS1033 directory (or whatever folder represents the culture for your installation), where they can be added to a page easily using ScriptLink controls, as shown in the following code.
<SharePoint:ScriptLink ID="JQueryLink1" runat="server" language="javascript"
 Name="jquery-1.3.2.min.js"/>
Much as you can use the $get shortcut to select elements easily in the DOM, jQuery supports a $ object. In jQuery, the $ object is a shortcut for the jQuery object. So, everywhere you see a $ in code, you could substitute jQuery. For example, you can test for jQuery support before performing an operation using the following code.
if ($) { //perform actions }When working with SharePoint, AJAX, and the client object model, you can use jQuery to make your development easier and more structured. You can, for example, select elements from the DOM using the $ operator. For example, the following code selects a div element with an id of displayDiv.
var d = $("div#displayDiv");Along with simpler development, jQuery provides several plug-ins that make it very easy to produce Web 2.0 interfaces in your solutions. One popular example of a jQuery plug-in is the accordion. The accordion plug-in allows you to create a user interface element that has sections that slide open when they are clicked. Figure 10-6 shows a simple accordion created from an unordered list containing the titles and descriptions of SharePoint lists on the current site. Clicking a list title causes the accordion to slide open and reveal the list description.

To create the solution shown in Figure 10-6, the code from Example 10-18 was modified slightly to create an unordered list instead of an ordered list. In addition, the list was given an id attribute with a value of simpleAccordion so that it could be selected in jQuery. Once those changes are made, it is a simple matter to apply the accordion by selecting the unordered list using the following line of code.
$('ul#simpleAccordion').accordion;Although the jQuery framework is extensive, you can see that integrating it with SharePoint, AJAX, and the client object model requires just a few steps. This same approach can be used with your own custom frameworks and libraries. This combination will allow you to create SharePoint solutions that provide an appealing and responsive user interface that runs entirely on the client.
WCF Data Services (formerly known as ADO.NET Data Services) is a framework that allows you to create and access data remotely. WCF Data Services exposes data as Web-based resources that are addressable through Uniform Resource Identifiers (URIs). WCF Data Services implements REST semantics, which means you can perform complete CRUD operations on data sources using only the GET, PUT, POST, and DELETE operations in the Hypertext Transfer Protocol (HTTP). SharePoint 2010 implements WCF Data Services for all lists and libraries. This means you can perform operations on list items using simple URIs.
WCF Data Services has several advantages over the client object models. First, WCF Data Services provides a strongly typed ORM layer that you can use in code to access SharePoint lists and items. In the client object model, on the other hand, all lists and items are returned as more generic types like List and ListItem. Second, WCF Data Services supports LINQ queries against SharePoint lists, whereas the client object model relies on CAML queries. Third, WCF Data Services uses GET, PUT, POST, and DELETE operations in HTTP so any client that supports HTTP can access SharePoint lists.
To use WCF Data Services in your solutions, you must ensure that the latest version is installed in your farm. The installation itself is straightforward, with no additional configuration required after install. Once you have WCF Data Services installed, you may use it immediately by simply opening a browser and issuing URI commands. SharePoint 2010 supports the URI commands through a WCF service named ListData.svc. ListData.svc is located in the ISAPI directory, which is accessible through URIs containing _vti_bin. For example, the following URI returns information about all the lists available in the Wingtip.com site.
http://wingtip.com/_vti_bin/ListData.svc
Information returned from Listdata.svc is in the form of an ATOM feed. In the browser, this will simply appear as an XML document. The following code shows the XML returned from the previous URI.
<?xml version="1.0" encoding="utf-8" standalone="yes" ?>
<service xml:base="http://contososerver/clientom/_vti_bin/ListData.svc/" xmlns:atom="http://
www.w3.org/2005/Atom" xmlns:app="http://www.w3.org/2007/app" xmlns="http://www.w3.org/2007/
app">
  <workspace>
    <atom:title>Default</atom:title>
    <collection href="Demos">
      <atom:title>Demos</atom:title>
    </collection>
    <collection href="MasterPageGallery">
      <atom:title>MasterPageGallery</atom:title>
     </collection>
    <collection href="MasterPageGalleryCompatibleUIVersionS">
      <atom:title>MasterPageGalleryCompatibleUIVersionS</atom:title>
     </collection>
    <collection href="TrainingModules">
      <atom:title>TrainingModules</atom:title>
     </collection>
  </workspace>
</service>
Once you have this information about available lists, you can use it to create a new URI that requests information about the items in a list. This is accomplished by simply appending the name of the list to the end of the URI. The following URI returns all the list items for the TrainingModules list.
http://intranet.wingtip.com/_vti_bin/ListData.svc/TrainingModules
Instead of returning all the items in the list, you can ask for a particular item. This is done by appending the Id of the item to the end of the URI. The following URI requests only the item with Id equal to “2”.
http://intranet.wingtip.com/_vti_bin/ListData.svc/TrainingModules(2)
When making a request, you can also order the results by including the $orderby query string in the URI. The following URI returns all items ordered by title.
http://intranet.wingtip.com/_vti_bin/ListData.svc/TrainingModules?$orderby=Title
Additional query commands are also available. The $top command returns just the first number of rows specified. The $skip command skips rows and is used with the $top command to implement paging. The $filter command allows you to specify a WHERE clause. The following URIs show samples of these commands.
http://intranet.wingtip.com/_vti_bin/ListData.svc/TrainingModules?$top=2
http://intranet.wingtip.com/_vti_bin/ListData.svc/TrainingModules?$skip=2&top=2
http://intranet.wingtip.com/_vti_bin/ListData.svc/TrainingModules?$filter=Title eq 'WCF'
Creating URIs in the browser is interesting and instructive, but it is not typically the way that you would create a WCF Data Services solution. Instead, you would create a new project in Visual Studio 2010 and set a reference to the ListData.svc service. When you create a reference to ListData.svc in your project, Visual Studio creates a proxy object and an ORM layer. This allows you to use strongly typed objects when you write code. Behind the scenes, Visual Studio takes care of issuing the appropriate URI to fulfill your request.
Much like the client object model, you must create a context using the URL of the site where the lists reside. After that, however, you may create and execute LINQ queries immediately to perform CRUD operations. Example 10-20 shows a simple example of a solution that runs a LINQ query to return all the overdue items in the TrainingModules list.
Example 10-20. Using WCF Data Services in Visual Studio 2010
ListDataRef.ClientObjectModelDataContext ctx =
    new ListDataRef.ClientObjectModelDataContext(
    new Uri("http://intranet.wingtip.com/_vti_bin/ListData.svc"));
ctx.Credentials = CredentialCache.DefaultCredentials;

var q = from m in ctx.TrainingModules
        where m.DueDate.Value.CompareTo(DateTime.Today)<0
        orderby m.Title
        select m;

Console.WriteLine("Overdue Modules");
Console.WriteLine("**************");
foreach (var i in q)
{
    Console.WriteLine(i.Title);
}
WCF Data Services supports full CRUD operations on the SharePoint lists. Once items are returned from the LINQ query, they may be updated and saved. Changes are sent back to the list when you call the SaveChanges method of the context object. Creating new items and deleting items are performed using the AddTo and DeleteObject methods. Of course, all operations are performed under the credentials supplied in the application, so users must have rights to the list for an operation to succeed.
Creating rich-client solutions that use the full range of CRUD operations on a list can be extremely simple with WCF Data Services. This is because Visual Studio 2010 provides support for directly binding SharePoint list data to controls in an application. To get started, all you need to do is select Data, Add New Data Source from the Visual Studio menu. This will start the Data Source Configuration Wizard.
In the Data Source Configuration Wizard, you can select to create a new SharePoint Data Source. Here, you simply provide the complete path to ListData.svc through the site that contains your lists. Once the connection is made, you may view all the lists by selecting Data, Show Data Sources. From this view, you can simply drag the list you want to work with onto a Windows form, and a data-bound grid will appear automatically. A complete sample for creating a data-bound solution is contained in the companion code.
In this chapter, you learned how to create SharePoint solutions that use client-side technologies. Using client-side technologies in your solutions is powerful because they provide a more responsive user interface, unload processing from the server, and are a great complement to sandboxed solutions. Client-side technologies are more powerful in SharePoint 2010 than in any previous version of the software. You should give strong consideration to including them in your SharePoint solutions.