
Microsoft Office SharePoint Server (MOSS) 2007 represented Microsoft’s first entry into Enterprise Content Management (ECM). In SharePoint Server 2010 (SPS2010), Microsoft has changed and improved their ECM offering dramatically by simplifying how users participate in ECM solutions, as well as extending the capabilities of the platform.
This chapter will first explain Microsoft’s approach to ECM in SPS2010 and will then explore the different components that fall under the ECM label: document management, records management, and Web content management. As with most areas of the SharePoint platform, many of these capabilities are extensible, and therefore some customization scenarios are provided.
It helps to have an understanding of Microsoft’s approach to ECM before exploring what SPS2010 has to offer. Many leaning analysts firms, including Gartner Group and Forrester, have shown over the years that the majority of ECM deployments do not succeed or meet their full potential. This is a disturbing fact, considering that ECM deployments are expensive and demand significant resources in terms of equipment, personnel, and time. The precise reasons for this troubling fact are not known. However, it can usually be attributed to two things: lack of user adoption and participation and the inability of records managers to find content and effectively manage the solution.
With SPS2010, Microsoft is taking a different approach to ECM than other competing solutions in the market. Typically, users have to submit their content to an ECM implementation for recordkeeping or to comply with established policies. SPS2010 is different in that it brings the ECM capabilities to the users where they do most of their content creation and collaboration: right inside the Microsoft SharePoint sites. This addresses the challenge around user adoption and participation. Users are more likely to participate when they can easily check documents in and out, mark them as records, or assign tags where they are used to working and collaborating on the content. For records managers, SPS2010 includes capabilities simplifying eDiscovery (finding content), auditing, and setting up holds for content involved in litigation.
The previous version of SharePoint, MOSS 2007, had a very different approach to ECM than what is in SPS2010. Microsoft provided site templates that served the purpose of managing documents and records. It was in these two templates, the Document Center and the Records Center, where users found ECM capabilities like the ability to mark content as a record or to establish holds.
In SPS2010, these capabilities, along with many new ones, have been refactored into SharePoint Features, enabling site collection and site owners to add these capabilities to sites based on any template. For instance, pages within a wiki site or posts within a blog site can now be designated as a record.
In SPS2010, the following ECM-supporting capabilities have been packaged as SharePoint Features available on any SharePoint site:
Content Organizer
Document ID Service
Document Sets
Holds and eDiscovery
In-Place Records Management
Metadata Navigation and Filtering
Ratings
SharePoint ships out of the box with two site templates addressing ECM: the Document Center and the Records Center. The Document Center site template is designed to serve as a central place for users to collaborate or store a large number of documents. It has been preconfigured with specific features that address document management capabilities. Users can elect to have a central Document Center implementation that stores a large number of documents for the organization, or they can create smaller instances for specific purposes within existing site collections using the site template. Some of the capabilities that it offers include the following:
Unique Document IDs
Multi-stage content retention policies and file plans
Location-based metadata defaults
Metadata-driven navigation and filtering
The Records Center template, like the Document Center template, also has been configured with specific features. Users can submit documents to the Record Center, which uses the Content Organizer to determine, based on the metadata of the document, where the document should be stored and marked as a record. It also contains a Drop Off Library, which serves as a catch-all for content that does not match a rule and needs to be processed by a librarian or records manager. Like the Document Center, the Records Center site template can be used to create a single instance that everyone in the organization uses, allowing corporate librarians and records managers to define one set of policies and retention schedules, or it can be used to create smaller, team-based Records Center implementations for distinct policies and retention schedules.
SPS2010 includes many capabilities and features that enable organizations to implement very flexible and robust document management solutions. This section will explore some of the most common document management capabilities and how a developer can implement and interact with them.
One new capability is providing a sort of self-health aspect to document libraries (and lists) that contain a large quantity of data. When lists contain a lot of content, SharePoint has to work very hard to retrieve and render datasets from queries that exceed 5,000 items. This can put an unnecessary burden on the system, affecting all the users on the site. SharePoint 2010 addresses this with the concept of large lists. The primary purpose behind large lists is to protect the server from being overtaxed, thereby improving the health and reliability of the environment for all users.
When a list contains more than 5,000 items, it is flagged automatically as a large list, a value that can be configured in Central Administration. This tells SharePoint to stop processing queries and report an exception if the result set grows beyond this threshold. Site collection and farm administrators have a higher threshold of 20,000 items that applies to their queries, a value that can be configured in Central Administration. When queries exceed these limits, users should refine their queries or list view filters to limit the scope of the results.
Administrators using Windows PowerShell can configure some of the large list throttling. A service window can be created where throttling is disabled, providing a period for developers to run their expensive queries. This is done by setting the start hour, start minute, and the duration (in hours) of how long the window is open, as shown in Example 14-1.
Example 14-1. Enabling a large list query service window
# create a service window of 3 hours from 11 PM until 2 AM for expensive queries
PS C:> $webApp = Get-SPWebApplication http://intranet.wingtip.com
PS C:> $webApp.DailyStartUnthrottledPriviledgedOperationHour = 23
PS C:> $webApp.DailyStartUnthrottledPriviledgedOperationMinute = 0
PS C:> $webApp.DailyUnthrottledPriviledgedOperationsDuration = 3
PS C:> $webApp.Update()
Administrators can configure the default throttling limits as well, using the following properties:
Developers can also override the throttling in their queries using a new property on the SPQuery and SPSiteDataQuery objects called QueryThrottleMode. This property can be set to one of three values:
SPQueryThrottleOption.Default Throttling is enabled for all users except for local administrators. Throttling includes the number of items and number of Lookup, Person/Group, and Workflow Status fields in the query.
SPQueryThrottleOption.Override Throttling is disabled for the administrator. For all other users, if they are granted Full Read or Full Control (a Web application security policy setting), the limits are not applied to the number of items returned, but they are applied to the number of Lookup, Person/Group, and Workflow Status fields in the query. For all other users, SPQueryThrottleOption.Default applies.
SPQueryThrottleOption.Strict Throttling applies to the number of items and number of Lookup, Person/Group, and Workflow Status fields in the query, as well as the number of items in the query, regardless of the user’s permissions or Web application security policy settings.
The ability to override the self-protection capabilities in SharePoint may seem counterintuitive, because it could support bad coding practices. However, like the powerful SPSecurity.RunWithElevatedPrivliedges() method, it provides an important capability that cannot be met any other way. Used sparingly as part of a well-thought-out application design and highlighted in code reviews, it should not present a problem. It is important to note, however, that administrators have the final say in this matter—they can block this override capability by setting a property on the Web application, as shown in Example 14-2.
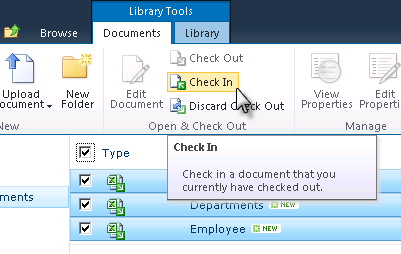
One of the most common and basic document management capabilities is check-in and checkout. When an item is checked out, no other user can make changes to it until it is checked in. One major improvement in SharePoint 2010 is the ability to check in and check out multiple documents at one time. This addresses the tedious task of checking in multiple documents manually after uploading them to a document library, as shown in Figure 14-1.
Checking a file in or checking it out programmatically is fairly straightforward. After checking the status of the file, developers can check it in by calling the CheckIn() method and (if they want) specifying the checking type, as shown in Example 14-3.
Example 14-3. Checking in all checked-out documents in a library
using (SPSite siteCollection = new SPSite("http://intranet.wingtip.com")) {

  SPWeb site = siteCollection.RootWeb;
  SPList list = site.Lists["Shared Documents"];

  foreach (SPListItem item in list.Items) {
    if (item.Level == SPFileLevel.Checkout)
      item.File.CheckIn("Checking file in.", SPCheckinType.MajorCheckIn);
  }
}SharePoint document libraries allow users to create and interact with individual files. These individual files can be the target of workflows and event receivers, support versioning, or have unique permissions applied to them. In many cases, however, a single document does not represent a complete work product. A work product may consist of multiple documents, such as an invoice with supporting timesheets, travel receipts, a statement of work, and other resources.
Folders can be used to group documents; however, folders cannot be versioned or be the target of an event receiver or workflow.
SPS2010 introduces a new capability called a document set, which enables users to create a single work product that contains multiple work items. A document set has all the same characteristics of an individual document, and all items within the document set retain their individual capabilities as well. A document set is based on a specific content type called Document Set, which adds the following other characteristics to a typical folder:
Allowed Content Types The types of content that are permitted within the document set.
Shared Fields Common columns that exist on the document set and child content types. When the value is changed in the document set, SharePoint automatically updates the metadata on all documents in the document set with the new value.
Welcome Page SharePoint implements documents sets as a Web Part Page when users view them with a browser. The Welcome page displays specified fields from the document set’s content type, as well as the individual files that make up the document set.
Default Content When users create a new instance of the document set, it can provision new content that is associated with one of the allowed content types automatically.
When interacting with a document set, the SharePoint interface adds a new contextual tab group that provides additional functionality that you do not normally have in a document library, as shown in Figure 14-2.

Creating a new document set with the browser is simple. First, create the content types (which must be derived from the Document content type) that will be allowed within the document set. Then create a new content type that derives from the Document Set content type and configure its settings. The Document Set content type is added to the site’s Content Type Gallery by activating the Document Set feature. Once a document set has been created, it can then be added to a document library in the same way that regular content types are added.
Creating document sets through the browser is simple, but it is not a very reusable approach. Another approach is to create them declaratively with SharePoint features, packaged in SharePoint solution packages (*.wsp) and deployed where and when needed, thus addressing both the portability and reusability issues.
The SharePoint developer tools in Microsoft Visual Studio 2010 do not contain a project template or project item template for creating custom document sets, so it must be done by hand. Because a document set is a special kind of a content type, the process for creating a document set is identical to creating a content type except that it has a few extra steps.
Before creating the document set, create all the site columns and content types that will be used within the document set. These should be provisioned before creating the document set. When defining the document set content type, ensure that it inherits from the Document Set content type (ID = 0x0120D520). The definition should also identify itself as a document set, enabling certain client capabilities like the Document Set contextual tab group and customizations to the ECB menu. This is done by adding Progld=“SharePoint.DocumentSet” to the <ContentType /> element, as shown in Example 14-4.
Example 14-4. Declaring a new Document Set content type
<ContentType ID="0x0120D52000e0130de6901740a69cff09cb2906dbc8"
             Name="Invoice Document Set"
             Group="Wingtip Content Types"
             ProgId="SharePoint.DocumentSet">
It is also good practice to tell SharePoint where the folder for the content type should be created and what to name it. This will be useful when specifying the default content that should be provisioned in new instances of the document set.
<Folder TargetName="_cts/Invoice Document Set" />
Next, add the site columns to the document set content type. Some of these fields will be used on the document set’s Welcome page, and some will be synchronized with the matching fields on the documents that make up the document set, as shown in Example 14-5.
Example 14-5. Specifying the fields in a document set
<FieldRefs>
  <FieldRef ID="{8553196d-ec8d-4564-9861-3dbe931050c8}" DisplayName="Invoice Name"
            Description="Enter in the format of [CUSTOMER]-[INVOICE NUMBER]." />
  <FieldRef ID="{038D1503-4629-40f6-ADAF-B47D1AB2D4FE}" Name="Company"
            DisplayName="Company" Required="TRUE" />
  <FieldRef ID="{83729202-DCA7-4BF8-A75B-56DDDE53189C}" Name="InvoiceNumber"
            DisplayName="Invoice Number" Required="TRUE" />
  <FieldRef ID="{0BFAF66B-BB9A-4876-AAFA-4D5223352745}" Name="InvoiceAmount"
            DisplayName="Invoice Amount" Required="TRUE" />
  <FieldRef ID="{06F6AF4F-F1AD-491B-B83C-6BC47739731A}" Name="InvoiceDate"
            DisplayName="Date Invoice Received" Required="TRUE" />
  <FieldRef ID="{885F61BF-F61C-42DE-89D9-4AA7E562CBBF}" Name="InvoicePaymentTerms"
            DisplayName="Payment Terms" Required="TRUE" />
  <FieldRef ID="{444F753B-D35C-4E93-845A-3EDA63214C30}" Name="InvoicePaidStatus"
            DisplayName="Paid Status" Required="TRUE" />
</FieldRefs>
The rest of the content type definition is specific to creating a document set. SharePoint sets the document set specific characteristics via the <XmlDocuments /> section of the content type. First, add all the content types that are allowed in the document set, referencing them by their ContentTypeId, as shown in Example 14-6.
Example 14-6. Specifying the allowed content types in the document set
<XmlDocument NamespaceURI="http://schemas.microsoft.com/office/
                                documentsets/allowedcontenttypes">

  <act:AllowedContentTypes xmlns:act="http://schemas.microsoft.com/office/
                                           documentsets/allowedcontenttypes"
                           LastModified="1/1/2010 08:00:00 AM">

    <!-- Document -->
    <AllowedContentType id="0x0101" />

    <!-- Invoice -->
    <AllowedContentType id="0x01010079156360b718448b8cd89ea90a9db922" />

    <!-- Receipt -->
    <AllowedContentType id="0x0101002bc80a9a6946417891f8d100cebace6a" />

    <!-- Timesheet -->
    <AllowedContentType id="0x01010100202388ebe7f24afb8c44263ea755cfc1" />

  </act:AllowedContentTypes>
</XmlDocument>
There is one column in the invoice document set that should be kept in sync with all other content types in the collection: Invoice Number. Designate this as a shared field, referencing the ID of the Site Column definition, as shown in Example 14-7.
Example 14-7. Specifying the shared fields in the document set
<XmlDocument
   NamespaceURI="http://schemas.microsoft.com/office/documentsets/sharedfields">

  <sf:SharedFields
    xmlns:sf="http://schemas.microsoft.com/office/documentsets/sharedfields"
    LastModified="1/1/2010 08:00:00 AM">

    <!-- Invoice Number -->
    <SharedField id="83729202-DCA7-4BF8-A75B-56DDDE53189C" />

  </sf:SharedFields>
</XmlDocument>
Next, specify the fields in the document set content type that should be displayed on the Welcome page when users view an invoice instance, again referencing the ID of the Site Column definition, as shown in Example 14-8.
Example 14-8. Specifying the Welcome page fields in the document set
<XmlDocument NamespaceURI="http://schemas.microsoft.com/office/
                               documentsets/welcomepagefields">

  <wpFields:WelcomePageFields xmlns:wpFields="http://schemas.microsoft.com/office/
                                                   documentsets/welcomepagefields"
                              LastModified="1/1/2010 08:00:00 AM">

    <!-- Invoice Number -->
    <WelcomePageField id="83729202-DCA7-4BF8-A75B-56DDDE53189C" />

    <!-- Invoice Amount -->
    <WelcomePageFIeld id="0BFAF66B-BB9A-4876-AAFA-4D5223352745" />

    <!-- Date Invoice Received -->
    <WelcomePageField id="06F6AF4F-F1AD-491B-B83C-6BC47739731A" />

    <!-- Payment Terms -->
    <WelcomePageField id="885F61BF-F61C-42DE-89D9-4AA7E562CBBF" />

    <!-- Paid Status -->
    <WelcomePageField id="444F753B-D35C-4E93-845A-3EDA63214C30" />

  </wpFields:WelcomePageFields>
</XmlDocument>
When users create new instances of the document set, it should contain a blank timesheet attached to the Timesheet content type. First, configure the document set so that it provisions the default content, as shown in Example 14-9.
Example 14-9. Specifying document set default content
<XmlDocument NamespaceURI="http://schemas.microsoft.com/office/documentsets/
defaultdocuments">

  <dd:DefaultDocuments
    xmlns:dd="http://schemas.microsoft.com/office/
                   documentsets/defaultdocuments"
    AddSetName="TRUE"
    LastModified="1/1/2010 08:00:00 AM">

    <DefaultDocument name="WingtipTimesheet.xsn"
                     idContentType="0x01010100202388ebe7f24afb8c44263ea755cfc1" />

  </dd:DefaultDocuments>
</XmlDocument>
Next, the timesheet template needs to be provisioned into the SharePoint site in the document set’s location specified earlier. Add a new Module project item in the Visual Studio 2010 project that contains a Microsoft InfoPath timesheet file and provision it to the folder of the document set, which was specified previously with the <Folder TargetName /> element, as shown in Example 14-10.
Example 14-10. Provisioning document set default content
<Module Name="InvoiceDocSet_DefaultContent">
  <File Path="InvoiceDocSet_DefaultContentWingtipTimesheet.xsn"
        Url="_cts/Invoice Document Set/WingtipTimesheet.xsn" />
</Module>
At this point, the document set is complete. An optional step is to create a custom Welcome page that users will be taken to when they view the document set. When showing the document set, SharePoint looks for a file named DocSetHomePage.aspx in the document set’s folder. If it exists, it will be used as the Welcome page for that document set. If it doesn’t exist, a generic Welcome page will be shown instead.
In the case of the invoice document set, the Welcome page should display a message about how much the company can save if the invoice is paid during the discount period and how many days remain until the invoice is past due. To create a custom Welcome page, create a copy of the default Welcome page that is provisioned by the Document Set Feature found in {SharePoint Root}TEMPLATEFEATURESDocumentSet and provision it using a Module SharePoint project item, as shown in Example 14-11.
Example 14-11. Provisioning the document set Welcome page
<Module Name="InvoiceDocSet_WelcomePage" RootWebOnly="TRUE">

  <File Path="InvoiceDocSet_WelcomePageDocSetHomePage.aspx"
        Url="_cts/Invoice Document Set/DocSetHomePage.aspx">

    <AllUsersWebPart WebPartOrder="0" WebPartZoneID="WebPartZone_TopLeft">
      <!-- WebPart element omitted for clarity -->
    </AllUsersWebPart>

    <AllUsersWebPart WebPartOrder="0" WebPartZoneID="WebPartZone_CenterMain">
      <!-- WebPart element omitted for clarity -->
    </AllUsersWebPart>

    <AllUsersWebPart WebPartOrder="0" WebPartZoneID="WebPartZone_Top">
      <!-- WebPart element omitted for clarity -->
    </AllUsersWebPart>

  </File>
</Module>
The three <AllUsersWebPart /> elements provision an Image Web Part with the default document set image, a Document Set Contents Web Part that shows the contents of the Web Part, and the Document Set Properties Web Part that shows all the Welcome page properties. The easiest way to get these values is to copy them from the element manifest in the out-of-the-box DocumentSet feature.
At this point, the Visual Studio 2010 project should look similar to Figure 14-3.

Package, deploy, and activate the Feature that provisions the invoice document set Feature and add it to a document library. Test everything by creating a new instance of the document set to see the results. Figure 14-4 shows an invoice for work performed with payment terms of 2% 10 NET 30, meaning that if it is paid within 10 days of receipt, the payee can take an automatic 10% discount.

When users create or add a document to a document library, they can share it with their colleagues by sending them a Uniform Resource Locator (URL) that points to the document. This is a great way to reference the document at a later date. If the document is moved or renamed, though, it will now have a completely different URL, making the old one useless.
SPS2010 addresses this common challenge by introducing a new capability called Document IDs. When the Document ID Service feature is activated on a site collection, all documents and document sets within that site collection are automatically assigned a site collection scope unique ID—a string value that stays with the document regardless of what happens to it within that site collection. Any existing documents already in the site collection when the feature is activated will be assigned document IDs in a deferred batch process implemented by the Document ID Assignment Job timer job.
Regardless of whether a document is renamed or moved within a site collection, users will always be able to find it using the unique document ID. SPS2010 has a special application page, DocIdRedir.aspx, which accepts the document ID as a query string value and will redirect the requester to the document within the site collection. In addition, the Document ID Service feature adds a new Find by Document ID Web Part to the Web Part Search category that allows users to enter the unique ID to be routed to the document.
Document IDs are generated by a document ID provider. When the Document ID Service is activated, it adds a new site column to the document and document set content types to store the ID. When a user requests a document using a document ID, by default, SharePoint first tries to find the document using the out-of-the-box search capability. If it cannot find the document, it falls back on the document ID provider to give it the opportunity to find the document.
Developers can create custom document ID providers when they want to override either the default document ID string pattern or how documents are found. This is done by first creating a provider and then registering it with a site collection.
To create a new document ID provider, create a new class that inherits from the Microsoft.Office.DocumentManagement.DocumentIdProvider class. This class has four members that should be overridden:
GenerateDocumentId() This method is responsible for creating the unique document ID string. Overriding this allows the developer to change how new document IDs are generated. It is the responsibility of the developer to ensure that the generated ID is unique across the site collection. Also note that, if desired, this method could be used to generate an ID that is unique at a scope higher than site collection, such as Web applications or even the whole farm.
GetDocumentUrlsById() This method accepts a document ID string and returns a list of URLs for the corresponding document. It can return multiple values because developers can copy documents programmatically from one location to another and specify that the document ID be retained on the copied instance.
GetSampleDocumentIdText() This method generates a sample document ID string that is displayed in the Find by Document ID Web Part, giving users a hint as to what the ID looks like.
DoCustomSearchBeforeDefaultSearch This Boolean property tells SharePoint if it should default to using the SharePoint search feature or the document ID provider to find the URL of the document ID string.
The following code listing demonstrates a custom document ID provider that uses the first part of the hosting Web Application, site collection, site, list, and list item’s ID as the document ID string, as shown in Example 14-12.
Example 14-12. A custom document ID provider
public class MoreUniqueDocumentIDProvider : DocumentIdProvider {
  private const string DOCID_FORMAT = "{0}-{1}-{2}-{3}-{4}";

  public override bool DoCustomSearchBeforeDefaultSearch {
    get { return false; }
  }

  public override string GenerateDocumentId(SPListItem listItem) {
    string listItemID = listItem.ID.ToString();
    string listID = listItem.ParentList.ID.ToString().Substring(0, 4);
    string siteID = listItem.Web.ID.ToString().Substring(0, 4);
    string siteCollectionID = listItem.Web.Site.ID.ToString().Substring(0, 4);
    string webAppID =
           listItem.Web.Site.WebApplication.Id.ToString().Substring(0, 4);
    return string.Format(DOCID_FORMAT, webAppID, siteCollectionID,
                         siteID, listID, listItemID);
  }

  public override string[] GetDocumentUrlsById(SPSite hostingSiteCollection,
                                               string documentId) {
    List<string> possibleURLs = new List<string>();
    string[] brokenDownDocID = documentId.Split("-".ToCharArray()[0]);

    // find the Web application
    SPWebService webService = hostingSiteCollection.WebApplication.WebService;
    foreach (SPWebApplication webAppplication in webService.WebApplications) {
      if (webAppplication.Id.ToString().StartsWith(brokenDownDocID[0])) {
        // find the SPSite (if multiple, won't matter as it will go to next one...)
        foreach (SPSite siteCollection in webAppplication.Sites) {
          if (siteCollection.ID.ToString().StartsWith(brokenDownDocID[1])) {
            // find the SPWeb (if multiple, won't matter as it will go to next one...)
            foreach (SPWeb site in siteCollection.AllWebs) {
              if (site.ID.ToString().StartsWith(brokenDownDocID[2])) {
                foreach (SPList list in site.Lists) {
                  if (list.ID.ToString().StartsWith(brokenDownDocID[3])) {
                    // find the item in the list
                    SPListItem targetItem = list.GetItemById(
                                                 Int32.Parse(brokenDownDocID[4]));

                    if (targetItem != null)
                      possibleURLs.Add(String.Format("{0}//{1}",
                                                     site.Url,
                                                     targetItem.Url));
                  }
                }
              }
              site.Dispose();
            }
          }
          siteCollection.Dispose();
        }
      }
    }
    return possibleURLs.ToArray();
  }

  public override string GetSampleDocumentIdText(Microsoft.SharePoint.SPSite site) {
    return string.Format(DOCID_FORMAT,
      "55DA526F", "FD9D4836", "FD0910DC", "15B4AD8A", "ABDC1A45");
  }
}
After creating the document ID provider, it needs to be registered with a site collection. This can be done using the Feature receiver of a site collection scoped feature. Use the Microsoft.Office.DocumentManagement.DocumentId class to set the provider for a specified site collection, as shown in Example 14-13.
Example 14-13. Registering custom document ID providers
public override void FeatureActivated(SPFeatureReceiverProperties properties) {
  SPSite siteCollection = properties.Feature.Parent as SPSite;
  MoreUniqueDocumentIDProvider docIDProvider = new MoreUniqueDocumentIDProvider();
  DocumentId.SetProvider(siteCollection, docIDProvider);
}

public override void FeatureDeactivating(SPFeatureReceiverProperties properties) {
  SPSite siteCollection = properties.Feature.Parent as SPSite;
  hMicrosoft.Office.DocumentManagement.DocumentId.SerDefaultProvider();
}In the 2007 release, SharePoint located all records management capabilities and features within the Records Center site template. In SPS2010, Microsoft has changed their approach to records management by converting many of the records management–specific capabilities into SharePoint features that can be activated on a site based upon any template. This provides additional flexibility to organizations in that they can still elect to have a single dedicated Records Center for the whole organization, or, by using these capabilities in other site templates, multiple smaller implementations throughout the organization. Some of the records management features include:
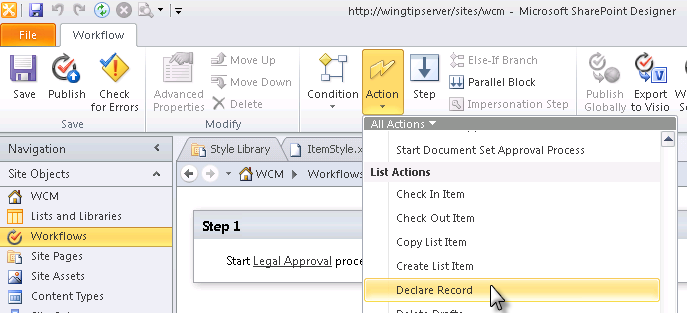
The SharePoint feature In-Place Records Management enables users to declare records in a document library alongside other collaborative content. While it can be configured to allow for users to declare (and undeclare) records manually, this is something that should be undertaken as part of the business process. Document libraries can be configured to declare files as records automatically when they are added. Microsoft SharePoint Designer 2010 and Visual Studio 2010 provide actions and activities for use in SharePoint workflows to declare and undeclare an item as a record, as shown in Figure 14-5.
Under certain conditions, developers may need to declare a file as a record programmatically, such as within an event receiver when certain metadata properties are found. Declaring and undeclaring a record programmatically involves a single line of code, as shown in Example 14-14.
Example 14-14. Declaring and undeclaring files as records programmatically
// using Microsoft.Office.RecordsManagement.RecordsRepository;

SPListItem targetDocument = GetDocument();

// Declare file as record
Records.DeclareItemAsRecord(targetDocument);

// Undeclare file as record
Records.UndeclareItemAsRecord(targetDocument);
Similar to the Document ID Service, the new Content Organizer is designed to assist in the management of large libraries. Many times, users are not sure into which document library or folder they should put a document. In the case of a large, central Document Center or Records Center implementation, users know that they need to submit the document, but they have no idea where to put it within that implementation. The Content Organizer assists with this task by looking at new content, checking the document’s metadata against some predefined and prioritized rules, and, if a matching rule is found, saving the content to the document library and folder specified in the rule. It can even manage large libraries by automatically creating new folders if the content in the target folder grows beyond a specified threshold.
Once the site-scoped Content Organizer feature is activated, two new links are added to the Site Administration section in the Site Settings page. One provides the settings for customizations, such as whether a Drop Off Library is required, a folder size should be managed automatically, or content can be routed to a subsite.
The other link provides access to the rules used by the Content Organizer. All rules are stored in the RoutingRules list and are based on the Rule content type, which is new in SPS2010. When a user creates or uploads a new document to the site, the Submit Document dialog displays a message that the content will be moved according to the defined rules, as shown in Figure 14-6.

Web Content Management (WCM) is the collection of capabilities and features used to facilitate a content-managed site on the SharePoint platform. WCM existed in SharePoint 2007 but was based on many of the capabilities in the now-discontinued Microsoft Content Management Server 2002.
With WCM in SPS2010, customers can create Publishing sites that are designed to have few content contributors but a large number of content consumers. This differs from a traditional SharePoint collaboration experience, in which there are many contributors interacting with many consumers.
A Publishing site is a SharePoint site that has the Publishing features activated. This is an important distinction because the Publishing features add a considerable amount of infrastructure to a site collection upon which they are activated.
SPS2010 WCM can be used in a various scenarios, such as the primary corporate Internet-facing .com site, a company intranet site, a partner extranet site, or even as a divisional portal. Each implementation can use different capabilities in SPS2010 WCM.
The process of rendering requested pages in Publishing sites differs from traditional collaboration sites in SharePoint. This is because the content pages within a Publishing site are not real pages. Instead, they are simply items in a SharePoint list: the Pages library. Each item in this list contains some important information:
Page Name The page’s file name as it will be listed in the URL, such as homepage.aspx
Page Layout The name of the page layout, an .aspx file, that defines how the content on the page should be rendered
Scheduling Details A collection of fields that specifies when the page should be published or expired, once it has been approved for publication
Content Fields The collection of image, text, and rich text fields that contain the content on the page
A requested page is rendered using various components. The URL tells SharePoint where it will find the page, specifically which site collection, site, library, and list item. It uses the file name requested to find the specific file in the Pages library. In turn, this list item tells SharePoint which page rendering, a special *.aspx page called a “page layout,” to use in rendering the page. ASP.NET loads the page layout, which contains master page content placeholders and a reference to the site’s master page. These two files are merged.
Dynamic content areas in the page—those areas where content owners can manage the content—are implemented using two types of controls: field controls and Web Part Zones. The contents of field controls are stored with the page item itself in the Pages list and are mapped to one of the content fields defined on the page. Web Part Zones can contain Web Parts, the contents of which are stored separately inside the content database. The page rendering process gets the Web Parts and their data for a specific zone in the requested page from the ASP.NET Personalization store, which has been incorporated into the site collection’s content database.
The distinction of where content is stored (either in the page item using field controls or in the ASP.NET Personalization store using Web Parts) is important because it affects the versioning of a page. When a page is modified, by default the list item is versioned. This versions the content referenced by field controls, but not Web Parts because the data in the Web Part is not saved with the page, as shown in Figure 14-7.

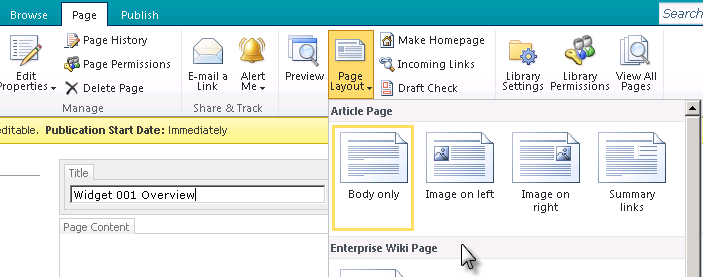
When creating new pages in SPS2010 content, authors can pick from various types of pages and different rendering options. Each of the page types are implemented using content types that are derived from the Page content type. The Page content type contains the minimum required information for the page, such as the file name, page layout to use, a thumbnail image of the page to display in content rollup scenarios, content owner contact details, and the scheduling information, as shown in Figure 14-8.
Once the new content type for the page type has been created, a site designer or developer can create one or more rendering options for the content authors to choose from. This is done by creating a page layout, associating it with the new page type’s content type, and saving it to the Master Page Gallery. Designers and developers add field controls and Web Part Zones to the page layout to implement the rendering of the page.
Site designers and developers can use SharePoint Designer 2010 to create new page layouts using a what-you-see-is-what-you-get (WYSIWYG) rich experience and to associate the page layout with a specific page type in a wizard-like fashion.
Developers can also use Visual Studio 2010 to create page types and page layouts using features and solution packages (*.wsp) allowing for more code reuse and testing in moving the solution between environments (that is, development, testing, staging, and production). The SharePoint Developer Tools do not include specific project item templates for doing this, but it can be achieved using the content type and module item templates.
First, create a new content type using the Content Type project item that inherits from the Page content type. Create any necessary site columns that will be used in the content type, as well as the content type itself, as shown in Example 14-15.
Example 14-15. Creating a page type (content type) declaratively
<?xml version="1.0" encoding="utf-8"?>
<Elements xmlns="http://schemas.microsoft.com/sharepoint/">

  <!-- new site column based off the "single line of text" field type -->
  <Field SourceID="http://schemas.microsoft.com/sharepoint/v3"
         ID="{0D499375-D734-43DB-A2EE-343B490B9CB0}"
         Name="PRByLine" DisplayName="Press Release ByLine" Group="Wingtip"
         Type="Text" Required="FALSE" Sealed="FALSE" Hidden="FALSE" />

  <!-- new site column based off the "publishing html" field type -->
  <Field SourceID="http://schemas.microsoft.com/sharepoint/v3"
         ID="{0C50E0BF-A35C-4A38-B784-AFA60BBADC00}"
         Name="PRBody" DisplayName="Press Release Body" Group="Wingtip"
         Type="HTML" Required="FALSE" Sealed="FALSE" Hidden="FALSE" />

  <!-- Parent ContentType: Page
   (0x010100C568DB52D9D0A14D9B2FDCC96666E9F2007948130EC3DB064584E219954237AF39)
  -->
  <ContentType ID="0x010100C568DB52D9D0A14D9B2FDCC96666E9F2007948130EC3DB064
                   584E219954237AF39008d9a0288b03e457abc84303bcdaa9cd7"
               Name="Press Release" Description="Wingtip Press Release"
               Group="Wingtip" Inherits="TRUE" Version="0">
    <FieldRefs>
      <FieldRef ID="{0D499375-D734-43DB-A2EE-343B490B9CB0}" Name="PRByLine" />
      <FieldRef ID="{0C50E0BF-A35C-4A38-B784-AFA60BBADC00}" Name="PRBody" />
    </FieldRefs>
  </ContentType>
</Elements>
To add the page layout, add a Module project item to the project. Remove the default sample.txt file and add a new file named PressRelease.aspx. Add the following markup to the new file, creating a basic rendering for the press release content type, as shown in Example 14-16.
Example 14-16. Creating a press release page layout
<%@ Page language="C#"
      Inherits="Microsoft.SharePoint.Publishing.PublishingLayoutPage,
                Microsoft.SharePoint.Publishing, [full assembly name]" %>

<%@ Register Assembly="Microsoft.SharePoint, [full assembly name]"
             Namespace="Microsoft.SharePoint.WebControls"
             TagPrefix="SharePointWebControls" %>

<%@ Register Assembly="Microsoft.SharePoint.Publishing, [full assembly name]"
             Namespace="Microsoft.SharePoint.Publishing.WebControls"
             TagPrefix="PublishingWebControls" %>

<asp:Content runat="server" contentplaceholderid="PlaceHolderPageTitle">
  <SharePointWebControls:FieldValue id="PageTitle"
                                    FieldName="Title"
                                    runat="server"/>
</asp:Content>


<asp:Content runat="server" contentplaceholderid="PlaceHolderPageTitleInTitleArea">
  <SharePointWebControls:TextField ID="TitleField"
                                   FieldName="Title"
                                   runat="server" />
</asp:Content>

<asp:Content runat="server" contentplaceholderid="PlaceHolderMain">
  <SharePointWebControls:TextField ID=" PRByLineField"
                                   FieldName="PRByLine"
                                   runat="server"/>
  <br />
  <PublishingWebControls:RichHtmlField ID="RichHtmlField1"
                                       FieldName="PRBody"
                                       runat="server"/>
</asp:Content>
Adding this file to the project item will update the feature’s elements.xml file automatically to reference the *.aspx page. The target of where the file will be provisioned needs to be updated, and a few properties need to be set using the <File URL=“” /> attribute. In addition, the module needs to be configured to provision the file as content in the library by setting the <File Type=“” /> attribute to GhostableInLibrary. The property references are used to specify the values of certain metadata fields in the Master Page Gallery, as shown in Example 14-17.
Example 14-17. Provisioning the page layout
<Elements xmlns="http://schemas.microsoft.com/sharepoint/">

  <Module Name="PressReleaseLayout" RootWebOnly="TRUE"
          Path="PressReleaseLayout" Url="_catalogs/masterpage" >

    <File Url="PressRelease.aspx" Type="GhostableInLibrary">

      <Property
        Name="PublishingAssociatedContentType"
        Value=";#Press Release;#0x010100C568DB52D9D0A14D9B2FDCC96666E9F2007948130
                EC3DB064584E219954237AF39008d9a0288b03e457abc84303bcdaa9cd7;#" />

      <Property
        Name="ContentType"
        Value="$Resources:cmscore,contenttype_pagelayout_name;" />

      <Property
        Name="Title"
        Value="Wingtip Press Release" />

    </File>
  </Module>
</Elements>
The listing includes three important properties:
ContentType This is the ID of the page layout content type. The value in the listing is what should be used for all page layouts because it is what SharePoint will be looking for.
PublishingAssocatedContentType This value tells SharePoint which content type this rendering is associated with. It contains two delimited values separated with ;#. The first value is the name of the content type. The second value is the content type’s unique ID.
Title This is the name of the page layout.
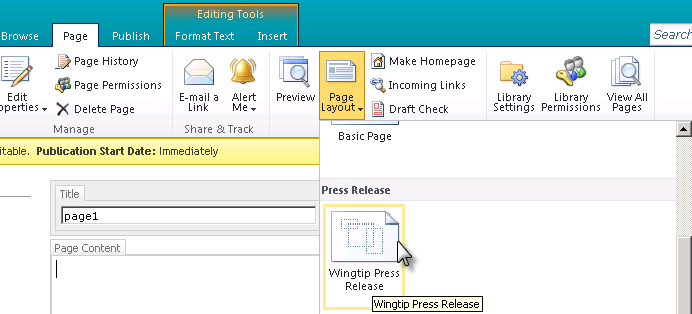
Finally, build and deploy the project and activate the site collection scoped feature to create the site columns and content type, and provision the new page layout. Now, when creating a new page, the Press Release page type with a single rendering should appear in the list of available options, as shown in Figure 14-9.
A very common task in a managed content site is to aggregate content from various places in a site collection to a single page. In these scenarios, Publishing sites can take advantage of the Content Query Web Part (CQWP) that is included in SPS2010 WCM. This is the preferred method of aggregating content in a Publishing site because it has been highly optimized. It uses the same underlying components that are used to create and render the Publishing site navigation, including advanced caching techniques.
The CQWP is a very flexible Web Part that allows content authors to select content from across a site collection applying filtering and different grouping options. The CQWP takes the results from the query and converts them to Extensible Markup Language (XML). It then takes this XML result set and applies an Extensible Stylesheet Language for Transformations (XSLT) template that contains the presentation option selected by the content owner to generate the Hypertext Markup Language (HTML) used to render the results.
While Microsoft includes various rendering options for the CQWP, a common task is to create a custom rendering for specific implementations. This involves creating a custom XSLT template and registering it with the CQWP.
A challenge with creating CQWP rendering templates is that the result set could have heterogeneous types of content returned, each with different column names. When the XSLT needs to reference a column, it has no way of determining whether a particular result in the XML contains an element for that particular column. To address this challenge, Microsoft created slots in the CQWP style templates. A slot is simply a variable declared in the XSLT file. When the style is selected in the browser’s Web Part tool pane, it displays all available slots. The page content author can then provide a semicolon-delimited list of fields to attempt to insert into the slot. If there is no content or field for a particular search result, it proceeds to the next one. This not only makes the XSLT much simpler, but it also makes it easier for the content author to control which columns take precedence.
You can create a custom presentation option by modifying the existing XSLT file used by the CQWP. Open the ItemStyle.xsl file in SharePoint Designer 2010 found in the Style Library’s XSL Style Sheets subfolder. Find a template that is the closest match for the desired rendering, create a copy, and rename it. Example 14-18 demonstrates taking the default Image on Left rendering and renaming it to InsideSharePoint2010.
Example 14-18. Provisioning the page layout
<xsl:template name="InsideSharePoint2010"
              match="Row[@Style='InsideSharePoint2010']"
              mode="itemstyle">

  <xsl:variable name="SafeLinkUrl">
    <xsl:call-template name="OuterTemplate.GetSafeLink">
        <xsl:with-param name="UrlColumnName" select="'LinkUrl'"/>
    </xsl:call-template>
  </xsl:variable>

  <div class="item">
    ...
  </div>

</xsl:template>
Next, create a new variable by referring to an attribute in the XML named CustomSlot, which will be passed to the template:
<div class="item">
  <xsl:value-of select="@CustomSlot" />
  ...
</div>
Save all changes, check in the XSLT file, and add a CQWP to a page. Open the tool window, and, in the Content Query – Presentation – Styles section, set Item Style to InsideSharePoint2010, and then apply the changes to see the new slot appear, as shown in Figure 14-10.
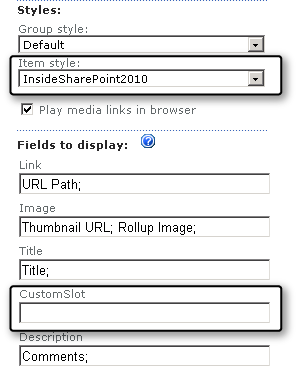
To inject content into this slot, add one or more column names from the result set separated by semicolons.
Users will find metadata throughout SharePoint quickly in any place where content can be created. In SharePoint, this has traditionally been tied to lists and document libraries, allowing users to add fields to items to provide a more detailed description of the content.
SPS2010 takes metadata much further, in that it provides additional capabilities to create reusable enterprise taxonomies and folksonomies. Taxonomies are hierarchical sets of terms, or tags, usually centrally defined. Folksonomies are similar to taxonomies in that they are a collection of terms, but they have no organization or hierarchical structure. Metadata is used in many more places throughout SharePoint, such as refining search results, filtering and navigating content within SharePoint lists and document libraries using the new Metadata Navigation Settings list, and enabling users to tag pages in social solutions.
Management and syndication of metadata is facilitated with the new Managed Metadata Service (MMS). The MMS allows users to create and manage taxonomies and folksonomies. SPS2010 supports both taxonomies and folksonomies. Taxonomies can be defined either as global or local. Global taxonomies are available to all site collections in Web applications associated with the MMS. Local taxonomies are defined and managed at the site collection level and are not shared across site collections.
Administrators serving the role as librarians, information architects, or records managers use the Term Store Management Tool to manage taxonomies and folksonomies. Start the Term Store Management Tool by selecting the MMS instance in Central Administration on the Manage Service Applications page and clicking the Manage button on the Ribbon. Each MMS implementation has a single term store that contains one or more groups of term sets. Groups are used very much like site column or content type groups, in that they make it easier to find relevant term sets.
Term sets are hierarchical collections of terms. Each term set can be configured to have an open or closed submission policy. An open submission policy allows anyone to insert terms into the term set, while a closed submission policy is the exact opposite—only a defined group can insert terms into the term set.
Each term in the term set has various characteristics:
Default Label The label used for the term set when it is selected and displayed in the user interface.
Description A brief description of what the term is used for.
Available for Tagging A flag indicating if the term can be used to tag content. Some terms are used for grouping child terms and should not be used with tagging solutions. For example, in a term set used to define age groups, the various age groups may be given names such as Toddler, Adolescent, Teen, Young Adult, Adult, and Elderly. These should not be used in tagging, but they can be used to find the appropriate age group tag.
Language Each term can be translated to multiple languages (depending on the language packs installed in the SharePoint farm). Users tagging content with the tag named mountain bicycle in English would see the tag as bicicleta de montaña in Spanish, assuming that the Spanish language pack was installed on the server and their browser was set to a local of es-es.
Synonyms Some terms may be different depending on the users and the context. Users can tag content using the default label or any listed synonym and have the same term from the term set associated with the content. For instance, the term New York City may have synonyms JFK, LGA, and EWR for the three airports in and around New York.
The MMS also manages the process of renaming terms and updating the content tagged with those terms. When a term is updated, the Taxonomy Update Scheduler timer job looks at all changes and updates the content with any changes applied to the terms. By default, this process runs once an hour.
Creating terms using the browser is very straightforward using the Term Store Management Tool. In addition, administrators can import existing taxonomies using this tool. The import process requires a *.csv file formatted a specific way. For details on this format, see the following page on Microsoft TechNet at http://technet.microsoft.com/en-us/library/ee424396.aspx.
The out-of-the-box taxonomy import process is somewhat limiting, in that it does not provide a way to include multiple language translations for a tag or synonym. It also will not merge terms into an existing taxonomy. SPS2010 includes a robust application programming interface (API) that developers can use to create and manage taxonomies. The API is found in the Microsoft.SharePoint.Taxonomy.dll assembly. The first step in working with the MMS is to create a TaxonomySession object. This object’s constructor accepts an instance of a site collection called SPSite. This will serve as the entry point to the available term stores (MMS instances). The next step is to get a reference to a term store using the TaxonomySession.TermStores collection. This collection contains references to all the MMS instances with which the current site collection’s hosting Web application is associated. Each term store has a collection of groups accessible in the TermStore.Groups collection. Finally, each group has a collection of term sets called Group.TermSets. Each term set contains a collection of terms called TermSet.Terms.
Creating a new term set programmatically is an option available to developers who need a customized import process, such as merging terms into an existing term set, importing from another system, or adding translations or synonyms. Microsoft has made it very easy to create new groups and term sets within an MMS instance. Example 14-19 demonstrates getting a reference to an existing term store and creating a new group and term set.
Example 14-19. Working with the MMS programmatically
using (SPSite siteCollection = new SPSite("http://intranet.wingtip.com")) {

  // get reference to the taxonomy term store
  TaxonomySession taxonomySession = new TaxonomySession(siteCollection);

  // get reference to first term store
  TermStore termStore = taxonomySession.TermStores["Wingtip Corporate Metadata"];
  string termGroupName = "Locations";
  Group termGroup =
    termStore.Groups.Where(x => x.Name == termGroupName).Count() > 0 ?
                                          termStore.Groups[termGroupName] :
                                          termStore.CreateGroup(termGroupName);

  string termSetName = "United States Geography";
  TermSet termSet =
    termGroup.TermSets.Where(x => x.Name == termSetName).Count() > 0 ?
                                            termGroup.TermSets[termSetName] :
                                            termGroup.CreateTermSet(termSetName);
  termStore.CommitAll();
}
Creating new terms and labels is just as straightforward:
Term newTerm = termSet.CreateTerm("term name", 1033);
newTerm.CreateLabel("term synonym", 1033, false);
Term newTerm2 = newTerm.CreateTerm("term 2 name", 1033);
Similar to updating SharePoint sites or list items, all changes must be committed back to SharePoint using the TermStore.CommitAll() method.
Metadata can be used in many ways throughout SPS2010. One way is with a new field type that can create columns in lists, libraries, and content types called Managed Metadata. New columns based on Managed Metadata require a few characteristics unique to the field type to be set at creation time:
Term Set The term set that the field is associated with that users will use to select terms. This can be in any available term store; that is, a global term store (aka an MMS instance) with which the hosting Web application is associated or a local term set managed at the site collection level.
Display Format Specifies if just the term should be displayed (that is, Mountain Bicycle) or if the entire lineage to the term should be displayed (that is, ProductsToysBicyclesMountain Bicycle).
Allow Fill-in If the term set is open, this will allow users to insert their own terms into the hierarchy. If the term set is closed, this option is disabled.
Setting these values through the browser interface is straightforward using the new column wizard-like interface. When creating columns through code or declaratively, developers need to specify the MMS instance as well, something that was not required when creating it through the browser because it could be determined automatically based on the term set selected.
To create a new Managed Metadata column programmatically, first get a reference to the four necessary taxonomy objects, as shown in Example 14-20.
Example 14-20. Connecting to the MMS instance and term set
using (SPSite siteCollection = new SPSite("http://intranet.wingtip.com")){
  TaxonomySession taxonomySession = new TaxonomySession(siteCollection);
  TermStore termStore = taxonomySession.TermStores[0];
  Group termGroup = termStore.Groups["Locations"];
  TermSet termSet = termGroup.TermSets["United States Geography"];
}
Next, create the column using the field type TaxonomyFieldType and set the MMS instance (indicated by the TaxonomyField.SspId property) and the term set ID, as shown in Example 14-21.
Example 14-21. Creating Managed Metadata columns programmatically
TaxonomyField taxonomyField =
  list.Fields.CreateNewField("TaxonomyFieldType", "Location Tag") as TaxonomyField;

taxonomyField.SspId = termStore.Id;
taxonomyField.TermSetId = termSet.Id;
taxonomyField.AllowMultipleValues = true;

list.Fields.Add(taxonomyField);
list.Update();The most common things that developers will need to do when working with metadata in SPS2010 is finding terms in the term store and writing to Managed Metadata columns. Finding terms in a term set or MMS instance can be done using the GetTerms() method. This method is found on the TaxonomySession, TermSet, and Term objects. It has multiple overload options that provide different filtering criteria made up of different combinations of the following potential parameters:
TermLabel The string to find for the term. This string can be the default label or one of the synonyms.
DefaultLabelOnly Determines if SharePoint should perform the lookup against only the default labels, or if it should include synonyms.
StringMatchOption Determines if an exact match should be performed, or if the TermLabel parameter should be treated as the start string in the search.
ResultCollectionSize The maximum number of terms that should be returned in the search.
TrimUnavailable Determines if tags that have the IsAvailableForTagging property set to true should be returned in the results or excluded.
The GetTerms() method returns a collection of terms in a TermCollection object. Example 14-22 looks for all terms that match a specific state.
Example 14-22. Finding terms in a term set
TaxonomySession taxonomySession = new TaxonomySession(SPContext.Current.Site);
TermStore termStore = taxonomySession.TermStores["Wingtip Corporate Metadata"];
Group termGroup = termStore.Groups["Locations"];
TermSet termSet = termGroup.TermSets["United States Geography"];
TermCollection terms = termSet.GetTerms("FL", true));
Once terms have been found and acquired, the next step is to write them to a Managed Metadata column. Writing to columns based on the Managed Metadata field type is a little different from writing to columns of other types. First, get a reference to the column in the list, and then call the SetFieldValue() method to update the value of a specific list item, as shown in Example 14-23.
The new support in SharePoint 2010 for LINQ-based queries provides developers a much more productive way to read and write data in SharePoint lists. In-depth coverage of the LINQ integration and support in SharePoint 2010 is featured in Chapter 9.
To use LINQ, developers must first create an entity model using the command-line tool SPMetal.exe. This tool creates the entity model based on the lists in the target site, but it includes only columns that are based on field types that are included with SharePoint Foundation 2010 (SPF2010). This means that Managed Metadata columns are not included in the LINQ entity models.
Microsoft does provide a way for developers to extend the generated model by augmenting it with columns that were excluded. This is done by creating a partial class that mirrors the signature of the generated object, except that it also implements the ICustomMapping interface. This interface defines three methods that SharePoint will use to map data to and from the database from the custom field and also do conflict resolution.
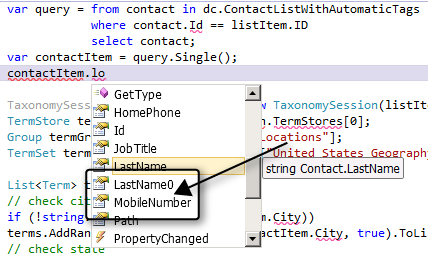
Consider a list named Contact List With Automatic Tags, which is created using the Contacts list template. After creating this list, a new Location Tag column, based on the Managed Metadata column, is created. After running SPMetal.exe, when working with objects in that list via the new entity model, notice that the Location Tag column is missing, as shown in Figure 14-11.
Now, create a new partial class that matches the prototype from the generated class exactly, and then add the interface ICustomMapping:
public partial class ContactListWithAutomaticTagsContact : Contact, ICustomMapping
Next, create the new column object in the class. This is what will be used by developers working with the model, as shown in Example 14-24.
Example 14-24. Adding a Managed Metadata column to extended LINQ models
private TaxonomyField _taxonomyFields;
public TaxonomyField LocationTag {
  get { return _taxonomyFields; }
  set {
    if (value != _taxonomyFields) {
      this.OnPropertyChanging("LocationTag", _taxonomyFields);
      _taxonomyFields = value;
      this.OnPropertyChanged("LocationTag");
    }
  }
}
Now, implement the three required methods defined by the interface. These methods tell the LINQ to SharePoint provider how to get the data from the database and put it into the LocationTag property, do the opposite in taking the object and writing it back to the database, and perform any conflict resolution, as shown in Example 14-25.
Example 14-25. ICustomMapping interface implementation
[CustomMapping(Columns = new string[] { "Location_x0020_Tag" })]
public void MapFrom(object listItem) {
  SPListItem item = listItem as SPListItem;
  this.LocationTag = item["Location_x0020_Tag"] as TaxonomyField;
}

public void MapTo(object listItem) {
  SPListItem item = listItem as SPListItem;
  item["Location_x0020_Tag"] = this.LocationTag;
}

public void Resolve(RefreshMode mode,
                    object originalListItem,
                    object databaseListItem) {

  SPListItem originalItem = originalListItem as SPListItem;
  SPListItem databaseItem = databaseListItem as SPListItem;
  TaxonomyField originalValue = originalItem["Location_x0020_Tag"] as TaxonomyField;
  TaxonomyField databaseValue = databaseItem["Location_x0020_Tag"] as TaxonomyField;

  switch (mode) {
    case RefreshMode.OverwriteCurrentValues:
      this.LocationTag = databaseValue;
      break;
    case RefreshMode.KeepCurrentValues:
      databaseItem["Location_x0020_Tag"] = this.LocationTag;
      break;
    case RefreshMode.KeepChanges:
      if (this.LocationTag != originalValue)
        databaseItem["Location_x0020_Tag"] = this.LocationTag;
      else if (this.LocationTag == originalValue && this.LocationTag != databaseValue)
        this.LocationTag = databaseValue;
      break;
  }
}
Finally, compile the project to see the new column appear in the entity model. Now it can be used like other properties in LINQ queries, as shown in Figure 14-12.

Because the customizations to the model are in a separate code file, facilitated by the fact that SPMetal.exe generates entity models using partial classes, the model can be refreshed in the future without affecting the customizations.
The term store is not the only capability that the MMS has to offer. Another feature is that it can syndicate content types from one site collection across multiple site collections so long as those site collections are hosted in Web applications linked to the MMS instance. This simplifies content type management because one site collection can be used to create and manage all enterprise content types for the organization and let the MMS syndicate them to other site collections that are used to manage content.
Set up the syndication process by first going to a single site collection and activating the Content Type Syndication Hub site collection scoped feature. Next, configure the MMS instance to use that site collection as the hub for all content types. This is set by going into Central Administration/Application Management/Manage Service Applications, selecting the MMS instance, and clicking the Properties button on the Ribbon. At the bottom of the dialog, enter the URL of the site collection and then click OK.
Once the syndication has been set up, the content type settings page in the hub site collection now includes the Manage Publishing for This Content Type link. This page enables users to publish, unpublish, or republish the content type to all site collections consuming the syndicated content types.
When a content type is syndicated, all its characteristics are syndicated. The syndication process involves creating a new content type in the subscribing site collections. When the content type is created in the subscribing site collections, it is marked as read-only. This blocks users from customizing the content type, ensuring that future publish and republish actions will succeed. However, users can customize the content type by creating a new content type that inherits from the syndicated one and use the local, non-syndicated one.
This chapter covered some of the new and improved capabilities in SPS2010 that can be used to implement ECM solutions. Microsoft’s approach of bringing ECM capabilities to where users do most of their work should improve user participation. True to the SharePoint platform, developers can extend and customize many capabilities, such as document sets, the Document ID Service, and Managed Metadata.