
Microsoft SharePoint Foundation is built on top of ASP.NET. It would be impossible for you to really understand how SharePoint Foundation processes the request for pages without a basic knowledge of the underlying architecture and page processing model of the ASP.NET Framework. For this reason, we will begin this chapter by explaining how key features of ASP.NET have been integrated into SharePoint Foundation.
After examining how SharePoint Foundation processes various types of pages, the chapter will focus on creating pages within a sandboxed solution. This will teach you how to create pages and a navigation scheme for scenarios where your SharePoint solutions are required to run under the constraints of the SharePoint Foundation Sandboxed Code Service.
The next part of this chapter examines the extra flexibility afforded to you when creating pages and navigation elements within a farm solution. As you will see, many more options become available when you make the assumption that your SharePoint solutions will be deployed at the farm level and you do not have to worry about the constraints of the sandbox.
The final section of this chapter will discuss creating a reusable SharePoint solution to brand SharePoint sites. You will see that it’s fairly simple to create a SharePoint project designed to change the look and feel of a SharePoint site using a custom master page, a Cascading Style Sheets (CSS) file, and custom images. Along the way, we will discuss how branding issues change across different types of sites, as well as which branding techniques work on Microsoft SharePoint Server farms and SharePoint Foundation farms alike.
ASP.NET is a very deep topic in and of itself. There is no way this section, a chapter, or even an entire book could possibly cover all there is to say about ASP.NET. However, there are a handful of fundamental ASP.NET concepts that you must understand to learn how SharePoint Foundation really works inside.
Before we start to explain how SharePoint Foundation integrates with ASP.NET, we want to conduct a quick review of the following ASP.NET topics:
An ASP.NET application represents a set of pages in a directory that share the same execution scope. An ASP.NET application can also include pages nested in child directories. If you are hosting ASP.NET applications with Microsoft Internet Information Services (IIS), then the ASP.NET runtime sees each IIS website and each IIS virtual directory as its own ASP.NET application.
The ASP.NET runtime runs each ASP.NET application in isolation from all other ASP.NET applications. Even in scenarios where multiple ASP.NET applications are running within the same IIS application pool, the ASP.NET runtime still ensures isolation by loading each ASP.NET application into its own private execution context using a mechanism supplied by the Microsoft .NET Framework known as an AppDomain.
Each ASP.NET application can be configured independently using a Web configuration file. The Web configuration file provides control over the behavior of various features of the ASP.NET Framework, such as compilation, page rendering, and state management. A Web configuration file for an ASP.NET application must be named web.config, and it should be added to the hosting application’s root directory.
Each web.config file has a top-level element named configuration. The configuration element can contain many inner elements, such as the section with ASP.NET settings named system.web, shown here.
<configuration>
  <system.web>
    <customErrors mode="On" />
    <httpRuntime maxRequestLength="51200" />
  </system.web>
</configuration>
Much of the development done with the ASP.NET Framework is centered on ASP.NET Pages. An ASP.NET page is simply a text file with an .aspx extension that resides in an ASP.NET application. The contents of an ASP.NET page must include the Page directive as the first line.
A simple ASP.NET page can also define a Hypertext Markup Language (HTML) layout that can include server-side controls as well as inline code with server-side event handlers written in a language such as C# or Visual Basic.
<%@ Page Language="C#" %>
<html>
<head><title>Wingtip Toys</title></head>
<body>
  <form id="frmMain" runat="server">
    <asp:Label runat="server" ID="lblDisplay" />
  </form>
</body>
</html>

<script runat="server">
  protected override void OnLoad(EventArgs e)  {
    lblDisplay.Text = "Welcome to Wingtip Toys";
  }
</script>
What makes an ASP.NET page special is that the ASP.NET runtime compiles it into an assembly DLL on demand the first time it is processed. Behind the scenes, the ASP.NET Framework does quite a bit of work to compile an .aspx file into an assembly dynamic-link library (DLL). First, the ASP.NET runtime must parse the .aspx file to generate a C# or Visual Basic source file containing a public class that inherits from the Page class that is defined within the System.Web.UI namespace.
When the ASP.NET page parser generates this Page-derived class, it builds a control tree containing all the server-side controls defined within the .aspx file. The ASP.NET page parser also adds the required code to hook up any event handlers that are defined within the page.
Once the ASP.NET page parser builds the source file for an .aspx page, it can then compile it into an assembly DLL. This compilation occurs automatically the first time the .aspx file is requested by a user. Once the ASP.NET runtime has compiled an .aspx file into an assembly DLL, that copy of the assembly DLL can be used for all subsequent requests that target the same .aspx file until the Web server process is restarted. However, the ASP.NET runtime monitors the date/time stamp on the .aspx file and retriggers the compilation process to rebuild the assembly DLL if it determines that the associated .aspx file has been updated.
The ASP.NET Framework provides support for master pages, which provide an effective approach to page templating. More specifically, a master page is a text file with a .master extension that defines common HTML elements and server controls that can be reused across many different ASP.NET pages to give a website a consistent look and feel. Once you have created a master page with a common layout, you can then create ASP.NET pages that link to this master page. The key point is that all the ASP.NET pages that link to the same master page are able to share the same HTML layout.
When you create a master page, you must provide the pages that link to it with an ability to substitute in their own unique content. This is done by adding ContentPlaceHolder controls with unique IDs. Here is an example of a simple master page defined using the Master directive and a single ContentPlaceHolder control with an ID of PlaceHolderMain.
<%@ Master %>
<html>
<head><title>Wingtip Toys</title></head>
<body>
  <form id="frmMain" runat="server">
    <h2>Wingtip Toys</h2>
    <asp:ContentPlaceHolder ID="PlaceHolderMain" runat="server" />
  </form>
</body>
</html>
Note that when you create an ASP.NET page that links to a master page, you must specify the name of the master page file inside the Page directive using the MasterPageFile attribute. You must also take precautions to place any HTML and server control tags inside Content controls that reference specific ContentPlaceHolder controls from the master page by their IDs using the ContentPlaceHolderID attribute.
<%@ Page Language="C#" MasterPageFile="~/wingtip.master" %>

<asp:Content ID="Main" runat="server"
             ContentPlaceHolderID="PlaceHolderMain" >
 <asp:Label runat="server" ID="lblDisplay" />
</asp:Content>

<script runat="server">
  protected override void OnLoad(EventArgs e)  {
    lblDisplay.Text = "Welcome to Wingtip Toys";
  }
</script>
It is important to understand that an ASP.NET page that links to a master page will not compile if you try to add any HTML elements or server-side controls outside a Content element. Also, an ASP.NET page that links to a master page will not compile if it contains a Content control with a ContentPlaceHolderID attribute that does not reference the ID of a valid ContentPlaceHolder control on the master page.
Now that we have covered the rules of what you must do to avoid compilation errors, let’s discuss some of the decisions that you face when you begin to work with ASP.NET pages that link to a master page. One important thing to keep in mind is that a ContentPlaceHolder control in a master page can contain default content, as in the following example.
<asp:ContentPlaceHolder ID="PlaceHolderMain" runat="server" >
  <p>under contruction</p>
</asp:ContentPlaceHolder>
Now assume that you are creating a master page that links to the master page with this ContentPlaceHolder control. You are then faced with a decision about what to do with this ContentPlaceHolder control, and you have three choices. Your first is to do what we have already discussed. You can add a Content control with a ContentPlaceHolderID attribute to swap out the default content and replace it with unique content for the page.
<asp:Content ID="Main" runat="server" ContentPlaceHolderID="PlaceHolderMain" >
  <p>My unique content<p>
</asp:Content>
Your second choice is to accept the default content. You can do this by ensuring that the page you are creating does not contain a Content control that references the ContentPlaceHolder control with the default content. This will ensure that the default content from the ContentPlaceHolder control on the master page will be added to the page that you are creating.
The third choice is the one that’s not so obvious at first. Think about a scenario where you want to prevent the default content from a ContentPlaceHolder control from being added to the page, but you don’t have any content that you want to substitute in its place. If you just want to eliminate the default content from a ContentPlaceHolder control, you can add an empty Control tag that references the appropriate ContentPlaceHolderID.
<asp:Content ID="Main" runat="server" ContentPlaceHolderID="PlaceHolderMain" />
The decision as to which approach to take will come up again and again as you begin working with ASP.NET pages that link to master pages created by the SharePoint Foundation team.
Now that we have reviewed a few essential features of the ASP.NET Framework, we can move ahead to discuss how these features have been integrated into SharePoint Foundation.
SharePoint Foundation integrates with ASP.NET at the level of the IIS website. Whenever you create a new SharePoint Web application, SharePoint Foundation typically creates a new IIS website and adds quite a bit of configuration to it behind the scenes that involves adding child directories and files within the root directory of the hosting IIS website. This set of files includes a SharePoint-specific web.config file. Figure 5-1 shows a screenshot of an IIS website in the IIS Manager after it has been configured to run as a SharePoint Web application.

Figure 5-1. An IIS website configured as a Web application containing a standard set of virtual directories and files
When SharePoint Foundation configures an IIS website to run as a SharePoint Web application, it also creates several virtual directories including the _layouts directory and the _controltemplates directory. As you will see later in this chapter, these two virtual directories play a special role in how SharePoint Foundation processes pages.
At this point, we would like to make an important observation about Web applications. In particular, we want you to consider how the Web application as a whole fits into the bigger picture of SharePoint Foundation architecture from the perspective of manageability and scalability.
The creation of a Web application in SharePoint Foundation is a significant administration task that requires farm-level administrative privileges. Creating a Web application requires a significant number of changes to the file system on each front-end Web server. In a Web farm environment, these changes are mirrored automatically across each front-end Web server in the farm by SharePoint Foundation. But keep in mind that the process of creating a Web application is typically required only when initially installing and configuring SharePoint Foundation or SharePoint Server 2010. It is often unnecessary to continue creating Web applications on an ongoing basis.
Once a Web application has been created, it is no longer necessary to touch the file system of the front-end Web server when creating, updating, and deleting site collections. The SharePoint Foundation architecture makes it possible to provision new sites and site collections simply by adding entries to the configuration database and a content database. It is this aspect of the SharePoint Foundation architecture that gives it significant management and provisioning advantages over ASP.NET. This added level of manageability is even more pronounced in a Web farm environment.
One thing must be stressed here: a SharePoint Web application and all the site collections inside run as a single ASP.NET application. This has an important implication. All the sites and site collections running within the same Web application share the same web.config file. SharePoint Foundation provides no support for creating a web.config file that is private to a specific site or site collection.
When SharePoint Foundation provisions a new Web application, it copies a SharePoint-specific web.config file to its root directory. This web.config file contains a system.web section, which is used to configure the ASP.NET runtime. However, SharePoint Foundation goes further by extending the standard ASP.NET web.config file format with a custom SharePoint section. Examine the Extensible Markup Language (XML) fragment in Example 5-1, which shows the SharePoint section of the web.config file and the elements within the configSections element that are required by ASP.NET for extended configuration information.
Example 5-1. The SharePoint section of the web.config file
<configuration>

  <configSections>
    <sectionGroup name="SharePoint">
      <section name="SafeControls" />
      <section name="RuntimeFilter" />
      <section name="WebPartLimits" />
      <section name="WebPartCache" />
      <section name="WebPartWorkItem" />
      <section name="WebPartControls" />
      <section name="SafeMode" />
      <section name="MergedActions" />
      <section name="PeoplePickerWildcards" />
      <section name="WorkflowServices" />
      <section name="BlobCache" />
      <section name="OutputCacheProfiles" />
      <section name="ObjectCache" />
    </sectionGroup>
  </configSections>

  <SharePoint>
    <SafeMode />
    <WebPartLimits />
    <WebPartCache />
    <WebPartControls />
    <SafeControls />
    <PeoplePickerWildcards />
    <MergedActions />
    <BlobCache />
    <ObjectCache />
    <OutputCacheProfiles />
    <RuntimeFilter />
  </SharePoint>

</configuration>
The configuration elements that are nested within the SharePoint section are read by various components of SharePoint Foundation at run time. For each element nested within the SharePoint section, there is a section element inside the configSections element that defines what configuration class is used to read this information. This makes it possible for various components of the SharePoint Foundation to read this SharePoint Foundation–specific configuration information to control page processing. You will see several SharePoint development techniques throughout this book that require adding or changing elements within the SharePoint section of the web.config file. We will start by showing you how to modify the web.config file of a Web application to enable support for debugging.
When you create a new Web application, SharePoint Foundation copies the standard web.config file, which has default configuration settings created specifically for a production environment. To enable debugging support, you must make three modifications to the web.config file.
The SharePoint section of the web.config file contains a SafeControls element with a CallStack attribute that is initially set to false. This attribute setting should be set to true to instruct the SharePoint Foundation to propagate error messages up the call stack. The system.web section contains a customErrors element with a mode attribute that is initially set to On. This attribute setting should be assigned a value of Off to actually see the error messages. Finally, the system.web section contains a compilation element with a debug attribute that is initially set to false. This attribute setting should be set to true so that the ASP.NET runtime compiles .aspx pages with symbolic debug information.
<configuration>
  <SharePoint>
    <SafeMode CallStack="true" />
  </SharePoint>
  <system.web>
    <customErrors mode="Off" />
    <compilation debug="true" />
  </system.web>
</configuration>
The SharePoint developer tools in Microsoft Visual Studio 2010 provide the convenience of automatically modifying the web.config file for you to enable debugging support on your developer workstation. As an example, let’s walk through what happens when you press the F5 key to debug a SharePoint project.
When you press the F5 key to begin debugging a SharePoint project, the SharePoint Developer Tools inspect the current project’s Site Url property and they use that information to locate the target Web application and its web.config file. If the SharePoint Developer Tools discover that this web.config file has not been modified to enable debugging support, they prompt you with the dialog shown in Figure 5-2. If you leave the radio button list with the default setting of Modify The Web.Config File To Enable Debugging and click OK, the SharePoint Developer Tools modify the three attributes that enable debugging support.

Figure 5-2. The SharePoint Developer Tools are capable of modifying settings in the web.config file to enable debugging support.
It’s very handy that the SharePoint Developer Tools automatically update the web.config file to enable debugging support. However, you should keep in mind that the SharePoint Developer Tools do not provide any support to return the web.config file to its original state to simulate how your code will behave in a production environment. Several development scenarios, such as testing event handlers that cancel the user’s action, require that debugging support be disabled. In times like this, you can modify the web.config file by hand to return it to this initial state.
<configuration>
  <SharePoint>
    <SafeMode CallStack="false" />
  </SharePoint>
  <system.web>
    <customErrors mode="On" />
    <compilation debug="false" />
  </system.web>
</configuration>Whenever you create a new site collection, SharePoint Foundation creates a GUID to serve as its ID and assigns it to a specific content database. This content database is then used to store the content for all sites created within the scope of this site collection. SharePoint Foundation also creates a GUID-based ID for each site to track site-specific content within the content database.
As a SharePoint developer, you should see each SharePoint site as a virtual file system containing a hierarchy of folders and files. For example, consider what happens when you create a new site from the Blank site template. During the provisioning process, SharePoint Foundation adds many different files and folders to the virtual file system of the site, including the home page, named default.aspx, within the site’s root directory.
A page that is tracked within the virtual file system of a site is known as a site page. Site pages play a key role in the SharePoint Foundation architecture because they make it possible for users to add, customize, and delete pages dynamically within any site without having to touch the file system on the front-end Web server. Everything about provisioning and tracking site pages is managed within the content database.
Let’s look at an example of how the SharePoint Foundation provisions site pages. Consider the scenario when a user creates a new list or document library. For example, let’s say you create a new document library named Proposals. You can do this by hand in a SharePoint site or programmatically using the server-side object model.
SPWeb site = SPContext.Current.Web;
string listName = "Proposals";
string listDesc = "Library for documents describing proposed new toys";
Guid libraryID = site.Lists.Add(listName, listDesc, SPListTemplateType.DocumentLibrary);
SPDocumentLibrary library = (SPDocumentLibrary)site.Lists[libraryID];
library.EnableVersioning = true;
library.OnQuickLaunch = true;
library.Update();
When SharePoint Foundation provisions the Proposals document library, it creates a folder named Proposals at the root of the site and then it creates a child folder named Forms. Inside the Forms folder, it creates a set of site pages with names such as DispForm.aspx, EditForm.aspx, AllItems.aspx, and Upload.aspx. The reason that SharePoint Foundation creates site pages inside the Forms folder for each new list and document library is that these site pages will provide users with the forms they will use to add and manage content.
Now let’s turn our attention to writing code using the SharePoint Foundation server-side object model, which programs against site pages. You can access the files in the virtual file system of a site such as a site page using the SPFile class. The SPWeb object provides a GetFile method, which allows you to create an SPFile object using the site-relative path to a site page.
SPWeb site = SPContext.Current.Web;
SPFile sitePage1 = site.GetFile("default.aspx");
SPFile sitePage2 = site.GetFile("Proposals/Forms/AllItems.aspx");
The SPFile class provides methods for managing site pages within a site, such as Delete, MoveTo, and CopyTo. The Delete method, as its name implies, removes the target file from the site. MoveTo makes it possible to move a file, such as a site page, to another location so that it’s accessible through a different URL. CopyTo allows you to clone a site page.
Note that the GetFile method returns an SPFile object even when you pass the path to a site page that does not exist. However, you will experience an exception if you attempt to access the majority of its methods and properties. If you are uncertain as to whether a site-relative path points to an existing site page, you should inspect the Exists property before attempting to access any of its other methods.
SPWeb site = SPContext.Current.Web;
SPFile sitePage = site.GetFile("SmellyOldSitePage.aspx");
if (sitePage.Exists) {
  sitePage.Delete();
}
SharePoint Foundation also makes it possible for a user to add site pages using several different techniques. For example, Team sites provide a New Page command on the Site Actions menu, giving users the ability to create new site pages in a wiki document library named Site Pages. The SharePoint Designer provides even more options for creating and customizing new site pages within SharePoint sites.
As a developer, you can create new site pages within an existing document library or at the root of the site. For example, you can write the text-based content of an ASP.NET page into a MemoryStream object and then pass that Stream-based object in a call to the Add method of the site’s Files collection property.
MemoryStream stream = new MemoryStream();
StreamWriter writer = new StreamWriter(stream);
writer.WriteLine("<%@ Page %>");
writer.WriteLine("<html>");
writer.WriteLine("<body>");|
writer.WriteLine("<h2>Hello World</h2>");
writer.WriteLine("</body>");
writer.WriteLine("</html>");
writer.Flush();

SPWeb site = SPContext.Current.Web;
site.Files.Add("Hello.aspx",stream, true);
After you execute this code to create the new site page, you should be able to navigate to the site and type in the site-relative URL of Hello.aspx. At that point, you should see a simple page rendered inside the browser.
One of the strengths of SharePoint Foundation over ASP.NET is its ability to provision and customize the pages of a site without having to touch the front-end Web server. However, providing this capability and making it scale requires some additional complexities in the SharePoint Foundation page-processing model. Let’s start with an example to illustrate a potential performance issue.
Imagine that your company has just created 100 new sites from the Blank Site template. If none of these sites requires a customized version of its default.aspx home page, would it still make sense to copy the exact same ASP.NET page definition file into the content database 100 times? The answer to this question is obviously no. Fortunately, site pages such as default.aspx can be processed using underlying page templates that live on the file system of the front-end Web server.
When SharePoint Foundation provisions a site page such as default.aspx, it adds information to the content database to indicate that the site page exists at a specific location within the virtual file system of the site. However, SharePoint Foundation does not copy the contents for the page into the content database. Instead, SharePoint Foundation adds extra metadata for the page to indicate which page template should be used when processing a request. This makes it possible for SharePoint Foundation to process the request for site pages using ASP.NET page files deployed on the file system of the front-end Web server.
A site page that is processed using an underlying page template is known as a ghosted page. From an architectural standpoint, ghosted pages are a key factor in allowing SharePoint Foundation farms to scale to tens of thousands of sites and pages because they eliminate the need to transfer the contents of an ASP.NET page from the Microsoft SQL Server computer running the content database to the front-end Web server where it is parsed. Instead, SharePoint Foundation can process requests for pages across thousands of sites using a handful of page templates that are compiled into assembly DLLs and loaded into the IIS worker process just once per Web application.
While a site page usually starts its life as a ghosted page that is rendered using an underlying page template, it can also be customized. For example, you can open a site page such as default.aspx in the page editor provided by SharePoint Designer 2010 and make changes to its content. When you save your work, SharePoint Designer writes the changes back to SharePoint Foundation. SharePoint Foundation responds by writing the content for the entire customized page into the content database.
A site page that has been customized cannot be processed using a page template. For this reason, customized pages are often referred to as unghosted pages. To process the request for an unghosted page, SharePoint Foundation must retrieve the content for an ASP.NET page from the content database server and move it over to the Web server. SharePoint Foundation then passes the customized page content over to the ASP.NET runtime, which parses the page definition and then loads it into memory, where it can be processed. The extra work of retrieving the page from SQL Server and moving it to the Web server where it is processed has negative performance implications in very large environments.
Another important aspect of site pages involves security. Consider a scenario in which a site collection owner tries, intentionally or unintentionally, to attack the Web server. For example, what would happen if this site collection owner added inline C# code to a customized site page? She may or may not have the training to realize that she is potentially damaging the SharePoint environment. As you might imagine, it would be quite a security hole if users without farm-level permissions were able to write code that would execute freely on the Web server. Fortunately, SharePoint Foundation was designed to prevent these types of attacks.
The key point is that customization support for site pages brings security concerns with it. Therefore, customized pages run under a special processing model known as safe mode. Safe mode prohibits the use of inline code that would execute on the Web server. Safe mode also prohibits the use of controls on customized page that have not been marked as safe using SafeControl elements in the SharePoint section of the hosting Web application’s web.config file.
To implement safe mode processing, SharePoint Foundation must inspect the contents of each customized site page prior to processing. If SharePoint Foundation finds any inline code or unsafe controls, it does not process the page. If SharePoint Foundation doesn’t find any inline script or unsafe controls, it then forwards the page to ASP.NET for parsing and processing.
Now that we have explained the difference between ghosted and unghosted pages, let’s return to our discussion of programming against site pages using the server-side object model. The SPFile class makes it possible to read and write to the contents of a site page. For example, the OpenBinary method of an SPFile object returns a binary array containing the page contents. The OpenBinaryStream method returns a System.IO.Stream object. Each of these methods provides an approach for reading the contents of a site page.
An SPFile object also provides a SaveBinary method that allows you to update the contents of a site page. Note that updating the contents of a site page by using the SaveBinary method customizes the page and moves it into a customized or unghosted state.
Think about a scenario where the home page for a site has been unexpectedly customized by a user with SharePoint Designer 2010. What if these changes are unwanted? Can you remove the customization changes and return this site page to its original ghosted state? The answer is yes, and there are quite a few ways to accomplish this.
You can return a customized page to a ghosted state using SharePoint Designer 2010 by right-clicking a site page and running the Reset To Site Definition menu command. If you navigate to the Site Settings page in a site, you will find the Reset To Site Definition link, which will take you to a site administration page that provides the ability to convert customized pages back to their original ghosted state. As a developer, you can use the server-side object model. More specifically, you can access a customized site page using an SPFile object and call the RevertContentStream method.
SPWeb site = SPContext.Current.Web;
SPFile sitePage = site.GetFile("default.aspx");
sitePage.RevertContentStream();
Now let’s discuss a scenario where your code must inspect the state of a site page dynamically to determine whether it has been customized. The SPFile class provides a property named CustomizedPageStatus for this exact reason. The CustomizedPageStatus property is based on an enumeration named SPCustomizedPageStatus, which defines three possible values: Uncustomized, Customized, and None.
A site page that runs in a ghosted state will have a CustomizedPageStatus property value of Uncustomized. When a site page that was initially in a ghosted state is customized, it will have the CustomizedPageStatus property value of Customized. Therefore, you can run a check before executing the RevertContentStream method.
SPWeb site = SPContext.Current.Web;
SPFile sitePage = site.GetFile("default.aspx");
if (sitePage.CustomizedPageStatus == SPCustomizedPageStatus.Customized) {
  sitePage.RevertContentStream();
}
Note that a site page can also have a CustomizedPageStatus property value of None. This indicates that the site page was created dynamically, without an underlying page template. An example of creating this type of site page using the Add method of the site’s Files collection property was shown in the section entitled The Virtual File System of a Site earlier in this chapter. Because this type of site page never had an underlying page template, it can never be returned to a ghosted state.
In addition to site pages, SharePoint Foundation supports another common type of page known as an application page. An application page is an .aspx file that runs out of the _layouts virtual directory and is deployed physically inside the SharePoint Root directory under the following path.
C:Program FilesCommon FilesMicrosoft SharedWeb Server Extensions14TEMPLATELAYOUTS
An application page is different from a site page because it is not tracked by the content database. Instead, application pages have a less complicated processing model that does not include support for customization. The processing model for application pages is far more like that of ASP.NET pages in a standard ASP.NET application because it doesn’t require any extra support for ghosting and unghosting.
The Site Settings page (settings.aspx) is a good example of a typical application page. It is not owned by a particular site; rather, it can be used by any site within the farm. Furthermore, the Site Settings page does not require any site-specific entries in the content database, nor does it provide users with any opportunities for customization. However, the Site Settings page can still appear and behave differently from one site to the next. That’s because an application page can determine the current site from its execution context and change its appearance and behavior according to what it discovers about the current site, the current site collection, and the current Web application.
As you already know, SharePoint Foundation creates the virtual _layouts directory for each Web application and maps it to the physical LAYOUTS directory. By using this mapping scheme, along with some additional processing logic, the SharePoint Foundation runtime can make each application page accessible within the context of any site in the farm. For example, assume that there are three different sites in a SharePoint Foundation farm, accessible through these three URLs: http://intranet.wingtip.com, http://intranet.wingtip.com/sites/sales, and http://www.wingtip.com.
An application page, such as settings.aspx, can be accessed by adding its relative path within the _layouts directory to the end of a site’s URL. For example, you can access the Site Settings page by using any of these three URLs: http://intranet.wingtip.com/_layouts/settings.aspx, http://intranet.wingtip.com/sites/sales/_layouts/settings.aspx, and http://www.wingtip.com/_layouts/settings.aspx.
Because there is only one version of an application page scoped at the farm level, it can be compiled into a single assembly DLL and loaded into memory once for each Web application. You never have to worry about the existence of different versions of an application page for different sites. Furthermore, application pages are not subject to attack from users who have permission to customize site pages. Therefore, SharePoint Foundation never needs to run applications in safe mode or prohibit them from containing inline code.
Application pages are used extensively by both SharePoint Foundation and SharePoint Server 2010 to supply much of the standard functionality for provisioning and administering sites. The default installation of SharePoint Server 2010 adds more than 400 application pages into the LAYOUTS directory. In the section entitled Creating Pages in Farm Solutions later in this chapter, you will learn how to create custom application pages.
As you begin to design and develop SharePoint solutions, you will find that it is often necessary to add new pages to a site. Each time you add a new page, you must decide whether to create the new page as a site page or an application page. Let us now summarize the difference between site pages and application pages so that you can consider the most relevant issues involved in making this decision.
Site pages support page customization through the browser and with SharePoint Designer 2010. Examples of site pages include the home page (default.aspx) for a site, as well as the pages associated with lists and document libraries, such as AllItems.aspx, NewForm.aspx, and EditForm.aspx. Site pages represent an essential part of the SharePoint Foundation architecture because they provide users with the flexibility to add, customize, and delete pages within a site.
The downside to site pages is that they require an elaborate processing infrastructure that has implications on security, performance, and scalability. Remember that customized site pages run in safe mode and, consequently, do not support inline code. To process the request for a customized site page, SharePoint Foundation must retrieve the content of pages from across the network in the content database. SharePoint Foundation must also parse each customized site page individually, as well as execute it in a special no-compile mode. While this special processing mode doesn’t typically result in a measurable performance impact on small to medium farms, it can affect large farms with thousands of customized pages. This is mainly because each customized page instance must be loaded separately into memory.
Application pages do not support customization, which gives them a few distinct advantages over site pages. First, they are convenient to use in a design when you want to add pages to a site that users are not able to customize. Second, application pages are not tracked in the content database, which means that they are not subject to the same types of attacks as site pages. Therefore, they never run in safe mode and they can contain inline code. Third, each application page is always compiled into a single assembly DLL so that it performs and scales better than site pages that can be customized.
One noteworthy requirement of using application pages is that they must be deployed inside the SharePoint Root directory, which means that they cannot be used within sandboxed solutions. If you are required to build a SharePoint solution that targets the sandbox, the only type of page that you can add to a site is a site page.
SharePoint Foundation is designed around the concept of master pages. The obvious benefit of this is that all the pages in a SharePoint site can link to a single master page to achieve a consistent look and feel. Note that enhancements were made in SharePoint 2010 so that site pages and application pages could link to the same master page. This is a nice enhancement of SharePoint 2007, which had limitations that made it difficult to support linking site pages and application pages to the same master page.
Whenever SharePoint Foundation provisions a new site, it creates a special hidden document library known as the Master Page Gallery. In addition to creating the Master Page Gallery in each new site, SharePoint Foundation provisions the following three master page instances:
The master page named v4.master is the primary master page used in SharePoint 2010 sites. For example, v4.master is what gives Team sites in SharePoint 2010 a common page layout across site pages and application pages. This common layout is what some developers refer to as the “chrome” of the page because it includes familiar elements such as the Site Actions menu, the breadcrumb trail, the Ribbon, the Welcome menu, the Site Icon, the TopNav bar, and the Quick Launch, as shown in Figure 5-3.

Figure 5-3. The standard master page named v4.master provides the default layout for SharePoint 2010 sites.
The master page named minimal.master provides a page layout without any of the chrome that is included in v4.master. The minimal.master page is used by several of the standard site page templates and application pages that are distributed along with SharePoint Foundation and SharePoint Server 2010.
The third master page that is provisioned in the Master Page Gallery for every new SharePoint 2010 site is default.master. This master page requires a bit of an explanation. Default.master is a master page designed to support a feature known as visual upgrade, which assists companies that are upgrading SharePoint 2007 sites to run within SharePoint 2010 farms. Here is a brief description of how visual upgrade works.
Default.master contains the standard HTML layout and chrome of a SharePoint 2007 site. When a site is upgraded from SharePoint 2007 to SharePoint 2010, SharePoint Foundation has its pages initially link to default.master instead of v4.master. The idea is that companies can upgrade from SharePoint 2007 to SharePoint 2010 without forcing their users to switch to the new SharePoint 2010 user interface immediately. Instead, users can continue to work with the older SharePoint 2007 user interface during a transition period. At some point in the future, a site collection owner can begin to use the new SharePoint 2010 user interface, and then SharePoint Foundation will redirect all the pages to use v4.master instead of default.master.
What is important to understand is that default.master is involved only when upgrading SharePoint 2007 sites to SharePoint 2010. If you are not involved in upgrade scenarios, your sites will never use default.master. However, things can be confusing because the “default” master page used by SharePoint 2010 is not default.master; it is v4.master.
An important point to understand about the master pages in the Master Page Gallery is that they are created initially in a ghosted state. In other words, every SharePoint 2010 site gets a copy of v4.master that is processed using a master page template that exists on the file system of the front-end Web server. However, you can customize a master page just as you can customize a site page.
For example, you can open a site using SharePoint Designer 2010 and then open its copy of v4.master in the page designer. This makes it possible to make customizations that affect every page in the current site. When you save your work to save the customization you have made to a master page with SharePoint Designer 2010, SharePoint Foundation will write the contents for the customized master page into the content database.
You should observe that the customized support for a master page is very similar to the customization support for a site page. A customized master page runs in safe mode, which means that it cannot contain inline code. Once a master page has been customized, you can get rid of this customization and return the master page to its initial ghosted state. You can accomplish this using the exact same techniques for returning a customized site page to its initial ghosted state discussed in the section entitled Page Templates and Ghosting earlier in this chapter.
The master page named v4.master is widely used in SharePoint Foundation. For example, it defines the standard layout for every page on a team site. The v4.master page can also serve as the master page for the site page templates and application pages that you create within a SharePoint solution.
To understand the best practice for creating pages that link to v4.master, it’s important that you have a basic understanding of what’s defined inside. It’s worth your time to open a copy of the v4.master file within Visual Studio 2010 and try to absorb all that’s in there. While it might take some time to get to know everything inside v4.master, it’s a worthwhile investment for any developer who is serious about designing pages and mastering branding techniques in SharePoint 2010.
The v4.master page contains the basic HTML layout for a page, including standard elements such as html, head, body, and form, and includes many server-side controls that are used to encapsulate logic and user interface components into the Microsoft.SharePoint assembly. Examples of these server-side controls include the SPWebPartManager control and controls to provide navigation components, such as breadcrumb trails and menus for navigating around the site.
Learning about the ContentPlaceHolder controls that exist in v4.master is important because they provide the extensibility mechanism used to add unique content to site page templates and application pages. Example 5-2 shows a fragment of HTML distilled from v4.master that has been simplified to show you how these ContentPlaceHolder controls are structured within the HTML. Note that this listing shows just 4 of the 34 ContentPlaceHolder controls that are actually defined inside the full v4.master.
Example 5-2. v4.master containing ContentPlaceHolder controls
<%@ Master Language="C#" %>
<!DOCTYPE html PUBLIC "-//W3C//DTD XHTML 1.0 Strict//EN"
"http://www.w3.org/TR/xhtml1/DTD/xhtml1-strict.dtd">
<html runat="server">
<head runat="server">
  <title id="onetidTitle">
    <asp:ContentPlaceHolder ID="PlaceHolderPageTitle" runat="server" />
  </title>
  <asp:ContentPlaceHolder id="PlaceHolderAdditionalPageHead" runat="server"/>
</head>
<body>
<form runat="server">
<div id="s4-ribbonrow" ></div>
<div id="s4-workspace">
  <div id="s4-bodyContainer">
    <div id="s4-titlerow" >
     <asp:ContentPlaceHolder id="PlaceHolderPageTitleInTitleArea" runat="server" />
    </div>
    <div id="s4-mainarea" >
      <div id="s4-leftpanel"></div>
      <div id="MSO_ContentTable">
        <asp:ContentPlaceHolder ID="PlaceHolderMain" runat="server" />
      </div>
    </div>
  </div>
</div>
</form>
</body>
</html>
You can see that the head element of v4.master defines ContentPlaceHolder controls with an ID of PlaceHolderPageTitle and PlaceHolderAdditionalPageHead. The ContentPlaceHolder control with the ID of PlaceHolderPageTitle makes it possible to substitute the page title seen in the title bar of the browser. The ContentPlaceHolder control with the ID of PlaceHolderAdditionalPageHead makes it possible to add items such as extra meta tags, CCS rules, and JavaScript code into the head section of the page.
When you examine the site page templates supplied by SharePoint Foundation and SharePoint Server 2010, you will discover that they use the standard MasterPageFile attribute, which is understood and interpreted by the ASP.NET runtime. However, these site page templates use a dynamic token value of ~masterurl/default.master.
<%@ Page MasterPageFile="~masterurl/default.master" %>
The obvious question now becomes what the meaning of ~masterurl/default.master is. This dynamic token is a key part of the strategy that SharePoint Foundation employs to swap out the master page used by all the pages in a site. Let’s examine exactly how this works.
The SPWeb object that represents a site has a property named MasterUrl, which is initialized to reference the instance of v4.master in the current site. When SharePoint Foundation processes a site page, it inspects the page’s MasterPageFile attribute. If the MasterPageFile attribute has a token value of ~masterurl/default.master, SharePoint Foundation replaces it with the MasterUrl property value of the current site. After SharePoint Foundation performs this substitution, it passes the site page over to ASP.NET for parsing and execution.
What is important to see is that all the pages in a site initially link to v4.master. However, you can modify the value of the MasterUrl property for an SPWeb object to reference a different master page. This has the effect of swapping out one master page for another. You will see this technique used in the section entitled Adding a Feature Receiver to Apply Branding Attributes later in this chapter.
Note that there is one common scenario in SharePoint Server 2010 where the pages in a site do not link to the master page referenced by the MasterUrl property. This scenario involves publishing sites, which contain a special document library named Pages. The Pages document library contains a special type of page known as a publishing page. All publishing pages dynamically link to a master page using another property of the SPWeb class named CustomMasterUrl. Therefore, when writing code to swap out the master page in a publishing site, you will be required to update the CustomMasterUrl property instead of, or in addition to, the MasterUrl property.
Now that you have seen how to link to a master page in the standard manner, let’s create a new site page using what we have just learned. Let’s start by looking at the content of a simple page.
<%@ Page MasterPageFile="~masterurl/default.master" %>

<asp:Content ContentPlaceHolderId="PlaceHolderMain" runat="server">
  <p>This is a very simple page.</p>
</asp:Content>
The Page directive at the top of this page template assigns the token value of ~masterurl/default .master to the MasterPageFile attribute. As you already know, this token has the effect of linking the resulting site page to the current site’s master page, which is v4.master by default. Other than that, all that’s really required is to supply some unique content for the placeholder named PlaceHolderMain. You should be impressed by how little text is needed to define a simple site page or a site page template. This simple example demonstrates the power and elegance of master pages in SharePoint Foundation development.
At this point, let’s revisit the coding example from earlier in this chapter, where we wrote the code to create a new site page using the server-side object model. Now we just need a minor modification to create a site page that links to v4.master.
// write out new site page instance into memory stream
MemoryStream stream = new MemoryStream();
StreamWriter writer = new StreamWriter(stream);
writer.WriteLine("<%@ Page MasterPageFile='"~masterurl/default.master'" %>");
writer.WriteLine("<asp:Content ContentPlaceHolderId='"PlaceHolderMain'" runat='"server'">");
writer.WriteLine("<h2>Hello World</h2>");
writer.WriteLine("</asp:Content>");
writer.Flush();

// add new page to site
SPWeb site = SPContext.Current.Web;
site.Files.Add("Page1.aspx", stream);SharePoint Foundation processes application pages differently than site pages. The processing of an application page is more efficient because SharePoint Foundation does not need to parse through the page contents to look for inline code or to substitute dynamic tokens to link to a master page. However, application pages can still dynamically link to a master page using the DynamicMasterPageFile attribute in the Page directive.
<%@ Page DynamicMasterPageFile="~masterurl/default.master" %>
The technique that you have just seen to link to a master page can be confusing at first because the DynamicMasterPageFile attribute is not recognized by the ASP.NET runtime. Instead, DynamicMasterPageFile is a custom attribute that is read and interpreted by SharePoint Foundation. More specifically, the base class behind an application reads the value of the DynamicMasterPageFile attribute early in the page life cycle and uses the OnPreInit event of the Page class to link dynamically to the master page that is specified. This new behavior that has been added in SharePoint 2010 is a welcome improvement because it now allows all application pages and site pages to link to a single master page.
While the way that site pages and application pages link to a master page is different, they both typically rely on the ~masterurl/default.master token to produce the same effect. This is what makes it possible to swap out the master page for every application page and site page in a site simply by updating the SPWeb.MasterUrl property. You will see how to practice this technique in the section entitled Creating a Reusable Branding Solution later in this chapter.
So far, you have seen how to create the content for a simple site page. However, the example did not involve using an underlying page template. If you create site pages using an underlying page template, you will be able to achieve higher levels of control, reuse, and performance. The technique that is required to use page templates involves creating a feature that contains a special type of CAML element known as Module.
At a high level, you can think of a Module element as a file set. When you create a Module, you add one or more inner File elements. The key point is that each File element is used to provision an instance of a file from a file template. In our case, we will be creating a site page from a site page template. Keep in mind that the site page template exists on the file system of the Web server inside the directory of the hosting feature. The site page itself is created by adding entries to the content database.
Let’s start by creating a site page template named MyTemplate.aspx with the same page content from the previous example and adding it to a feature directory.
<%@ Page MasterPageFile="~masterurl/default.master" %>

<asp:Content ContentPlaceHolderId="PlaceHolderMain" runat="server">
  <p>This is a very simple page</p>
</asp:Content>
Now we can add an element manifest to the feature with the following Module element.
<Elements xmlns="http://schemas.microsoft.com/sharepoint/">
  <Module Path="" Url="" >
    <File Url="MyTemplate.aspx" Name="MySitePage.aspx" Type="Ghostable" />
  </Module>
</Elements>
Note that the File element in this example is created with a Url attribute that references the site page template named MyTemplate1.aspx. The Name attribute contains the name of the site page being created, which in this case is MySitePage.aspx. When you activate the feature that contains this Module element, SharePoint Foundation provisions a site page instance within the target site at the following relative path.
MySitePage.aspx
Now let’s add just a bit more complexity. Imagine that you do not want to create site pages at the root of the site but instead within a folder inside the root named WingtipSitePages. You can accomplish this by adding the folder path to the URL attribute of the Module element. You can also add multiple File elements inside a Module element, which makes it possible to create multiple site page instances from a single site page template.
<Elements xmlns="http://schemas.microsoft.com/sharepoint/">
  <Module Path="" Url="WingtipSitePages" >
    <File Url="MyTemplate.aspx" Name="Page1.aspx" Type="Ghostable" />
    <File Url="MyTemplate.aspx" Name="Page2.aspx" Type="Ghostable" />
    <File Url="MyTemplate.aspx" Name="Page3.aspx" Type="Ghostable" />
  </Module>
</Elements>
When you activate the feature that contains this updated Module element, SharePoint Foundation provisions three site page instances within the target site at the relative paths WingtipSitePages/Page1.aspx, WingtipSitePages/Page2.aspx, and WingtipSitePages/Page3.aspx.
Note that the File element in the previous two examples contains a Type attribute with a value of Ghostable. When a site page is provisioned from a site page template, it initially exists in a ghosted state. This means that you can activate this feature in a thousand different sites within a farm, and there would be a thousand site pages that can all be processed using this page template, which is compiled into a single-assembly DLL and loaded into memory only once.
There are only two possible settings that you can use for the Type attribute: Ghostable and GhostableInLibrary. These two settings are used to differentiate between files that are provisioned inside a document library and those that are not. In this case, the site page instance has a Type of Ghostable because it is not being provisioned inside a document library. Later in this chapter, in the section entitled Deploying a Custom Master Page, you will encounter an example of a File element whose Type attribute value will be defined as GhostableInLibrary.
In this chapter, you have seen two different ways to create a site page. The first technique involved adding a site page by executing the Add method on the site’s Files collection property. The second technique involved using a feature containing a page template and a Module element. It is important to understand that the second technique has an advantage over the first because you can create ghosted pages.
Unfortunately, the server-side object model provides no direct support for creating a ghosted site page. The only way to create a new ghosted page is to use a feature with a Module element. However, this can cause problems in certain design scenarios because you must actually activate the feature to create the new ghosted site page.
Now consider a scenario in which your SharePoint solution must be designed to create new site pages continually in response to user actions. You can’t simply activate a new feature each time the user does something to create a new page. Therefore, you need a design that can create new site pages in an ongoing fashion that doesn’t require feature activation. However, you cannot use the Add method as discussed earlier because you want each of these new pages to be created in a ghosted state.
While you cannot create a new ghosted page directly using the server-side object model, there is a technique that will provide the same results. As noted earlier, the SPFile class contains a method named CopyTo. If you call CopyTo on a ghosted page, it creates a copy at a different URL, which is also a ghosted page. Therefore, you can supply a feature that needs to be activated only once. This feature can use a Module to provision a new ghosted site page that can then be used as a template.
<Elements xmlns="http://schemas.microsoft.com/sharepoint/">
  <Module Path="" Url="WingtipTemplates" >
    <File Url="MyTemplate.aspx" Name="MyTemplate.aspx" Type="Ghostable" />
  </Module>
</Elements>
Each time that you need to respond to a user action to create a site page, you can use the site page template to create a new SPFile object and then call the CopyTo method to clone it.
SPWeb site = SPContext.Current.Web;
SPFile sitePageTemplate = site.GetFile("WingtipTemplates/MyTemplate.aspx");
// copy iste page template to create new ghosted pages
sitePageTemplate.CopyTo("Page1.aspx);
sitePageTemplate.CopyTo("Page2.aspx);
sitePageTemplate.CopyTo("Page3.aspx);
Now that you have a more solid understanding of how SharePoint Foundation processes pages, let’s create a few SharePoint solutions using the SharePoint Developer Tools in Visual Studio 2010. We will begin by creating a SharePoint project that can be deployed as a sand-boxed solution. After that, we walk through a SharePoint solution that is designed as a farm solution and see that you have extra options in creating pages and controls when you don’t have to worry about deployment within the sandbox.
Up to this point in this chapter, we have focused on essential background theory to help you understand the types of pages supported in SharePoint 2010, as well as how SharePoint Foundation processes each type of page. Now it’s time to put this knowledge to work inside Visual Studio 2010 to create pages in a SharePoint project. We will begin by exploring how to create site pages and a simple navigation scheme in a sandboxed solution.
As we discussed in Chapter 4, designing a SharePoint solution for the sandbox does not prevent you from deploying it as a farm solution. Instead, when you create a SharePoint project as a sandboxed solution, you are really keeping your deployment options open and giving yourself the greatest amount of flexibility. Therefore, the techniques discussed in this section for creating pages can be used in any SharePoint 2010 deployment scenario. We will wait until later in this chapter, in the section entitled Creating Pages in Farm Solutions, to discuss techniques for creating pages that must be deployed using a farm solution.
The primary technique for creating site pages in a sandboxed solution involves the use of page templates and a CAML-based Module element, as we discussed in the previous section of this chapter. Now we will focus on how the SharePoint Developer Tools provide assistance in creating and maintaining Module elements using a SharePoint Project Item Type, which is also known as Module.
The SharePoint Developer Tools provide a SharePoint Project Item Type named Module, which provides a layer of productivity on top of the CAML-based Module element. You can add a new Module SharePoint Project Item Type to a SharePoint project using the Add New Item dialog of Visual Studio 2010, as shown in Figure 5-4.

Figure 5-4. The SharePoint Developer Tools provide a SharePoint Project Item Type named Module, which makes it easier to work with the CAML-based Module element.
When you add a new Module SharePoint Project Item Type into a SharePoint project, the SharePoint Developer Tools create a new top-level folder in the project, which initially contains two files named elements.xml and sample.txt. The elements.xml file is important because it contains the Module element CAML markup that will be used to provision site pages from page templates. The sample.txt doesn’t really have any purpose except to show you what happens when you add a file into the folder of the Module SharePoint Project Item Type. Therefore, you will typically either delete or rename the sample.txt file whenever you create a new Module SharePoint Project Item Type.
If you examine the contents of this elements.xml file right after you have created a Module SharePoint Project Item Type, you will see that it contains a Module element with an inner File element that references sample.txt. For example, if you add a new Module SharePoint Project Item Type named WingtipSitePages, the SharePoint Developer Tools will generate an elements.xml file with a Module element that looks like this.
<Module Name="WingtipSitePages">
  <File Path="WingtipSitePagesSample.txt" Url="WingtipSitePages/Sample.txt" />
</Module>
A key advantage of using the Module SharePoint Project Item Type is that the SharePoint Developer Tools will create and maintain File elements inside the Module element automatically. For example, what happens if you right-click the sample.txt file and rename it as Page1.aspx? The SharePoint Developer Tools respond by automatically updating the Module element inside elements.xml to reflect the change.
<Module Name="WingtipSitePages">
  <File Path="WingtipSitePagesPage1.aspx" Url="WingtipSitePages/Page1.aspx " />
</Module>
Let’s say that you then add a second file to the root folder of the Module SharePoint Project Item Type named Page2.aspx. The SharePoint Developer Tools respond by automatically updating the Module element with a second File element.
<Module Name="WingtipSitePages">
  <File Path="WingtipSitePagesPage1.aspx" Url="WingtipSitePages/Page1.aspx" />
  <File Path="WingtipSitePagesPage2.aspx" Url="WingtipSitePages/Page2.aspx" />
</Module>
In addition to adding these two page template files to the Module SharePoint Project Item Type, you will want to update the content inside them with the contents of ASP.NET pages that have been designed to run in a SharePoint 2010 environment. For example, you can use this simple starting point for the contents of a site page template.
<%@ Page MasterPageFile="~masterurl/default.master" %>

<asp:Content ContentPlaceHolderId="PlaceHolderMain" runat="server">
  <p>This is page1.aspx</p>
</asp:Content>
Now you should be able to run the project’s Deploy command, which will activate the feature in your test site. You should then be able to navigate to the site pages that have been created using the site-relative URLs WingtipSitePages/Page1.aspx and WingtipSitePages/Page2.aspx.
As you can see, the Module SharePoint Project Item Type makes your life easier because it takes care of adding and updating File elements inside a Module element. The Module SharePoint Project Item Type goes even further, providing Deployment Conflict Resolution. We first explained Deployment Conflict Resolution back in Chapter 3, with respect to List Instance project items. We will now revisit the topic to discuss how Deployment Conflict Resolution works with Module SharePoint Project Item Types.
Think about what happens when you activate a feature with the Module element containing two inner File elements that reference the page templates named Page1.aspx and Page2.aspx. When this feature is activated, SharePoint Foundation creates two new site pages in a ghosted state. Now think about what happens when you deactivate the feature. Does SharePoint Foundation automatically delete these two site pages? The answer is no. If you have a scenario that requires site pages to be deleted during feature deactivation, you must add explicit code to do so.
Now, think about a common scenario that can come up during testing, where you are activating and deactivating the same feature constantly. If your feature creates a site page during feature activation but does not delete it during feature deactivation, there is a potential problem. The second time you activate the feature, it attempts to create a new site page using the same site-relative URLs of the existing site page. SharePoint Foundation deals with this conflict by failing silently. There is no error, but the creation of the new site page fails.
When you run the Deploy command on a SharePoint project with a Module SharePoint Project Item Type, the SharePoint Developer Tools provide support to examine the target site and delete any existing files, such as site pages, that would cause conflicts. This ensures that each File element in a Module SharePoint Project Item Type is able to create a file in the virtual file system of your target site properly each time you run the Deploy command.
It’s important to remember that the Deployment Conflict Resolution provides value only while you are testing your work inside Visual Studio 2010. Deployment Conflict Resolution does not provide any assistance with the way your SharePoint solutions behave when deployed in a production environment. Therefore, you must determine when you need to supply code to delete files such as site pages explicitly during feature activation for your production deployment.
While the Module SharePoint Project Item Type provides a significant boost in developer productivity by updating the elements.xml file on your behalf, there are common scenarios where you will need to edit the elements.xml file by hand.
As an example, let’s say you want to use a Module SharePoint Project Item Type to create multiple site pages from a single page template. The SharePoint Developer Tools cannot update the elements.xml file to more than one site page automatically using the same underlying page template. The SharePoint Developer Tools only know how to add a single File element for each template file. However, you can update the elements.xml file by hand to achieve the desired effect without causing any undesirable side effects.
Let’s walk through an example. Imagine you have created a Module SharePoint Project Item Type and added a single page template named Page1.aspx. The SharePoint Developer Tools will update the elements.xml file automatically to look like this.
<Module Name="WingtipSitePages">
  <File Path="WingtipSitePagesPage1.aspx" Url="WingtipSitePages/Page1.aspx " />
</Module>
Now you can edit the Module element inside elements.xml manually to add two new File elements that create two additional site pages at different URLs based on the same page template named Page1.aspx.
<Module Name="WingtipSitePages">
  <File Path="WingtipSitePagesPage1.aspx" Url="WingtipSitePages/Page1.aspx" />
  <File Path="WingtipSitePagesPage1.aspx" Url="WingtipSitePages/Page2.aspx" />
  <File Path="WingtipSitePagesPage1.aspx" Url="WingtipSitePages/Page3.aspx" />
</Module>
After you manually edit the Module element, you might worry that the SharePoint Developer Tools will overwrite your changes as they continue to update the elements.xml file automatically in response to your actions, such as adding, moving, deleting, and renaming files. Rest assured that the SharePoint Developer Tools are very good about preserving your manual edits as they continue to update the elements.xml file.
One of the sample SharePoint projects in the downloadable .zip archive of companion code for this book is named SandboxedSolutionPages. This project demonstrates how to create a Module SharePoint Project Item Type that contains page templates, image files, CSS files, JavaScript files, and a Silverlight application. The SandboxedSolutionPages project also demonstrates integrating jQuery functionality into site pages created from custom page templates. You can see the high-level structure of the SandboxedSolutionPages project in Figure 5-5.
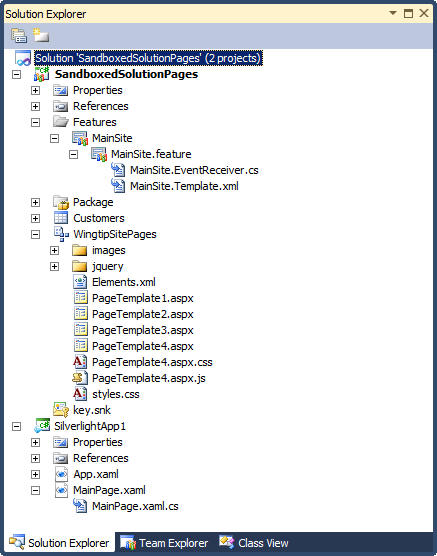
Figure 5-5. The SandboxedSolutionPages project demonstrates how to create site pages from page templates.
The SandboxedSolutionPages project contains a Module SharePoint Project Item Type named WingtipSitePages. Inside WingtipSitePages, there are four page templates that are used to create four site pages. For example, there is a page template named PageTemplate1.aspx, which is used to create a site page named SitePage1.aspx. Note that you will be required to edit the elements.xml file by hand if you want the name of the site page to differ from the file name of the template file used to create it. The Module element inside elements.xml contains File elements that have been modified manually to look like this.
<Module Name="WingtipSitePages">
  <File Path="WingtipSitePagesPageTemplate1.aspx"
        Url="WingtipSitePages/SitePage1.aspx" />
  <!-- other elements omitted for brevity -->
</Module>
In addition to provisioning four new site pages within the top-level site, activation of the MainSite feature creates a simple navigation scheme by adding four links to the top link bar. This is accomplished in the FeatureActivated method by using the server-side object model to add four new SPNavigationNode objects to the TopNavigationBar property of the current SPWeb object’s Navigation property.
public override void FeatureActivated(SPFeatureReceiverProperties properties) {
  SPSite siteCollection = (SPSite)properties.Feature.Parent;
  SPWeb site = siteCollection.RootWeb;
  // create dropdown menu for custom site pages
  SPNavigationNodeCollection topNav = site.Navigation.TopNavigationBar;
  topNav.AddAsLast(new SPNavigationNode("Page 1", "WingtipSitePages/SitePage1.aspx"));
  topNav.AddAsLast(new SPNavigationNode("Page 2", "WingtipSitePages/SitePage2.aspx"));
  topNav.AddAsLast(new SPNavigationNode("Page 3", "WingtipSitePages/SitePage3.aspx"));
  topNav.AddAsLast(new SPNavigationNode("Page 4", "WingtipSitePages/SitePage4.aspx"));
}
By executing this code during feature activation, the SandboxedSolutionPages project is able to complement the four site pages with a simple but effective navigation scheme. There are now links on the top link bar that allow users to navigate to any of the four site pages, as shown in Figure 5-6.

Since we have been discussing designing and creating site pages, it now makes sense to cover Web Part pages. As their name implies, Web Part pages are a specific type of site page used to host Web Parts. Web Parts provide a valuable dimension to SharePoint Foundation. In particular, they make it possible for a site owner to customize a site page with changes that are seen by all users. Web Parts go even further, allowing individual users to add personalized changes that are seen only by them. SharePoint Foundation provides the underlying mechanisms to track all this customization and personalization inside the content database, along with all the other site-related data.
Before diving into the details of how Web Part pages work, two important aspects of their architecture must be noted. First, support for customizing and personalizing Web Parts is available with site pages but not with application pages, thus giving site pages a clear design advantage.
Second, adding and customizing Web Parts does not require customizing the Web Part pages that host them. A Web Part page defines Web Part zones but does not define what goes inside these zones. Instead, all the data for tracking Web Part instances and their customization and personalization data are kept in separate tables inside the content database. This means that a Web Part page can remain in a ghosted state, even though users are adding, customizing, and personalizing the Web Parts within its zones continually. For this reason, you should prefer to use Web Parts when designing business solutions that require user-level customization or personalization.
Web Part pages in SharePoint Foundation are built on top of the Web Part infrastructure supplied by ASP.NET. To create a Web Part page in an ASP.NET application, you must create an .aspx page that contains exactly one instance of a control named WebPartManager and one or more WebPartZone controls. The WebPartManager control is responsible for managing the lifetime of Web Part instances, as well as serializing Web Part–related data so that it can be stored and retrieved from the tables in the ASP.NET services database.
The Web Part infrastructure of SharePoint Foundation does not use the standard WebPartManager control from ASP.NET. Instead, SharePoint Foundation relies on a specialized control named SPWebPartManager, which derives from the ASP.NET WebPartManager control. The SPWebPartManager control overrides the standard behavior of the WebPartManager control to persist Web Part data inside the SharePoint Foundation content database instead of inside the ASP.NET services database.
In most cases, you don’t have to worry about dealing with the SPWebPartManager control directly because the one and only required instance of the SPWebPartManager is already defined in all the standard SharePoint Foundation master pages, including v4.master, minimal.master, and default.master. When you create a site page that links to any other master page, the SPWebPartManager control is added to the page automatically. Therefore, you simply need to add one or more WebPartZone controls.
Two things must be done when creating a page template for a Web Part page. The first is to inherit from the WebPartPage class that is defined inside the Microsoft.SharePoint assembly. The second is to add one or more WebPartZone controls. Note that you must use the WebPartZone control defined by SharePoint Foundation, not the one of the same name defined by ASP.NET.
To add WebPartZone controls to a page template, you must add a Register directive that imports the controls from the Microsoft.SharePoint assembly defined in the Microsoft.SharePoint.WebPartPages namespace. Example 5-3 shows the contents of PageTemplate2.aspx, which demonstrates how to create a page template for a Web Part page.
Example 5-3. A starting point for a Web Part page template
<%@ Assembly Name="Microsoft.SharePoint, [4-part assembly name]" %>
<%@ Page language="C#" MasterPageFile="~masterurl/default.master"
         Inherits="Microsoft.SharePoint.WebPartPages.WebPartPage"  %>

<%@ Register Tagprefix="WebPartPages" Namespace="Microsoft.SharePoint.WebPartPages"
             Assembly="Microsoft.SharePoint, [4-part assembly name]" %>

<asp:Content ContentPlaceHolderId="PlaceHolderAdditionalPageHead" runat="server">
    <link href="styles.css" rel="stylesheet" type="text/css" />
</asp:Content>

<asp:Content ContentPlaceHolderId="PlaceHolderMain" runat="server">

  <div id="PageBanner" >
    <img src="images/WingtipLogo.gif" alt="Wingtip Logo" />
    <span id="PageBannerText" >Sales Page</span>
  </div>

     <div id="PageBody" >
    <div id="RightColumn" >
      <h2>Wingtip Sales Team</h2>
      <WebPartPages:WebPartZone ID="TopRight" runat="server"
                                Title="Top Right Web Part Zone"
                                FrameType="TitleBarOnly" />
    </div>
    <div id="LeftColumn" >
      <WebPartPages:WebPartZone ID="Main" runat="server"
                                Title="Main Web Part Zone"
                                FrameType="TitleBarOnly" />
    </div>
  </div>
</asp:Content>
When you provision a Web Part page from a page template, it initially contains no Web Parts in any of its Web Part zones. While you could rely on users manually adding Web Parts to your pages, it is more convenient and reliable for you to use a technique in which you prepopulate Web Part zones with whatever Web Parts your business solution requires. One common technique to accomplish this involves a declarative approach used inside the File element used to create the site page from the page template. More specifically, you can add an AllUsersWebPart element inside a File element. The following example demonstrates the File element that is used to create the site page from PageTemplate2.aspx.
<File Path="WingtipSitePagesPageTemplate2.aspx" Url="WingtipSitePages/SitePage2.aspx" >
  <!-- Add a Web Part to top right zone -->
  <AllUsersWebPart WebPartZoneID="TopRight" WebPartOrder="0">
    <![CDATA[
    <WebPart xmlns="http://schemas.microsoft.com/WebPart/v2"
             xmlns:iwp="http://schemas.microsoft.com/WebPart/v2/Image">
      <Assembly>Microsoft.SharePoint, [4-part assembly name]</Assembly>
      <TypeName>Microsoft.SharePoint.WebPartPages.ImageWebPart</TypeName>
      <FrameType>None</FrameType>
      <Title>Wingtip Sales Team - 1988</Title>
      <iwp:ImageLink>images/Salesteam.jpg</iwp:ImageLink>
    </WebPart>
    ]]>
  </AllUsersWebPart>
</File>
As you can see, a File element can contain an inner AllUsersWebPart element that references a target Web Part zone and contains an inner WebPart element with the serialized data for a Web Part instance. We will revisit the topic of creating Web Part elements in more detail in Chapter 6, when we discuss Web Part template files.
As you have seen, the Module SharePoint Project Item Type provided by the SharePoint Developer Tools is both flexible and convenient. That’s because the Module SharePoint Project Item Type makes it easy to deploy template files for site pages, CSS files, JavaScript files, and image files. In many cases, you can just add your template files to the folder for a Module SharePoint Project Item Type and then let the SharePoint Developer Tools do what’s required to provision file instances in the target site during feature activation.
The SharePoint Developer Tools provide an especially valuable convenience when you need to integrate a Silverlight application into a SharePoint solution. However, the support for integrating a Silverlight application and deploying it with a SharePoint project is a bit more complicated than what you have seen so far. That’s because Visual Studio 2010 must provide a way for you to work on a Silverlight application project and the hosting SharePoint project at the same time within the same Visual Studio solution. What’s called for is something that will allow you to work on the user interface and write code inside the Silverlight application project, and then to test your work in a SharePoint test site by running the Deploy command.
Let’s review for a moment and begin by discussing the basic concepts of developing a Silverlight application. When you create a new Silverlight project in Visual Studio 2010, the project is created with a MainPage.xaml file that contains the user interface definition and a code-behind file named MainPage.xaml.cs. When you build the Silverlight project, Visual Studio 2010 compiles MainPage.xaml and MainPage.xaml.cs into an assembly DLL and then packages the assembly DLL in a self-compressed .zip archive for distribution. The .zip archive used to deploy a Silverlight application has an extension of .xap and is usually referred to by developers as a XAP file (pronounced “zap”).
The key point here is that every Silverlight project is configured to generate a XAP file as its output. For example, the output for a Silverlight project named SilverlightApp1 is SilverlightApp1.xap. However, it is important to recognize that the XAP file alone cannot be started as a stand-alone application. Instead, a Silverlight application must be hosted within the browser behind a Web page by adding an HTML-based object tag that references the XAP file.
<div>
  <object id="SilverlightApp1" width="800" height="300"
          data="data:application/x-silverlight-2,"
          type="application/x-silverlight-2" >
      <param name="source" value="SilverlightApp1.xap"/>
  </object>
</div>
There are two things that you must do to host a Silverlight application from a site page in a sandboxed solution. First, you must deploy the XAP file to the target site, making it accessible to the site page. Second, you must add an object tag to the site page to reference the XAP file. The SharePoint Developer Tools provide a special feature called Output Reference, which makes the second step incredibly easy to accomplish.
Each Module SharePoint Project Item Type has a collection property named Output References, which can be accessed through the standard Visual Studio property sheet. The SharePoint Developer Tools provide output references to give you a means to deploy the output of a Visual Studio 2010 project. While it’s possible to create output references based on several different types of Visual Studio 2010 projects, the use of output references is particularly useful when integrating Silverlight applications into a SharePoint project. When you create an output reference based on a Silverlight project, the SharePoint Developer Tools automatically add the support to build the XAP file into the output solution package and to provision an instance of the XAP file in the target site.
To add an output reference, you should have a SharePoint project and a Silverlight project open at the same time within the same solution. If you look back at Figure 5-5, you can see that the solution contains the SharePoint project named SandboxedSolutionPages and the Silverlight project named SilverlightApp1. If you examine the property sheet for a Module SharePoint Project Item Type, you will notice that it contains a collection property named Output References. You can add a new output reference to the Output References collection property using the dialog shown in Figure 5-7.

Figure 5-7. You can use the Output Reference property to deploy a Silverlight application in a SharePoint solution.
When you add an output reference to a sandboxed solution, you should ensure that the DeploymentType property is configured as ElementFile. This instructs the SharePoint Developer Tools to deploy the XAP file into the Module’s target folder at the same location as the site pages. This makes it simple to reference the XAP file from an object tag inside one of the site pages because the site page and the XAP file have been deployed at the exact same location.
Once you properly integrate the Silverlight application project with a SharePoint project, it becomes very easy to test your work. You can run the Deploy command to push out the XAP file, along with the site page which references it using an object tag. As you continue to modify the user interface and write code behind your Silverlight application, you can continue to run the Deploy command. Each time you run the Deploy command, the SharePoint Developer Tools use Deployment Conflict Resolution to delete the previous version of the XAP and replace it with the latest version that has just been compiled.
The SharePoint Developer Tools provide a project item template named Application Page, as shown in Figure 5-8, which makes it simple to add a new application page to a farm solution. When you add a new application page to a project, the SharePoint Developer Tools adds a skeleton .ASPX page file and an associated code-behind file with an extension of either .cs or .vb, depending on what language you are using.

Figure 5-8. The SharePoint Developer Tools provide a SharePoint Project Item template for creating application pages.
Unfortunately, the SharePoint Developer Tools do not provide a visual designer for application pages. Therefore, you must work directly with HTML in code view when laying out controls and designing the user interface for an application page. However, you should remember that you can still use the Visual Studio 2010 toolbox to drag ASP.NET controls directly to the HTML in code view.
Now it’s time to look at an example. The downloadable .zip archive of companion code for this book contains a sample SharePoint project named FarmSolutionPages. This project contains several different examples of using application pages in a SharePoint solution. The first example that we will look at is a custom application page named SiteInfo.aspx, which has been designed to display information about the lists on the current site. It is important to observe that SiteInfo.aspx has an associated code-behind file named SiteInfo.aspx.cs.
As a rule, application pages should derive from a base class named LayoutsPageBase, which is defined in the Microsoft.SharePoint assembly inside a namespace called Microsoft.SharePoint.WebControls. When the SharePoint Developer Tools generate the code-behind file for an application page, they add a public class with the same name as the application page that inherits from LayoutsPageBase. For example, here is the class that was created by the SharePoint Developer Tools inside SiteInfo.aspx.cs.
using Microsoft.SharePoint;
using Microsoft.SharePoint.WebControls;

namespace FarmSolutionPages {
  public partial class SiteInfo : LayoutsPageBase {
    // your code goes here
  }
}
Now let’s take a look at Example 5-4, which shows a partial listing for SiteInfo.aspx. If you look at the Page directive of SiteInfo.aspx, you can see that it has several attributes, including Language, CodeBehind, Inherits, and DynamicMasterPage. You can see that the CodeBehind attribute has a value that references the code-behind file SiteInfo.aspx.cs. Note that the CodeBehind attribute is used only by Visual Studio 2010 at design time and has no effect on the actual page at run time.
Example 5-4. A simple example of creating a custom application page
<%@ Assembly Name="$SharePoint.Project.AssemblyFullName$" %>
<%@ Page Language="C#"
         CodeBehind="SiteInfo.aspx.cs"
         DynamicMasterPageFile="~masterurl/default.master"
         Inherits="FarmSolutionPages.SiteInfo" %>

<asp:Content ID="PageTitle" runat="server"
             ContentPlaceHolderID="PlaceHolderPageTitle" >
  Wingtip Site Info
</asp:Content>

<asp:Content ID="PageTitleInTitleArea" runat="server"
             contentplaceholderid="PlaceHolderPageTitleInTitleArea" >
  Wingtip Site Info
</asp:Content>

<asp:Content ID="PageHead" runat="server"
             ContentPlaceHolderID="PlaceHolderAdditionalPageHead" >
  <style type="text/css">
    #MSO_ContentTable{ padding-left:10px; }
  </style>
</asp:Content>

<asp:Content ID="Main" runat="server"
             ContentPlaceHolderID="PlaceHolderMain" >

  <div style="margin-bottom:16px;">
    <h2>Site Lists</h2>
    <asp:GridView ID="grdLists" runat="server"
          AutoGenerateColumns="true" />
  </div>
  <div>
    <asp:Button ID="cmdReturn" runat="server"
                Text="Return to Site Settings" />
  </div>

</asp:Content>
You can also see that the Page directive inside SiteInfo.aspx contains the DynamicMasterPageFile attribute, which has a standard token value of ~masterurl/default.master. As discussed earlier in this chapter in the section entitled Understanding v4.master, this dynamic token has the effect of linking the application page to the master page that references the current site’s MasterUrl property, which is v4.master by default.
The Inherits attribute of the Page directive references the class named FarmSolutionPages.SiteInfo, which has been created inside the code behind the SiteInfo.aspx.cs file. You should observe that this class in the code-behind file inherits from LayoutsPageBase.
At the top of Example 5-4, you see an Assembly directive, which uses a token value of $SharePoint.Project.AssemblyFullName$. When the SharePoint Developer Tools generate the project’s output solution package, they replace this token with the four-part assembly name of the current project’s output assembly, which in this case is FarmSolutionPages.dll. Note that without the Assembly directive, SiteInfo.aspx would not be able to reference the class assigned to its Inherits attribute properly.
Note that the partial listing of SiteInfo.aspx in Example 5-4 contains Content tags that override ContentPlaceHolder controls defined inside v4.master. The four Content tags used in this example reference ContentPlaceHolder controls with the IDs of PlaceHolderPageTitle, PlaceHolderPageTitleInTitleArea, PlaceHolderAdditionalPageHead, and PlaceHolderMain. Note that while these are 4 of the most commonly overridden placeholders in v4.master, there are 30 other ContentPlaceHolder controls that are useful to override in other scenarios. Figure 5-9 shows what this application page looks like when run in the context of a standard Team site.
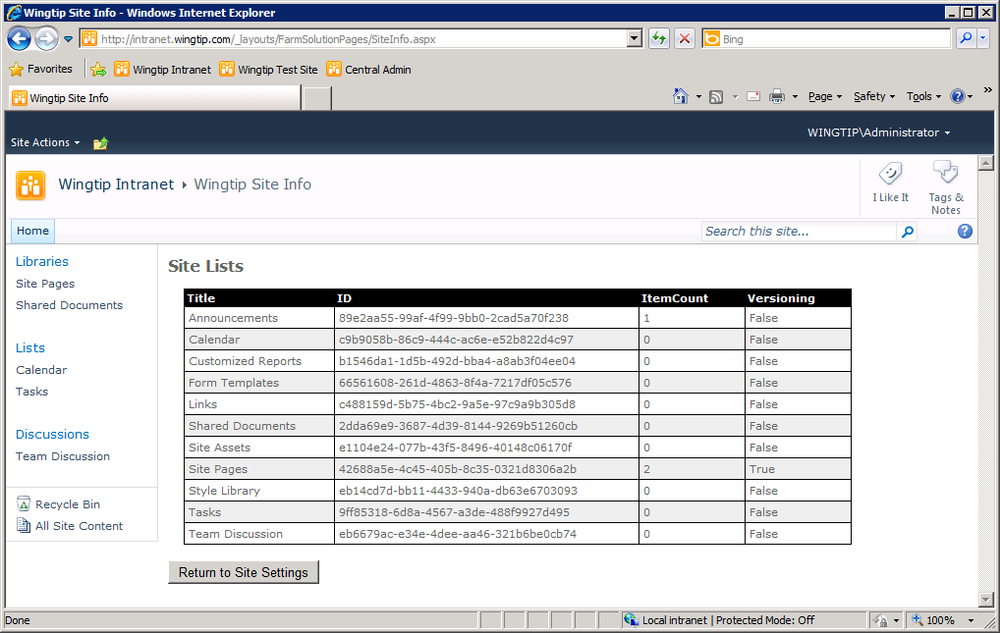
The placeholder named PlaceHolderPageTitle is fairly simple. It is used to replace the page title that is shown on the top title bar of the browser window. The placeholder named PlaceHolderPageTitleInTitleArea is used to add a title to the page in the title row area just above the TopNav bar.
The placeholder named PlaceHolderAdditionalPageHead is very useful because it allows you to add several different types of content such as META tags, CSS rules, and JavaScript code at the bottom of the head section of the resulting page. In this example, PlaceHolderAdditionalPageHead is used to add a CSS rule to a div element in v4.master named MSO_ContentTable. This CCS rule adds 10 pixels of padding between the left navigation panel and the HTML content that has been added to PlaceHolderMain.
In most scenarios, the placeholder named PlaceHolderMain is where you will lay out HTML tags and ASP.NET controls to build the user interface. In SiteInfo.aspx, the Content control for PlaceHolderMain contains an H2 tag, an ASP.NET GridView control, and a standard ASP.NET command button.
Tip
One other aspect of debugging that can catch you off guard is that the _layouts directory has its own web.config file, which has settings that override settings in the web.config file of the hosting Web application. To debug pages running from the _layouts directory, you must also open the web.config file at the following location and change the mode attribute setting in the customErrors element from On to Off.
C:Program FilesCommon FilesMicrosoft SharedWeb Server Extensions14TEMPLATE
LAYOUTS
When you first begin working with application pages, it can be tricky to add event handlers behind controls due to the lack of a visual designer. However, a simple and easy approach involves overriding the OnInit method. When you are writing code inside the body of a method such as OnInit in the code-behind class, you will see that the IntelliSense of Visual Studio 2010 will recognize controls such as the command button named cmdReturn. Here’s an example wiring up a simple event handler for this command button that navigates from SiteInfo.aspx back to the Site Settings page named settings.aspx.
public partial class SiteInfo : LayoutsPageBase {
  protected override void OnInit(EventArgs e) {
    cmdReturn.Click += new EventHandler(cmdReturn_Click);
  }
  void cmdReturn_Click(object sender, EventArgs e) {
    SPUtility.Redirect("settings.aspx",
                        SPRedirectFlags.RelativeToLayoutsPage,
                        this.Context);
  }
}Now that you have seen how to create an application page, let’s continue the process by adding a custom section and a navigation link to the Site Settings page. This can be accomplished by creating a feature containing a CustomActionGroup element and a CustomAction element. While these types of elements are not supported directly by the SharePoint Developer Tools with SharePoint Project Item templates, they can be created using the SharePoint Project Item template named Empty Element. For example, you can create an Empty Element project item and then add the following CAML elements to elements.xml.
<Elements xmlns="http://schemas.microsoft.com/sharepoint/">

  <CustomActionGroup
    Id="WingtipSiteAdministration"
    Location="Microsoft.SharePoint.SiteSettings"
    Title="Wingtip Site Administration"
    Sequence="61"
    Description=""
    ImageUrl="/_layouts/images/FarmSolutionPages/WingtipSectionIcon.gif" />

  <CustomAction
    Id="WingtipSiteInfo"
    GroupId="WingtipSiteAdministration"
    Location="Microsoft.SharePoint.SiteSettings"
    Rights="ManageWeb"
    Sequence="1"
    Title="Wingtip Site Info"
    Description="Use this page to get information about the current site" >
    <UrlAction Url="~site/_layouts/FarmSolutionPages/SiteInfo.aspx" />
  </CustomAction>

</Elements>
The CustomActionGroup element is used to add a new section to the site-setting menu for the current site. This has a Title of Wingtip Site Administration and has been assigned a Sequence attribute of 61, so that it appears after the other standard sections displayed on the Site Settings page. You can see that the CustomAction element in this example has a GroupID attribute that references the ID of the CustomActionGroup element. This ensures that the link created by the custom action is placed in the custom group.
This CustomAction element creates a link with a caption of “Wingtip Site Info,” which points to the URL defined in the Url attribute within the UrlAction attribute. In this example, the URL has been assigned a value of ~site/_layouts/FarmSolutionPages/SiteInfo.aspx. The first part of the URL contains the ~site token, which SharePoint Foundation replaces with the base URL to the current site. This ensures that the application page always executes through the context of the current site. You can also use the ~sitecollection token instead of the ~site token if you want the application page to execute through the context of the top-level site of the current site collection, even in scenarios where the user has clicked the link within a child site.
There is one more aspect of this example that we want to discuss. You can observe that the CustomAction element also includes the Rights attribute, which has a value of ManageWeb. This attribute setting produces the effect of security trimming. In other words, the link will be shown only to users who have administrative permissions on the current site.
However, you should understand that the Rights attribute affects only security trimming and has no effect on security enforcement. While the Rights attribute can prevent users without the proper permissions from seeing the link, it does nothing to prevent an unprivileged user who knows the actual URL from getting to the application page. If you need actual security enforcement to prevent users without site administration permissions from being able to get to an application page such as SiteInfo.aspx, that security enforcement would have to be implemented separately.
One simple way to enforce security on an application page is to use the support built into the underlying base class named LayoutsPageBase. This class provides an overridable property named RequireSiteAdministrator. You can override this property in the code-behind class and return true, as shown in the following example.
public partial class SiteInfo: LayoutsPageBase {

  protected override bool RequireSiteAdministrator {
    get { return true; }
  }
}
Once you add this code to an application page, you truly make the page secure. When a user who is not a site administrator tries to navigate to this application page, the user is redirected to the standard SharePoint Foundation Access Denied page.
One of the less noticeable navigation components supplied by v4.master is the Breadcrumb control. This control appears as an icon of a folder with a green arrow just to the right of the Site Actions menu. The Breadcrumb control is a drop-down menu that displays a hierarchy of pages with the site’s home page at the top. By default, the Breadcrumb control shows a hierarchy that contains the site’s home page and the current page. However, you can build a custom site map that allows you to construct a more elaborate hierarchy of pages.
For example, if you are creating applications such as SiteInfo.aspx, which users navigate to from links on the Site Settings page, you can create a custom site map that adds the Site Settings page to the hierarchy of pages shown in the breadcrumb trail control, as shown in Figure 5-10.

Figure 5-10. A custom site map can be used to customize the hierarchy of pages shown in the Breadcrumb control.
The first step to customizing the hierarchy of pages in the Breadcrumb control is to create a custom site map. To do this, you must create the site map file using a special naming convention. The name of the file must start with layouts.sitemap, and it must be given the extension of .xml. The site map in our example is named layouts.sitemap.FarmSolutionPages.xml. A second requirement is that this site map file must be deployed directly inside the LAYOUTS directory and not inside one of its child directories.
The second step is to create the XML content inside the site map file. You must add a top-level sitemap element, and then you add a siteMapNode element for each page that you want to place in the hierarchy.
<siteMap enableLocalization="true">
  <siteMapNode
    title="Wingtip Site Info"
    parentUrl="/_layouts/settings.aspx"
    url="/_layouts/FarmSolutionPages/SiteInfo.aspx" />
</siteMap>
One complication in getting the site map to work correctly is that SharePoint Foundation does not inspect your site map file at run time when it builds the hierarchy of pages in the Breadcrumb control. Instead, you must run a SharePoint Foundation system process that retrieves the siteMapNode elements from your site map and merges them into a master site map file named layouts.sitemap, which is located in the _app_bin folder inside the root directory of each Web application.
While you are testing your code in the development environment, you can force SharePoint Foundation to rebuild the layouts.sitemap file each time that you run the Deploy command by adding a FeatureInstalled event handler with the following code to a feature in your project.
public override void FeatureInstalled(SPFeatureReceiverProperties props) {
  SPWebService webService = SPFarm.Local.Services.GetValue<SPWebService>();
  webService.ApplyApplicationContentToLocalServer();
}
This code acquires a reference to the SPWebService object for the local farm. The code then calls the ApplyApplicationContentToLocalServer method, which forces SharePoint Foundation to rebuild the layouts.sitemap file on the local Web server.
However, keep in mind that this method name includes the word “local,” which means that it will work reliably only in a farm that has a single Web server. To rebuild the layouts.sitemap file properly across a server farm with multiple Web servers, you should use the Windows PowerShell cmdlet named Install-SPApplicationContent from the SharePoint PowerShell snap-in.
The final step to getting the Breadcrumb control to work properly involves adding a Content control with an ID of PlaceHolderTitleBreadcrumb to swap out the ListSiteMapPath control defined in v4.master with a customized instance of the ListSiteMapPath control that uses a site map provider named SPXmlContentMapProvider.
<asp:Content ID="TitleBreadcrumb" runat="server"
             contentplaceholderid="PlaceHolderTitleBreadcrumb" >
  <SharePoint:ListSiteMapPath
    ID="ListSiteMapPath1" runat="server"
    SiteMapProviders="SPSiteMapProvider,SPXmlContentMapProvider"
    RenderCurrentNodeAsLink="false"
    PathSeparator=""
    CssClass="s4-breadcrumb"
    NodeStyle-CssClass="s4-breadcrumbNode"
    CurrentNodeStyle-CssClass="s4-breadcrumbCurrentNode"
    RootNodeStyle-CssClass="s4-breadcrumbRootNode"
    HideInteriorRootNodes="true"
    SkipLinkText="" />
</asp:Content>There is one common request for customizing SharePoint sites that has been heard again and again: “Can you make my SharePoint site look like it’s not a SharePoint site?” Whether a company has public Internet sites or internal team sites, there is often a desire to replace the standard SharePoint look and feel with custom colors, fonts, and images.
While different designers and developers don’t always agree on the best approach for branding SharePoint sites, we will focus on a technique that works in either a sandbox solution or a farm solution. That means our SharePoint solution must be designed in such a way that it does not deploy any files inside the SharePoint root directory. Instead, our SharePoint solution will be designed to deploy all the required branding files using template files and Modules. We will also refrain from picking up any dependencies on SharePoint Server 2010, which will ensure that our branding solution will work equally well on farms running either SharePoint Foundation or SharePoint Server 2010.
In this section, we are going to walk through a simple SharePoint project named Branding101. This project has been designed to create a reusable brand solution that can be used with any SharePoint 2010 site. You can see the high-level structure of the Branding101 project, which includes a custom master page, custom CSS files, and custom images, by examining Figure 5-11.

The first step in creating a branding solution is to figure out how to deploy a custom master page to the Master Page Gallery of the top-level site. You can start by creating a Module SharePoint Project Item Type, which is activated by a feature that is scoped at the site collection level. Note that the Branding101 solution has a single feature named Main, which activates at the site collection level.
The Branding101 solution contains a Module element named MasterPageGallery, which contains a template file for a custom master page named Branding101.master. When you create a custom master page such as Branding101.master, you will need a starting point. A popular technique is to copy and paste the text from the standard SharePoint 2010 master page named v4.master, which can be found at the following location.
C:Program FilesCommon FilesMicrosoft SharedWeb Server Extensions14TEMPLATEGLOBAL
v4.master
Once you have added a master page template such as Branding101.master to a Module SharePoint Project Item Type, you must modify the elements.xml file to ensure that it is deployed correctly to the Master Page Gallery during feature activation. The elements.xml file of the MasterPageGallery item has been edited manually to produce the following XML.
<Elements xmlns="http://schemas.microsoft.com/sharepoint/">
  <Module Name="MasterPageGallery"
          Path="MasterPageGallery"
          Url="_catalogs/masterpage" >

    <File Url="Branding101.master" Type="GhostableInLibrary" >
      <Property Name="UIVersion" Value="4" />
      <Property Name="ContentTypeId" Value="0x010105" />
    </File>

  </Module>
</Elements>
When you create a Module element such as MasterPageGallery to provision files within a document library such as the Master Page Gallery, it is important that you configure the Url attribute of the Module element using the site relative path to the root of the document library. When provisioning a master page to the Master Page Gallery, the Url attribute of the Module element should always be configured with the standard path of _catalogs/masterpage.
When you provision a file into the scope of a document library, each File element should also be edited to include a Type attribute with a value of GhostableInLibrary. When provisioning master pages in SharePoint 2010, you should also add two Property elements inside the File element to configure two important properties named UIVersion and ContentTypeId.
The UIVersion property of a master page is used by SharePoint Foundation to differentiate between master pages designed for the new SharePoint 2010 user interface and those designed for the older user interface of SharePoint 2007. If you have designed your master page based on the new SharePoint 2010 user interface, you should configure the UIVersion property with a value of 4. Earlier in this chapter, in the section entitled Master Pages we briefly described the new visual upgrade feature in SharePoint 2010. You can configure the UIVersion property with a value of 3 for migration scenarios where you are taking advantage of the visual upgrade feature, and you have designed the master page to target the older SharePoint 2007 user interface.
The ContentTypeId property is used to differentiate between master pages and page layouts that are used by SharePoint Server 2010 publishing sites. When deploying a master page, you should configure it with the correct ContentTypeId value for master pages, which is always 0x010105.
In SharePoint Server 2007, the publishing features have been designed to create a special document library named the Style Library, which Microsoft uses to deploy standard CSS files and image files used in publishing sites. The Style Library is also commonly used as a deployment target by Web designers and developers who are using CSS files and image files to apply branding elements to SharePoint 2007 publishing sites.
When you are developing a generic and reusable branding solution for SharePoint 2007 farms, the Style Library cannot be used because it exists only on publishing sites. Windows SharePoint Services 3.0 does not create the Style Library when you create other types of sites, such as a Team site, Blank site, or Document Workspace. Fortunately, this is no longer a problem in SharePoint 2010.
In SharePoint 2010, every site collection gets its own Style Library. That’s because Microsoft has moved the standard provisioning instructions for creating the Style Library out of the publishing features and into the Global site definition. Each time that SharePoint Foundation creates a new site collection, it adds the Style Library to the top-level site. This makes the Style Library an ideal candidate for deploying CSS files and image files in a generic branding solution.
The Branding101 project contains a second Module SharePoint Project Item Type named Style Library, which is used to provision a custom CSS file and multiple custom images inside the Style Library. Deploying custom CSS files and image files in the Style Library is recommended because it works with both sandboxed solutions and farm solutions. This technique also works within farms running SharePoint Server 2010, as well as within farms running only SharePoint Foundation. It must be noted that several other popular approaches to branding SharePoint 2010 sites do not provide this level of flexibility.
Unlike MasterPageGallery, which is used to deploy a custom master page template, it is not necessary to modify the elements.xml file of the Style Library by hand. The SharePoint Developer Tools can add all the appropriate File elements behind the scenes. Furthermore, you can continue to add other image files to the Images folder inside the Style Library Module, and they will be deployed automatically inside the proper location within the Style Library for you.
Now that you understand how the two Module SharePoint Project Item Types have been configured to deploy the custom master page and a custom CSS file, it’s time to walk through the code that configures the current site collection to begin using them. The feature, named Main, contains a feature receiver with a FeatureActivated event handler and a FeatureDeactivating event handler. These event handlers make it possible to write code that applies the branding solution during feature activation, as well as to remove the branding solution during feature deactivation.
Now let’s go through the code in the FeatureActivated event handler, which applies the branding solution. First, the code determines the path to Branding101.master in the Master Page Gallery. Note that the path to the master page must be calculated relative to the root of the hosting Web application. Next, the code enumerates through all the sites within the current site collection and updates several properties within the SPWeb object of each site.
public override void FeatureActivated(
                       SPFeatureReceiverProperties properties) {
  SPSite siteCollection = properties.Feature.Parent as SPSite;
  if (siteCollection != null) {
    SPWeb topLevelSite = siteCollection.RootWeb;
    // calculate relative path to site from Web Application root
    string WebAppRelativePath = topLevelSite.ServerRelativeUrl;
    if (!WebAppRelativePath.EndsWith("/")) {
      WebAppRelativePath += "/";
    }
    // enumerate through each site and apply branding
    foreach (SPWeb site in siteCollection.AllWebs) {
      site.MasterUrl = WebAppRelativePath +
                       "_catalogs/masterpage/Branding101.master";
      site.CustomMasterUrl = WebAppRelativePath +
                             "_catalogs/masterpage/Branding101.master";
      site.AlternateCssUrl = WebAppRelativePath +
                             "Style%20Library/Branding101/Styles.css";
      site.SiteLogoUrl = WebAppRelativePath +
                         "Style%20Library/Branding101/Images/Logo.gif";
      site.UIVersion = 4;
      site.Update();
    }
  }
}
The MasterUrl property of the SPWeb object is the property that you use to redirect site pages and application pages to link to a custom master page such as Branding101.master. Note that the code that you have just seen calculates the path to Branding101.master by combing the Web application-relative path to the site and the site relative path to the Master Page Gallery in the top-level site, which always has a value of _catalogs/masterpage.
Note that this example updates the SPWeb property named CustomMasterUrl in addition to the MasterUrl property. Updating the CustomMasterUrl property is important only in publishing sites that contain publishing pages inside the Pages document library. The CustomMasterUrl property is used to reassign the master page for publishing pages. Assigning a new value to the CustomMasterUrl property in a SharePoint Foundation site will have no effect, nor will it cause any problems.
The AlternateCssUrl property is used to link all the pages within a site to the custom CSS file named styles.css. Note that the linking behavior associated with the AlternateCssUrl property is implemented by the SharePoint CssLink control, which is defined in the head section of all the standard SharePoint 2010 master pages. The SharePoint CssLink control also adds a link to an essential CSS file named coreV4.css and should therefore be included in any custom master page targeting SharePoint 2010.
While the SharePoint project named Branding101 relies on the approach of linking to a custom CSS file using the AlternateCssUrl property, it should be noted that some branding solutions take an alternative approach of linking to a custom CSS file using the CSSRegistration control. For example, you can add the following CssRegistration tag to the head section of a custom master page to link to a CSS file inside the Style Library.
<SharePoint:CssRegistration
  name="<% $SPUrl:~sitecollection/Style Library/styles.css %>"
  After="corev4.css"
  runat="server"
/>
One benefit to using the CssRegistration control over the AlternateCssUrl property is that it allows you to link to more than one CSS file. A second advantage is that you can use the CssRegistration control in individual pages for scenarios where you have a CSS file that is used by some but not all the pages within a site.
However, use of the CssRegistration control also has a disadvantage because it usually relies on the $SPUrl expression to determine the path to the current site. However, use of the $SPUrl expression requires the hosting farm to be running SharePoint Server 2010. If there is a chance that your branding solution will need to be used in farms running only SharePoint Foundation, you should choose the technique of linking to a custom CSS file using the AlternateCssUrl property over the CssRegistration control. While it is possible to use the CssRegistration without the $SPUrl expression, it can be tricky, and it often results in branding solutions that do not work in scenarios where the hosting site collection is not located at the root of the hosting Web application.
The SiteLogoUrl property is used in this example because it provides a quick and effective way of replacing the site image in the upper-left side of the page. Note that the behavior associated with the SiteLogoUrl property is implemented by the SharePoint SiteLogoImage control, which is defined in the Title Row section of standard SharePoint 2010 master pages such as v4.master.
The UIVersion property is used to configure whether the current site should run in the standard UI mode for SharePoint 2010 sites or whether it should run in the older UI mode that is used when migrating SharePoint 2007 sites to SharePoint 2010. The main effect that the UIVersion property setting will have will be to determine which file the CssLink control links to: the new standard CSS file created for SharePoint 2010 named corev4.css, or the older standard CSS file named core.css, which is designed to style pages in SharePoint 2007. The Branding101 solution assigns a value of 4 to the UIVersion property to ensure that pages are linked to corev4.css instead of core.css.
You have now seen how and why the Branding101 solution configures important SPWeb properties on every site within the current site collection during feature activation. Now let’s discuss what code should be executed during feature deactivation. It makes sense to remove all the custom branding elements to return the current site collection to its original state. Here is an implementation of the FeatureDeactivating method, which returns all pages to using the standard master page v4.master as well as removing the link to the custom CSS file and the custom site logo.
public override void FeatureDeactivating(
                       SPFeatureReceiverProperties properties) {
  SPSite siteCollection = properties.Feature.Parent as SPSite;
  if (siteCollection != null) {
    SPWeb topLevelSite = siteCollection.RootWeb;
    // calculate relative path of site from Web Application root
    string WebAppRelativePath = topLevelSite.ServerRelativeUrl;
    if (!WebAppRelativePath.EndsWith("/")) {
      WebAppRelativePath += "/";
    }
    // enumerate through each site and remove custom branding
    foreach (SPWeb site in siteCollection.AllWebs) {
      site.MasterUrl = WebAppRelativePath +
                       "_catalogs/masterpage/v4.master";
      site.CustomMasterUrl = WebAppRelativePath +
                             "_catalogs/masterpage/v4.master";
      site.AlternateCssUrl = "";
      site.SiteLogoUrl = "";
      site.Update();
    }
  }
}There is one more project item that needs to be discussed to complete the walkthrough of the Branding101 project. What’s still needed is a way to apply the custom branding elements to child sites automatically as they are created inside a site collection that has activated the Branding101 feature. To accomplish this task in SharePoint 2007, you would be required to resort to feature stapling. However, SharePoint 2010 adds support for a new event named WebProvisioned, which makes this job much easier.
The Branding101 project contains an Event Receiver SharePoint Project Item Type named ChildSiteInit, which is used to automate copying the branding property values from the top-level site to child sites as they are created. The key benefit of adding this event handler is that it will fire each time a new child site is created. This makes it fairly simple to write this code, which copies the relevant SPWeb properties from the top-level site to the new child site.
using System;
using Microsoft.SharePoint;

namespace Branding101.ChildSiteInit {

  public class ChildSiteInit : SPWebEventReceiver {
    public override void WebProvisioned(
                           SPWebEventProperties properties) {
      SPWeb childSite = properties.Web;
      SPWeb topSite = childSite.Site.RootWeb;
      childSite.MasterUrl = topSite.MasterUrl;
      childSite.CustomMasterUrl = topSite.CustomMasterUrl;
      childSite.AlternateCssUrl = topSite.AlternateCssUrl;
      childSite.SiteLogoUrl = topSite.SiteLogoUrl;
      childSite.Update();
    }
  }
}This chapter has covered the fundamentals of how pages are processed in SharePoint 2010. You learned that pages in a SharePoint site can be categorized as either site pages or application pages. Site pages provide SharePoint users with the ability to add, customize, and delete pages while working with a site. While many site pages are initially created in a ghosted state and processed in terms of an underlying page template, SharePoint Foundation must provide a more elaborate processing model to support site page customization. Application pages, on the other hand, are based on a less complicated deployment and processing model, which can lead to simpler designs and more efficient processing.
This chapter also examined and compared the factors involved in designing and implementing pages for sandboxed solution and farm solutions. Because a sandboxed solution cannot deploy application pages, the design for a sandboxed solution must rely on provisioning site pages using page templates and Modules. However, you have also seen that it is possible to create site pages in a sandboxed solution that contains advanced elements such as Web Parts, Silverlight applications, and client-side code that uses jQuery. In addition, you have learned that many design options are available in only farm solutions, such as using application pages and creating a custom site map.
The last part of the chapter examined designing and implementing a reusable SharePoint solution to brand SharePoint sites. You learned how to create a SharePoint project that applies a branding solution to a target site collection using a custom master page and a custom CSS file. Furthermore, you now know the proper techniques to create a branding solution that can be deployed as either a sandboxed solution or a farm solution on farms running either SharePoint Foundation or SharePoint Server 2010.