
This chapter explores advanced techniques for developing and deploying custom templates and type definitions. We will begin by discussing how to develop custom field types. This development strategy offers the greatest level of control when initializing field values and performing data validation. You will also learn how to create a customized editing experience for a custom field type by extending it with a custom field control.
The second section of the chapter focuses on developing reusable type definitions for site columns, content types, and list templates using features and Collaborative Application Markup Language (CAML). While developing CAML-based definitions has a steep learning curve and poses more challenges with testing and debugging, it provides an alternative approach with certain advantages over creating site columns, content types, and lists using the server-side object model. Therefore, we also need to provide some motivation by discussing when the extra work required to develop CAML-based definitions is worth the effort.
The final part of the chapter focuses on site definitions and the process of creating new sites. You will learn about the underlying site provisioning architecture of Microsoft SharePoint Foundation in which every new site is created using a specific site definition. We will examine the standard site definitions included with SharePoint 2010 and explain the role of the Global site definition. We will also discuss the pros and cons of developing custom site definitions and provide alternative techniques for creating new sites, including feature stapling and developing a custom site provisioning provider.
Chapter 7, introduced the fundamental concepts involved with fields, site columns, and field types. You learned that every field and every site column is created in terms of an underlying field type. You also learned about the built-in field types in SharePoint Foundation, which include Text, Note, Boolean, Integer, Number, Decimal, Currency, DateTime, Choice, and Lookup. Now it’s time to discuss extending the set of built-in field types by developing custom field types. What’s important to understand is that when you develop a custom field type, you are really developing a field type definition.
A primary motivation for creating custom field types is that it provides the greatest level when it comes to initializing and formatting field values. Custom field types are also commonly written to perform data validation on user input to prevent inconsistent field values from being written into the content database.
A second motivation for developing a custom field type is that it can be extended with an associated user interface component known as a field control. A custom field control complements a custom field type because it allows you to create a rich user interface with a Hypertext Transfer Markup Language (HTML) layout, ASP.NET server controls, and code-behind that can be as simple or as complicated as the scenario calls for.
Before we begin, we must point out a few caveats about developing custom field types. First, custom field types cannot be deployed in sandbox solutions. Instead, custom field types must be deployed using a farm solution. Second, custom field types work great through the browser, but they often cause integration problems with Microsoft Office products such as Microsoft Word or Microsoft Excel. Furthermore, you will find several other areas in which custom field types cause frustration, such as a scenario where a user is viewing list items through the DataGrid view or a developer is trying to program against a list using the LINQ to SharePoint provider.
There is one particular area in SharePoint 2010 development where custom field types are most popular. This involves a scenario when you are creating a custom SharePoint solution for publishing sites whose functionality is included as part of SharePoint Server 2010 Standard Edition. The high-level design of a publishing site is based on a scheme in which content authors submit page content through browser-based input forms. The power of developing a custom field type along with a custom field control makes it possible to provide content authors with a very rich editing experience in the browser.
The developer tools in Microsoft Visual Studio 2010 do not provide a dedicated project item template for creating a custom field type. However, this doesn’t pose much of a problem. When you need to develop a custom field type, you should start by creating a new SharePoint project based on the Empty SharePoint Project template. Inside this project, you will add a new public class for each custom field type. You will also add a special Extensible Markup Language (XML) definition file that is required to deploy the project’s custom field types.
The downloadable .zip archive of companion code for this book contains a sample SharePoint project named WingtipFieldTypes. This project contains working samples of the custom field types and field controls that we are going to examine over the next few pages. You can see that the project structure of WingtipFieldTypes in Figure 8-1 contains the source files for four custom field types named FieldEmployeStartDate, FieldSocialSecurityNumber, FieldUnitedStatesAddress, and FieldEmployeeStatus.

Figure 8-1. The WingtipFieldTypes project demonstrates creating custom field types and custom field controls.
For each custom field type, you must create a field type class that inherits from one of the built-in field type classes, such as SPFieldText, SPFieldNumber, SPFieldDateTime, and SPFieldMultiColumn. The following code snippet shows how each of the custom field type classes in the WingtipFieldTypes project inherits from one of these required base classes.
public class EmployeeStartDate : SPFieldDateTime {
  // custom field type implementation
}
public class SocialSecurityNumber : SPFieldText {
  // custom field type implementation
}
public class UnitedStatesAddress : SPFieldMultiColumn {
  // custom field type implementation
}
public class EmployeeStatus : SPFieldText {
  // custom field type implementation
}
The first step in implementing a custom field type class is to add two public constructors that are required by SharePoint Foundation. SharePoint Foundation requires these two specially parameterized constructors because it uses them in various scenarios to create instances of your custom field type. When you add these constructors to your field type class, you don’t need to supply any actual code inside the curly braces. You just need to define the required parameter list and pass these parameters on to the base class constructor with a matching parameter list.
public class EmployeeStartDate : SPFieldDateTime {

  public EmployeeStartDate(SPFieldCollection fields, string fieldName)
           : base(fields, fieldName) { }

  public EmployeeStartDate(SPFieldCollection fields, string typeName, string displayName)
           : base(fields, typeName, displayName) { }

}
Once you have added these two public constructors, the next step is to override whatever base class methods and properties make sense for your particular scenario. We will begin by examining the sample field type class named EmployeeStartDate, which has overridden the base members named OnAdded, DefaultValue, and GetValidatedString.
public class FieldEmployeeStartDate : SPFieldDateTime {
  // constructors omitted for brevity

  // configure new fields to display date but not time
  public override void OnAdded(SPAddFieldOptions op) {}

  // add logic to create default date as first Monday
  public override string DefaultValue {  get {}  }

  // add validation to ensure start date is a Monday
  public override string GetValidatedString(object value) {}
}
Let’s first look at the implementation of OnAdded. This method acts like an event handler for an after event, such as we discussed in Chapter 7. Whenever a new field is created using this custom field type, the OnAdded method will execute, giving us a chance to modify the field’s property settings. The implementation of OnAdded in the EmployeeStartDate class updates the DisplayFormat property of each new field to display its date value without the time.
public override void OnAdded(SPAddFieldOptions op) {
  this.DisplayFormat = SPDateTimeFieldFormatType.DateOnly;
  this.Update();
}
At Wingtip Toys, the Human Resources department has established a policy that the start date for a new employee must always fall on a Monday due to payroll processing requirements. Therefore, the EmployeeStartDate class overrides the get method of the DefaultValue property to return the current date, if that is a Monday, or the first Monday after that.
public override string DefaultValue {
  get {
    DateTime startDate = DateTime.Today;
    // move forward to first Monday
    while (startDate.DayOfWeek != DayOfWeek.Monday) {
      startDate = startDate.AddDays(1);
    }
    return SPUtility.CreateISO8601DateTimeFromSystemDateTime(startDate);
  }
}
Note that the DefaultValue property is based on the string type, not the DateTime type. Therefore, its implementation must calculate the correct date for the next Monday and return this date as a string. Another observation is that SharePoint Foundation formats dates as strings using a special format known as ISO8601. There are helper methods provided by the SPUtility class to assist with converting dates between System.DateTime values and System.String values, and vice versa. This example demonstrates calling the CreateISO8601DateTimeFromSystemDateTime method supplied by SPUtility.
The implementation of the EmployeeStartDate class also demonstrates performing a custom validation on a field value. Field value validation is implemented by overriding a method named GetValidatedString, which is always executed prior to SharePoint Foundation saving an item that contains a field based on the field type. The GetValidatedString method passes a parameter named value that you can use to inspect the field value that the user is attempting to save to the content database. If the custom validation logic inside GetValidatedString determines that user input for the field value is not valid, it should be written to throw an exception of type SPFieldValidationException. Here is the implementation of the GetValidatedString method in the EmployeeStartDate field type class, which validates that each field value is a Monday.
// add validation to ensure start date is a Monday
public override string GetValidatedString(object value) {
  DateTime input = System.Convert.ToDateTime(value);
  if (input.DayOfWeek != DayOfWeek.Monday) {
    throw new SPFieldValidationException("Employee start date must be a Monday");
  }
  return base.GetValidatedString(value);
}
Now let’s discuss what happens when this validation code is executed. Imagine a scenario with a list named Wingtip Employees, which contains a field created from the EmployeeStartDate field type. What happens when a user attempts to save an employee item with a start date that is not a Monday? The GetValidatedString method executes and determines that the user input is invalid. At this point, the method throws an exception that cancels the user’s request to save the current item and displays an error message to the user, as shown in Figure 8-2.

Figure 8-2. Throwing an SPFieldValidationException item cancels the action to update an item and displays an error.
As you can see, a custom field type provides an effective way to validate user input values. Now let’s look at a second example of a custom field type that contains custom validation logic. The GetValidatedString method in the SocialSecurityNumber field type class uses the Regex class supplied by the Microsoft .NET Framework and a regular expression to determine whether the user input matches the correct pattern for a U.S. social security number.
public override string GetValidatedString(object value) {
  string UserInput = value.ToString();
  string SSN_RegularExpression = @"^d{3}-d{2}-d{4}$";
  if ( (!string.IsNullOrEmpty(UserInput)) &
       (!Regex.IsMatch(UserInput, SSN_RegularExpression) ) {
      throw new SPFieldValidationException("SSN must be form of 123-45-6789");
    }
  return base.GetValidatedString(value);
}Now that we have created a custom field type class, the next step is to create an XML file containing a CAML-based definition for each custom field type that is required for deployment. When you create the XML file to deploy your custom field types, you must create it using a naming pattern where the file name starts with fldtypes and ends with an extension of .xml. For example, the WingtipFieldTypes project contains the file fldtypes_WingtipFieldTypes.xml. In addition to giving this XML file a special name, you must deploy it to a specific directory inside the SharePoint Root directory at the path of TEMPLATE/XML.
Let’s quickly review how SharePoint Foundation initializes the available set of field types. When SharePoint Foundation initializes the worker process for an application pool, it queries the TEMPLATE/XML directory for files that match the pattern of fldtypes*.xml and scans through them to discover the field type definitions deployed within the local farm. From this, you can make two interesting observations about custom field type deployment. First, custom field types are not deployed using features. Second, custom field types are deployed as an all-or-nothing proposition at farm-level scope.
If you look at the TEMPLATE/XML directory on a Web server in a SharePoint 2010 farm, you will find a system file named fldtypes.xml that defines all the core field types supplied by SharePoint Foundation. The installation of SharePoint Server 2010 deploys several more of these XML files, including fldtypes_hold.xml, fldtypes_publishing.xml, fldtypes_SPRatings.xml, fldtypes_TargetTo.xml, and fldtypes_taxonomy.xml, to supply additional field type definitions of its own. When you are learning how to develop custom field types, it can be very helpful to inspect these XML files to see how the SharePoint Foundation team and the SharePoint Server 2010 team have structured the CAML definitions for the built-in field types.
Each field type definition is created using a FieldType element, which must reside inside a top-level FieldTypes element. The WingtipFieldType project deploys the definitions for all four custom field types in an XML file named fldtypes_WingtipFieldTypes.xml.
<FieldTypes>
  <FieldType> <!- EmployeeStartDate field type definition --> </FieldType>
  <FieldType> <!- SocialSecurityNumber field type definition --> </FieldType>
  <FieldType> <!- UnitedStatesAddress field type definition --> </FieldType>
  <FieldType> <!- EmployeeStatus field type definition --> </FieldType>
<FieldTypes>
When you create the FieldType element for a field type definition, you must add several Field elements with a Name attribute that defines the type of value inside. These Field elements are required to provide information about the custom field type, such as its name, its parent type, its display name, the field type class name, and the name of its assembly. The FieldType element for the custom field type named EmployeeStartDate is defined in the following code.
<FieldType>
  <Field Name="TypeName">EmployeeStartDate</Field>
  <Field Name="ParentType">DateTime</Field>
  <Field Name="TypeDisplayName">Employee Start Date</Field>
  <Field Name="TypeShortDescription">Employee Start Date</Field>
  <Field Name="UserCreatable">TRUE</Field>
  <Field Name="FieldTypeClass">
    WingtipFieldTypes.EmployeeStartDate,$SharePoint.Project.AssemblyFullName$
  </Field>
</FieldType>
Note that there are several more optional attributes that you can use when creating custom field type definitions. For example, you can add optional named attributes, such as ShowInListCreate, ShowInDocumentLibraryCreate, ShowInSurveyCreate, and ShowInColumnTemplateCreate, which allow you to configure a custom field type to be displayed or hidden on the Create Column page for scenarios where users are adding new fields to a list or content type.
<FieldType>
  <Field Name="TypeName">SocialSecurityNumber</Field>
  <Field Name="ParentType">Text</Field>
  <Field Name="TypeDisplayName">Social Security Number</Field>
  <Field Name="TypeShortDescription">Social Security Number (demo)</Field>
  <Field Name="UserCreatable">TRUE</Field>
  <Field Name="ShowInListCreate">TRUE</Field>
  <Field Name="ShowInDocumentLibraryCreate">TRUE</Field>
  <Field Name="ShowInSurveyCreate">TRUE</Field>
  <Field Name="ShowInColumnTemplateCreate">TRUE</Field>
  <Field Name="FieldTypeClass">
    WingtipFieldTypes.SocialSecurityNumber,$SharePoint.Project.AssemblyFullName$
  </Field>
</FieldType>You have now seen the required steps to create and deploy a custom field type. Now we will examine how to extend a custom field type with a custom field control to provide the user with a customized editing experience.
Remember that the step for creating a custom field control is optional when creating a custom field type. The custom field type named EmployeeStartDate provides an example of a custom field type that does not have an associated field control. Instead, it relies on the editing experience provided by its parent, which is the field type named Text.
The primary motivation for extending a custom field type with a custom field control is to provide a custom editing experience. You create this editing experience using a rendering template. To create a rendering template, you must create a new user control and add a control tag based on a special control type named RenderingTemplate.
<SharePoint:RenderingTemplate>
  <Template>
    <!-- your HTML layout and server controls go here -->
  </Template>
</SharePoint:RenderingTemplate>
The WingtipFieldTypes project contains a custom field control that extends the custom field type named SocialSecurityNumber. The rendering template for this custom field control is defined inside the user control file named WingtipFieldTypes.SocialSecurityNumber.ascx. The rendering template definition has been created using a RenderingTemplate control with an ID of SocialSecurityNumberRenderingTemplate.
<SharePoint:RenderingTemplate ID="SocialSecurityNumberRenderingTemplate" runat="server">
  <Template>
    <asp:TextBox ID="txtUserInput" runat="server" MaxLength="11" CssClass="ms-long" />
  </Template>
</SharePoint:RenderingTemplate>
The RenderingTemplate control ID of SocialSecurityNumberRenderingTemplate is used to load and initialize the rendering template. You will see how that is accomplished in just a moment. Inside the RenderingTemplate control, there is an inner Template element. This is where you add the HTML layout and ASP.NET controls to produce a custom editing experience. You have the flexibility to create the RenderingTemplate control using a composite of ASP.NET controls and a rich HTML layout involving div elements or an HTML table. In this first example, we have kept things simple by defining the rendering template using a simple ASP.NET TextBox control:
<asp:TextBox ID="txtUserInput" runat="server" MaxLength="11" CssClass="ms-long" />
If you look back at the Visual Studio project structure in Figure 8-1, you can see that all three user control files have been deployed inside the SharePointRoot directory within the directory structure of TEMPLATE/CONTROLTEMPLATES. This is the directory in which you are required to deploy the .ascx file for a user control that contains a RenderTemplate control tag. Note that the rendering template will not load correctly if you deploy the user control file in a child directory such as TEMPLATE/CONTROLTEMPLATES/WingtipFieldTypes. This reason for this is that SharePoint Foundation inspects the CONTROLTEMPLATES directory for user control files that contain rendering templates, but it does not inspect any of its child directories.
As a general best practice when developing farm solutions, avoid deploying custom files from a SharePoint project directly inside one of the standard directories inside the SharePoint Root directory, such as IMAGES, LAYOUTS, or CONTROLTEMPLATES. The purpose of this practice is to avoid file name conflicts between the files that you deploy and the files that are already deployed by Microsoft and by other custom solutions. However, when developing custom field types, you cannot follow this practice because you must deploy the user control file directly inside the CONTROLTEMPLATES directory.
To increase your level of protection against file name conflicts, it is recommended that you add the solution name to the beginning of the file name to make it more unique. For example, the user control files with rendering templates in the WingtipFieldTypes project have names such as WingtipFieldTypes.SocialSecurityNumber.ascx instead of SocialSecurityNumber.ascx.
Once you have created the rendering template, the next step is to create a field control class. You create the field control class by inheriting from a base class named BaseFieldControl and overriding properties and methods such as DefaultTemplateName, CreateChildControls, and Value.
public class SocialSecurityNumberFieldControl : BaseFieldControl {

  // used to pass the RenderTemplate ID to SharePoint Foundation
  protected override string DefaultTemplateName {}

  // used to obtain references to controls created by the rendering template
  protected override void CreateChildControls() {}

  // used to read and write values to and from the content database
  public override object Value {}
}
When you override the read-only property named DefaultTemplateName, your implementation simply needs to return the string-based ID of the rendering template.
protected override string DefaultTemplateName {
  get { return "SocialSecurityNumberRenderingTemplate"; }
}
Once you have implemented the DefaultTemplateName property, the next thing to do is to set up a way to access programmatically controls defined in the rendering template. You can accomplish this by adding a protected field for each control and overriding CreateChildControls to initialize these fields properly. Here is an example of how this is done in the field control class named SocialSecurityNumberFieldControl, which has an associated rendering template that contains a single TextBox control named txtUserInput.
public class SocialSecurityNumberFieldControl : BaseFieldControl {

  protected TextBox txtUserInput;

  protected override void CreateChildControls() {
    base.CreateChildControls();
    txtUserInput = (TextBox)this.TemplateContainer.FindControl("txtUserInput");
  }
}
Note that you will not be instantiating control instances in the CreateChildControls method but rather going through a protected property of the base class named TemplateContainer, which exposes a FindControl method. This technique allows you to obtain references to existing control instances that are created by the control tags inside the rendering template.
Now it’s time to add the logic to the field control class that is responsible for reading and writing the field’s underlying value to and from the content database. You do this by overriding a property of the BaseFieldControl class named Value. The Value property is based on the type System.Object, which allows quite a bit of flexibility. You can work with any type of object you’d like as long as it supports .NET serialization. Fortunately, most of the standard types, arrays, and collections in the base class libraries of the .NET Framework provide automatic support for .NET serialization. The SocialSecurityNumberFieldControl class illustrates a fairly simple example of implementing the Value property.
public class SocialSecurityNumberFieldControl : BaseFieldControl {
  protected TextBox txtUserInput;

  public override object Value {
    get {
      this.EnsureChildControls();
      // return control Text property value which is written to content DB
      return txtUserInput.Text;
    }
    set {
      this.EnsureChildControls();
      // initilize control with current field value retrieved from content DB
      txtUserInput.Text = (string)this.ItemFieldValue;
    }
  }
}
As you can see, the get and set methods of the Value property both begin their implementation with a call to EnsureChildControls. The call to EnsureChildControls guarantees that the CreateChildControls method has already executed. This is done to ensure that the txtUserInput field contains a valid reference so that you can program against the control without a null reference exception.
You can see that the get method of the Value property simply returns the string value from the TextBox control. The SharePoint Foundation run time will call the get method when a user updates an item that contains a column based on this custom field type. SharePoint Foundation takes this return value and writes it directly to the content database.
SharePoint Foundation calls the set method when a user opens the item in edit view just before the controls created by your RenderingTemplate control are shown to the user. The key point to understand about implementing the set method is that the ItemFieldValue property provides you with access to the current field value in the content database. This is what makes it possible for you to initialize the control (or controls) in your RenderingTemplate.
At this point, we have walked through the complete implementation of the rendering template and the custom field control class. The only step that remains is to update the custom field type class named SocialSecurityNumber to use the custom field control. You do this by overriding a read-only property named FieldRenderingControl.
public class SocialSecurityNumber : SPFieldText {

  public override BaseFieldControl FieldRenderingControl {
    get {
      BaseFieldControl fldControl = new SocialSecurityNumberFieldControl();
      fldControl.FieldName = this.InternalName;
      return fldControl;
    }
  }
}
As shown in this example, when you override the get method of FieldRenderingControl in a custom field type class, you must create an instance of the field control class and initialize the FieldName property using the InternalName property of the custom field type class. Once you have created and initialized an instance of the field control class, you pass it back as the get method’s return value. This is how a custom field type class informs SharePoint Foundation that it wants to load its own custom field control.
The custom field type named UnitedStatesAddress demonstrates the technique of creating a field type with multicolumn values. This is useful in the case of capturing an address from the user where there are several pieces of related data that must be captured and validated as a whole.
Multicolumn field types such as UnitedStatesAddress must inherit from SPFieldMultiColumn. In most cases, there will also be a requirement to supply a custom field control with a custom RenderingTemplate designed to display multiple input controls to the user. Here is an example of the rendering template defined inside WingtipFieldTypes.UnitedStatesAddress.ascx.
<SharePoint:RenderingTemplate ID="UnitedStatesAddressRenderingTemplate" runat="server">
  <Template>
    <table class="ms-authoringcontrols" >
      <tr>
        <td>Street:</td>
        <td><asp:TextBox ID="txtStreet" runat="server" Width="328px" /></td>
      </tr>
      <tr>
        <td>City:</td>
        <td><asp:TextBox ID="txtCity" runat="server" Width="328px" /></td>
      </tr>
      <tr>
        <td>State:</td>
        <td><asp:TextBox ID="txtState" runat="server" MaxLength="2" Width="120px" /></td>
      </tr>
      <tr>
        <td>Zipcode:</td>
        <td><asp:TextBox ID="txtZipcode" runat="server" MaxLength="10" Width="120px" /></td>
      </tr>
    </table>
  </Template>
</SharePoint:RenderingTemplate>
When you create a multicolumn field type, you typically create the RenderingTemplate as a composite of several input controls like the example that you have just seen. Next, you need to learn the trick of moving the values from these controls back and forth to and from the content database as a single multicolumn value. The server-side object model supplies a creatable class type named SPFieldMultiColumnValue, which makes this possible using programming syntax similar to dealing with a string array. The UnitedStatesAddressFieldControl class demonstrates overriding the Value property with an implementation that reads and writes multicolumn values to and from the content database.
public override object Value {
  get {
    this.EnsureChildControls();
    SPFieldMultiColumnValue mcv = new SPFieldMultiColumnValue(4);
    mcv[0] = txtStreet.Text;
    mcv[1] = txtCity.Text;
    mcv[2] = txtState.Text;
    mcv[3] = txtZipcode.Text;
    return mcv;
  }
  set {
    this.EnsureChildControls();
    SPFieldMultiColumnValue mcv =
              (SPFieldMultiColumnValue)this.ItemFieldValue;
    txtStreet.Text = mcv[0];
    txtCity.Text = mcv[1];
    txtState.Text = mcv[2]; ;
    txtZipcode.Text = mcv[3];
  }
}
It would be possible for you to extend this simple example further to exploit the potential of multicolumn field types. For example, what if you were able to call to a Web service and pass a postal code that would return the associated city and state? That would allow you to add extra functionality to autopopulate the text boxes for City and State and to perform validation to ensure that the address is correct.
The custom field type named FieldEmployeeStatus demonstrates how you can extend a custom field type with one or more custom properties. The main idea is that each field instance created from the custom field type gets its own independent property settings. You can create custom properties for a custom field type by adding a PropertySchema element to the bottom of the FieldType element for a custom field type. You create each custom property by adding Field elements inside the PropertySchema element. For example, the custom field type named EmployeeStatus has been defined with two custom properties named AllowContractors and AllowInterns.
<FieldType>
  <Field Name="TypeName">EmployeeStatus</Field>
  <Field Name="ParentType">Text</Field>
  <!-other Field elements omitted for clarity -->
  <PropertySchema>
    <Fields>
      <Field Name="AllowContractors"
             DisplayName="Allow for Contractors"
             Type="Boolean">
        <Default>0</Default>
      </Field>
      <Field Name="AllowInterns"
                   DisplayName="Allow for Interns"
                   Type="Boolean">
        <Default>0</Default>
      </Field>
    </Fields>
  </PropertySchema>
</FieldType>
Once you have added one or more custom properties to a custom field type, SharePoint Foundation will add input controls automatically to the page that allows a user to add or update columns based on your custom field type. Figure 8-3 shows what the user sees when adding or updating a field based on the custom field type named EmployeeStatus. The user has the option of choosing to include or exclude choice values for adding list items that include contractors or interns.

Once you have extended a custom field type with one or more custom properties, you then must write code to inspect what values the user has assigned to them. In the case of the custom field type named EmployeeStatus, there is code in the CreateChildControls method of the field control class that initializes a RadioButtonList control by adding items for contractors and interns only when the code has determined that the user has set the values for the associated custom properties to true.
protected override void CreateChildControls() {
base.CreateChildControls();
lstEmployeeStatus =
(RadioButtonList)TemplateContainer.FindControl("lstEmployeeStatus");
if (lstEmployeeStatus != null) {
lstEmployeeStatus.Items.Clear();
lstEmployeeStatus.Items.Add("Full-time Employee");
lstEmployeeStatus.Items.Add("Part-time Employee");
// check to see if contractors are allowed
bool AllowContactors =
(bool)this.Field.GetCustomProperty("AllowContractors");
if (AllowContactors) {
lstEmployeeStatus.Items.Add("Contractor");
}
// check to see if interns are allowed
bool AllowInterns =
(bool)this.Field.GetCustomProperty("AllowInterns");
if (AllowInterns) {
lstEmployeeStatus.Items.Add("Intern");
}
}
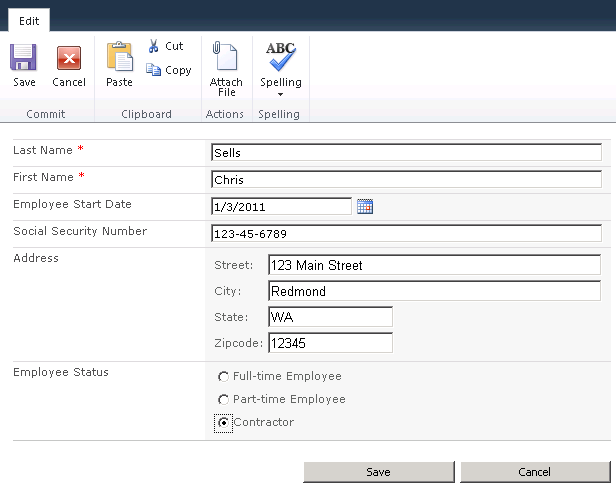
}Now that you have seen how to implement custom properties in a custom field type, let’s walk through a sample usage scenario so that you can see how these properties can change the user experience. Imagine that a user has added a new field to an Employees list based on the EmployeeStatus field type. If this user configures the EmployeeStatus field so that the AllowContractors property is true and the AllowInterns property is false, the field control has been implemented to display one additional choice in the RadioButtonList control for Contractor, as shown in Figure 8-4.
In this section, we will examine how to develop reusable definitions for site columns, content types, and list templates using Collaborative Application Markup Language (CAML). The techniques you will learn here will provide an alternative approach to the techniques discussed in Chapter 7, which involved creating new site columns and content types in the scope of a site collection using the server-side object model.
When compared to other SharePoint development techniques, CAML-based definitions are definitely harder to develop and test. For example, there is little debugging support and many of the error messages that you get are cryptic and hard to interpret. However, developing CAML-based definitions has its advantages. They provide the greatest level of control and higher levels of reuse across site collections and across farms. Another important advantage is that CAML-based definitions can also be localized to support multiple languages. The ability to localize site columns, content types, and list types for different spoken languages can be essential when developing commercial SharePoint solutions for international sale and redistribution.
As you begin working with CAML, it can be very educational to dissect the CAML-based definitions for site columns, content types, and list types that ship with SharePoint Foundation and SharePoint Server 2010. For example, you can examine the standard site columns defined in the fields feature and the standard content types defined in the ctypes feature. You can also inspect the CAML definitions for standard SharePoint Foundation list types by examining features such as CustomList, ContactsList, and TaskList.
When you examine the features and CAML definitions that ship with the product, be sure to look—but don’t touch. Modifying any of the built-in features or CAML definitions can seriously injure the SharePoint farm running on your development workstation. Start by copying and pasting the contents of the built-in CAML definitions into source files that you have created inside a SharePoint project. Then you can do all your editing and testing without modifying any of the files deployed by the installation of SharePoint Foundation and SharePoint Server 2010.
The downloadable .zip archive of companion code for this book contains a sample SharePoint project named WingtipTypes. We are going to walk through the WingtipTypes project to demonstrate how to create CAML definitions. From Figure 8-5, you can see that the project contains a SharePoint project item named WingtipSiteColumns, which contains several site column definitions. There is also SharePoint project item for a content type named WingtipProduct and another SharePoint project item for a list definition named WingtipProductList.

Figure 8-5. The WingtipTypes project demonstrates using a feature to activate CAML definitions with the scope of a site collection.
All the type definitions inside the WingtipTypes project are activated at the site collection scope using a feature named MainSite. The best way to think about this is that activating the feature instantiates these type definitions and makes them available for use. Note that WingtipTypes is a project that can be deployed as a farm solution or as a sandboxed solution.
A site column definition is created using a Field element. For example, the fields feature of SharePoint Foundation contains hundreds of site column definitions, including the following definition for the standard site column named FirstName.
<Field
  ID="{4a722dd4-d406-4356-93f9-2550b8f50dd0}"
  Name="FirstName"
  SourceID="http://schemas.microsoft.com/sharepoint/v3"
  StaticName="FirstName"
  Group="$Resources:Person_Event_Columns"
  DisplayName="$Resources:core,First_Name;"
  Type="Text">
</Field>
You can observe that certain text elements inside the FirstName site column are defined using a special syntax with the $ character, such as $Resources:core,First_Name;, which represents special ASP.NET syntax that is used to retrieve localized strings out of a resource file. The ability to localize such aspects of a site column definition makes it possible for SharePoint Foundation to support localization of CAML-based definitions for different spoken languages.
Now that we have seen one of the built-in site column definitions of SharePoint Foundation, let’s create one of our own. Note that the SharePoint Developer Tools do not provide a dedicated SharePoint project item template for creating site column definitions. Therefore, you should create a new project item using SharePoint project item template named Empty Element and add Field elements to the project item’s elements.xml file. That’s how we create a project item named WingtipSiteColumns in the WingtipTypes project.
The elements.xml file of the WingtipSiteColumns project item contains several site column definitions. The first two define text-based fields for tracking a product code and a product description.
<Field
  ID="{D0D32083-F81B-420E-832E-5CC94E12F417}"
  Name="ProductCode"
  DisplayName="Product Code"
  Group="Wingtip Site Columns"
  Type="Text"
  DisplaceOnUpgrade="TRUE" />

<Field
  ID="{36819A9B-E748-47D5-9949-A65DD195BF80}"
  Name="ProductDescription"
  DisplayName="Description"
  Group="Wingtip Site Columns"
  Type="Text"
  DisplaceOnUpgrade="TRUE" />
These two Field elements demonstrate creating a custom site column definition using attributes such as ID, Name, DisplayName, Group, and Type. You will need a new globally unique identifier (GUID) each time you create a new site column definition. Note that Visual Studio 2010 provides a handy utility named GuidGen.exe that can be used to create new GUIDs and copy them to the Clipboard.
One other important detail is that you must include the curly braces for GUIDs that are used as the ID in a Field element. Unfortunately, SharePoint Foundation is inconsistent about when it requires curly braces on the GUIDs you have created. Here is a case where each GUID must be added with curly braces for the site column definition to work properly.
The last attribute in both site column definitions is named DisplaceOnUpgrade and has been assigned a value of true. This attribute setting can provide more flexibility during a feature upgrade when you need to push changes within a site column definition out to fields that were created previously using an earlier version of the same site column definition.
The elements.xml file of the WingtipSiteColumns project item contains a third site column definition named ProductListPrice. This definition differs from the first two because it is based on the Currency field type and contains extra attributes for decimal formatting and the minimum allowable value.
<Field
  ID="{F0182CD5-C126-4E96-9BB5-B16A34DC8F3B}"
  Name="ProductListPrice"
  DisplayName="List Price"
  Group="Wingtip Site Columns"
  Type="Currency"
  Decimals="2"
  Min="0"
  Required="FALSE"
  DisplaceOnUpgrade="True" />
There is a fourth site column definition named ProductCategory, which demonstrates creating a Choice field. The definition for ProductCategory contains the Format attribute with a setting of RadioButtons, as well as a collection of choice values to provide the user with several different categories from which to pick when assigning the field value.
<Field
  ID="{0C5BDEB7-0E0E-4c38-A2E5-F39941E61CE9}"
  Name="ProductCategory"
  DisplayName="Category"
  Group="Wingtip Site Columns"
  Type="Choice"
  Format="RadioButtons"
  DisplaceOnUpgrade="TRUE" >
  <CHOICES>
    <CHOICE>Electronics</CHOICE>
    <CHOICE>Games</CHOICE>
    <CHOICE>Trains</CHOICE>
    <CHOICE>Arts and Crafts</CHOICE>
  </CHOICES>
  <Default>Electronics</Default>
</Field>
As you become more involved in creating site column definitions, you will discover that the Field element has many more possible attributes. For more information, you can look at the MSDN documentation at http://msdn.microsoft.com/en-us/library/ms437580.aspx.
A content type definition is created using a ContentType element. The ContentType element must contain a set of required attributes and a collection of field links created using FieldRef elements. Each content type definition also requires an ID that begins with the content type ID of its parent. For example, the content type ID for the Announcement content type is 0x0104, which inherits from the Item content type with an ID of 0x01. Here is the content type definition for the Announcement content type, which is activated in every new site collection using the built-in ctypes feature.
<ContentType
  ID="0x0104"
  Name="$Resources:Announcement"
  Group="$Resources:List_Content_Types"
  Description="$Resources:AnnouncementCTDesc"
  V2ListTemplateName="announce"
  Version="0">
  <FieldRefs>
    <FieldRef ID="{7662cd2c-f069-4dba-9e35-082cf976e170}" Name="Body" />
    <FieldRef ID="{6a09e75b-8d17-4698-94a8-371eda1af1ac}" Name="Expires" />
  </FieldRefs>
</ContentType>
As seen in this example, a content type definition includes references to site column definitions using FieldRef elements. In Chapter 7, we discussed how each content type tracks its fields using field links. In terms of the server-side object model, a field link is represented with an SPFieldLink object, as opposed to a field instance that is represented with an SPField object. Each FieldRef element references a specific site column definition using both the identifying GUID and its string-based name.
Before you can create a content type definition, you must decide which base content type to inherit from. For example, you can inherit from a standard list content type such as Item, Contact, or Task. You can also elect to create a content type that inherits from Document, making it possible to add support for a document template and use it in a document library. In our example, we are going to keep it simple and create a content type named WingtipProduct that inherits from Item.
The SharePoint Developer Tools provide a dedicated SharePoint project item template named Content Type. When you create a new Content Type project item, the SharePoint Customization Wizard prompts you to select a base content type from a drop-down list. If you select a base content type of Item, the SharePoint Customization Wizard will generate a new content type definition with an empty FieldRefs element.
<!-- Parent ContentType: Item (0x01) -->
<ContentType ID="0x01003e0f572308e74cffb2f0b13db11f5be2"
             Name="Wingtip Product"
             Group="Wingtip Content Types"
             Description="A Wingtip product"
             Inherits="TRUE"
             Version="0">
  <FieldRefs>
  </FieldRefs>
</ContentType>
As you examine the Wingtip Product content type definition, you will notice that the ID attribute generated by the SharePoint Customization Wizard has a somewhat complicated format. In Chapter 7, we explained that the first part of a content type ID is based on a hexadecimal number that identifies its base content type. The hexadecimal number for the base content type is followed by 00. The last part of a content type ID is a GUID that uniquely identifies the content type. The SharePoint Customization Wizard follows these rules when creating the content type ID for a new Content Type project item.
For each field link that you want to add, you must create a FieldRef element that references a site column definition. Also, note that you can include a field link that references a site column that is already included in the base content type to change some of its properties. For example, the Wingtip Product content type includes a field link to the Title field so that it can modify its DisplayName property to Product Name.
<FieldRefs>
  <FieldRef ID="{fa564e0f-0c70-4ab9-b863-0177e6ddd247}"
            Name="Title" DisplayName="Product Name" />
  <FieldRef ID="{D0D32083-F81B-420E-832E-5CC94E12F417}"
            Name="ProductCode" />
  <FieldRef ID="{36819A9B-E748-47D5-9949-A65DD195BF80}"
            Name="ProductDescription" />
  <FieldRef ID="{0C5BDEB7-0E0E-4c38-A2E5-F39941E61CE9}"
            Name="ProductCategory" />
  <FieldRef ID="{F0182CD5-C126-4E96-9BB5-B16A34DC8F3B}"
            Name="ProductListPrice" />
</FieldRefs>
A content type definition can contain embedded XML documents that carry additional metadata about the content type. This metadata can consist of either custom XML data unique to your SharePoint solution or XML data defined by a SharePoint Foundation schema. For example, you can include any custom XML content you like in the XmlDocument node so long as it is valid XML. However, the most common use of the XmlDocument nodes within SharePoint Foundation itself is to specify custom data forms and event handlers. The following example shows a custom data form specification, in which the display and edit forms are custom-defined.
<ContentType>
  <!-content type attributes and field links omitted for clarity -->
  <XmlDocuments>
    <XmlDocument
      NamespaceURI="http://schemas.microsoft.com/sharepoint/v3/contenttype/forms/url">
      <FormUrls xmlns="http://schemas.microsoft.com/sharepoint/v3/contenttype/forms/url">
        <Display>_layouts/MyCustomDisplayForm.aspx</Display>
        <Edit>_layouts/MyCustomEditForm.aspx</Edit>
      </FormUrls>
    </XmlDocument>
  </XmlDocuments>
</ContentType>The SharePoint Developer Tools provide two different SharePoint project item templates for creating a new list definition. One is named List Definition, and the other is named List Definition From Content Type. If you create a new project item using the List Definition project item template, the SharePoint Customization Wizard prompts you to choose the type of list that you want to create by selecting one of the built-in list definitions such as Announcements, Contacts, or Tasks. For example, if you choose Contacts, the SharePoint Customization Wizard generates a new custom list definition with CAML that is similar to the Contacts list definition.
When you create a new project item using the List Definition From Content Type project item template, the SharePoint Customization Wizard prompts you to select a content type defined inside the current project. In our example, we have used this project item template to create a new list definition named WingtipProductsList that is based on the Wingtip Product content type.
When you create a new project item for a list definition, it contains two CAML-based files named elements.xml and schema.xml. Both of these files are required to create a list definition. We will begin by examining the elements.xml file that contains a ListTemplate element.
<ListTemplate
     Name="WingtipProductsList"
     Type="25001"
     BaseType="0"
     OnQuickLaunch="TRUE"
     SecurityBits="11"
     Sequence="10"
     DisplayName="Products List"
     Description="Wingtip products list"
     Image="/_layouts/images/itgen.png"/>
As you can see, this ListTemplate element has a Name of WingtipProductsList. The value of the Name attribute is important within a ListTemplate element because SharePoint Foundation requires a child directory inside the root feature directory with the same name that contains a file with the well-known name schema.xml. Note that the SharePoint Developer Tools have done the required work of creating a child directory named WingtipProductsList inside the root feature directory and placing the schema.xml file inside. Just be careful not to change the value of the Name attribute without also changing the name of the directory that holds the schema.xml file.
The ListTemplate element defines a Type attribute with an integer value used to identify the creatable list type associated with the list definition. Microsoft uses lower-numbered identifiers for the built-in list types such as 104 for Announcements and 105 for Contacts. Microsoft recommends creating list type identifiers with values of 10,000 or greater. The SharePoint Developer Tools follow this recommendation by creating IDs starting at 10000. However, because the vast majority of custom list definitions defined around the world have a Type value of 10000, we will make ours a little more unique by giving it a value of 25001.
Now that you have seen what’s required in the elements.xml file, let’s move on to discuss what’s inside the schema.xml file. The schema.xml file contains a top-level List element that contains several attributes and inner elements for content type, fields, views, and forms.
<List
  xmlns:ows="Microsoft SharePoint"
  Title="Products List"
  FolderCreation="FALSE"
  DisableAttachments="TRUE"
  Url="Lists/Products"
  BaseType="0"
  Direction="0"
  xmlns="http://schemas.microsoft.com/sharepoint/">

  <MetaData>
    <ContentTypes> <!-- add content types --> </ContentTypes>
    <Fields> <!-- add fields --> </Fields>
    <Views> <!-- define views here -->  </Views>
    <Forms> <!-- add support for forms here --> </Forms>
  </MetaData>

</List>
Now we will take a little time to walk through the individual sections of the schema.xml file in more detail. We will begin with the ContentTypes element. The ContentTypes element can contain content type instances or content type references. The ContentTypes element in our example contains a ContentType element with an instance of the Wingtip Product content type.
<ContentTypes>
  <ContentType ID="0x01003e0f572308e74cffb2f0b13db11f5be2"
               Name="Wingtip Product" Description="Wingtip product"
               Inherits="TRUE" Version="0">
    <FieldRefs>
      <FieldRef ID="{fa564e0f-0c70-4ab9-b863-0177e6ddd247}" Name="Title"
                DisplayName="Product Name" />
      <FieldRef ID="{D0D32083-F81B-420E-832E-5CC94E12F417}" Name="ProductCode" />
      <FieldRef ID="{36819A9B-E748-47D5-9949-A65DD195BF80}" Name="ProductDescription" />
      <FieldRef ID="{0C5BDEB7-0E0E-4c38-A2E5-F39941E61CE9}" Name="ProductCategory" />
      <FieldRef ID="{F0182CD5-C126-4E96-9BB5-B16A34DC8F3B}" Name="ProductListPrice" />
    </FieldRefs>
</ContentTypes>
Now that you have seen the ContentTypes section, we will now examine the Fields section. Dealing with the fields of a content type in the schema.xml file is more complicated than the example shown in the previous chapter, when we added a content type to a list through the server-side object model. When you add a content type to a list using the server-side object model, SharePoint Foundation automatically adds the fields of the content type to the Fields collection of the list. However, this doesn’t happen automatically when you add a content type to the ContentTypes section of the schema.xml file. You are still required to add each field to the list field’s collection explicitly. This is accomplished by adding Field elements to the Fields element. Each Field element must contain required attributes such as its ID, Name, and Type, which are required to create a field instance whenever a new list is created.
<Fields>
   <Field ID="{fa564e0f-0c70-4ab9-b863-0177e6ddd247}" Name="Title"
          DisplayName="Product Name" Type="Text" DisplaceOnUpgrade="TRUE"  />
   <Field ID="{82642ec8-ef9b-478f-acf9-31f7d45fbc31}" Name="LinkTitle"
          DisplayName="Product Name" Type="Computed" Sealed="TRUE" />
   <Field ID="{bc91a437-52e7-49e1-8c4e-4698904b2b6d}" Name="LinkTitleNoMenu"
          DisplayName="Product Name" Type="Computed" Sealed="TRUE" />
   <Field ID="{D0D32083-F81B-420E-832E-5CC94E12F417}" Name="ProductCode"
          DisplayName="Product Code" Type="Text" />
  <Field ID="{36819a9b-e748-47d5-9949-a65dd195bf80}" Name="ProductDescription"
         DisplayName="Description" Type="Text" />
  <Field ID="{0C5BDEB7-0E0E-4c38-A2E5-F39941E61CE9}" Name="ProductCategory"
         DisplayName="Category" Type="Choice" Format="RadioButtons" >
    <CHOICES>
      <CHOICE>Electronics</CHOICE>
      <CHOICE>Games</CHOICE>
      <CHOICE>Trains</CHOICE>
      <CHOICE>Arts and Crafts</CHOICE>
      <CHOICE>Action Figures</CHOICE>
    </CHOICES>
    <Default>Electronics</Default>
  </Field>
  <Field ID="{f0182cd5-c126-4e96-9bb5-b16a34dc8f3b}" Name="ProductListPrice"
         DisplayName="List Price" Type="Currency" Decimals="2" Min="0" Required="FALSE"
         DisplaceOnUpgrade="True" RowOrdinal="0"
         SourceID="{eaa3c1e3-ceb2-4e64-b876-42726a96867e}" />
</Fields>
When you first begin to work with schema.xml files, the requirement to add redundant field definitions into the schema.xml file doesn’t seem too intuitive. After all, we’ve already defined the fields once in the Wingtip Product content type, so why should we be forced to define them a second time in the schema.xml file? SharePoint Foundation, however, doesn’t supply any mechanism to copy the fields from content types that are added or referenced from inside the schema.xml file.
For large sets of data, the list schema can define indexes on fields that can improve data access and querying list content significantly. This makes lists a viable storage mechanism for external business applications with the added value of the collaborative interface of SharePoint Foundation. Indexed fields can be defined in the list schema or they can be specified after creation through the browser or the server-side object model. List indexes are similar to the concept of a SQL index, although the index is defined in a SQL-indexed name-value table that contains a reference to the list as well as the indexed column values.
After adding fields, you also will want to specify which fields are to be added to the various views supported by the list, such as the standard All Items view. This means you must modify the Views element of the schema.xml file. The following View element demonstrates adding FieldRef elements to the ViewFields node of the default view so that it displays the fields that have been added in the Fields section previously.
<View BaseViewID="1" Type="HTML" WebPartZoneID="Main"
      Url="AllItems.aspx" DisplayName="All Items" DefaultView="TRUE"
      MobileView="TRUE" MobileDefaultView="TRUE"
      SetupPath="pagesviewpage.aspx"
      ImageUrl="/_layouts/images/generic.png" >
  <Toolbar Type="Standard" />
  <XslLink Default="TRUE">main.xsl</XslLink>
  <RowLimit Paged="TRUE">30</RowLimit>
  <ViewFields>
    <FieldRef Name="LinkTitle" />
    <FieldRef Name="ProductCode" />
    <FieldRef Name="ProductDescription" />
    <FieldRef Name="ProductCategory" />
    <FieldRef Name="ProductListPrice" />
  </ViewFields>
  <Query>
    <OrderBy><FieldRef Name="ProductCode" /></OrderBy>
  </Query>
<View>
The Forms element at the bottom of the schema.xml file is used to define the default forms for displaying, editing, and adding items. A schema.xml file can be written to use custom forms for viewing and editing content. However, you can also rely on a generic form named form.aspx, which is installed along with SharePoint Foundation and deployed inside the SharePoint Root directory at a path of TEMPLATEPages. When you create a new list definition using the SharePoint Developer Tools, the schema.xml is created to use the generic file form.aspx for each of its default forms.
<Forms>
  <Form Type="DisplayForm" Url="DispForm.aspx"
              SetupPath="pagesform.aspx" WebPartZoneID="Main" />
  <Form Type="EditForm" Url="EditForm.aspx" SetupPath="pagesform.aspx" WebPartZoneID="Main"
/>
  <Form Type="NewForm" Url="NewForm.aspx" SetupPath="pagesform.aspx" WebPartZoneID="Main"
/>
</Forms>Now that we have discussed creating CAML-based definitions for site columns, content types, and list types, it’s time to discuss an import feature design issue. Consider a scenario where you are developing a SharePoint project such as WingtipTypes, which defines a feature with a custom list definition. Now imagine that you create a second project named CreateProductsList, which contains a feature with a ListInstance element that creates a list instance from the custom list definition in WingtipTypes.
<ListInstance
  Title="Products"
  OnQuickLaunch="TRUE"
  TemplateType="25001"
  FeatureId="edcdcd75-dff2-479d-ac32-b37f8fa9d459"
  Url="Lists/Products"
  Description="" />
The key point is that the feature that contains this ListInstance element will not work correctly unless the first feature that contains the custom list definition has been activated. SharePoint Foundation provides support activation dependencies between features to deal with this scenario. A feature can defined with an activation dependency by adding an ActivationDependency element to its feature.xml file.
<Feature
  xmlns="http://schemas.microsoft.com/sharepoint/"
  Id="1a134b00-f92c-412f-a812-e9e1bf72619e"
  Scope="Web"
  Title="Create Products List">

  <ActivationDependencies>
    <ActivationDependency
      FeatureId="edcdcd75-dff2-479d-ac32-b37f8fa9d459"
      FeatureTitle="Wingtip Types" />
  </ActivationDependencies>

</Feature>
If you use the feature designer supplied by the SharePoint Developer Tools, you will find that it provides assistance adding activation dependencies to other features defined inside the same solution. This makes it so you can add activation dependencies without having to edit the feature.xml file manually.
Now let’s discuss what happens when a user activates a feature that depends on another feature that has not been activated. The behavior of SharePoint Foundation is different depending on whether the feature on which the dependency has been created has been configured as a hidden feature. When you activate a feature that defines an activation dependency on a hidden feature, SharePoint Foundation automatically activates the hidden feature in any case where it has not already been activated. However, when you activate a feature that defines an activation dependency on a visible feature that has not already been activated, things work out differently. In this case, SharePoint Foundation fails to activate the dependent feature and displays an error message informing the user of the feature that must be activated first.
The TeamCollab feature, which ships as a built-in feature with SharePoint Foundation, provides another good example of using activation dependencies. The TeamCollab feature in and of itself provides no implementation. However, it defines activation dependencies on 19 other built-in features that define the list definitions for the standard collaboration list types.
Activating the TeamCollab feature forces the activation of these 19 other features that make all the collaboration list types available, such as Announcements, Contacts, Tasks, Events, and Document Library. As you can see, feature activation dependencies can be used to aggregate many features into a common feature set that can then be activated and deactivated through a single high-level feature.
A site definition is top-level component that SharePoint Foundation uses to create and initialize new sites. A site definition contains a set of provisioning instructions that have been designed to initialize new sites by performing common tasks such as activating specific features and creating site elements such as pages, lists, navigation nodes, and Web Parts.
In SharePoint Foundation, every site is provisioned from a specific site definition. This is true for top-level sites as well as for child sites nested within a site collection. Once a site is provisioned from a particular site definition, it picks up a dependency on that site definition that remains in effect for the lifetime of the site. A site’s dependency on its underlying site definition can never be removed or changed, and the site definition must be installed and remain functional in the farm for the site to continue working properly.
The installation of SharePoint Foundation deploys several site definitions that can be used to create various types of collaboration sites. For example, SharePoint Foundation provides a popular site definition named STS, which can be used to create Team sites and Blank sites. The installation of SharePoint Server 2010 deploys additional site definitions that can be used to create specialized sites that use features in areas such as publishing, searching, business intelligence, and records management. SharePoint Foundation also supports creating and deploying custom site definitions created by third-party developers.
Consider a scenario in which you create a custom site definition and deploy it within a particular SharePoint Foundation farm. Now imagine that you use this site definition to provision the top-level site for a new site collection. What would happen if you attempted to back up the site collection in a Windows PowerShell script using the Backup-SPSite cmdlet and then attempted to restore this site in another SharePoint Foundation farm using Restore-SPSite? This would not work properly unless your custom site definition has been deployed to both farms.
Now is the time for us to make a big disclaimer. Developing custom site definitions has several well-known pitfalls and disadvantages. Throughout the history of SharePoint development, custom site definitions have proved to be hard to deploy and to version over time. The biggest problem that many companies face with custom site definitions involves migrating sites from one version of SharePoint to another. For example, many of the custom site definitions that were developed for SharePoint 2007 have caused serious problems when companies have attempted to migrate the content in their sites to SharePoint 2010. For these reasons, it is generally recommended that you avoid custom site definitions when designing and developing SharePoint solutions.
In rare circumstances, in very controlled environments, it still might make sense for an experienced SharePoint developer to develop a custom site definition. However, you are better off learning alternative techniques that allow you to achieve the same goal without all the pitfalls and disadvantages associated with custom site definitions. In particular, you can find other ways to create sites and initialize them with a customized set of provisioning instructions.
In this chapter, we will not spend time showing you how to develop a custom site definition. Instead, we are going to explain how site definitions work in order to demonstrate how to fully use the site definitions that come with SharePoint 2010. This approach will give you techniques for creating sites that will not cause migration pains as you move your sites and content to future versions of the product.
A site definition itself does not represent a creatable site template. Instead, a site definition contains one or more configurations, which appear to users as creatable site templates. For example, the STS site definition contains three separate configurations: Team Site, Blank Site, and Document Workspace.
Let’s examine the details of how a site definition is deployed. Each site definition has its own directory in the SiteTemplates directory, which exists inside the TEMPLATE directory. The directory for a site definition must be given the same name as the site definition itself. For example, if you look inside the SiteTemplates directory, you will find a child directory named STS, which contains files used by the STS site definition.
The directory for a site definition such as STS must always include a child directory named XML containing a special file named ONET.XML, which serves as the site definition manifest. While the ONET.XML file is the only file required, the directory for a site definition can contain other files, such as page templates. The STS site definition directory contains page templates named default.aspx and defaultdws.aspx. The page template named default.aspx is used to create the home page for Team sites and Blank sites, while defaultdws.aspx is used to create the home page for a new Document Workspace site.
In addition to a named directory inside the SiteTemplates directory, a site definition must be deployed using a Web template file. A Web template file is a localized file that is deployed within a locale-specific directory using a path such as TEMPLATE<culture>XML, where the <culture> folder is the locale identifier. In a farm running the U.S. English version of SharePoint 2010, for example, Web template files are deployed in the TEMPLATE1033XML directory.
Now let’s discuss how SharePoint Foundation initializes the available set of site templates with a farm. When SharePoint Foundation initializes the worker process for an application pool, it queries the TEMPLATE/<culture>/XML directory for files that match the pattern of webtemp*.xml and scans through them to discover the configurations of each site definition that have been deployed within the local farm. As you can see, a site definition is like a field definition because it is deployed as an all-or-nothing proposition at farm-level scope.
A Web template file contains a Template element for each site definition. Inside the Template element, there is one Configuration element for each configuration supported by the site definition. Note that a single Web template file can contain multiple site definitions. SharePoint Foundation deploys a core Web template file named webtemp.xml that contains Template elements for all the standard site definitions included with SharePoint Foundation.
<Templates xmlns:ows="Microsoft SharePoint">

  <Template Name="GLOBAL" ID="0">
    <Configuration ID="0" Title="Global template" Hidden="TRUE" />
  </Template>

  <Template Name="STS" ID="1">
    <Configuration ID="0" Title="Team Site" Hidden="FALSE"  />
    <Configuration ID="1" Title="Blank Site" Hidden="FALSE" />
    <Configuration ID="2" Title="Document Workspace" Hidden="FALSE" />
  </Template>

  <!-- other Template elements omitted for clairty -->

</Templates>
The webtemp.xml file deployed by SharePoint Foundation includes several other Template elements for other site definitions, including MPS, CENTRALADMIN, WIKI, BLOG, SGS, and TENANTADMIN. SharePoint Server 2010 deploys several other Web template files of its own, such as webtempsps.xml, webtempsrch.xml, and webtempppsma.xml. If you open up these Web template files and examine them, you will find familiar site definitions and configurations that can be used to create new sites offering extended functionality in areas such as publishing, content searching and management, business intelligence, and social networking.
The ONET.XML file serves as the top-level manifest for a site definition and its configurations. This manifest file is used to define provisioning instructions that activate features and create site elements. Let’s start by examining a high-level view of the ONET.XML file that serves as the manifest for the STS site definition.
<Project
  Title="$Resources:onet_TeamWebSite;"
  Revision="2"
  ListDir="$Resources:core,lists_Folder;"
  xmlns:ows="Microsoft SharePoint"
  UIVersion="4">

  <NavBars />
  <ListTemplates />
  <DocumentTemplates />
  <Configurations/>
  <Modules />
  <ServerEmailFooter/>

</Project>
The basic structure of the ONET.XML file includes a top-level Project element, which contains several child elements such as NavBars, ListTemplates, DocumentTemplates, Configurations, Modules, and ServerEmailFooter.
The NavBars node defines the set of what navigation bars that are created when a new site is provisioned. The NavBars element inside the STS site definition has been written to create several navigation bars that are used by the top link bar and the Quick Launch.
<NavBars>
  <NavBar Name="$Resources:core,category_Top;" ID="1002" />
  <NavBar Name="$Resources:core,category_Documents;" ID="1004" />
  <NavBar Name="$Resources:core,category_Lists;" ID="1003" />
  <NavBar Name="$Resources:core,category_Discussions;" ID="1006" />
</NavBars>
Note that these NavBar elements are based on well-known ID values. The NavBar element with an ID of 1002 is used to create the navigation bar used by the top link bar. The NavBar elements with IDs of 1004, 1003, and 1006 are used to create dynamic collections of navigation nodes that are displayed in the Quick Launch. For example, the NavBar element with an ID of 1004 creates a dynamic collection of navigation nodes that link to document libraries that have been created with the option to display them on the Quick Launch.
The Configurations section of the ONET.XML file contains a child Configuration element for each supported configuration. This is what makes it possible for a site definition to provide multiple configurations that provision new sites differently from one another. The ONET.NET file in the STS site definition defines three separate Configuration elements for creating Team sites, Blank sites, and Document Workspace sites.
<Project>
  <Configurations>
    <Configuration ID="0" Name="Default" />  <!-used to create Team sites -->
    <Configuration ID="1" Name="Blank" />    <!-used to create Blank sites -->
    <Configuration ID="2" Name="DWS" />      <!-used to create Document Workspace sites -->
  </Configurations>
</Project>
A Configuration element contains attributes such as ID, Name, and MasterUrl. A Configuration element also contains child elements such as Lists, Modules, SiteFeatures, and WebFeatures, which are used to create site elements and activate features.
<Configuration ID="0" Name="Default" MasterUrl="_catalogs/masterpage/v4.master">
  <Lists />
  <Modules />
  <SiteFeatures />
  <WebFeatures />
</Configuration>
If you examine the Configuration element for a Blank site, you will find that it contains an empty Lists element. However, the Configuration element for a Team site contains a Lists element that creates several list instances whenever a new Team site is created.
<Lists>
  <List Type="101" Title="$Resources:core,shareddocuments_Title;" />
  <List Type="108" Title="$Resources:core,discussions_Title;" />
  <List Type="104" Title="$Resources:core,announceList;" />
  <List Type="103" Title="$Resources:core,linksList;" />
  <List Type="106" Title="$Resources:core,calendarList;" />
  <List Type="107" Title="$Resources:core,taskList;" />
</Lists>
The Configurations section contains a Modules element that is used to reference Module elements defined below in the ONET.XML file. For example, the Configuration element for a Team site includes a Modules element that references a Module named Default.
<Modules>
  <Module Name="Default" />
</Modules>
While Module elements are referenced inside the Configurations element, they are actually defined below the Configurations element in a Modules element that is nested directly inside the top-level Project element.
<Project>
  <Configuration ID="0" Name="Default">
    <Modules>
      <Module Name="Default" />
    </Modules>
  </Configuration>
  <Modules>
    <Module Name="Default" />
    <Module Name="DefaultBlank" />
    <Module Name="DWS" />
  </Modules>
<Project>
In Chapter 5, we discussed using Module elements with features. As you may remember, a Module element contains File elements that are used to provision files such as site pages and master pages from template files. There is one major difference between the behavior of Module elements in features and their behavior in site definitions. A Module element in a feature is always processed when the feature is activated. However, a Module element defined inside a site definition is processed only when it is referenced by a Configuration element.
As you learned in Chapter 5, a Module element can contain a File element written to create a Web Part page and populates it with Web Part instances. The STS site definition contains a Module element named DefaultBlank, which is referenced by the Configuration element for a Blank site. This Module has been written to provision a home page for a new Blank site named default.aspx and add a link to the top link bar.
<Module Name="DefaultBlank" Url="" Path="">
  <File Url="default.aspx" NavBarHome="True" Type="Ghostable">
    <NavBarPage Name="$Resources:core,nav_Home;" Url="~site" ID="1002" Position="Start" />
    <NavBarPage Name="$Resources:core,nav_Home;" Url="" ID="0" Position="Start" />
  </File>
</Module>
The last two items that we want to discuss about an ONET.XML file are the two elements inside the Configuration element named SiteFeatures and WebFeatures. These two elements contain Feature elements whose purpose is to activate specific features during the site provisioning process. For example, the SiteFeatures element for the Team site configuration activates two site collection-scoped features that add support for the standard SharePoint Foundation Web Parts and the Three-State Workflow template.
<SiteFeatures>

  <!-- BasicWebParts Feature -->
  <Feature ID="00BFEA71-1C5E-4A24-B310-BA51C3EB7A57" />

  <!-- Three-state Workflow Feature -->
  <Feature ID="FDE5D850-671E-4143-950A-87B473922DC7" />

</SiteFeatures>
The WebFeatures element for the Team site configuration activates three site-scoped features named TeamCollab, MobilityRedirect, and WikiPageHomePage. These features add support for the basic collaboration list types, a standard wiki library named SitePages, and mobile device compatibility.
<WebFeatures>

  <!-- TeamCollab Feature -->
  <Feature ID="00BFEA71-4EA5-48D4-A4AD-7EA5C011ABE5" />

  <!-- MobilityRedirect -->
  <Feature ID="F41CC668-37E5-4743-B4A8-74D1DB3FD8A4" />

  <!-- WikiPageHomePage Feature -->
  <Feature ID="00BFEA71-D8FE-4FEC-8DAD-01C19A6E4053" />

</WebFeatures>
SharePoint Foundation maintains a set of common provisioning instructions in the Global site definition. Whenever a new site is created, SharePoint Foundation begins the site provisioning process by executing the provisioning instructions defined by the Global site definition. After that, SharePoint Foundation completes the site provisioning process by executing the unique provisioning instructions defined by the site definition configuration that has been selected as the site template.
The Global site definition has an ONET.XML file that contains site provisioning instructions that are executed each time a new site is created. If you examine the ONET.XML file of the Global site definition, you will find a Project element that contains child elements named ListTemplates, BaseTypes, Configurations, and Modules.
<Project>
  <ListTemplates/>   <!-- defines list definitions for system lists and galleries -->
  <BaseTypes/>       <!-- defines base types used by list and document libraries -->
  <Configurations/>  <!-- defines configuration with shared provisioning instructions -->
  <Modules/>         <!-- provisions files for standard master pages and themes -->
</Project>
The ListTemplates element contains ListTemplate elements that define list definitions for creating special system lists and galleries such as the Master Page Gallery and the Web Part Gallery. The BaseTypes section provides a definition for each of the supported base types, including Generic List, Document Library, Discussion Form, and Issues List.
<BaseTypes>
  <BaseType Title="Generic List" Type="0" />
  <BaseType Title="Document Library" Type="1" />
  <BaseType Title="Discussion Forum" Type="3" />
  <BaseType Title="Issues List" Type="5" />
</BaseTypes>
If you want to learn about how each base type is defined, you can examine the contents of each BaseType element to see what fields are added to every list and document library.
The Configuration element of the Global site definition is important because it is used to activate the built-in features named fields and ctypes automatically whenever a new site collection is created. The Configuration element also contains a Lists element to create special system lists and galleries.
<Configuration ID="0" Name="Default" MasterUrl="_catalogs/masterpage/v4.master">
  <SiteFeatures>
    <Feature ID="CA7BD552-10B1-4563-85B9-5ED1D39C962A" /> <!-- activates fields feature -->
    <Feature ID="695B6570-A48B-4A8E-8EA5-26EA7FC1D162" /> <!-- activates ctypes feature -->
  </SiteFeatures>
  <Lists>
    <!-- provisions system lists such as the master page gallery -->
  </Lists>
</Configuration>
Inside the Lists section, there is a List element that is used to create a Master Page Gallery in each new site.
<List Title="$Resources:core,MasterPageGallery;" Type="116" Url="_catalogs/masterpage" />
There are six other List elements that contain a RootWebOnly attribute with a value of TRUE. This attribute setting configures these List elements so that they create system lists and galleries in top-level sites only when a new site collection is being created.
<!-system lists and galleries created in every top-level site -->
<List Title="$Resources:core,global_onet_solutiongallery_list;" Type="121"
      Url="_catalogs/solutions" RootWebOnly="TRUE" />
<List Title="$Resources:core,userinfo_schema_listtitle;" Type="112"
      Url="_catalogs/users" RootWebOnly="TRUE" />
<List Type="113" Title="$Resources:core,webpartgalleryList;"
      Url="_catalogs/wp" RootWebOnly="TRUE" />
<List Type="114" Title="$Resources:core,listtemplategalleryList;"
      Url="_catalogs/lt" RootWebOnly="TRUE" />
<List Title="$Resources:core,themegalleryList;" Type="123"
      Url="_catalogs/theme" RootWebOnly="TRUE" />
<List Title="$Resources:core,stylelibraryList;" Type="101" Catalog="TRUE"
      Url="Style Library" Description="$Resources:core,stylelibraryList_Desc"
      RootWebOnly="TRUE" AllowEveryoneViewItems="TRUE" AllowDeletion="FALSE" />
The ONET.XML file in the Global site definition includes two Module elements, which are named DefaultMasterPage and OOBThemes.
<Modules>
  <Module Name="DefaultMasterPage" />
  <Module Name="OOBThemes" />
</Modules>
The Module element named DefaultMasterPage is used to add the three standard master pages to every new site.
<Module Name="DefaultMasterPage" List="116" Url="_catalogs/masterpage" >
    <File Url="default.master" Type="GhostableInLibrary" IgnoreIfAlreadyExists="TRUE" />
    <File Url="v4.master" Type="GhostableInLibrary" IgnoreIfAlreadyExists="TRUE" />
    <File Url="minimal.master" Type="GhostableInLibrary" IgnoreIfAlreadyExists="TRUE" />
  </Module>
</Modules>
The Module element named OOBThemes has been written to add the .thmx files for the standard SharePoint Foundation themes into the Themes Gallery of each top-level site.
<Module Name="OOBThemes" List="123" Url="_catalogs/theme" RootWebOnly="TRUE">
  <File Url="Azure.thmx" Type="GhostableInLibrary"
        Path="lists/themes/Azure.thmx" IgnoreIfAlreadyExists="TRUE" />
  <!-- File elements for other .thmx files have been omitted for clarity -->
</Module>Now that you have learned about site definition and configurations, let’s discuss automating the process of creating new sites. You can create a new site in a Windows PowerShell script by calling the SharePoint PowerShell cmdlet named New-SPSite. When you do this, you can specify a site template by passing a parameter that identities a specific configuration from one of the standard site definitions. The parameter value is created by specifying the name of the site definition followed by the pound sign (#) and the integer identifier of the configuration. For example, you can use STS#0 to reference the site template called Team Site, and STS#1 to reference the site template called Blank Site. If you want to create a new site collection based on the Publishing site template, you can reference its configuration for creating a new top-level site, which is BLANKINTERNETCONTAINER#0.
The following example of a Windows PowerShell script uses a site template parameter of STS#1 to create a new site collection that has a Blank site as its top-level site.
Add-PSSnapin Microsoft.SharePoint.PowerShell -ErrorAction "SilentlyContinue"

# add variables to track parametrized values used to provision new site
$title= "Wingtip Sales Site"
$url = "http://intranet.wingtip.com/sites/sales"
$owner = "WINGTIPWendyW"
$template = "STS#1"
$WikiHomePageFeatureId = "00BFEA71-D8FE-4FEC-8DAD-01C19A6E4053"

# create new site collection with Blank site as top-level site
$sc = New-SPSite -URL $url -Name $title -OwnerAlias $owner -Template $template

# obtain reference to top-level site
$site = $sc.RootWeb

# activate any required features
Enable-SPFeature -Identity $WikiHomePageFeatureId -Url $site.Url

# use the server-side object model to initialize site properties.
$site = $sc.RootWeb
$site.Title = "My Custom Title"
$site.Update
As you can see, this approach makes it possible to create a new site using any configuration you want. Once you have created a new top-level site from a specific configuration, you can use the Enable-SPFeature cmdlet to enable any required features. You can also use the server-side object model to initialize site properties and to add site elements such as lists and navigation nodes. What we have shown here in a Windows PowerShell script can also be written in C# or Visual Basic code that programs against the server-side object model. The key point is that you can initialize new sites however you want, without having to resort to custom site definitions.
A feature can also be used to attach one or more other features to a configuration of a site definition through a technique known as feature stapling. For example, instead of creating a custom site definition, you can elect to create a custom feature to extend configurations from a standard site definition. For example, you can create a feature to staple the MainSite feature in the WingtipTypes project to the configurations for Team Site and Blank Site.
To staple a feature to a configuration such as Team Site and Blank Site, you must create a second feature to associate the feature to be stapled with one or more configurations. Feature stapling is achieved by adding a FeatureSiteTemplateAssociation element that contains an Id attribute specifying the feature that is being stapled and a TemplateName attribute specifying the target configuration. The following example demonstrates stapling the MainSite feature of the WingtipTypes project to the configurations for Team Site and Blank Site.
<Elements xmlns="http://schemas.microsoft.com/sharepoint/">
  <FeatureSiteTemplateAssociation
    Id="edcdcd75-dff2-479d-ac32-b37f8fa9d459"
    TemplateName="STS#0" />
  <FeatureSiteTemplateAssociation
    Id="edcdcd75-dff2-479d-ac32-b37f8fa9d459"
    TemplateName="STS#1" />
</Elements>
The purpose of feature stapling is to activate features automatically when a new site is created. Once a feature that staples other features has been activated, SharePoint Foundation automatically activates the stapled features as new sites are created. However, it is important that you know how the scope of a feature that staples other features affects the provisioning behavior of SharePoint Foundation.
The activation scope of the feature performing the stapling must be higher than the features being stapled. For example, a feature that activates at the site collection scope can staple only features that activate a site-level scope. A feature that activates at the Web application scope can staple features that activate a site-level scope or at the site collection scope. A feature that activates at the farm scope can staple features that activate at any of the other three scopes.
If you define a feature with an activate scope of Web application scope, it provides a quick and easy way to automate the activation of its stapled features within every new Team site and Blank site that are created in the target Web application. Going one step further, you can associate stapling a feature to the main configuration of the Global site definition. This technique makes it possible to staple a feature to all new sites, as opposed to only sites created from a specific configuration.
<Elements xmlns="http://schemas.microsoft.com/sharepoint/">
  <FeatureSiteTemplateAssociation
    Id="edcdcd75-dff2-479d-ac32-b37f8fa9d459"
    TemplateName=" GLOBAL" />
</Elements>
This technique is powerful because it provides an approach to activate specific features on any type of site created within a farm. The one caveat here is that the configuration for Blank sites is configured to ignore any features stapled to the Global site definition. You can staple a feature to all site configurations, including Blank Site, using the following code.
<Elements xmlns="http://schemas.microsoft.com/sharepoint/">
  <FeatureSiteTemplateAssociation
    Id="edcdcd75-dff2-479d-ac32-b37f8fa9d459"
    TemplateName=" GLOBAL" />
  <FeatureSiteTemplateAssociation
    Id="edcdcd75-dff2-479d-ac32-b37f8fa9d459"
    TemplateName=" STS#1" />
</Elements>Up to now, we have discussed the caveats of creating custom site definitions, and we have stated that we will not show you how to create a custom site definition in this chapter because it is not a recommended approach. This is primarily due to the migration problems that occur when sites are created that depend on custom site definitions. Microsoft recommends that you avoid these problems by creating sites using the standard site definitions that are included as part of SharePoint Foundation and SharePoint Server 2010.
We would like to finish the chapter by demonstrating an advanced technique that makes it possible to add customized site templates to a farm. These site templates will be added in a fashion that allows users to create new top-level sites and child sites in the browser using the standard site template selector of SharePoint Foundation.
The technique involves creating a special type of component known as a site provisioning provider. The purpose of a site provisioning provider is to create and initialize new sites. However, a critical aspect of this technique is that it does not rely on a custom site definition. Instead, the technique involves creating new sites using the standard site definition configurations, such as Team Site and Blank Site.
The downloadable .zip archive of companion code for this book contains a sample SharePoint project named WingtipSiteTemplates. This project demonstrates creating a site provisioning provider named WingtipProvisioningProvider. Note that because this project contains a site provisioning provider and a Web Template file, it must be deployed as a farm solution. You create a site provisioning provider with a class that inherits from the SPWebProvisioningProvider base class and that overrides a single method named Provision.
using System;
using Microsoft.SharePoint;

namespace WingtipSiteTemplates {
  public class WingtipProvisioningProvider : SPWebProvisioningProvider {
    public override void Provision(SPWebProvisioningProperties properties) {
      // add code to provision new site
    }
  }
}
When you implement the Provision method, you get to specify the configuration that is used to provision the new site by calling the ApplyWebTemplate method. This makes it possible to create customized provisioning instructions while using standard configurations such as Blank Site.
public override void Provision(SPWebProvisioningProperties properties) {

   // provision new site using Blank site configuration
   properties.Web.ApplyWebTemplate("STS#1");

  // TODO: add extra code here to initialize new site.
}
When the ApplyWebTemplate method completes, SharePoint Foundation has finished provisioning the new site using the Blank Site configuration. Now you can add whatever logic you would like to activate features, initialize site properties, and create any required site elements, such as lists and child sites. Note that due to security issues, you must call a method named RunWithElevatedPrivileges on the SPSecurity class to run your code with the privileges required to initialize a new site.
public override void Provision(SPWebProvisioningProperties properties) {
  // apply template using a configuration
  properties.Web.ApplyWebTemplate("STS#1");

  // elevate privileges before programming against site
  SPSecurity.RunWithElevatedPrivileges(delegate() {
    using (SPSite siteCollection = new SPSite(properties.Web.Site.ID)) {
      using (SPWeb site = siteCollection.OpenWeb(properties.Web.ID)) {
        // activate features and initilize site properties
        site.Features.Add(new Guid("00BFEA71-D8FE-4FEC-8DAD-01C19A6E4053"));
        site.Title = "My Custom Site Title";
        site.Update();
      }
    }
  });
}
The final step to deploying a site provisioning provider involves creating a Web template file that references the site provisioning provider class. The WingtipSiteTemplates project contains the following Web template file, named webtemp_WingtipSiteTemplates.xml, which is deployed in the Web templates directory for U.S. English at a path of TEMPLATE/1033/XML.
<Template Name="WingtipSiteTemplates" ID="11001">

    <Configuration ID="0"
        Title="Wingtip Standard Team Site"
        Hidden="FALSE"
        ImageUrl="/_layouts/images/litware/LITWARE_PREV.PNG"
        Description="Use this site template to create a Wingtip team site."
        DisplayCategory="Wingtip"
        ProvisionAssembly="$SharePoint.Project.AssemblyFullName$"
        ProvisionClass="WingtipSiteTemplates.WingtipProvisioningProvider"
        ProvisionData="StandardTeamSite" />

    <Configuration ID="1"
        Title="Wingtip Sales Site"
        Hidden="FALSE"
        ImageUrl="/_layouts/images/litware/LITWARE_PREV.PNG"
        Description="Use this site template to create a Wingtip team site."
        DisplayCategory="Wingtip"
        ProvisionAssembly="$SharePoint.Project.AssemblyFullName$"
        ProvisionClass="WingtipSiteTemplates.WingtipProvisioningProvider"
        ProvisionData="SalesSite" />

  </Template>

</Templates>
As you can see, this Web template file defines two configurations called Wingtip Standard Team Site and Wingtip Sales Site. Both of these configurations are set to display in the standard SharePoint Foundation site template picker under the Wingtip custom tab, as shown in Figure 8-6. You can see that both Configuration elements are configured to use the same provisioning provider class, but they have different values for the ProvisionData attribute. This makes it possible for the WingtipProvisioningProvider class to provide the Provision method that inspects the ProvisionData attribute to determine what type of new site to create and initialize.
public override void Provision(SPWebProvisioningProperties properties) {
  if (properties.Data.Equals("StandardTeamSite")) {
    // add code to provision standard team site
  }
  if (properties.Data.Equals("SalesSite")) {
    // add code to provision standard team site
  }
}
This chapter has examined advanced techniques for developing custom definitions. We began by discussing how to develop custom field types and custom field controls. While developing custom field types has its share of compatibility issues, it offers the greatest amount of flexibility when initializing field values and performing data validation.
The chapter also taught you how to develop reusable type definitions for site columns, content types, and list templates. You saw that this style of development requires a solid understanding of CAML. Developing CAML-based definitions can be challenging when it comes to testing and debugging, yet it provides advantages over creating site columns, content types, and lists by hand in the browser or through the server-side object model. You can see that developing CAML-based definitions can be helpful in some projects but is overkill in others.
The chapter ended with an examination of how SharePoint Foundation provisions new sites using site definitions and configurations. You also learned about the role of the Global site definition. We ended the chapter by recommending that you avoid developing custom site definitions and that you use alternative techniques for creating and initializing new sites, including feature stapling and developing a custom site provisioning provider.