
6
Configuring an Application with Spring Boot
In the previous chapter, we learned how to test various aspects of an application, including web controllers, repositories, and domain objects. We also explored security-path testing, as well as using Testcontainers to emulate production.
In this chapter, we’ll learn how to configure our application, which is a critical piece of application development. While at first glance this may sound like setting a handful of properties, there is a deeper concept at play.
Our code needs a connection to the real world. In this sense, we’re talking about anything our application connects to: databases, message brokers, authentication systems, external services, and more. The details needed to point our application at a given database or message broker are contained in these property settings. By making application configuration a first-class citizen in Spring Boot, application deployment becomes versatile.
The point of this chapter is to reveal how application configuration becomes not just simple, but instead, a tool to make applications better serve our needs. This way, we can spend all our time serving the application’s needs!
In this chapter, we’ll cover the following topics:
- Creating custom properties
- Creating profile-based property files
- Switching to YAML
- Setting properties with environment variables
- Order of property overrides
Where to find this chapter’s code
The source code for this chapter can be found at https://github.com/PacktPublishing/Learning-Spring-Boot-3.0/tree/main/ch6.
Creating custom properties
We have already dabbled with application properties in a couple of places in this book. Remember setting spring.mustache.servlet.expose-request-attributes=true in the application.properties file in Chapter 4, Securing an Application with Spring Boot?
Configuring our application using property files is incredibly handy. While Spring Boot offers many custom properties we can use, it’s possible to create our own!
Let’s start by creating some custom properties. To do that, create a brand new AppConfig class, like this:
@ConfigurationProperties("app.config")
public record AppConfig(String header, String intro,
  List<UserAccount> users) {
}
This Java 17 record can be described as follows:
- @ConfigurationProperties: A Spring Boot annotation that flags this record as a source of property settings. The app.config value is the prefix for its properties.
- AppConfig: The name of this bundle of type-safe configuration properties. It doesn’t matter what name we give it.
The fields themselves are the names of the properties, which we’ll cover in more detail shortly.
This tiny record essentially declares three properties: app.config.header, app.config.intro, and app.config.users. We can populate them right away by adding the following to application.properties:
app.config.header=Greetings Learning Spring Boot 3.0 fans!
app.config.intro=In this chapter, we are learning how to make a web app using Spring Boot 3.0
app.config.users[0].username=alice
app.config.users[0].password=password
app.config.users[0].authorities[0]=ROLE_USER
app.config.users[1].username=bob
app.config.users[1].password=password
app.config.users[1].authorities[0]=ROLE_USER
app.config.users[2].username=admin
app.config.users[2].password=password
app.config.users[2].authorities[0]=ROLE_ADMIN
This batch of properties can be described as follows:
- app.config.header: A string value to insert into the top-most part of our template (which we’ll do soon).
- app.config.intro: A string greeting to put in the template.
- app.config.users: A list of UserAccount entries with each attribute split out into a separate line. The square bracket notation is used to populate the Java list.
These property settings are cool, but we don’t have access to them yet. We need to enable them by adding a little more. In truth, it doesn’t matter where so long as it’s on a Spring component we know will be picked up by Spring Boot’s component scanning.
Since this set of properties (you can have more than one!) is application-wide, why not apply them to the entry point for our application?
@SpringBootApplication
@EnableConfigurationProperties(AppConfig.class)
public class Chapter6Application {
  public static void main(String[] args) {
    SpringApplication.run(Chapter6Application.class, args);
  }
}
This code is very similar to the code in previous chapters with one change:
- @EnableConfigurationProperties(AppConfig.class): This annotation activates this application configuration, making it possible to inject into any Spring bean.
The rest of the code is the same as we’ve seen in previous chapters.
Tip
Where is the best place to enable custom properties? In truth, it doesn’t matter. So long as it gets enabled on some Spring bean that will be picked up by Spring Boot, it will get added to the application context. However, if this particular set of properties were specific to a certain Spring bean, it’s recommended to put the annotation on that bean definition, emphasizing that the bean comes with a complement of configurable properties. If the properties are used by more than one bean, consider what we just did.
Thanks to @EnableConfigurationProperties, a Spring bean of the AppConfig type will be registered automatically in the application context, bound to the values applied inside application.properties.
To leverage it in our HomeController, we only need to make the following changes at the top of the class:
@Controller
public class HomeController {
  private final VideoService videoService;
  private final AppConfig appConfig;
  public HomeController(VideoService videoService,
    AppConfig appConfig) {
      this.videoService = videoService;
      this.appConfig = appConfig;
  }
    …rest of the class…
HomeController has one change: a field of the AppConfig type is declared below VideoService and it gets initialized in the constructor call.
With this in place, we can use its provided values in rendering the index template further down in HomeController, like this:
@GetMapping
public String index(Model model, //
  Authentication authentication) {
  model.addAttribute("videos", videoService.getVideos());
  model.addAttribute("authentication", authentication);
  model.addAttribute("header", appConfig.header());
  model.addAttribute("intro", appConfig.intro());
  return "index";
}
These changes can be described as follows:
- The model’s "header" attribute is populated with appConfig.header()
- The model’s "intro" attribute is populated with appConfig.intro()
This will take the string values we put into application.properties and route them so that they render index.mustache.
To complete the loop, we need to make the following changes to the template:
<h1>{{header}}</h1>
<p>{{intro}}</p>
We simply use Mustache’s double-curly syntax to grab the {{header}} and {{intro}} attributes. What used to be hard-coded is now a template variable!
This is neat, but is parameterizing a couple of fixed values in a template that big a deal? Perhaps not. To get our hands on the power of Spring Boot configuration properties, let’s delve into the users field.
That one is NOT ready to go. Why?
It’s important to understand the Java property fields are fundamentally built up out of key-value pairs of strings. The values aren’t wrapped in double quotes, but they are pretty much treated that way.
Spring comes with some convenient converters built in, but centered inside the AppConfig user’s property, inside the UserAccount type, is a List<GrantedAuthority>. Converting strings into GrantedAuthority is not clear-cut and requires that we write and register a converter.
The code for handling user accounts is security-focused, so it makes sense to register this custom converter inside our already-existing SecurityConfig:
@Bean
@ConfigurationPropertiesBinding
Converter<String, GrantedAuthority> converter() {
  return new Converter<String, GrantedAuthority>() {
    @Override
    public GrantedAuthority convert(String source) {
      return new SimpleGrantedAuthority(source);
    }
  };
}
This code can be described as follows:
- @Bean: This converter must be registered with the application context so that it gets picked up properly.
- @ConfigurationPropertiesBinding: Due to application property conversion happening very early in the application life cycle, Spring Boot ONLY applies converters that have this annotation applied. Try to avoid pulling in other dependencies.
- Convert(): At the heart is one little method that converts a String into a GrantedAuthority by using SimpleGrantedAuthority.
Spring converters are quite handy. However, you may be encouraged by your IDE to simplify this code a little bit. It may suggest that you convert this into a Java lambda expression (return source -> new SimpleGrantedAuthority(source)), or perhaps trim it down into a method reference (return SimpleGrantedAuthority::new).
But that won’t work. At least, not without some help.
That’s because Java has type erasure. At runtime, Java will drop the generic information, which makes it impossible for Spring to find the proper converter and apply it. So, we must either keep things just the way they are or adopt a different strategy, as shown here:
interface GrantedAuthorityCnv extends Converter<String, GrantedAuthority> {}
@Bean
@ConfigurationPropertiesBinding
GrantedAuthorityCnv converter() {
  return SimpleGrantedAuthority::new;
}
This type-erasure beating solution can be described as follows:
- GrantedAuthorityCnv: By extending Spring’s Converter interface with a custom interface that applies our generic parameters, we are freezing a copy of these parameters that Spring can find and use
- Using this new interface instead of Converter<String, GrantedAuthority>, we can switch to the slimmed-down method reference
This may appear to be roughly the same amount of code. It is simply a different way the same information is being put together. It’s a personal preference whether a fully-expanded Converter<String, GrantedAuthority> inside a bean definition or a slimmed-down but separate interface is easier to grok.
Either way, we can now fire up our application, knowing that we have varying aspects of our application retooled to be property-driven.
And with all this in place, we can begin to explore how a property-driven application gives us the ability to customize things for different environments in the next section.
Creating profile-based property files
In the previous section, we realized the ability to extract certain aspects of our application into property files. The next big step you can take is realizing how far you can go with this.
Inevitably, we run into situations such as carrying our application into a new environment and wondering, “can we change the properties for THIS situation?”
For example, what if our application, before release, has to be installed in a test bed where it can get checked out? The databases are different. The test team may want a different set of test accounts. And any other external services (message brokers, authentication systems, and so on) will probably also be different.
So, the question arises, “can I have a different set of properties?” To which Spring Boot says “yes!”
To check this out, create another property file. Call it application-test.properties and load it up, like this:
app.config.header=Greetings Test Team!
app.config.intro=If you run into issues while testing, let me know!
app.config.users[0].username=test1
app.config.users[0].password=password
app.config.users[0].authorities[0]=ROLE_NOTHING
app.config.users[1].username=test2
app.config.users[1].password=password
app.config.users[1].authorities[0]=ROLE_USER
app.config.users[2].username=test3
app.config.users[2].password=password
app.config.users[2].authorities[0]=ROLE_ADMIN
These alternative sets of properties can be described as follows:
- application-test.properties: When you append –test to the base name of the property file, you can activate it by using the Spring test profile
- The web bits are tuned to the audience
- The test team would probably have a set of users they want to carry out all their scenarios
To run the application, all we have to do is activate the Spring test profile. There are multiple ways to switch that one:
- Add -Dspring.profiles.active=test to the JVM
- In a Unix environment, use export SPRING_PROFILES_ACTIVE=test
- Some IDEs even support this directly! Check out the following screenshot from IntelliJ IDEA (Ultimate Edition, not Community Edition):
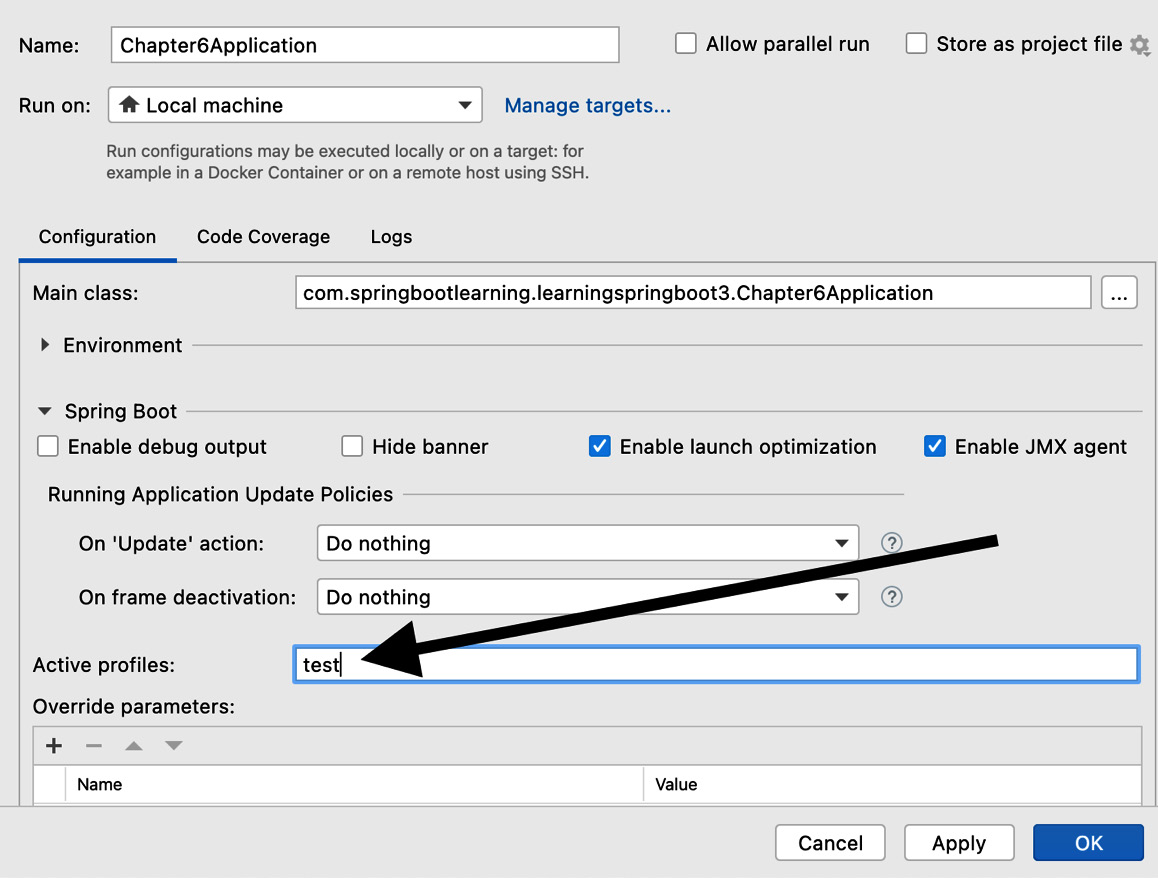
Figure 6.1 – IntelliJ’s Run dialog
Look toward the bottom for Active profiles and see where we entered test.
Want to check out IntelliJ IDEA Ultimate Edition?
JetBrains does offer a 30-day free trial for IntelliJ IDEA Ultimate Edition. They also have options if you happen to be working on certain open source projects. Personally, this is my favorite IDE I’ve used throughout my career. It has incredible insight into all kinds of things from Java code to SQL strings in Spring Data @Query annotations to property files to Spring Boot powerups (and more). Feel free to check out your options at https://springbootlearning.com/intellij-idea-try-it.
When we activate a Spring profile, Spring Boot will add application-test.properties to our configuration.
Tip
Profiles are additive. When we activate the test profile, application-test.properties is added to the configuration. It doesn’t replace application.properties. However, if a given property is found in both, the last profile applied wins. Considering application.properties is considered the default profile, application-test.properties would be applied afterward. Hence, the header, intro, and users properties would be overrides. It’s also possible to apply more than one profile, separated by commas.
Imagine if we had A) a development lab where we had a slimmed-down complement of servers, B) a full-sized test bed with a separate set of servers, and C) a production environment with full-sized servers. We could consider the following:
- Make production the default configuration and put connection URLs pointed at our production servers in application.properties. Also, have a counterpart test profile captured in the application-test.properties file with connection URLs for the test servers. Finally, make individual developers use a dev profile, using the application-dev.properties file with connection URLs for the development lab of servers.
- Another tactic is to flip production and development. When anyone runs the application by default, with no custom profiles activated, it runs in dev mode. To run things in production, activate the production profile and apply application-production.properties. Keep the test profile the same as the previous example.
So far, we’ve talked about different environments and real, physical environments. Of course, we could be discussing traditional servers in various rack configurations. But we could just as well be talking about virtualized servers. Either way, adjusting connection URLs among other settings through the use of environment-specific configuration files is valuable.
But that’s not the only choice put before us.
What if our application is being deployed in the cloud? In different clouds? What if we started with a traditional set of hardware, as discussed earlier in this section, but management has decided to migrate to AWS, Azure, or VMware Tanzu?
There is no need to go into our code and start making changes. Instead, all we need to do is work on a new property file and plug in whatever the connection details are to communicate with our cloud-based services!
Switching to YAML
Part of the Spring way is options. Developers have varying needs based on circumstances, and Spring tries to offer different ways to effectively get things done.
And sometimes, the number of property settings we need can explode. With the property file’s key/value paradigm, this can get unwieldy. In the previous section, where we had lists and complex values, it became clunky to have to specify index values.
YAML is a more succinct way to represent the same settings. Perhaps an example is in order. Create an application-alternate.yaml file in the src/main/resources folder, as shown here:
app:
  config:
    header: Greetings from YAML-based settings!
    intro: Check out this page hosted from YAML
    users:
      -
        username: yaml1
        password: password
        authorities:
          - ROLE_USER
      -
        username: yaml2
        password: password
        authorities:
          - ROLE_USER
      -
        username: yaml3
        password: password
        authorities:
      - ROLE_ADMIN
These YAML-based settings can be described as follows:
- The nested nature of YAML prevents duplicate entries and makes it clear where each property is located
- The hyphens underneath users denote array entries
- Because the users field of AppConfig is a complex type (List<UserAccount>), each field of each entry is listed on a separate line
- Because authorities itself is a list, it too uses hyphens
In Chapter 4, Securing an Application with Spring Boot, in the Leveraging Google to authenticate users section, we had a first-hand look at using YAML to configure Spring Security OAuth2 settings.
YAML is slim and trim because it avoids duplicating entries. In addition to that, its nested nature makes things a little more readable.
Tradeoff
Everything has tradeoffs, right? I’ve seen many systems built on top of YAML configuration files, especially in the cloud configuration space. If your YAML file is so big that it doesn’t fit on one screen, the nice readable format can work against you. That’s because the spacing and tabbing between nested levels are important. That example I just gave was about something not specific to Spring Boot. The number of properties you’ll be dealing with will probably be fine. Just don’t be surprised if you work on something else and discover the dark side of YAML.
A bonus feature provided by most modern IDEs is code completion support for both application.properties files and application.yaml files!
Check out the following screenshot:

Figure 6.2 – IntelliJ’s code completion for property settings
In this screenshot, while the available properties appear with standard key/value notation, they will be automatically applied in YAML format if need be.
Spring Boot encourages us to use custom, type-safe configuration property classes. To support having our configuration settings appear in code completion popups like the one shown previously, all we must do is add the following dependency to our pom.xml file!
<dependency>
        <groupId>org.springframework.boot</groupId>
        <artifactId>spring-boot-configuration-processor
          </artifactId>
        <optional>true</optional>
</dependency>
But this isn’t the only way to supply property settings. In the next section, we’ll learn how environment variables can also be used to override property settings.
Setting properties with environment variables
A configurable application wouldn’t be complete if there weren’t a way to configure it straight from the command line. This is of key value because no matter how much thought and design we put into our applications, something will always pop up.
Being stuck with a bundled-up application and no way to override the various property files stuffed inside it would be a showstopper.
Don’t do this!
Maybe you’ve run into situations where you need to unpack the JAR file, edit some property files, and bundle it back up. Do not do this! This is a hack that may have skated by 20 years ago, but it just doesn’t cut it today. In today’s age of controlled pipelines and secured release processes, it’s simply too risky to manually get your hands on a JAR file and tweak it like that. And thanks to the real-world experience of the Spring team, there’s no need to do that.
You can easily override any property using an environment variable. Remember how, earlier in this chapter, we activated a profile using IntelliJ IDEA’s Run dialog? You can do the same thing right from the command line, like this:
$ SPRING_PROFILES_ACTIVE=alternative ./mvnw spring-boot:runThis command can be explained as follows:
- SPRING_PROFILES_ACTIVE: The alternative way to reference properties on a Mac/Linux-based system. Dots typically don’t work as well, so capitalized tokens with underscores work.
- alternative: The profile we are running. In fact, in the console output, you can see The following 1 profile is active: “alternative” as proof that it’s running with that profile activated.
- ./mvnw: Run things using the Maven wrapper. This is a handy way to use Maven without having to install it on your system (really handy for CI systems!).
- spring-boot:run: The Maven command that activates the run goal of spring-boot-maven-plugin.
It’s also important to understand that the environment variables, when used this way, only apply to the current command. To make environment variables persistent for the duration of the current shell, you have to export the variable (which we won’t cover here).
And it’s easy to activate multiple profiles. Just separate the profile names with commas, as shown here:
$ SPRING_PROFILES_ACTIVE=test,alternate ./mvnw spring-boot:runThis is almost the same as activating a single profile, except both the test and alternate profiles have been activated.
Considering both the test and the alternate profiles defined a different set of users, perhaps you’re wondering which ones are active. It’s simple – the property files are applied from left to right.
Since the alternate profile goes last, it will layer on any new properties while overriding any duplicates. Thus, the YAML-based accounts are what end up getting configured!
That isn’t the only rule when it comes to property overrides and options. Just read the next section to grok all the options we have to tune properties.
Ordering property overrides
Back in Chapter 1, Core Features of Spring Boot, we got a summary of the order of property settings.
Let’s see that list of options again:
- Default properties are provided by Spring Boot’s SpringApplication.setDefaultProperties() method.
- @PropertySource-annotated @Configuration classes.
- Config data (such as application.properties files).
- A RandomValuePropertySource that has properties only in random.*.
- OS environment variables.
- Java System properties (System.getProperties()).
- JNDI attributes from java:comp/env.
- ServletContext init parameters.
- ServletConfig init parameters.
- Properties from SPRING_APPLICATION_JSON (inline JSON embedded in an environment variable or system property).
- Command-line arguments, as shown in the previous section.
- properties attribute on your tests. Available with the @SpringBootTest annotation and also slice-based testing (which we covered back in Chapter 5, Testing with Spring Boot in the Testing data repositories with Testcontainers section)
- @TestPropertySource annotations on your tests.
- DevTools global settings properties (the $HOME/.config/spring-boot directory when Spring Boot DevTools is active).
This list is ordered from lowest priority to highest priority. The application.properties file is pretty low, meaning it offers a great way to set a baseline for our properties, but we have multiple ways to override them either in tests or at deployment. Further down the list are all the ways we can override that baseline.
In addition to that, configuration files are considered in the following order:
- Application properties packaged inside your JAR file
- Profile-specific application properties inside your JAR file
- Application profiles outside your JAR file
- Profile-specific application properties outside your JAR file
That’s right. We can have application property files sitting adjacent to our runnable JAR file and have them serve as overrides. Remember that earlier warning to not crack open a JAR and tweak its properties?
No need! You can simply create a new property file and apply any adjustments.
Warning
There is still some risk with adjusting properties on the fly from the command line. Anytime you do, take note and consider capturing these changes in your version control system, perhaps as a different profile. Nothing is worse than hammering out a solution and watching it get overwritten with a patch that didn’t pick up your changes.
There is a fundamental concept in software engineering that encircles this idea of decoupling code from configuration through the power of property settings. It’s known as a Twelve-Factor App, a concept that arose back in 2011 from cloud vendor Heroku (now owned by Salesforce). To be specific, configuration is the third factor listed at https://12factor.net/.
The idea is to externalize everything likely to vary from environment to environment. It extends the life of our application when we design with this sort of flexibility. Our examples of property settings may have been a bit contrived, but hopefully, you can see the value in externalizing certain bits.
And with Spring Boot’s ability to pull together profile-specific properties, it becomes even easier to apply this feature to our code.
Whether all the factors of Twelve-Factor Apps are relevant today or applicable to our next application is debatable. But many of those factors listed on the site certainly lend themselves to making our applications easier to deploy, link, and stack up, like building blocks to build systems. So, I’d consider reading through it in your spare time.
Summary
In this chapter, we learned how to externalize parts of our system from content that appears in the web layer to the list of users allowed to authenticate with the system. We saw how to create type-safe configuration classes, bootstrap them from property files, and then inject them into parts of our application. We even saw how to use profile-based properties and choose between using traditional Java property files or using YAML. We then explored even more ways to override property settings from the command line and checked out a comprehensive list of yet more ways to override properties.
While our examples were probably not as realistic as they could have been, the concept is there. Externalizing properties that are likely to vary from environment to environment is a valuable feature, and Spring Boot eases the usage of this pattern.
In the next chapter, Releasing an Application with Spring Boot, we are finally going to release our application into the wild. There, we’ll learn what Spring Boot does to not only help us perform this task but then proceed to manage our application on Day 2.