
8
Going Native with Spring Boot
In the previous chapter, we learned multiple ways to turn our application from a collection of code into an executable, ready for any production environment, including the cloud. We also learned how to tune it and tweak it so that we could scale it up as needed.
Building upon the tools covered in the previous chapters, we’ll see how Spring Boot applications are indeed ready for the future by taking them to some of the most bleeding-edge platforms where performance can be truly dialed up to 11 as we explore native applications.
In this chapter, we’ll cover the following topics:
- What is GraalVM and why do we care?
- Retrofitting our application for GraalVM
- Running our native Spring Boot application inside GraalVM
- Baking a Docker container with GraalVM
Where to find this chapter’s code
The code for this chapter can be found at https://github.com/PacktPublishing/Learning-Spring-Boot-3.0/tree/main/ch8.
The focus of this chapter isn’t so much on writing Spring Boot applications as it is about compiling them into a faster, more efficient format (which we’ll soon see). Hence, there is no need to write new code. If you check the preceding link, you’ll find that this chapter’s code is a copy of the previous chapter’s code. However, the build file is a little different, which we’ll introduce in the next section.
What is GraalVM and why do we care?
For years, Java has suffered a lot of criticism. One of its biggest slights from the early days was its performance. While true to a degree, Java has made quantum leaps by adopting tactics that have allowed it to compete with other platforms at a raw performance level.
Nevertheless, people had continued to criticize Java over things that may seem inane, such as startup time. Indeed, a Java app, running inside its own virtual machine, isn’t as fast as Go or C++ binaries. But for the longest time, this has not been an issue, given web apps often have long uptimes.
However, new frontiers of production have exposed this weakness. Continuous deployment systems where 10,000 instances are running all at once and get replaced multiple times a day have made a 30-second cost begin to add up on people’s cloud bills.
A new player in the space of production systems has been executable functions. That’s right. It’s now possible to deploy a single function as an entire application on platforms such as AWS Lambda. And their results could be piped right into another deployed function.
In these scenarios, where the functions are spun up immediately upon demand, things such as startup time HEAVILY drive what technologies people use.
And thus has emerged GraalVM.
GraalVM by Oracle is essentially a new virtual machine that sports support for just about any programming language out there. Don’t run your Java JAR files on the JVM. Run them on GraalVM!
GraalVM is a high-performance runtime aimed at Java, JavaScript, Python, Ruby, R, C, and C++. When you’re running thousands of instances of systems, then the whole performance output of your applications can make a significant difference.
And the Spring team, in their continuing quest to reduce Java complexity, is here to help. Beginning in 2019, the experimental project Spring Native was born. And since then, almost every facet of the Spring portfolio has been tuned and adjusted to support this endeavor to bring the power of GraalVM to any Spring Boot application.
All with minimal fuss to the end user.
And so, through the rest of this chapter, we will explore taking the application we have come to know in previous chapters and adapting it to the rigors of GraalVM.
Retrofitting our application for GraalVM
There are always two ways to approach building a native application: create a brand-new application or take an existing one and update it. Thanks to Spring Boot 3.0 and their adoption of native application support, it’s very easy to update an existing application to use GraalVM instead of the JVM.
What is Java Virtual Machine code?
Java code has always, since the dawn of time, been compiled into bytecode, meant to be run on Java Virtual Machine (JVM). This has resulted in the common expression write once, run anywhere. Any compiled Java bytecode, due to every aspect of these files being captured by the Java specification, can be run on any compliant JVM, no matter what machine it lives on. This was a huge departure from a previous era that involved compiling separately for every single machine architecture an app would get deployed to. This was revolutionary in its day and has allowed other post-compilation enhancements such as just-in-time (JIT) compiler speedups and dynamically making applications slimmer and trimmer.
Compiling applications for GraalVM involves trading in some of that preserved flexibility for faster, more memory-efficient code.
This may trigger a question: why not compile EVERY ONE of our applications for GraalVM?
Because of tradeoffs.
GraalVM, to do some of the things it does, requires us to let go of some key features:
- Limited support for reflection
- Limited support for dynamic proxies
- Special handling of external resources
Why? Because GraalVM performs advanced analysis of our code. It uses a concept called reachability, where it essentially starts the app and then analyzes what code GraalVM can see. Anything that is NOT reachable is simply cut out of the final native image.
Reflection is still possible in native applications. But because not everything is visible directly, it can require extra configuration so that nothing is missed.
Proxies are of a similar issue. Any proxies that are to be supported must be generated at the time of native image building.
This means that accessing bits of code through reflection tactics, deserialization of data, and proxies are trickier and not as straightforward as they once were. The risk is that certain parts of our app may be cut out if we don’t properly capture them.
This is one reason why every Spring portfolio project has been diligently working to ensure that whatever bits NEED to be in our applications have the necessary hints for GraalVM to find them.
Beware of faulty information
Some articles capturing the details of Spring Boot 3.0 and its support for native images may mention that reflection and proxies are simply not supported. This is false. There is support for reflection, but it requires that the code on the other end of such reflective calls is properly registered. Regarding proxies, native images can’t handle generating and interpreting bytecode at runtime. All dynamic proxies must be generated at native image build time. These are limitations on the usage of reflection and proxies but not a complete lack of support.
It’s also a reason that Spring Framework has slimmed down its usage of reflection tactics to manage the application context. And it’s also the reason that Spring Boot has adopted a general approach of not proxying configuration classes containing bean definitions to reduce the number of actual proxies in an application.
For the past 2 years, the Spring team has worked tirelessly with the GraalVM team to tweak and adjust various aspects of the Spring portfolio, removing unnecessary reflection calls and reducing the need for proxies. On top of that, many improvements have been made to GraalVM so that it works better with Spring code.
For us to pick up and run with GraalVM, we will go back to our favorite friend, Spring Initializr, at https://start.spring.io.
From here, let’s start with a fresh set of coordinates:
- Project: Maven
- Group: com.springbootlearning.learningspringboot3
- Artifact: ch8
- Name: Chapter 8
- Description: Going Native with Spring Boot
- Package name: com.springbootlearning.learningspringboot3
- Packaging: Jar
- Java: 17
- Dependencies:
- Spring Web
- Mustache
- H2 Database
- Spring Data JPA
- Spring Security
- GraalVM Native Support
From here, we can click EXPLORE. A popup showing us the build file lets us see what is needed to build a Spring Boot native application.
The Spring Boot starters found include the following:
- spring-boot-starter-data-jpa
- spring-boot-starter-web
- spring-boot-starter-mustache
- spring-boot-starter-security
- h2
- spring-boot-starter-test
Because we’re using Spring Data JPA, which involves (by default) Hibernate and its proxied entities, we have this additional plugin:
<plugin>
    <groupId>org.hibernate.orm.tooling</groupId>
    <artifactId>hibernate-enhance-maven-plugin</artifactId>
    <version>${hibernate.version}</version>
    <executions>
        <execution>
            <id>enhance</id>
            <goals>
                <goal>enhance</goal>
            </goals>
            <configuration>
                <enableLazyInitialization>
                    true
                        </enableLazyInitialization>
                <enableDirtyTracking>
                    true
                        </enableDirtyTracking>
                <enableAssociationManagement>
                    true
                        </enableAssociationManagement>
            </configuration>
        </execution>
    </executions>
</plugin>
This helps add some extra settings the Hibernate team identified as critical to Hibernate’s proxies working properly with GraalVM.
Something also provided by spring-boot-starter-parent (referenced at the top of our build file) is a native Maven profile. When we enable it, it changes the settings for spring-boot-maven-plugin. Other tools are also brought online, including the ahead-of-time (AOT) compilation toolset, as well as GraalVM’s native-maven-plugin.
We’ll see how to utilize all this to build lightning-fast native applications in the next section.
GraalVM and Spring Boot
We’re entering a new area of code development. Not only are we talking about building Spring Boot apps, but we’re also talking about building them with alternative tools such as GraalVM. You may wish to read Spring Boot’s section on GraalVM Native Image Support at https://springbootlearning.com/graalvm.
Running our native Spring Boot application inside GraalVM
The common convention when building an application for Spring Boot is to run ./mvnw clean package. This cleans out the old cruft and creates a new uber JAR, something we already saw in Chapter 7, Releasing an Application with Spring Boot.
Building a Maven-based project with Spring Boot 3 requires that we have Java 17 installed. But to build a native image, we need to change course.
native-maven-plugin mentioned in the previous section, which comes with the native Maven profile, requires that we install a different JVM. There are additional tools required to build native images. The easiest way to manage different JVMs on our machine is by using sdkman (https://sdkman.io).
sdkman?
sdkman is an open source tool that allows you to install multiple JDKs and switch between them with ease. It’s as easy as sdk install java 17.0.3-tem followed by sdk use java 17.0.3-tem to download, install, and switch to the Eclipse Foundation’s Temurin Java 17.0.3 release. (The Eclipse Foundation is the current maintainer of Jakarta EE.) sdkman is also able to install the right version of the JDK – for example, if you are on an M1 Mac or an older Intel Mac. And in our case, it allows us to install GraalVM’s own JDK, which includes all the tools needed to build native images on our machine.
To build native applications on GraalVM, we need to install a version of Java 17 that includes GraalVM tools by typing the following command:
% sdk install java 22.3.r17-grlOnce it's installed, we can then switch over to it by typing the following:
% sdk use java 22.3.r17-grlWe can even take a peek at what this version of Java has:
% java -version
openjdk version "17.0.5" 2022-10-18
OpenJDK Runtime Environment GraalVM CE 22.3.0 (build 17.0.5+8-jvmci-22.3-b08)
OpenJDK 64-Bit Server VM GraalVM CE 22.3.0 (build 17.0.5+8-jvmci-22.3-b08, mixed mode, sharing)
This is OpenJDK version 17, also known as Java 17, but it has GraalVM Community Edition (CE) version 22.3.0. Essentially, it has all the bits for Java 17 stirred together with GraalVM 22.3.
What is OpenJDK?
OpenJDK is the source of all distributions of Java. SUN Microsystems, the inventors of Java, and later Oracle, initially made the official releases of Java. However, ever since Java 7, all releases of Java start with OpenJDK. Every vendor is free to take the OpenJDK baseline and apply additions as they see fit. However, ALL distributions of Java are required to pass a Technology Compatibility Kit (TCK) released by Java’s executive committee to earn the coffee cup logo. Various vendors offer different levels of support for differing periods and what patches they’ll maintain or carry back to the source. There are even distributions from certain vendors that are NOT certified against the TCK, so be sure to read all the details before choosing a JDK.
With GraalVM CE’s Java 17 active, we can finally build our application natively. To do so, we need to execute the following command:
% ./mvnw -Pnative clean native:compileTrying to build a native image on Windows?
Linux is probably the most straightforward platform on which to build native images. Macs have strong support as well, with some gaps in the M1 chipset. To build native images on Windows, though, you need to check out the Windows section of the Spring Boot reference documentation at https://springbootlearning.com/graalvm-windows. There, you’ll find details about what needs to be installed on your machine to build native images on Windows. Also, don’t forget to use mvnw.cmd when building with Maven on Windows!
This command will compile our application with the native profile switched on. It leverages native-maven-plugin mentioned in the previous section. This process can take a bit longer than building using a standard configuration. And there are a lot of warnings.
The process involves completely scanning the code and performing what’s known as AOT compilation. Basically, instead of leaving things in a bytecode format, to be converted into local machine code when the JVM starts up, it instead converts things in advance.
This requires certain features to be curtailed, such as the usage of proxies and reflection. Part of Spring’s support in making itself GraalVM-ready was to reduce the usage of proxies and to avoid reflection when not necessary. There are ways to still use such features, but they can bloat up the native executable and remove some of the benefits. The AOT tools also can’t see everything on the other side of reflection calls and proxy usage, so they require additional metadata to be registered.
Part of the output can be seen here:
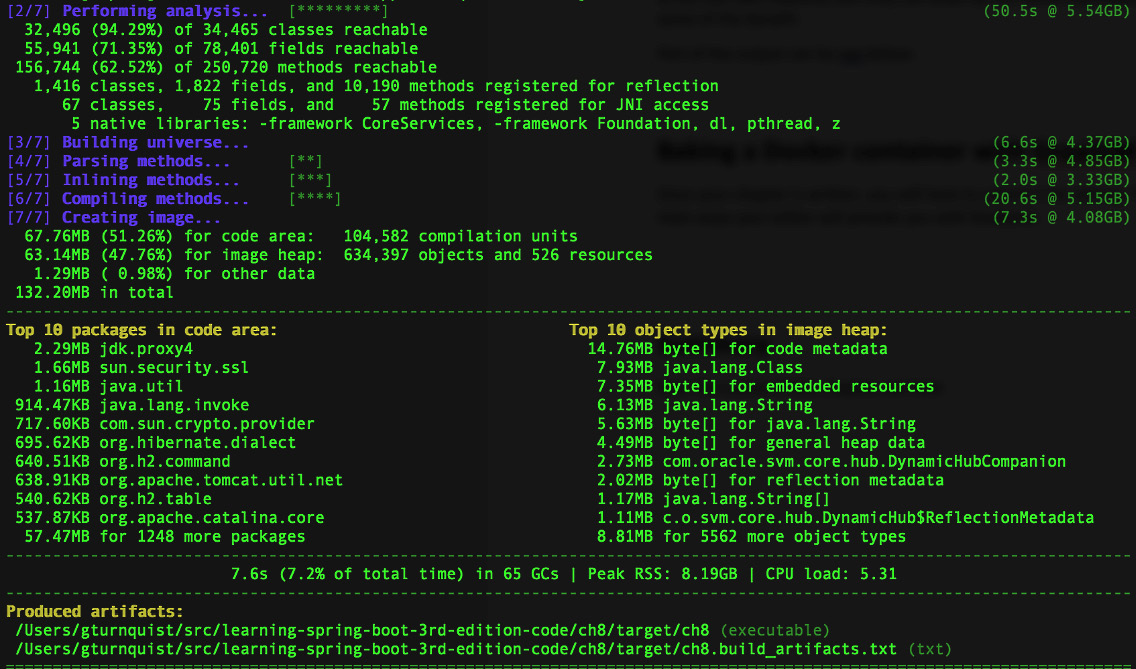
Figure 8.1 – Output from mvnw -Pnative clean native:compile
The resulting artifact is neither an uber JAR file nor an executable JAR file. Instead, it’s an executable file for the platform it was built on.
Important
One of Java’s most popular features since Day 1 has been its write once/run anywhere nature. This works because it’s normally compiled into platform-independent bytecode and runs inside JVM, a virtual machine that can vary from machine to machine. GraalVM sidesteps all of that. The final executable does NOT have this run anywhere nature. You can inspect the final app by typing file target/ch8 in the project’s base directory. On my machine, it reads Mach-O 64-bit executable arm64.
To run our native application, we just do this:
% target/ch8
    .     ____                    _                        __ _ _
 /\ / ___'_ __ _ _(_)_ __    __ _
( ( )\___ | '_ | '_| | '_ / _` |
 \/    ___)| |_)| | | | | || (_| |    ) ) ) )
    '    |____| .__|_| |_|_| |_\__, | / / / /
 =========|_|==============|___/=/_/_/_/
 :: Spring Boot ::                        (v3.0.0)
……omitted for brevity……
2022-11-06T14:35:40.717-06:00    INFO 12263 --- [                     main] o.s.b.w.embedded.tomcat.TomcatWebServer    : Tomcat started on port(s): 8080 (http) with context path ''
2022-11-06T14:35:40.717-06:00    INFO 12263 --- [                     main] c.s.l.Chapter8Application                                : Started Chapter8Application in 0.104 seconds (process running for 0.121)
On the last line, we can see that the application started up in 0.104 seconds. For a Java application, that is incredibly fast.
It’s possible to get a popup like this:

Figure 8.2 – Native application requesting permission to accept network connections
That was a lot of effort. So, why do all this?
Why do we want GraalVM again?
It’s taken a little extra effort to configure our application to work with GraalVM. It also took longer to build the app itself. On top of that, we traded in Java’s amazing write-once/run-anywhere flexibility.
Why?
Imagine running 1,000 copies of this application in the cloud. What if our app were to take 20 seconds to start up? 1,000 instances would translate to 20,000 seconds or 5.6 hours.
5.6 hours of billable cloud time.
Adding on an extra 5.6 hours of billable time every time we rolled out a change would start to add up. If we embrace continuous delivery and pushed out every patch commit, our bill could get out of hand. Maybe not from an Ops perspective, but definitely from a billing one!
If, instead, our app launches in 0.1 seconds, like it just did, 1,000 instances would net us just under 17 minutes of cloud time. Whew! That’s some cost savings.
Additionally, our application would run in a more efficient memory configuration. So long as our continuous delivery system built the app on the same operating system as our target environment, write-once/run-anywhere isn’t an issue.
There is still one lingering issue… what if we don’t HAVE the target environment on our local build machine? What if we were working in Windows or on a Mac, but our cloud operated using Linux-based Docker containers?
Thankfully, there’s a solution for that in the next section!
Baking a Docker container with GraalVM
Earlier in this chapter, we installed GraalVM’s OpenJDK distribution and built our native application locally. But that’s not the only way, nor is it always the ideal way.
For example, if we plan to run our application on a cloud configuration based on Linux, then building an application locally on a MacBook Pro or a Windows machine won’t do.
In Chapter 7, Releasing an Application with Spring Boot, we learned how to use ./mvnw spring-boot:build-image and let a Paketo Buildpack assemble our application into a Docker container. We can use something similar to build a native application inside a Docker container.
Just run the following command:
% ./mvnw -Pnative spring-boot:build-imageThis combines the previous chapter’s spring-boot:build-image command with the native Maven profile.
This process may take even longer than building the native application locally, but the benefit is that, when completed, you will have a fully baked Docker container with a native application in it.
As discussed in the previous chapter, you now have multiple options for running it on your local machine, pushing it to your cloud provider, or releasing the application to Docker Hub.
Warning!
At the time of writing, M1 Macs do NOT support this option! If you invoke ./mvnw -Pnative spring-boot:build-image, it will start the process, but at a certain stage, it will simply hang and never go forward. To stop the process, you MUST go into Docker Desktop and kill the Paketo Buildpack that is being used to perform this task. There are overrides to spring-boot-maven-plugin that let you plug in alternative Buildpack configurations. If you are native to spring-boot-starter-parent, look at its pom.xml file from inside your IDE and look for that native profile – you’ll see how they configure that plugin with a builder.
Having done all this, there might some lingering confusion out there.
Spring Boot 3.0 versus Spring Boot 2.7 and Spring Native
You may have heard of Spring Native. There have been a lot of blog articles about it. You can even find videos on YouTube talking about using Spring Native (even on my channel!). But as you may have noticed, we haven’t mentioned Spring Native until now.
Spring Native was an experimental bridge project built for Spring Boot 2.7. The bits that are in Spring Native have been made first-class citizens in Spring Boot 3 and Spring Framework 6. There is nothing that must be added to your project to compile it into native mode.
We did add GraalVM Native Support from start.spring.io, but that was to provide additional support to spring-boot-maven-plugin. This brought in hibernate-enhance-maven-plugin to help ensure we were building ALL the needed metadata to work properly with GraalVM.
But all the AOT processing and metadata management used to make native applications work is in the latest version of the Spring portfolio.
GraalVM and other libraries
The Spring portfolio is being fitted to support GraalVM. Most of their projects support it. But that doesn’t mean every third-party library we pick up is supported (yet). As stated in Spring Boot’s reference documentation, “GraalVM native images are an evolving technology and not all libraries provide support.”
The Spring team is working diligently to not only ensure ALL of their modules eventually support native images, but they are also working directly with the GraalVM team to ensure GraalVM itself works properly.
Stay tuned to spring.io/blog for future posts concerning improvements for native images.
Summary
In this chapter, we learned how to build native images using GraalVM. This is a faster, more efficient version of our application than we could ever build using the standard JVM. We also learned how to bake native images into a Docker container using Paketo Buildpacks.
In the next chapter, we’ll learn how to make Spring Boot apps even more efficient by dipping our toes in the waters of reactive programming.