
2
Creating a Web Application with Spring Boot
In Chapter 1, Core Features of Spring Boot, we learned about how Spring Boot comes with several powerful features including, autoconfiguration, starters, and configuration properties. Combined with managed dependencies, it becomes easy to upgrade to supported versions of Spring portfolio components as well as third-party libraries.
With the help of start.spring.io, we’ll learn the basics of creating a web application using Spring Boot. This is vital because the following chapters of this book will build upon this foundation. Since the majority of application development today is focused on web applications, learning how Spring Boot streamlines the whole process will open the door to building apps for years to come!
In this chapter, we’ll cover the following topics:
- Using start.spring.io to build apps
- Creating a Spring MVC web controller
- Using start.spring.io to augment an existing project
- Leveraging templates to create content
- Creating JSON-based APIs
- Hooking in Node.js to a Spring Boot web app
Where to find this chapter’s code
The code for this chapter is available at https://github.com/PacktPublishing/Learning-Spring-Boot-3.0/tree/main/ch2.
Using start.spring.io to build apps
The world is littered with different web stacks and toolkits for building web applications and they all come with hooks and modules to tie into various build systems.
But none had the trend-setting notion to help us put together a barebones application directly.
In the past, before Spring Boot entered the scene, we would do one of the following actions to start off a new project:
- Option 1: Comb through stackoverflow.com, looking for a sample Maven build file
- Option 2: Dig through reference documentation, piecing together fragments of build XML, hoping they would work
- Option 3: Search various blog sites authored by renowned experts, praying one of their articles contains build details
Oftentimes, we had to contend with out-of-date modules. We may have attempted to apply a configuration option that no longer existed or did not do whatever we needed it to do.
As part of the emergence of Spring Boot came a related website (maintained by the Spring team): Spring Initializr (start.spring.io).
start.spring.io comes with the following key features:
- We can select the version of Spring Boot we wish to use
- We can choose our preferred build tool (Maven or Gradle)
- We can enter our project’s coordinates (artifact, group, description, and so on)
- We can select which version of Java our project will be built on
- We can choose the various modules (Spring and third-party) to use in our project
We will start by selecting the build tool, language, and version of Spring Boot we wish to use:
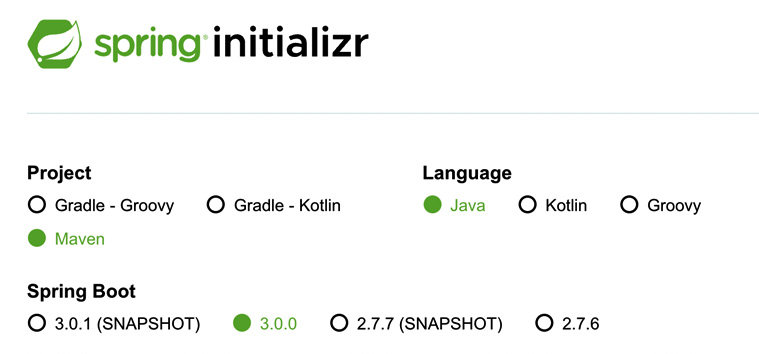
Figure 2.1 – Selecting a build system (Maven), language (Java), and version of Spring Boot
In the preceding screenshot, it’s important to point out that we have multiple options. We can choose Maven or Gradle for our build system and choose between three languages: Java, Kotlin, or Groovy. For this book, we’ll stick with Java. But if you or your team wants to leverage the power of Kotlin, you can choose that and get all the right plugins wired into your project to do that.
Spring Initializr also lets us select which version of Spring Boot we wish to use. It’s important to point out, that there are subtle differences in the project based on which version we choose, but for this book, we will select 3.0.0. But we don’t have to worry about any of that.
It’s also nice to know that the website dynamically updates itself when new versions of Spring Boot are released!
After selecting our build system, language, and version of Spring Boot, we need to dial in our project details further down on the page:
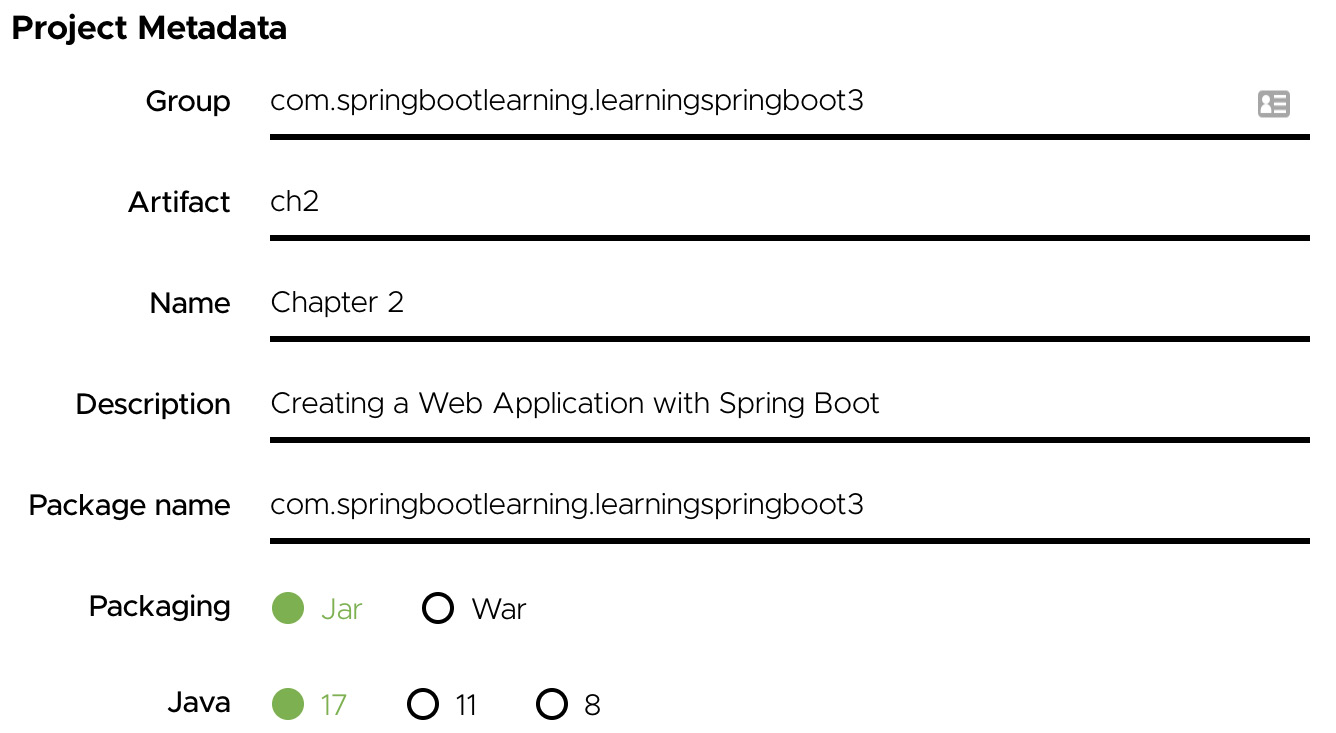
Figure 2.2 – Selecting the project coordinates, packaging (JAR), and version of Java (17)
Unless there is some critical reason to select the War files (supporting a specific application server or some other legacy reason), it’s best to choose the Jar files as the packaging mechanism of choice.
Why?
WAR files are specific to application servers. Unless you are leveraging one, there is little benefit in using them. JAR files have first-class support from the Spring Boot team, and as we’ll see further on in this chapter, they have some keen advantages.
We are also choosing Java 17 for this book. Java 17 is the minimum version required for Spring Framework 6, the version underpinning Spring Boot 3. In fact, Java 17 is the default option chosen by Spring Initialzr.
The core feature that makes Spring Initializr so nice is that it gives us the ability to select all the modules we wish to include in our project. To do this, go to the Dependencies section.
Click on ADD DEPENDENCIES; we should be presented with a filter box. Enter web and notice how Spring Web rises to the top of the list.

Figure 2.3 – Adding Spring Web to the project
Hit the Return key and see it nicely added to our list.
Amazingly, this is enough to get underway with creating web controllers!
Click on the GENERATE button at the bottom of the screen.

Figure 2.4 – The GENERATE button, which generates a complete project
Clicking on the preceding button will prompt the download of a ZIP file containing an empty project with a build file containing all our settings for our project.
Unzip the project’s ZIP file and open it up inside our favorite IDE, and we can start writing some web controllers!
Tip
It doesn’t really matter what IDE you use. As mentioned at the beginning of Chapter 1, Core Features of Spring Boot, IntelliJ IDEA, Microsoft’s VS Code, and Spring Tool Suite all come with support for Spring Boot. Whether it’s baked in by default or through the installation of a plugin, you can engage with Spring Boot projects with ease.
With our pre-baked application ready to go, we’ll take the first steps toward building a web application in the next section.
Creating a Spring MVC web controller
Assuming we have unzipped that ZIP file from the Spring Initializr and imported it into our IDE, we can immediately start writing a web controller.
But for starters, what is a web controller?
Web controllers are bits of code that respond to HTTP requests. These can comprise an HTTP GET / request that is asking for the root URL. Most websites respond with some HTML. But web controllers can also answer requests for APIs that yield JavaScript Object Notation (JSON), such as HTTP GET /api/videos. Furthermore, web controllers do the heavy lifting of transporting provided JSON when the user is affecting change with an HTTP POST.
The piece of the Spring portfolio that affords us the ability to write web controllers is Spring MVC. Spring MVC is Spring Framework’s module that lets us build web apps on top of servlet-based containers using the Model-View-Controller (MVC) paradigm.
Yes, the application we are building is Spring Boot. But having picked Spring Web in the previous section, we will put the tried and true Spring MVC on our classpath.
In fact, if we peek at the pom.xml file at the root of the project, we’ll find one critical dependency:
<dependency>
  <groupId>org.springframework.boot</groupId>
  <artifactId>spring-boot-starter-web</artifactId>
</dependency>
This is one of those starters mentioned in the previous chapter, in the Adding portfolio components with Spring Boot starters section. This dependency puts Spring MVC on our project’s classpath. This gives us access to Spring MVC’s annotations and other components, allowing us to define web controllers. Its mere presence will trigger Spring Boot’s autoconfiguration settings to activate any web controller we create.
There are some other goodies as well, which we’ll explore later in this chapter.
Before creating a new controller, it’s important to notice that the project already has a base package created per our settings: com.springbootlearning.learningspringboot3.
Let’s kick things off by creating a new class inside this package and call it HomeController. From there, write the following code:
@Controller
public class HomeController {
  @GetMapping("/")
  public String index() {
  return "index";
  }
}
This code can be described as follows:
- @Controller: Spring MVC’s annotation to communicate that this class is a web controller. When the application starts, Spring Boot will automatically detect this class through component scanning and will create an instance.
- @GetMapping: Spring MVC’s annotation to map HTTP GET / calls to this method.
- index: Because we used the @Controller annotation, index turns out to be the name of the template we wish to render.
The name of the class and the name of the method aren’t critical. They can really be anything. The critical parts are the annotations. @Controller signals this class is a web controller, and @GetMapping indicates that the GET / calls are to be routed to this method.
Tip
It’s good to use class and method names that provide semantic value to us so we can maintain things. In this respect, this (the preceding code snippet) is the controller for the home path of the site we are building.
We mentioned that index is the name of the template to render. However, do you remember picking a template engine? That’s right, we didn’t. In the next section, we’ll see how to add a templating engine to our application and use it to start building HTML content.
Using start.spring.io to augment an existing project
What if we already started a project and have been working hard on it for the past six months? Creating a brand-new project makes no sense, right?
So, what can we do?
It’s possible to pick up an already existing project and make alterations using start.spring.io.
We started this chapter with nothing but Spring Web. While we could get pretty far with this, it’s not quite enough. While we can write HTML by hand, in this day and age it’s easier to use template engines to do that for us. Since we are looking for something lightweight, let’s pick Mustache (mustache.github.io).
If this is appearing a tad contrived, that is because it is. If you’re starting a new web project, it makes sense to pick a templating engine at the same time that you choose Spring Web. Nevertheless, this tactic of adding additional modules to existing projects still works.
The best way to augment an existing project is to revisit the Spring Initializr site and punch in all our various settings as well as pick the modules we need (especially the new ones we wish to add to our existing project).
Assuming we entered in the same settings we did earlier in this chapter, we just need to click the DEPENDENCIES button and enter mustache, as shown in the following screenshot:
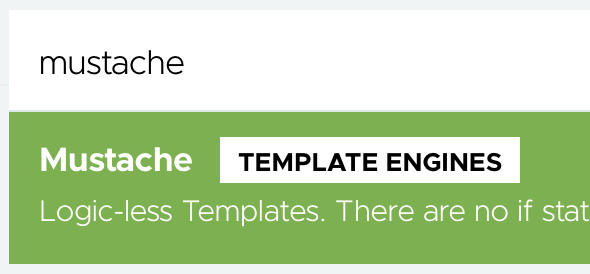
Figure 2.5 – Adding Mustache, a logic-less template language
Hit the Return key and add it to the list.
The secret to updating our in-flight project is clicking on the EXPLORE button at the bottom of the page instead of the GENERATE button we hit earlier.

Figure 2.6 – Exploring a Spring Boot project on the website
The EXPLORE button, instead of downloading a ZIP file, lets us view the project we would have gotten right in the browser.
A common tactic is to view the build file: pom.xml in our case. From there, we can copy the fragments we need (or copy and paste the whole thing) and paste them into our existing project.
This makes it easy to ensure our project is up to date with any dependencies, customized modules, or whatever.
In this case, we can find the entry for Mustache, as shown here:
<dependency>
  <groupId>org.springframework.boot</groupId>
  <artifactId>spring-boot-starter-mustache</artifactId>
</dependency>
Another Spring Boot starter to the rescue!
Thankfully, this technique helps us reach the Spring Boot starters without having to dig into the details of looking up the names of starters.
The point is, we can quickly get underway with new projects. We can also go back again and again, adding new modules as needed with complete confidence that we aren’t breaking things.
Now that we have both Spring Web and Mustache baked into our project, it’s time to start creating some real web content, which we’ll do in the next section.
Leveraging templates to create content
We can now switch to writing a Mustache template!
After creating the controller class earlier in this chapter, we don’t have to do much more. Spring Boot’s component scanning feature, as mentioned in Chapter 1, Core Features of Spring Boot, will do all the legwork of instantiating our controller class. Spring Boot’s autoconfiguration will add the extra beans that power Mustache’s templating engine, hooking it into Spring’s infrastructure.
We just need to craft the content that goes inside the template.
By default, Spring Boot expects all templates to be located at src/main/resources/templates.
Tip
Spring Boot has configuration properties for template engines that default to putting all templates inside src/main/resources/templates. Also, each templating engine has a suffix. For Mustache, it’s .mustache. When we return index from a controller method, Spring Boot transforms it into src/main/resources/templates/index.mustache, fetches the file, and then pipes it into the Mustache templating engine. It’s possible to go in and adjust these settings. But it’s frankly easier to just follow the convention.
Create index.mustache inside src/main/resources/templates. Then, add the following code:
<h1>Greetings Learning Spring Boot 3.0 fans!</h1>
<p>
  In this chapter, we are learning how to make
  a web app using Spring Boot 3.0
</p>
This is 100%, bona fide, Use It Anywhere™ HTML5.
To see it in action, we just need to run our application. That’s right, we have a fully armed and operational application already in place.
Inside our IDE, we just need to right-click on the Chapter2Application class that the Spring Initializr created for us and select Run.
Once it’s up, we can surf over to localhost:8080 in our favorite browser and see the results:

Figure 2.7 – A Mustache template rendered with Spring Boot 3
Ta-dah!
What’s that? Not impressed?
Okay, we haven’t hung any dynamic content here. To be honest, it’s boring. A header and a paragraph. Who wants that? Perhaps we should have started with some demo data. This is not hard. The next section will show you how to do this.
Adding demo data to a template
We can tweak the HomeController we just made as follows:
@Controller
public class HomeController {
  record Video(String name) {}
  List<Video> videos = List.of(
    new Video("Need HELP with your SPRING BOOT 3
      App?"),
    new Video("Don't do THIS to your own CODE!"),
    new Video("SECRETS to fix BROKEN CODE!"));
  @GetMapping("/")
  public String index(Model model) {
    model.addAttribute("videos", videos);
    return "index";
  }
}
Java 17 provides several nice features that we’ve used in the preceding bit of code:
- We can define a nice little data Video object as a Java 17 record with a single line of code
- We can assemble an immutable collection of Video objects using List.of()
This makes it super simple to create a batch of test data. As for how this works with the templating engine, continue reading.
Tip
Why do we need to create a Java 17 record to encapsulate a single element of data? Mustache operates on named attributes. We could manually write raw JSON with a name and a value, but it’s simpler using a Java 17 record. Plus, it gives us stronger type safety. This Video type nicely encapsulates the data for our Mustache template.
In order to pass this data on to our template, we need an object that Spring MVC will understand. A holder where we can place data. To do that, we need to add a Model parameter to our index method.
Spring MVC has a handful of optional attributes we can add to any web method. Model is the type we use if we need to hand off data to the templating engine.
The code shown earlier has an attribute named videos and is supplied with List<Video>. With that in place, we can enhance index.mustache to serve it up to the viewers by adding the following code:
<ul>
    {{#videos}}
        <li>{{name}}</li>
    {{/videos}}
</ul>
The preceding code fragment (placed below the <p> tag we created earlier) can be explained as follows:
- {{#videos}}: Mustache’s directive to grab the videos attribute we supplied to the Model object. Because this is a list of data, Mustache will expand this for every entry in the list. It will iterate over each entry of the List<Video> collection stored in Model and create a separate HTML <li> entry.
- {{name}}: Indicates we want the name field of the data construct. This lines up with our Video type’s name field. In other words, for each entry of List<Video>, print out the name field between <li> and </li>.
- {{/videos}}: Indicates the end of the looping fragment.
This chunk of Mustache will yield a single HTML unordered list (<ul>) that contains three list items (<li>), each one with a different Video name entry.
Tip
Mustache works with Java’s getters, so if we had a value type with getName(), it would serve via {{name}}. But Java 17 records don’t generate getters. Instead, the compiler will generate a classfile with name(). Don’t worry, Mustache handles this just fine. Either way, we can use {{name}} in our templates.
If we re-run our application and then visit localhost:8080, we can see this updated template in action:

Figure 2.8 – Web page with an unordered list of video names
From here, there’s no limit to the HTML we can generate. We can even layer in some JavaScript, which is something we’ll tackle later in this chapter.
Building our app with a better design
That last app we built was pretty slick. We rapidly modeled some data and served it up in a lightweight template.
The lingering issue is that the design isn’t very reusable. The second we need another controller, we’ll find ourselves in a tricky situation for the following reasons:
- Controllers shouldn’t be managing data definitions. Since they respond to web calls and then interact with other services and systems, these definitions need to be at a lower level.
- Heavyweight web controllers that also deal with data will make it hard to make adjustments as our web needs evolve. That’s why it’s better if data management is pushed to a lower level.
And so, our first refactoring before continuing forward would be to migrate that Video record to its own class, Video.java, as follows:
record Video(String name) {
}
This is the exact same code we wrote earlier, only moved to its own file.
Note
Why isn’t the Video record marked public? In fact, what visibility does it have? This is Java’s default visibility, and for classes, records, and interfaces, it defaults to package-private. This means that it’s only visible to other code in the same package. It’s not a bad idea to entertain using Java’s default visibility as much as possible and only exposing things outside the package when deemed necessary.
Our next task would be to move that list of Video objects into a separate service. Create a class named VideoService as follows:
@Service
public class VideoService {
  private List<Video> videos = List.of( //
    new Video("Need HELP with your SPRING BOOT 3
      App?"),
    new Video("Don't do THIS to your own CODE!"),
    new Video("SECRETS to fix BROKEN CODE!"));
  public List<Video> getVideos() {
    return videos;
  }
}
VideoService can be explained as follows:
- @Service: Spring Framework’s annotation denoting a class that needs to be picked up during component scanning and added to the application context
- List.of(): The same operation used earlier in this chapter to quickly put together a collection of Video objects
- getVideos(): A utility method to return the current collection of Video objects
Tip
We have touched on Spring Boot’s component scanning functionality briefly in Chapter 1, Core Features of Spring Boot, and earlier in this chapter. This is where it shines. We will create a class and then mark it with one of Spring Framework’s @Component-based annotations, for example, @Service or @Controller, along with several others. When Spring Boot starts up, one of its first jobs is to run its component scanner, seeking out these classes and instantiating copies. These beans are then registered in the application context, ready to be autowired into any other Spring beans that demand it.
To pivot our HomeController to start using this new VideoService class, we just need to make updates as follows:
@Controller
public class HomeController {
  private final VideoService videoService;
  public HomeController(VideoService videoService) {
    this.videoService = videoService;
  }
}
The code we just wrote is quite simple:
- Rip out that List<Video> field and replace it with a private final instance of VideoService
- Populate the new field using constructor injection
Let’s find out what is constructor injection in the next section.
Injecting dependencies through constructor calls
Constructor injection is fancy talk for getting the dependencies a Spring bean needs through the constructor. To expand on this, anytime we create a Java class that is picked up by Spring Boot’s component scanning feature. Spring Boot will check for any injection points, and if it finds any, will look in the application context for beans of matching type…and inject them!
This is known as autowiring. We let Spring handle the issue of finding a Spring bean’s dependencies in the application context and plugging them in for us.
Before the days of Spring Boot, autowiring wasn’t as popular. Some shops loved it, while others avoided it like the plague. What did those who were opposed do instead? They created a class, marked it up with an @Configuration annotation, and created methods using @Bean methods. These methods then returned instances of objects to manually wire into other services, either through the constructor or through its setters.
But with the rise of Spring Boot and its beans generated by autoconfiguration that massively leveraged autowiring; autowiring in turn became agreeable to almost everyone.
The following are three ways that we can inject dependencies into a class:
- Option 1: The class itself can be marked with one of Spring Framework’s @Component annotations (or just @Component itself) such as @Service, @Controller, @RestController, or @Configuration.
- Option 2: The @Autowired Spring Framework annotation marks points to inject dependencies. It can be applied to constructors, setter methods, and fields (even private ones!).
- Option 3: If a class has but one constructor, there is no need to apply the @Autowired annotation. Spring will simply assume it’s to be autowired.
With VideoService injected into HomeController, we can update the index() method as follows:
@GetMapping("/")
public String index(Model model) {
  model.addAttribute("videos", videoService.getVideos());
  return "index";
}
The only change in this method from what we coded earlier in this chapter is invoking videoService in order to get a list of Video objects.
Maybe it felt a bit tedious to make these adjustments to our application, but they will pay off as we continue to flesh things out.
Changing the data through HTML forms
Our web page wouldn’t be very impressive if all it did was display server-side data. To make it more dynamic, it should accept new entries send them to our web controller and then show the updated results.
To do this, again, we go back to our Mustache template and start coding a standard HTML form as follows:
<form action="/new-video" method="post">
    <input type="text" name="name">
    <button type="submit">Submit</button>
</form>
This simple addition to index.mustache can be explained as follows:
- This HTML form will result in a POST /new-video call to our server-side app.
- It has a single text-based input called name.
- This form takes effect when the user clicks on the Submit button.
If you’re wondering where all the Mustache stuff is, there is none. An HTML form is pretty simple. It’s possible to render dynamic content here if needed, but our focus is to get the submission of new data working with a relatively simple scenario.
To make our Spring Boot application respond to POST /new-video, we need to write another controller method to our HomeController as follows:
@PostMapping("/new-video")
public String newVideo(@ModelAttribute Video newVideo) {
  videoService.create(newVideo);
  return "redirect:/";
}
This additional web controller method can be explained as follows:
- @PostMapping("/new-video"): Spring MVC’s annotation to capture POST /new-video calls and route them to this method.
- @ModelAttribute: Spring MVC’s annotation to parse an incoming HTML form and unpack it into a Video object.
- videoService.create(): Not-yet-written method for storing the new video object.
- "redirect:/": Spring MVC directive that sends the browser an HTTP 302 Found to URL /. A 302 redirect is the standard for a soft redirect. (301 is a permanent redirect, instructing the browser to not try the original path again.)
This additional web controller method now demands that we augment our VideoService with the means to add more Video objects.
It’s important to recognize that so far, we’ve been using Java 17’s List.of() operator to build our collection of videos, which produces an immutable list. This immutable list honors Java’s List interface, giving us access to an add() method. If we try to use it, it will only generate an UnsupportedOperationException.
No, we need to take a couple of extra steps if we are going to mutate this immutable collection.
The recipe for adding to an immutable anything is to create a new immutable instance out of the original contents combined with new contents. This is where we can take advantage of more familiar List-based APIs:
public Video create(Video newVideo) {
  List<Video> extend = new ArrayList<>(videos);
  extend.add(newVideo);
  this.videos = List.copyOf(extend);
  return newVideo;
}
This addition to our VideoService can be explained as follows:
- The signature of the method calls for a new video and then returns that same one back (common behavior for a repository-style service).
- new ArrayList<>(): creates a new ArrayList, a mutable collection, using its List-based constructor. This new collection initializes with the proper size and then copies every entry into the new ArrayList.
- This ArrayList does have a usable add() method that allows us to add our new Video object onto the end.
- Java 17 provides a copyOf() operator that takes any existing List and copies all of its elements into a new immutable list.
- Finally, we return the new Video object.
It’s important to point out that while it took us a couple of extra steps, the preceding code ensures that no existing copy of data will be accidentally mutated by invoking a method. Side effects are prevented by doing this, ensuring a consistent state is maintained.
Note
While this data may be consistent thanks to using immutable lists, it is by no means thread-safe. If multiple POST calls were made to the endpoint we just defined, they would all attempt to update the same VideoService, probably resulting in some form of a race condition that could cause loss of data. Given the fact that there are entire books written about solving such problems, we aren’t going to focus on making our code bulletproof in this one.
With these changes in place, we can re-run our application and check out our enhanced UI:
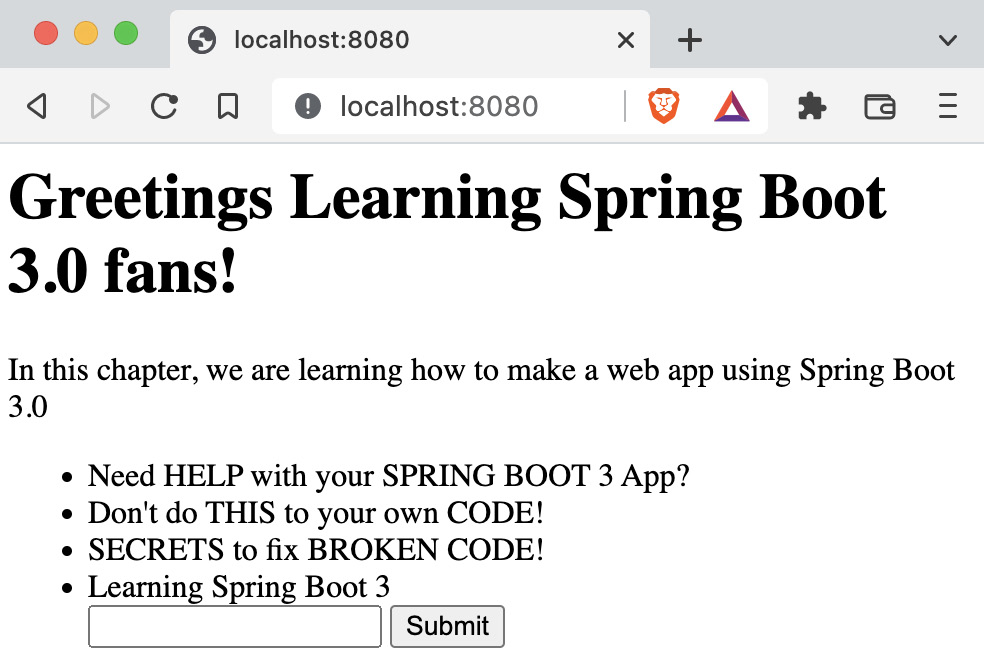
Figure 2.9 – Mustache template with an HTML form
If we were to enter Learning Spring Boot 3 in the input and click Submit, the controller will issue a redirect back to /. The browser will navigate back to the root path, causing it to fetch the data and render it with our latest Video.
Further reading
Perhaps you wish to learn more about Mustache and how it interacts with Spring Boot? Check out Dave Syer’s article The Joy of Mustache: Server Side Templates for the JVM (https://springbootlearning.com/mustache) where he goes into detail about integrating Spring Boot with Mustache, including ways to have a consistent layout and even code custom Mustache lambda functions.
With that, we have a functional web page that serves up dynamic content that also lets us add more content. But this is by no means complete. We should investigate adding support for building web-based APIs in the next section.
Creating JSON-based APIs
A key ingredient in building any web application is the ability to provide an API. In the olden days, this was complex and hard to ensure compatibility.
In this day and age, the world has mostly converged on a handful of formats, many based on JSON-based structures.
One of the powerful features of Spring Boot is that when you add Spring Web to a project, as we did at the beginning of this chapter, it adds Jackson to the classpath. Jackson is a JSON serialization/deserialization library that has been widely adopted by the Java community.
Jackson’s ability to let us define how to translate Java classes back and forth with our preferred flavor of JSON combined with Spring Boot’s ability to autoconfigure things means that we don’t have to lift another finger of setup to start coding an API.
To start things off, we create a new class in the same package we’ve been using throughout this chapter. Call it ApiController. At the top, apply the @RestController annotation.
@RestController is similar to the @Controller annotation we used earlier. It signals to Spring Boot that this class should be automatically picked up for component scanning as a Spring bean. This bean will be registered in the application context and also with Spring MVC as a controller class so it can route web calls.
But it has one additional property—it switches every web method from being template-based to JSON-based. In other words, instead of a web method returning the name of a template that Spring MVC renders through a templating engine, it instead serializes the results using Jackson.
Look at the following code:
@RestController
public class ApiController {
  private final VideoService videoService;
  public ApiController(VideoService videoService) {
    this.videoService = videoService;
  }
  @GetMapping("/api/videos")
  public List<Video> all() {
    return videoService.getVideos();
  }
}
We can describe the preceding code in detail as follows:
- We already mentioned how the @RestController annotation marks this as a Spring MVC controller that returns JSON
- Using constructor injection, we will automatically get a copy of the same VideoService we created earlier in this chapter
- @GetMapping responds to HTTP GET calls from /api/videos
- This web method will fetch that list of Video records and return them, causing them to get rendered into a JSON array by Jackson
In fact, if we run the application right now and curl that endpoint, we can see the following results:
[
    {
        "name": "Need HELP with your SPRING BOOT 3 App?"
    },
    {
        "name": "Don't do THIS to your own CODE!"
    },
    {
        "name": "SECRETS to fix BROKEN CODE!"
    }
]
This barebones JSON array contains three entries, one for each of our Video records. And since the Video record only has one attribute, name, this is exactly what Jackson yields.
There is no need to configure anything to make Jackson start producing.
Of course, an API that does nothing but produce JSON isn’t much of an API at all. Naturally, we need to consume JSON as well.
To do that, we need to create a web method in our ApiController class that will respond to HTTP POST calls.
POST versus PUT versus everything else
There are several standard HTTP verbs at our disposal. The most common ones are GET, POST, PUT, and DELETE. There are actually others, but we won’t be needing them here. It’s important to understand that GET calls are expected to do nothing but return data. They are not meant to cause state changes on the server, which is also known as idempotent. POST calls are what are used to introduce new data to the system. This is analogous to inserting a new row of data into a relational database table.
PUT is similar to POST in that it’s used for making changes, but it’s better described as updating existing records. It’s possible to also update a non-existent record, but this depends on how things have been set up on the server. Finally, DELETE is used to remove something from the server.
It is somewhat common behavior, although not a required standard, that any updates to the system should return to the person or system making the request, a copy of the new or deleted entry.
Add the following code to the ApiController class, right below the all() method:
@PostMapping("/api/videos")
public Video newVideo(@RequestBody Video newVideo) {
  return videoService.create(newVideo);
}
The preceding code can be described as follows:
- @PostMapping: Maps HTTP POST calls to /api/videos onto this method
- @RequestBody: Spring MVC’s annotation to signal that the incoming HTTP request body should be deserialized via Jackson into the newVideo argument as a Video record
- We then delegate the actual handling of this incoming Video record to our VideoService, returning back the record after it’s been added to the system
We already coded this create() operation earlier in this chapter, so there’s no need to go back into it.
Tip
Earlier in the section, we said “curl that endpoint” and saw a chunk of JSON printed out. curl (https://curl.se/) is a popular command-line tool that lets you interact with web APIs. In fact, this summary probably doesn’t do the tool justice. Suffice it to say, you probably want to install it on your system.
With our new addition to our API controller, we can interact with it from the command line as follows:
$ curl -v -X POST localhost:8080/api/videos -d '{"name": "Learning Spring Boot 3"}' -H 'Content-type:application/json'The preceding command can be described as follows:
- -v: Asks for curl to produce verbose output, providing extensive details about the whole interaction.
- -X POST: Signals it to use HTTP POST instead of the default GET call.
- localhost:8080/api/video: Provides the URL to direct the command.
- -d '{…}': Provides the data. Since the fields in JSON are delimited with double quotes, the entire JSON document is handed to curl using single quotes.
- -H 'Content-type:application/json': Provides the HTTP header that alerts the web app that this is a JSON-formatted request body.
The results of the command are as follows:
* Connected to localhost (::1) port 8080 (#0)
> POST /api/videos HTTP/1.1
> Host: localhost:8080
> User-Agent: curl/7.64.1
> Accept: */*
> Content-type:application/json
> Content-Length: 34
>
* upload completely sent off: 34 out of 34 bytes
< HTTP/1.1 200
< Content-Type: application/json
{"name":"Learning Spring Boot 3"}
The preceding output response shows the following:
- The command is shown toward the top including the HTTP verb, the URL, and the headers (User-Agent, Accept, Content-type, and Content-Length)
- The response is shown toward the bottom including an HTTP 200 success status code
- The response is denoted as application/json
- The actual response body contains the JSON-formatted new Video entry we created
Our method worked!
We can further verify this by re-pinging the /api/videos endpoint and looking for our latest addition:
$ curl localhost:8080/api/videos
[
    {"name":"Need HELP with your SPRING BOOT 3 App?"},
    {"name":"Don't do THIS to your own CODE!"},
    {"name":"SECRETS to fix BROKEN CODE!"},
    {"name":"Learning Spring Boot 3"}
]
The preceding code shows our latest entry at the bottom.
What do we have now? We have a web application with two key facets: a template-based version rendered in the browser for humans to read and a JSON-based version consumable by third parties.
With all this in place, we are finally able to write a little JavaScript!
Hooking in Node.js to a Spring Boot web app
So, do we need our web app to use JavaScript? To be honest, what web app doesn’t need JavaScript? It’s only the de facto standard tool found in every web browser on the planet.
In case you didn’t know it, JavaScript is a completely different world when it comes to tools and app building. So, how do we cross this vast gulf between Java and JavaScript developer tooling?
In a nutshell, we need to enter the world of Node.js. And to our fortune, there is a Maven plugin that can bridge this gap for us, known as the Maven frontend plugin (frontend-maven-plugin).
This plugin unites Node.js actions with Maven’s lifecycles, allowing us to properly invoke Node.js at the right time to download packages and assemble JavaScript code into a bundle.
Of course, compiling and bundling a JavaScript payload is for naught if there was no way for Spring Boot to bring it online.
Thankfully, Spring Boot has a solution. Anything found in src/main/resources/static is automatically picked up and will be put on the base path of our web application when fully assembled. This means we simply need to direct our Node.js bundling tool to drop its final results there.
If this is starting to sound confusing…well it is. Or at least it can be. So, let’s take things one step at a time, starting with the frontend-maven-plugin. If we open up the pom.xml file created by start.spring.io, there should be an entry about two-thirds of the way down called <plugins>. It should already have an entry for spring-boot-maven-plugin.
Right below spring-boot-maven-plugin, add another <plugin> entry as follows:
<plugin>
  <groupId>com.github.eirslett</groupId>
  <artifactId>frontend-maven-plugin</artifactId>
  <version>1.12.1</version>
  <executions>
    <execution>
      <goals>
         <goal>install-node-and-npm</goal>
      </goals>
    </execution>
  </executions>
  <configuration>
    <nodeVersion>v16.14.2</nodeVersion>
  </configuration>
</plugin>
This addition to our pom.xml build file can be explained as follows:
- We’ve added the coordinates for the latest version of frontend-maven-plugin (at the time of writing)
- Right now, it has one execution, install-node-and-npm. This command will download Node.js and its package manager npm
- In the configuration section toward the bottom, it specifies the latest long-term support (LTS) version of Node.js
This plugin does its thing during Maven’s generate-resources phase. You can see it right away with the following output shown in the console:
$ ./mvnw generate-resources
[INFO] --- frontend-maven-plugin:1.12.1:install-node-and-npm (default) @ ch2 ---
[INFO] Installing node version v16.14.2
[INFO] Downloading https://nodejs.org/dist/v16.14.2/node-v16.14.2-darwin-x64.tar.gz to /Users/gturnquist/.m2/repository/com/github/eirslett/node/16.14.2/node-16.14.2-darwin-x64.tar.gz
[INFO] Unpacking /Users/gturnquist/.m2/repository/com/github/eirslett/node/16.14.2/node-16.14.2-darwin-x64.tar.gz into /Users/gturnquist/src/learning-spring-boot-3rd-edition-code/ch2/node/tmp
[INFO] Copying node binary from /Users/gturnquist/src/learning-spring-boot-3rd-edition-code/ch2/node/tmp/node-v16.14.2-darwin-x64/bin/node to /Users/gturnquist/src/learning-spring-boot-3rd-edition-code/ch2/node/node
[INFO] Extracting NPM
[INFO] Installed node locally.
It should be pointed out that the frontend-maven-plugin actually downloads and unpacks Node.js, npm, and node package execute (npx) in our project’s root directory underneath the node folder.
Tip
Node.js and all its tools and modules can be considered intermediate build artifacts. There’s no need to commit them to version control. So, be sure to add the node folder as well as the intermediate node_modules folder to your list of items to not commit (for example, add node and node_modules to the project’s .gitignore file).
With this plugin in place, we are ready to embrace the world of JavaScript in the next section.
Bundling JavaScript with Node.js
At this point, we have the tooling. But no actual modules.
To start adding modules, we’ll use npm. And the first thing we must do is pick a Node.js package bundler. There are many to pick from, but let’s pick Parcel by typing the following command:
% node/npm install --save-dev parcelThis will use the locally installed copy of Node.js and its npm command to create a package.json file. The –save-dev option signals that this is a development module, and not a package used by our app.
Now that we have a package.json file created for our project, we need to hook it into the frontend-maven-plugin. To do that, we need to add another <execution> entry as follows:
<execution>
  <id>npm install</id>
  <goals>
    <goal>npm</goal>
  </goals>
</execution>
This additional fragment will configure the frontend-maven-plugin to run npm install, the command that will build our JavaScript bundle.
Now so far, we don’t have much in packages. Just the Parcel build tool. Before we start adding JavaScript modules, we should probably configure it to build things properly. Edit the package.json that npm just created as shown here so that Parcel will assemble an ES6 module for us:
{
    …
    "source": "src/main/javascript/index.js",
    "targets": {
      "default": {
        "distDir": "target/classes/static"
      }
    },
    …
}
This addition to package.json will cause the following to happen:
- Source: Points at a yet-to-be-written index.js JavaScript file. This will be our entry point for our JavaScript app. As far as Parcel is concerned, it doesn’t really matter where this file is. Since we’re using a Maven-based project, we can use src/main/javascript.
- As for the target destination, we can configure the default target with a distDir setting of target/classes/static. Parcel supports building multiple targets such as different browsers, but we don’t need that. A single, default destination will do. By putting the results in the target folder, anytime we run a Maven clean cycle, this compiled bundle will be cleaned out.
While npm is Node.js' tool for downloading and installing packages, npx is Node.js’ tool for running commands. By adding another <execution> entry to the frontend-maven-plugin, we can have it run Parcel’s build command:
<execution>
  <id>npx run</id>
  <goals>
    <goal>npx</goal>
  </goals>
  <phase>generate-resources</phase>
  <configuration>
    <arguments>parcel build</arguments>
  </configuration>
</execution>
This extra step runs npx parcel build after the npm install command is run, ensuring Parcel does its build step.
With all this, we can start installing some Node packages to build a sophisticated frontend in the next section.
Creating a React.js app
There are so many ways to build JavaScript apps these days and they all have their own features and benefits. For illustrative purposes, we’ll use React.js, Facebook’s toolkit for app building.
Type the following command:
node/npm install --save react react-domThe preceding command will update package.json with the react and react-dom modules. Now, we can start writing some JavaScript!
Create index.js inside src/main/javascript as follows:
import ReactDOM from "react-dom"
import { App } from "./App"
const app = document.getElementById("app")
ReactDOM.render(<App />, app)
This is our entry point, as shown earlier in package.json:
- The first line imports ReactDOM, a key module needed to launch React
- The second line imports the custom UI we’ll build further down in this section
- The third line uses vanilla JavaScript to find the element on the web page with id="app" where we can “hang” our app
- The fourth line actually renders the <App/> component in our soon-to-be-coded app using ReactDOM
React operates with a top-down perspective. You render a top-level component, and then that component, in turn, renders components nested further down.
It also uses a shadow document object model (DOM) where we don’t specify the actual nodes to render, but instead use virtual nodes. React computes the changes from whatever the current state is and generates the changes.
To continue building this application, we need to create App.js in src/main/javascript as follows:
import React from 'react'
import ListOfVideos from './ListOfVideos'
import NewVideo from "./NewVideo"
export function App() {
    return (
        <div>
            <ListOfVideos/>
            <NewVideo/>
        </div>
     )
}
The preceding chunk of JavaScript has some key parts:
- We import React to build components.
- The local bits of JavaScript that we will write after this includes a list of videos (ListOfVideos.js) and from for creating new videos (NewVideo.js).
From here, we have a single function, App(), exported publicly. Because it returns some HTML-styled elements, this signals to Parcel that we’re working with JavaScript XML (JSX), which contains some more React components to render.
React and JSX
React introduces a concept called JSX, where we can combine unique HTML elements with JavaScript code. In the past, we were told that mixing HTML and JavaScript was bad. But in truth, when laying out a UI that ties together functions, JSX provides an excellent blend. Instead of using tricky functions to layer JavaScript on top of HTML, React works by allowing us to build up tiny bits of HTML combined cohesively with functions that support their operation. Combined with its internal state management, React has become quite popular among many for building web apps.
The first thing to replicate from our earlier template is listing all the videos from the backend. To generate the same HTML unordered list in React, create ListOfVideos.js in src/main/javascript as follows:
import React from "react"
class ListOfVideos extends React.Component {
    constructor(props) {
        super(props)
        this.state = {data: []}
    }
    async componentDidMount() {
        let json = await fetch("/api/videos").json()
        this.setState({data: json})
    }
    render() {
        return (
            <ul>
                {this.state.data.map(item =>
                    <li>
                        {item.name}
                    </li>)}
            </ul>
        )
    }
}
export default ListOfVideos
The preceding React component can be described as follows:
- This code uses ES6 classes that extend React.Component.
- Its constructor creates a state field to maintain an internal state.
- componentDidMount() is the function called by React right after this component is inserted into the DOM and rendered. It uses vanilla JavaScript’s fetch() function to retrieve data from the JSON API we created earlier in this chapter. Because that function returns a promise, we can use the ES6 await function to wait for results and then update the internal state using React.Component’s setState(). For this method to work with the rest of things properly, we must mark it async. It’s also important to understand that anytime setState() is invoked, React will re-render the component.
- The sizzle is in the render() method where we actually lay out HTML elements (or more React components). This code uses the internal state and maps over the array of data, converting each piece of JSON into an HTML line item. No elements? No line items!
In the preceding chunk of code, we mentioned both properties and state. Properties typically comprise information injected into a React component from the outside. State is maintained within. It’s possible to initialize the state from properties, or as shown in this code, the component itself can fetch the data stored in the state.
What’s important to clarify, is that properties are typically considered immutable within the React component that has them injected. State is meant to evolve and change, in turn driving our rendered elements.
Our React app wouldn’t be much if we couldn’t create new entries. So, let’s create a new component that duplicates the HTML form we created earlier in this chapter in the Changing the data through HTML forms section!
Create NewVideo.js as shown here in src/main/javascript:
import React from "react"
class NewVideo extends React.Component {
    constructor(props) {
        super(props)
        this.state = {name: ""}
        this.handleChange = this.handleChange.bind(this);
        this.handleSubmit = this.handleSubmit.bind(this);
    }
    handleChange(event) {
        this.setState({name: event.target.value})
    }
    async handleSubmit(event) {
        event.preventDefault()
        await fetch("/api/videos", {
            method: "POST",
            headers: {
                "Content-type":
                    "application/json"
            },
            body: JSON.stringify({name: this.state.name})
        }).then(response =>
            window.location.href = "/react")
    }
    render() {
        return (
            <form onSubmit={this.handleSubmit}>
                <input type="text"
                       value={this.state.name}
                       onChange={this.handleChange}/>
                <button type="submit">Submit</button>
            </form>
        )
    }
}
export default NewVideo
This React component has some of the same bits as the other one, such as the import statement as well as a JavaScript class extending React.Component. But it contains some different parts, which are as follows:
- It has the handleChange and handleSubmit functions, both bound to the component. This ensures that this will properly reference the component upon invocation.
- The handleChange function is invoked anytime the field on the form is altered. It updates the component’s internal state.
- The handleSubmit function is invoked when the button is clicked. It disables standard JavaScript bubble-up behavior. Instead of button click events trickling up through the stack, it’s handled right here, invoking a vanilla JavaScript fetch() to affect a POST call on the /api/videos endpoint created earlier in the Creating JSON-based APIs section of this chapter.
- The render() function creates an HTML form element with the onSubmit() event tied to the handleSubmit function and the onChange event tied to the handleChange function.
Another aspect of this code is the async/await modifiers used on the handleSubmit function. Some JavaScript functions return standard promises (https://promisesaplus.com/), such as its built-in fetch function. To ease the usage of these APIs (and save us from using third-party libraries), ES6 introduced the await keyword, allowing us to indicate we wish to wait for the results. To support this, we must flag the function itself as async.
To load up the React app we’ve laid out, we need a separate Mustache template. Create react.mustache inside src/main/resources/templates and include the following elements:
<div id="app"></div>
<script type="module" src="index.js"></script>
The preceding code contains two critical aspects:
- <div id="app"/> is the element that the React component <App /> will be rendered at per the document.getElementById("app") from earlier in this section.
- The <script> tag will load our app through the index.js bundle Parcel will build. The type="module" argument indicates it’s an ES6 module.
The rest of react.mustache can have the same header and paragraph as our other template has.
To serve up our React app, we need a separate web controller method to HomeController, as shown here:
@GetMapping("/react")
public String react() {
  return "react";
}
This will serve the react Mustache template when the user requests GET /react.
With all this effort, perhaps you’re wondering if it was worth it. After all, we simply duplicated the content of a template. It took considerably more effort. If that was all we did, it’s true. This is too much effort.
But React really kicks in when we need to design a much more complex UI. For example, if we needed various components to optionally render or needed different types of components to appear, all driven by the internal state of things, that’s where React begins to shine.
As stated earlier in this section, React also has the shadow DOM. We don’t have to focus on the somewhat outdated concept of finding parts of the DOM and manually updating them. Instead, with React, we push out a set of HTML components. Then, as the internal state updates, the components are re-rendered. React simply computes the changes on real DOM elements and automatically updates itself. We don’t have to handle that.
But enough about React. The focus of this section was to illustrate how to merge JavaScript into a Spring Boot web application. These techniques of setting up Node.js, installing packages, and utilizing a build tool work, irrespective of whether we’re using React, Angular, Vue.js, or whatever.
If we have static components, be they JavaScript or CSS, we can put them into our src/main/resources/static folder. If they are generated, such as a compiled and bundled JavaScript module, we’ve seen how to route that output to target/classes/static.
In short, we’ve managed to connect the powerful world of Node.js and JavaScript with the land of Spring Boot and Java.
Summary
In this chapter, we used start.spring.io to create a barebones web application. We injected some demo data using a service. We create a web controller that uses Mustache to render dynamic content based on the demo data.
Then, we created a JSON-based API allowing third-party apps to interact with our web app, whether it’s to retrieve data or send in updates.
Finally, we leveraged Node.js to introduce some JavaScript to our web app using a Maven plugin.
Building web controllers, serving up templates, rendering JSON-based APIs, and serving up JavaScript apps is a valuable skill on just about any project.
In the next chapter, Querying for Data with Spring Boot, we will dig into creating and managing real data using Spring Data and the amazing power Spring Boot brings us.