
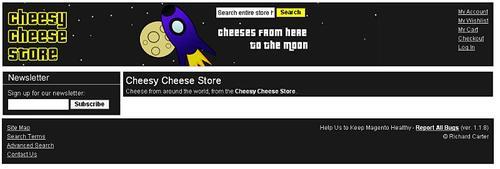
We already have a two-column layout for the Cheesy Cheese Store, but what if we wanted the column displayed to the left, rather than the right of the content? Currently, the Cheesy Cheese Store has a column on the righthand side, which contains the shopping cart and recently viewed products:

To change the column from the right to the lefthand side of our store, we need to locate the catalog.xml file in the app/design/frontend/default/blank/layout/ directory of our Magento store's installation.
Once the file has been opened, locate the opening <default> XML tag, which is the handle that identifies that the changes made to the layout here will impact upon most of the other pages in your Magento store. You should find the XML below nested within the <default> tag:
<default>
<reference name="top.menu">
<block type="catalog/navigation" name="catalog.topnav" template="catalog/navigation/top.phtml"/>
</reference>
<reference name="left">
<!--<block type="core/template" name="left.permanent.callout" template="callouts/left_col.phtml">
<action method="setImgSrc">
<src>images/media/col_left_callout.jpg</src>
</action>
<action method="setImgAlt" translate="alt" module="catalog">
<alt>Our customer service is available 24/7. Call us at (800) DEMO-NUMBER.</alt>
</action>
<action method="setLinkUrl">
<url>checkout/cart</url>
</action>
</block>-->
</reference>
<reference name="left">
<block type="core/template" before="cart_sidebar" name="catalog.compare.sidebar" template="catalog/product/compare/sidebar.phtml"/>
<!--<block type="core/template" name="right.permanent.callout" template="callouts/right_col.phtml"/>-->
</reference>
<reference name="footer_links">
<action method="addLink" translate="label title" module="catalog" ifconfig="catalog/seo/site_map">
<label>Site Map</label>
<url helper="catalog/map/getCategoryUrl" />
<title>Site Map</title>
</action>
</reference>
</default>
We can tell Magento to use the left-hand column layout, by adding the code highlighted below in to the XML file:
<default>
<reference name="root">
<action method="setTemplate"><template>page/2columns- left.phtml</template></action>
</reference>
<!-- more layout omitted -->
</default>
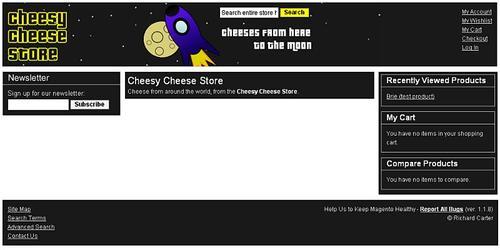
After uploading the new layout file, we'll be able to see that our column's content is now displayed on the left, rather than the right of the primary content:
Notice the callout template, which is highlighted above, is not displayed on the page, as we hid the callouts in our store earlier on.
Tip
Changes not showing up—Disable Magento's cache
If you cannot see your changes after refreshing the page, don't forget to disable Magento's cache in your administration panel, under System | Cache Management. You will probably want to re-enable Magento's cache once your store is ready to "go live".
The layout files are located in the app/design/frontend/default/blank/layout/directory, rather than in the skin/frontend directory.
Handles in Magento layout files allow a particular view in your Magento store to be identified. If the handle is <default>, then almost every page in your Magento store is affected by the layout information.
If the handle is not <default>, then the updates in the nested XML beneath it will only apply to the relevant page(s) in your Magento store.
Let's have a look at part of the cms.xml XML layout file from Magento:
<layout version="0.1.0">
<default>
<reference name="footer">
<block type="cms/block" name="cms_footer_links" before="footer_links">
<action method="setBlockId">
<block_id>footer_links</block_id>
</action>
</block>
</reference>
</default>
<cms_page>
<reference name="content">
<block type="cms/page" name="cms_page"/>
</reference>
</cms_page>
</layout>
The <default> handle applies a layout to any page which has its layout defined by the cms.xml file. The non-default handle in the layout above is <cms_page>, which controls the layout for pages created in Magento's CMS. The layout above simply tells Magento where to insert the page's content.
Some useful layout handles in Magento are the identifiers, which allow you to single out a particular page or section of your Magento store, such as the following:
|
XML handle |
Page it identifies in Magento |
XML layout file,which the XML handle is referenced in |
|---|---|---|
|
|
The default view of a category of products. |
|
|
|
The customer account page, shown when a customer is logged in to their account in your store. |
|
|
|
The product page view (a page that displays an individual product). |
|
|
|
Pages created with Magento's Content Management System. |
|
There are many other handles available to you, and as Magento expands, these will change and evolve.
We can apply the three-column page template to our Magento store in a similar way to the two-column layout above, by overwriting the template with the three-column layout . Open the catalog.xml file in the app/design/frontend/default/blank/layout/directory, and find the XML mentioned below (assuming that you had previously set the layout to use the two-column layout):
<default>
<!-- Mage_Catalog -->
<reference name="root">
<action method="setTemplate">
<template>page/2columns-left.phtml</template>
</action>
</reference>
We can just change the reference within the <template> tags to 3columns.phtml:
<reference name="root">
<action method="setTemplate">
<template>page/3columns.phtml</template>
</action>
</reference>
Once we've uploaded the newer layout file, refresh the page, and you should see that the home page is now divided into three columns:
As you can see, the other pages of the Cheesy Cheese Store also make use of the three-column layout, just like the About Us page:
