
As we've seen, there are two types of blocks in a Magento theme—structural blocks and content blocks. The next step to creating our new Magento theme is to break our XHTML template in to blocks for Magento to handle.
Tip
Finding block paths in existing themes
If you're looking at an existing Magento theme, then try turning Template Path Hints on, which you can do from the administration panel. In System | Configuration, select your store in the drop-down box to the top left. Then select the Developer tab to the left, and select Yes for Template Path Hints, and save the changes to see paths of various blocks in Magento beside the blocks themselves within the template.
Structural blocks in Magento contain one or more content blocks and are used to position these content blocks within each of our store's pages. The structural blocks in our store's new theme can be broken down in to the following:
- Header
- Content
- Footer
- Left column
- Right column
In the following image, each of the structural blocks is highlighted:

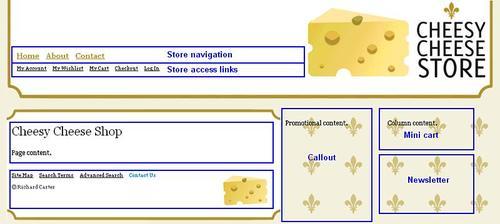
As you might expect, content blocks are the blocks that contain the content within each page in your Magento store. This type of block may include the following:
- Store navigation
- Store access links
- Page content
- Footer content
- Callout
- Mini cart
- Newsletters
In our new Cheesy Cheese Store design, we can pick out the elements in the following screenshot:
We'll start from the top of our original XHTML and work downwards. Therefore, the first template file is the one that is called within the <head> tag, called head.phtml, which you will find in the app/design/frontend/default/cheese2/template/page/html directory.
This content is not displayed within the page itself, but it is used (partially) to provide metadata about the page—information about the page itself, rather than any content of the page and to tell the search engines what the page is about.
<title><?php echo $this->getTitle() ?></title>
<meta http-equiv="Content-Type" content=" <?php echo $this->getContentType() ?>" />
<meta name="description" content=" <?php echo htmlspecialchars($this->getDescription()) ?>" />
<meta name="keywords" content=" <?php echo htmlspecialchars($this->getKeywords()) ?>" />
<meta name="robots" content=" <?php echo htmlspecialchars($this->getRobots()) ?>" />
<link rel="icon" href="<?php echo $this-> getSkinUrl('favicon.ico') ?>" type="image/x-icon" />
<link rel="shortcut icon" href="<?php echo $this->getSkinUrl('favicon.ico') ?>" type="image/x-icon" />
<script type="text/javascript">
//<!
[CDATA[
var BLANK_URL = '<?php echo $this-> helper('core/js')->getJsUrl('blank.html') ?>';
var BLANK_IMG = '<?php echo $this-> helper('core/js')->getJsUrl('spacer.gif') ?>';
//]]>
</script>
<?php echo $this->getCssJsHtml() ?>
<?php echo $this->getChildHtml() ?>
<?php echo $this->helper('core/js')->getTranslatorScript() ?>
<?php echo $this->getIncludes() ?>
This template's code also ensures that Magento knows where to look for the CSS associated with our theme (as highlighted). Hence, we need not change any code.
In our new store's design, header.phtml should contain the logo, navigation links, and what Magento calls the "store links", which include links to the customer's account on your store; such as to account features including their cart and a login (or logout) link. We need to open this file, in the app/design/frontend/default/cheese2/templates/page/html directory where Magento is installed, and make the following changes to it.
The top.links.phtml file inserts the code necessary for our Magento theme's "Store links".
<?php if($toplinks && is_array($toplinks)): ?>
<ul class="shop-access">
<?php echo $this->getChildHtml() ?>
<?php foreach($toplinks as $_toplink): ?>
<li<?php if($_toplink['first']||$_toplink['last']): ?> class="<?php if($_toplink['first']): ?>first <?php endif;?><?php if($_toplink['last']): ?> last <?php endif; ?>"<?php endif; ?> <?php echo $_toplink['liParams'] ?>>
<?php echo $_toplink['beforeText'] ?>
<a <?php echo $_toplink['aParams'] ?>> <?php echo $_toplink['innerText'] ?>
</a><?php echo $_toplink['afterText'] ?></li>
<?php endforeach; ?>
</ul>
<?php endif; ?>
Although the PHP mentioned previously might look complicated, it generates the necessary links that your customers will need to access their account, depending on whether they are logged in to or out of your Magento store. This PHP creates an unordered list of these navigational items, which results in XHTML similar to the following code being generated, assuming you are not logged in to an account on the store:
<ul class="shop-access">
<li class="first">
<a href="https://yourstore.com/customer/account/" title="My Account" >My Account</a></li>
<li ><a href="http://yourstore.com/wishlist/" title="My Wishlist" class="top-link-wishlist">My Wishlist</a></li>
<li ><a href="http://yourstore.com/checkout/cart/" title="My Cart" class="top-link-cart">My Cart</a></li>
<li ><a href="http://yourstore.com/checkout/"
title="Checkout" class="top-link-checkout">Checkout</a></li>
<li class="last">
<a href="https://yourstore.com/customer/account/login/" title="Log In" >Log In</a>
</li>
</ul>
Note that the first and last list items are identified with a class (.first and .last). This may be useful if you need these links to be styled slightly differently than the other links in the list.
You may recall that the logo in your Magento store can be changed through Magento's administration panel. To ensure that our new theme for Magento allows the logo and the alt text for the logo to be changed with Magento's control panel, we may need to make some changes to the code that refers to the store's logo within the header.phtml file:
<a href="#" title="<?php echo $this->getLogoAlt() ?>">
<img id="logo" src="<?php echo $this->getLogoSrc() ?> " alt="<?php echo $this->getLogoAlt() ?>" />
</a>
<?php echo $this->getLogoAlt() ?> inserts the alternative (alt) text associated with the logo to the page, while <?php echo $this->getLogoSrc() ?> inserts the address of the logo set in the administration panel to the page. You shouldn't need to change this code though.
Finally, we need to save the logo file in the skin/frontend/default/cheese2/images directory.
This assumes that our store's Logo Image Src value is set to images/logo.gif in the administration panel. If we want to use a logo with a different filename, then we can simply edit these values, which can be found under the System|Configurationoptions within the Design tab, and then upload the new logo to the images directory.

Our header.phtml file is now complete.
The footer contains links to the store's advanced search feature, site map, and RSS feeds. Our footer.phtml file is quite short, and it contains the following code:
<div class="informational">
<?php echo $this->getChildHtml() ?>
</div>
<p class="legality">
<?php echo $this->getCopyright() ?>
</p>
This gives us content, similar to the following in the footer of our page:
<div class="informational"> <ul> <li class="first"> <a href="http://yourstore.com/catalog/seo_sitemap/category/" title="Site Map" >Site Map</a></li> <li > <a href="http://yourstore.com/catalogsearch/term/popular/" title="Search Terms" >Search Terms</a></li> <li > <a href="http://yourstore.com/catalogsearch/advanced/" title="Advanced Search" >Advanced Search</a></li> <li > <a href="http://yourstore.com/contacts/" title="Contact Us" >Contact Us</a></li> <li class="last"> <a href="http://yourstore.com/rss/" title="RSS testing" class="link-feed">RSS</a></li> </ul> </div> <p class="legality"> © Richard Carter </p>
Luckily, there's nothing we need to change in the footer.phtml template for our theme, so we can leave it as it appeared within Magento's Blank theme.
The pager.phtml file creates the necessary code for pagination, when required. The code is as it appears in the original theme, so we need not change this as well.
Lastly, for our page templates, we can create wrapper.phtml. While this file is not used within most views of your Magento store, it's useful to leave it as it appears in Magento's default theme. This is because certain views within Magento make use of it (like the AJAX loader).
<?php $_tag = $this->hasTag() ? $this->getTag() : "div" ?>
<<?php echo $_tag?> id="<?php echo $this->getId()?>"
<?php echo $this->getParams()?>>
<?php echo $this->getChildHtml()?>
</<?php echo $_tag?>>
When creating themes that you intend to share with other Magento users, it can be helpful to use the same naming conventions used in Magento's default themes for the elements you use in your store. They can also be a useful reference while creating CSS for your Magento theme.
|
CSS ID/class |
Description |
|---|---|
|
|
This usually contains all of the store's content within the |
|
|
This ID refers to the store's logo, usually contained within an |
|
|
It is usual for the store's logo, search feature, and customer links to be contained within the header, though the beauty of theming Magento is that you can change these if you desire! |
|
|
The shop access element is used to contain links to Magento's customer features such as customer accounts, carts, and wishlist. |
|
|
The header navigation class is used to contain your store's navigation links. These often consist of categories and sub-categories of your store. |
|
|
The |
|
|
This class is used to contain heading elements (for example, the |
|
|
The content class is used to wrap content within the store. |
|
|
The legality class is usually applied to the copyright notice in the footer of your Magento store, which can be edited through Magento's CMS. |
As Magento is a powerful e-commerce system, there are a huge number of these ids and classes to consider, and listing them all here would be overwhelming. If you are curious, then the easiest way to find them is to check the source HTML of your page and locate the area you are interested in.
We can now style our theme's XHTML structure with some CSS. Remember that a Magento theme's CSS file is stored in the skin/frontend/default/cheese2/css directory, where cheese2 is the name of your theme.
Firstly, we'll use some reset CSS to make sure that the browser's default values don't affect our new Magento theme.
address, caption, cite, code, dfn, th{
font-style:normal;
font-weight:normal
}
abbr, acronym{
border:0
}
body, html{
margin:0;
padding:0
}
blockquote, body, div, dl, dt, dd, fieldset, form, h1, h2, h3, h4, h5, h6, input, li, ol, ul, p, pre, textarea, td, th{
margin:0; padding:0
}
caption, th{
text-align:left
}
h1, h2, h3, h4, h5, h6, p, pre, blockquote{
background:transparent;
font-weight:normal;
word-spacing:0px
}
fieldset, img{
border:0
}
table{
border-collapse:collapse;
border-spacing:0
}
Secondly, we'll add some generic styling to elements such as links, headings, and the <body>, giving a general style in terms of colors and typography. The font-size of the body is set to 62.5%, which helps to make the text size more stable across browsers.
body {
background: #F7F4E7 url("images/body_bg.png") repeat top left;
color: #000;
font-family: "georgia", "times new roman", "times", serif;
font-size: 62.5%
}
h1, h2, h3, h4, h5, h6 {font-weight: bold;line-height: 200%}
h1 {color: #333}
h2 {color: #C6AD52;font-size: 100%;line-height: 125%}
h3 {line-height: 110%;text-transform: uppercase}
h4, h5, h6 {color: #C6AD52;font-size: 100%;line-height: 100%}
a, a:link, a:active {color: #333}
a:hover {color: #09C;text-decoration: none}
.no-display {display: none !important}
Note that we define the .no-display class, and apply the CSS display: none to it, as this is another CSS class that many Magento themes make use of.
We'll now add more specific styles to the remaining elements on our page by styling .wrapper that surrounds the store's content to be centralized within the browser window. We'll also add style to get the logo to display where it is needed—to the top right of the screen.
.wrapper {
margin: 0 auto;
width: 950px
}
img#logo {
/* NB: we're not using a h1 for the logo */
display: inline;
float:right;
margin-bottom: 10px;
padding: 0 10px 0 0
}
.header {
background: transparent url("images/header_bg.png") no-repeat top right;
height: 193px;
margin-bottom: 20px
}
Next, we'll style the store's navigation and "shop access" links, which appear in the new theme's header area.
ul#nav {
float: left;font-size: 135%;
list-style-type: none;
padding: 100px 0 0 20px
}
#nav li {display: inline;margin-right: 10px}
#nav a {color: #C6AD52;font-weight: bold}
#nav a:hover, .shop-access a:hover {color: #09C}
ul.shop-access {
background: #FFF;
clear: left;
list-style-type: none;
margin: 10px 0 10px 20px !important;
padding: 10px 0;
width: 500px
}
.shop-access li {display: inline;margin-right: 10px}
.shop-access a {color: #333}
The content areas are the next to be styled. We'll apply widths to each of the three columns in the content area of our store, and apply float: left to them to achieve our three-column layout.
#main {
clear: both;
font-size: 120%
}
#main a {
color: #09C
}
#main p, #main ul, #main ol, #main dl {
margin: 10px 0
}
#main ol, #main ul {
margin-left: 15px
}
#main img {
clear: right;
float: right;
margin: 10px 0 10px 10px
}
#main img.float_left {
clear: left !important;margin: 10px 10px 0 0 !important
}
#content a:visited {
color: #666
}
#content, #left, #right {
display: inline;
float: left
}
p.contact {
border-top: 1px #666 dotted;
border-bottom: 1px #666 dotted;
color: #666;
font-size: 110%;
padding: 5px 0
}
.contact span {
font-weight: bold
}
#content {
background: #FFF url("images/content_bg.png") no-repeat top left;
padding: 20px 10px 0 10px;
width: 515px
}
#left, #right {
padding: 10px;
width: 180px
}
#left h2 {
text-align: center
}
Lastly, we'll style the footer, while making sure to display the background image.
#footer {
background: #FFF url("images/footer_bg.png") no-repeat bottom left;
clear: both;
color: #666;
font-size: 80%;
height: 75px;
margin: 0 -10px !important;
padding: 20px 150px 20px 10px;
width: 375px
}
#footer ul {
list-style-type: none;
margin: 0
}
#footer li {
display: inline;
margin-right: 10px
}
#footer a {
color: #333
}
#footer a:hover {
color: #09C
}
Before seeing the changes, you will need to have turned Magento's cache off!