
Social bookmarking services allow users to store and organize links to their favorite web sites online. By integrating social bookmarking with your Magento store, you allow customers to interact with your business outside the confines of your store, ensuring that your customers are still considering your products elsewhere.
There are a huge number of these services on the web, but some bookmarking tools are more popular than others. The following are a few examples:
- Digg (http://digg.com)
- Delicious (http://delicious.com)
- Mister Wong (http://www.mister-wong.com), which is particularly popular in Germany
- Facebook (http://www.facebook.com)
Your store's web pages could become very crowded if you listed every service available. Luckily, there are services that allow your visitors to choose which service to save their link to, for example:
- AddThis
- Socializer
These allow much easier integration with social bookmarking tools, as they aggregate at least the most popular services into one.
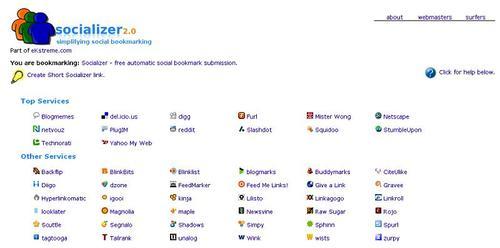
Ekstreme's Socializer (http://ekstreme.com/socializer) allows users to bookmark a huge range of bookmarking services. Creating a link to Socializer is simple. You pass an address (URL) and the title of the page to be bookmarked. A link to Socializer looks like this:
<a href='http://ekstreme.com/socializer/? url=http://www.yourstore.com&title=Title+of+your+store' title='Bookmark this page'>Bookmark this page>
</a>
Your visitor is then presented with a page similar to the following screenshot, with options to save the page in various bookmarking services:
AddThis (http://www.addthis.com) is the #1 bookmarking and sharing service, allowing visitors to your store to bookmark your Magento store with over 50 different online bookmarking services.
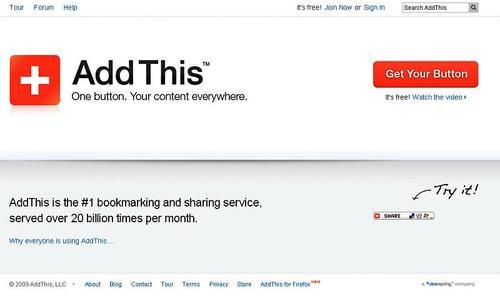
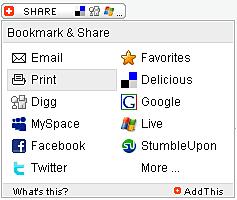
AddThis also allows its users to save the page to their preferred bookmarking service. It also has options for the user to print the page and email a friend too.
You can use AddThis without registering, but registering allows you to track which pages are being shared and how.
As AddThis offers more options to our visitors, we'll use it in the Cheesy Cheese Store's new theme. The first step to using AddThis in Magento is to select which button you would like to display. Go to http://www.addthis.com/web-button-select, and make a selection. For Cheesy Cheese Store, we'll use the option that we saw previously. The code that AddThis generates looks like this:
<!-- AddThis Button BEGIN -->
MagentoAddThis service used<script type="text/javascript">
var addthis_pub="4a0c2aff012daef5";
</script>
<a href="http://www.addthis.com/bookmark.php?v=20" onmouseover="return addthis_open(this, '', '[URL]', '[TITLE]')"onmouseout="addthis_close()" onclick="return addthis_sendto()">
<img src="http://s7.addthis.com/static/btn/lg-bookmark-en.gif" width="125" height="16" alt="Bookmark and Share" style="border:0"/>
</a>
<script type="text/javascript" src="http://s7.addthis.com/js/200/addthis_widget.js"></script>
<!-- AddThis Button END -->
We can add this to the addto.phtml template file in our Magento theme, which can be found in the app/design/frontend/default/cheese2/template/catalog/product/view directory.
<?php $_product = $this->getProduct() ?>
<ul class="add-to-box">
<?php if ($this->helper('wishlist')->isAllow()) : ?>
<li>
<a href="<?php echo $this->helper ('wishlist')->getAddUrl($_product) ?>"><?php echo $this ->__('Add to Wishlist') ?></a>
</li>
<?php endif; ?>
<?php if($_compareUrl=$this->helper('catalog/product_compare') ->getAddUrl($_product) ): ?>
<li>
<span class="pipe">|</span> <a href="<?php echo $_compareUrl ?>"><?php echo $this->__('Add to Compare') ?></a>
</li>
<?php endif; ?>
</ul>
We can add our link just above the closing </ul>:
<!-- AddThis Button BEGIN -->
<li><script type="text/javascript">var addthis_pub="4a0c2aff012daef5";</script>
<a href="http://www.addthis.com/bookmark.php?v=20" onmouseover="return addthis_open(this, '', '[URL]', '[TITLE]')" onmouseout="addthis_close()" onclick="return addthis_sendto()"><img src="http://s7.addthis.com/static/btn/lg-bookmark-en.gif" width="125" height="16" alt="Bookmark and Share" style="border:0"/></a></li>
<script type="text/javascript" src="http://s7.addthis.com/js/200/addthis_widget.js"></script>
<!-- AddThis Button END -->
This will mean that the AddThis button will be displayed alongside the links to compare products and to add a product to your Magento store. We can also remove the last <script> element from the code highlighted above, by using a Magento layout file to add it to the <head> of category pages.
To change the layout of our theme, we need to edit the catalog.xml file in the app/design/frontend/default/cheese2/layout directory. Locate the section (usually near the top) that looks like this:
<default>
<reference name="top.menu">
<block type="catalog/navigation" name="catalog.topnav" template="catalog/navigation/top.phtml"/>
</reference>
We can insert a snippet of XML in to the relevant layout file so that Magento only inserts the JavaScript files required by AddThis when they are needed.
<default>
<reference name="top.menu">
<block type="catalog/navigation" name="catalog.topnav" template="catalog/navigation/top.phtml"/>
</reference>
<reference name="head">
<action method="addJs">
<script>http://s7.addthis.com/js/200/addthis_widget.js</script>
</action>
</reference>
The AddThis button is now visible in our theme, allowing our store's customers to share our products with their friends and family!