Chapter 4. Smoke and Gas
When you start yawning at work or in an otherwise interesting class, the culprit could be carbon dioxide (CO2). It’s the gas all animals (including humans) exhale. Sensors in a building’s ventilation/air conditioning system could notice an elevated CO2 level and send you some needed fresh air.
The fire department can measure if there is hydrocarbon vapor in the air to avoid explosive surprises. There is also a gas sensor inside your car engine, which measures the fuel-air ratio. A correct fuel-air ratio ensures that all the gasoline burns in the cylinder—it wouldn’t be good if there was gasoline dripping out of the exhaust pipe.
It’s easy and fun to prototype with inexpensive smoke and gas sensors. But there are strict requirements, testing protocols, and certification programs for safety and security products. The projects in this chapter are no substitute for such products.
MQ is a series of inexpensive gas sensors. There are sensors for many gases, some of which are listed in Table 4-1.
| MQ Sensor | Gases detected |
MQ-2 | Flammable gas and smoke |
MQ-3, MQ-303A | Alcohol (ethanol) |
MQ-4 | Methane (CH4) |
MQ-7 | Carbon monoxide |
MQ-8 | Hydrogen |
MQ-9 | Carbon monoxide, methane, LPG (propane or butane) |
Experiment: Detect Smoke (Analog Gas Sensor)
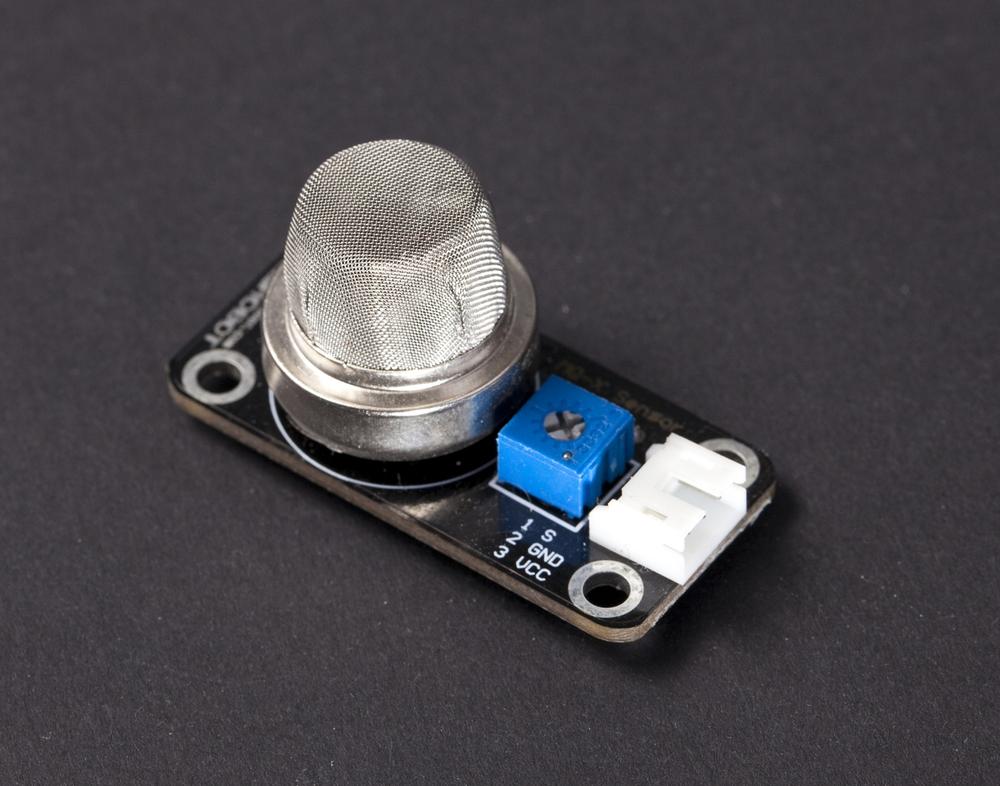
An MQ-2 smoke sensor reports smoke by the voltage level it puts out. The more smoke there is, the higher the voltage. The MQ-2 we used has a built-in potentiometer for adjusting sensitivity (see Figure 4-1).
What is the most dangerous poison gas? If you measure danger by the number of victims, it’s carbon monoxide (CO). In a fire, most victims die from smoke inhalation before the flames get them.
Lethal CO is different from the mostly harmless carbon dioxide, CO2. The human body creates CO2 when it produces energy, and blood is made for carrying CO2 to the lungs where it’s exhaled.
CO is poisonous because it doesn’t want to leave. It sticks to blood hemoglobin, preventing some blood from carrying oxygen and CO2 for hours. If all hemoglobin is stuck with CO, tissues are not able to get oxygen, and death follows.
As the MQ-2 has three leads, it doesn’t need any pull-up or pull-down resistors. From the Arduino point of view, the MQ-2 is like a potentiometer in a three-lead configuration.
The MQ-2 takes ground (black, 0 V) and +5 V (red). It measures smoke and sets its S pin voltage higher (nearer to +5 V) when it detects smoke.
MQ-2 Code and Connection for Arduino
Arduino has a built-in analog-to-digital converter, so you can read the MQ-2 with a call to analogRead(). Use the potentiometer on the breakout board to adjust its sensitivity.

// mq_x_smoke_sensor.ino - print smoke level to serial// (c) BotBook.com - Karvinen, Karvinen, ValtokariconstintsensorPin=A0;intsmoke_level=-1;//voidsetup(){Serial.begin(115200);// bit/spinMode(sensorPin,INPUT);}voidloop(){smoke_level=analogRead(sensorPin);//Serial.println(smoke_level);if(smoke_level>120){//Serial.println("Smoke detected");}delay(100);// ms}

Initialize smoke level to an impossible value to help debugging. If you ever see -1 in the output, you know it has never been replaced by a value read by
analogRead().
The MQ-2 is a simple analog resistance sensor, so you can read the value with
analogRead(). This returns a value between 0 (0 V) and 1023 (+5 V).
Even though there is a cutoff value in the code, it’s best to adjust sensitivity with the potentiometer on the sensor itself.
A fire alarm doesn’t have to be a dull box, as the Lento alarm designed by Paola Suhonen proves (see Figure 4-3). A moth shape gives this everyday item a whole new look. Keep this in mind while designing your own gadgets.

MQ-2 Code and Connection for Raspberry Pi
The Raspberry Pi needs an external analog-to-digital converter (ADC) to read the MQ-2. Similar to other analog resistance sensors (see Compound Eye Code and Connections for Raspberry Pi), you can use a cheap MCP3002 chip for this conversion.

# mq_x_smoke_sensor.py - print smoke level# (c) BotBook.com - Karvinen, Karvinen, Valtokariimporttimeimportbotbook_mcp3002asmcp#smokeLevel=0defreadSmokeLevel():globalsmokeLevelsmokeLevel=mcp.readAnalog()#defmain():whileTrue:#readSmokeLevel()#("Current smoke level is%i"%smokeLevel)#ifsmokeLevel>120:("Smoke detected")time.sleep(0.5)# sif__name__=="__main__":main()
-
The botbook.com library for MCP3002 saves a lot of coding and makes it easy to read analog values. The library (botbook_mcp3002.py) must be in the same directory as mq_x_smoke_sensor.py. You must also install the spidev library, which is imported by botbook_mcp3002. For more information, see the comments in the beginning of botbook_mcp3002/botbook_mcp3002.py or Installing SpiDev.
-
Read the voltage of the first device connected to the MCP3002 ADC. The parameters in
readAnalog(device=0, channel=0)are default values, so you could also leave them out.-
Repeating a program forever is common for embedded devices. When you use
while True, you should always add some delay at the end of the loop. You can kill the program with Control-C when you are done.
It’s practical to wrap the primary task of your program inside its own function. The purpose of
readSmokeLevel()is obvious from reading its name, which helps when you want to use it as a building block when you build bigger projects with many sensors and outputs.
Create the string to be printed with a format string. The value of smokeLevel is treated as an integer and replaces
%iin the format string.
Environment Experiment: Smoke Goes Up
There is a good reason why fire alarms are attached to the ceiling instead of the floor. Smoke is usually created by fire, so it’s warmer than the air around it. Warming makes gases less dense or, in other words, lighter.
Why is warm air lighter than cool air? Warmth is movement: molecules are shaking and bouncing against one another. The warmer it gets, the more molecules shake and bounce. As they bounce, they push one another farther away. This makes the gas less dense. Having fewer molecules in a liter of gas means it’s lighter. And surrounded by heavier air, the lighter gas goes up.
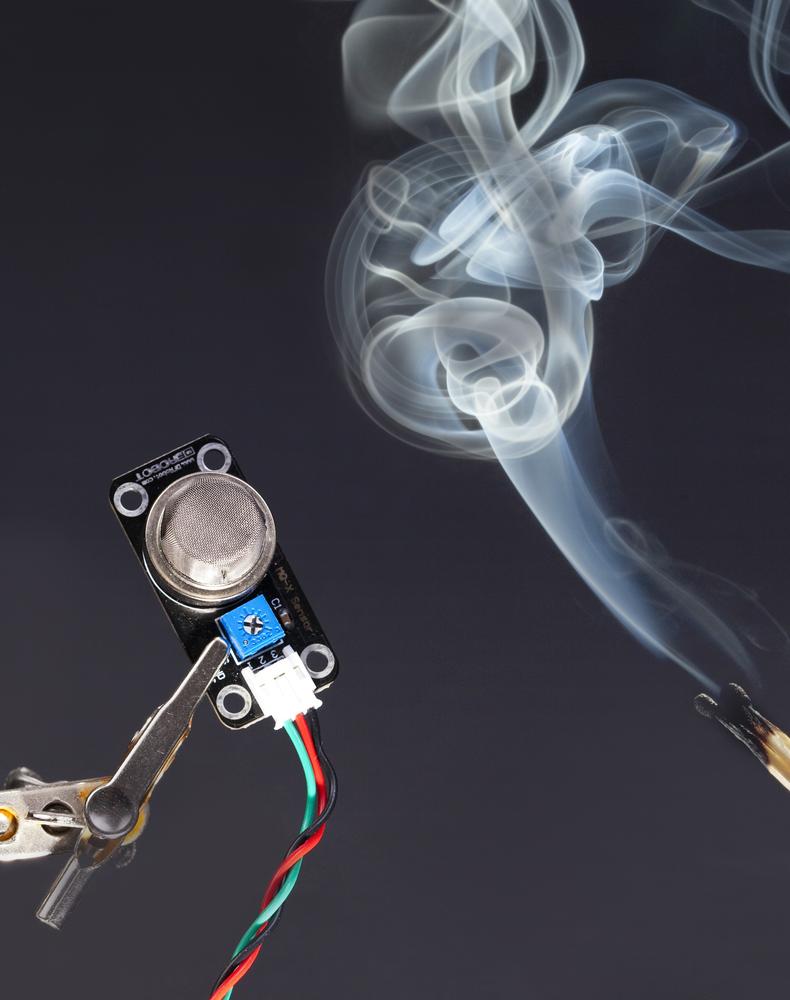
Use the smoke and gas sensor code and extinguish a match next to it. How high can you hold the extinguished match and still get a reading? When you reach the same level with the sensor you won’t likely see any difference to normal air. As the experiment title says: smoke goes up. This is why there is nothing to measure if you let the warm smoke escape to heights above the sensor.
Experiment: Breathalyzer (Alcohol Sensor MQ-303A)
A Breathalyzer is used for checking whether a person has alcohol in his blood. More specifically, ethanol, the alcohol found in wine, beer, and liquor.
The MQ-3 alcohol sensor looks a lot like the other MQ series gas sensors. (see Figure 4-6).

Before you call it a day and pour a glass of Castillo Montroy, at least have a look at Environment Experiment: Try It Without Drinking.
Just as the gas exchange in lungs brings in oxygen and gets rid of carbon dioxide, some blood alcohol is released in the air you exhale. This is the alcohol measured by an alcometer.
The more ethanol in your blood, the more there is in the air you exhale. Blood alcohol content gives a good indication how drunk a person is.
Even though more alcohol in blood makes the same person more drunk, the drunkenness differs from person to person. For making laws, a typical value is chosen as the limit. For example, the limit for DUI charges in Finland is 0.5%.
Officially accepted alcometers are calibrated periodically to get reliable readings. Alcometers use a built-in formula to estimate blood alcohol content from exhaled air alcohol content.
Figure 4-7 shows the Arduino circuit for the MQ-3, and the Arduino sketch is shown in Example 4-3. You can find the Raspberry Pi circuit in Figure 4-8 and the Python code in Example 4-4.

// mq_3_alcohol_sensor.ino - print alcohol value and limit digital info.// (c) BotBook.com - Karvinen, Karvinen, ValtokariconstintanalogPin=A0;constintdigitalPin=8;intlimit=-1;intvalue=0;voidsetup(){Serial.begin(115200);pinMode(digitalPin,INPUT);}voidloop(){//Read analog valuevalue=analogRead(analogPin);//Check if alcohol limit is breachedlimit=digitalRead(digitalPin);Serial.("Alcohol value: ");Serial.(value);Serial.(" Limit: ");Serial.println(limit);delay(100);}

# mq_3_alcohol_sensor.py - read digital output from alcohol sensor# (c) BotBook.com - Karvinen, Karvinen, Valtokariimporttimeimportbotbook_gpioasgpiodefreadLimit():limitPin=23gpio.setMode(limitPin,"in")returngpio.read(limitPin)defmain():whileTrue:ifreadLimit()==gpio.HIGH:("Limit breached!")time.sleep(0.5)if__name__=="__main__":main()
Environment Experiment: Try It Without Drinking
Drinking alcohol while trying to learn electronics would be slightly counterproductive. The good news is that you don’t need a bottle of whiskey to test your sensor. You can get impressive readings by using other products that have alcohol in them. Mouthwash and liquor candy worked really well for us.

Use the Breathalyzer code and open the serial monitor. Chew some candy or take a sip of mouthwash (don’t swallow it) and breathe into the sensor. The readings should instantly jump up. You can still get higher-than-normal levels from readings you take several minutes later.
Test Project: Emailing Smoke Alarm
Get an email when your gadget detects smoke.

What You’ll Learn
In this project, you’ll learn:
- How to react to environment changes with actions: if there’s smoke, send an email warning.
- How to automatically send email from Raspberry Pi.
- The basics of sending email.
Python for Email and Social Media
This is an example of a project that’s easy with Raspberry Pi. Sending email automatically from Raspberry Pi is no different from automatically emailing on any Linux system.
Python is known for having “batteries included,” in that there is a library for everything. Email sending is trivial using existing libraries. Similarly, there are libraries for sending and receiving data over the Web using the HTTP protocol.
What about social media? You could adapt the program to send messages to Twitter, Facebook, or similar “social media” services. But all of these use protocols that though they are built on open technologies, are proprietary and create lock-in to their services. Those giants have rules on how they run their service—rules that could unilaterally change any day. For example, Twitter could change the number of requests you’re permitted each day or remove the functionality you’ve grown to depend on. Don’t build your sand castle on someone else’s private beach. Or at least know the score before you make the decision.
Building It
Connect the MQ-2 smoke sensor to Raspberry Pi, as shown in MQ-2 Code and Connection for Raspberry Pi. It’s a good idea to test the smoke sensor with just the sensor code (Example 4-2) first.
Once you’re sure it works, you can advance to sending emails in your code. Test your email credentials normally before using them in this program. For example, you could enter them into a regular mail user agent (MUA) such as Thunderbird, KMail, Claws, or, in the worst case, Outlook. Even though the example uses a Gmail account, any mail account will work.
Don’t use your personal email account for this kind of testing. If you make a mistake in your code and send out too many email messages, your email server may interpret this as an attempt at sending spam. It’s best to create an email account just for these purposes. However, services like SendGrid and Amazon SES are designed for exactly this sort of scenario, so consider using them if you need to send many messages.
How Does Email Work?
Do you still remember how email works? In the time of Gmail and other webmail clients, it’s too easy to forget the basics.
Here we’ll describe the workings of email from the point of a mail user agent running on your local computer, not webmail. To keep things simple, we’ll just show key points in an example case.
It’s essential to remember that sending and receiving email involves two different servers (the sender’s and the recipient’s). It’s common that the sending and receiving server are in different networks, even on different continents.
When you click Send in your mail user agent, your computer contacts your SMTP server. The SMTP can be in your local network, run by your ISP (such as smtp.verizon.net or smtp.comcast.net) and may accept all connections originating within its network without password or login. Or it could be run by your email provider (such as smtp.gmail.com, mail.gmx.com), and require TLS/SSL encryption and login. When your email is accepted, the SMTP server will deliver your message to the recipient.
When your recipient checks her mail, her mail user agent contacts an IMAP server. This is run by her email provider (such as Gmail or GMX) or her ISP. Reading private email of course requires a login and password, and common sense dictates that one should use encryption (SSL/TLS) when connecting (most email providers require encryption). From the IMAP server, a mail user agent can download message headers and full copies of messages. And when someone sends you an email, the reverse happens: her mail user agent contacts her SMTP server, delivers it to your mail server, and when you check your mail, you retrieve your copy of the email from your IMAP server.
Messages are typically left on IMAP server, which is why you can check your mail on your computer and mobile phone and see the same list of messages on both.
Could Arduino Send Email? Not Easily
A typical way to build a similar project with Arduino would use an external computer. The Arduino would read the smoke sensor and communicate this value to a desktop computer using serial over USB. On the desktop computer, a Python program could read serial (with the pySerial API) and send the email just as shown in the next example.
But even with an Ethernet or WiFi shield, it would be difficult for you to send mail from Arduino. Although the email protocol is, on its surface, fairly simple, there are enough possible surprises when sending an email that it would be hard to write a reliable SMTP library for Arduino (also, many servers require SSL, and the Arduino Uno and similar models don’t support this).
Obviously, it is easier to do this project with Raspberry Pi, or a similarly capable microcontroller board such as the BeagleBone (or the Arduino/Linux hybrid Arduino Yún).
Code for Raspberry Pi
# smoke_alarm.py - send email every 5 minutes when smoke is detected# (c) BotBook.com - Karvinen, Karvinen, Valtokariimporttimeimportbotbook_mcp3002asmcpimportsmtplib#fromemail.mime.textimportMIMEText## Email addressesemail_to='[email protected]'#email_from='[email protected]'## SMTP email server settingsserver='smtp.gmail.com'#mail_port=587user='[email protected]'#password='password'#gracePeriod=5*60# seconds #defsendEmail(subject,msg):#msg=MIMEText(msg)#msg['Subject']=subject#msg['To']=email_to#msg['From']=email_fromsmtp=smtplib.SMTP(server,mail_port)#smtp.starttls()smtp.login(user,password)#smtp.sendmail(email_from,email_to,msg.as_string())#smtp.quit()#defmain():whileTrue:smokeLevel=mcp.readAnalog()("Current smoke level is%i"%smokeLevel)ifsmokeLevel>120:("Smoke detected")sendEmail("Smoke","Smoke level was%i"%smokeLevel)#time.sleep(gracePeriod)#time.sleep(0.5)# s #if__name__=="__main__":main()
-
“Batteries included”: Python has a built-in library for SMTP communication. You don’t have to do low-level socket programming on your own.
-
Email used to be plain text. Headers one per line, an empty line, and then the body. But nowadays we expect localized, non-ASCII characters to work. That’s why an email body is often MIME encoded, just as attachments are. Learn funny Finnish: ä (a with two dots) is pronounced like a and e at the same time. Päivää!
-
The To address is the recipient of your email. You should probably use your own address here to receive the smoke warning messages. These are global variables, visible to all functions.
-
The From address in the email could theoretically be anything. But in the time of spam filters, choosing a weird address could affect how well your mail goes through. You should use your email address, because its domain name will usually match that of the SMTP server you’re using.
-
The SMTP server is the sending server. As this program only sends email and never receives any, the SMTP server is the only server needed.

Your SMTP login name. It could be your email address ([email protected]) or a shorter login name (jdoe).

Your SMTP password should be the same you use for logging into webmail or connecting from an email client.

Even when smoke is detected, you probably don’t want to get 60 emails every minute. Trying to send email that fast would probably get your email blacklisted by the server. That’s why you should add a grace period: the time program should wait after sending an email. The grace period, 5 minutes, is converted to seconds by multiplying by 60 seconds per minute. (Write simple calculations into code instead of calculating magic numbers on paper. Avoid the temptation to repeat the value in comment.)

The code that sends email is in its own function for clarity. Topic (email subject) and msg (email body) come from function parameters.

The body of the message is MIME encoded to reliably handle non-ASCII characters. As you can see from the capitalized first letter,
MIMETextis a class. The constructorMIMEText()returns a new object that’s stored into variablemsg.MIMETextis just for creating the message; it does not take care of connecting anywhere or sending anything.
To modify email headers, you can use the MIMEText object
msgjust like a dictionary data type.
Recipient and sender come from global variables.

Create a new object of class SMTP. This will be used for connecting to the SMTP server. The beginning part (smtplib) is the namespace, automatically created with “import smtplib.”

Connect to the SMTP server, using the username and password from global variables.

Send the email, using the
sendmail()method of thesmtpobject of the classsmtplib.SMTP. Thesmtp.sendmail()method expects to see string, so themsgobject is dumped to string with its built-in method.
Close the connection and clean up. The
quit()function is a method of thesmtpobject.
Use a format string to create the
msg, replacing “%i” with the value ofsmokeLevel.
Wait for 5 minutes after sending email before you send another email.

Avoid running the loop at maximum speed by sleeping half a second.
Packaging
We used a general-purpose enclosure for packaging our email smoke alarm (see Figure 4-10). These boxes look ascetic but are available widely, and their rubber covered ready-made holes make modifications fast and easy.

A hole for the smoke sensor is the only one you need to drill (see Figure 4-11). Others can be made by carefully applying a sharp knife to the rubber-covered openings. Actually, you could use those for the sensor also, but as they tend to look pretty rough we prefer to use them for the cables only. A 19 mm drill bit was a perfect match for the sensor and we didn’t need any adhesives to keep it in place, as shown in Figure 4-12.


To prevent the Raspberry Pi from moving around inside the box, we secured it with Velcro to the bottom, as shown in Figure 4-13. This way it’s easy to remove it for debugging or to use in other projects.

We glued a mini breadboard to the bottom of the lid of the box (see Figure 4-14). Then, we used a zip tie to keep the jumper wires in a neat bundle.
We made one large hole (~2 cm) to the side for the LAN and power cables (see Figure 4-15). We wanted the smallest possible holes in the final gadget, so in our version we don’t have inlets for the other cables (see Figure 4-16).


Now just close the lid and you’re ready for some testing as shown earlier in Figure 4-9. And while placing your alarm, remember which way the smoke goes.
Your gadget now has an “electrical nose.” Using the family of MQ sensors, you can detect gases that are poisonous (CO), flammable (hydrocarbons), explosive (hydrogen), or that reveal intoxication (ethanol in breath).
In the project, you wrote a Python program to react to changes in the environment. You can adapt this program to react to events from other sensors. Alternatively, the reaction could be things other than email, such as contacting a web service or activating an output.
Gas sensors detect things that are difficult or impossible for our human senses to see. In the next chapter, you’ll sense a more visible phenomenon, touch.