
Chapter 13
A Monster Truck
A tenon saw can only cut in straight lines, but many tools exist to cut around a curve, and some of them are inexpensive (see the Holes and Curves Fact Sheet on page 164 for details). For this project I want you to use one of the most basic curve cutters of all: a coping saw, pictured in Figure 13-1.

Figure 13-1. A coping saw.
The goal of this project is to make a simple toy for a very young child. Maybe you have a young relative, or the son or granddaughter of a friend, who will enjoy something that has wheels, no sharp corners, and can be thrown around without falling apart.
I’m thinking of a toy truck. But not just any toy truck. A monster truck, because that should be more interesting.
Getting Acquainted with a Coping Saw
The first thing you may notice about a coping saw is that the teeth of its skinny little blade seem to be the wrong way around. See the closeup in Figure 13-2.

Figure 13-2. The teeth of a coping saw are oriented to cut on the pull stroke, not on the push stroke.
In fact, a coping saw is designed to cut when you pull it, not when you push it. This is because the blade is thin and has no stiffness. It is maintained in a state of tension by the springy steel frame of the saw. When you push the saw, you tend to reduce the tension in the blade, while when you pull the saw, you increase the tension in the blade.
Some people turn the blade around so they can use the coping saw in “push mode,” but this does entail the risk of the blade popping out if you push too hard.
The blade is easily removed, not just so that you can reverse it or replace it, but so that you can thread it through a hole that you have drilled in a piece of wood. While the blade is in the hole, you can reinstall it in the frame of the saw. Now you can saw around the inside of the hole to change its shape.
You’ll need to know the procedure for removing the blade, so let’s deal with that now. Its teeth are sharp, and you may want to wear gloves.
The wooden handle of the saw is mounted on a screw thread. When you turn it counterclockwise, it gradually releases the tension in the blade. If you unscrew it far enough, eventually the blade comes off completely—but now you have a loose handle, as well as a loose blade. I prefer to unscrew the handle just ½", then grab the frame of the saw in a clamp, as shown in Figure 13-3. Squeeze the clamp a little, and the blade should drop out of its mounts, as in Figure 13-4. You may need to practice this a couple of times, to get it right.

Figure 13-3. If you unscrew the handle of the saw by about ½", then clamp the frame, the blade is released from its mounts.

Figure 13-4. The blade released.
After you replace the blade in its mounts, retighten the handle. This pulls in the frame of the saw. Tighten the handle of the saw completely before you cut wood, and make sure that the metal tabs at each end of the blade are both pointing the same way. You can rotate the blade by reducing its tension and turning these tabs, to change the direction in which the saw cuts.
Truck Design
I want the fabrication process for the monster truck to be as easy as possible, so I’m specifying pine for the body and the wheels. If you try to make it from hardwood, you’ll be sawing for a very long time.
The basic plan is shown in Figure 13-5, although naturally you can redraw it to suit yourself. A fanciful 3D rendering is shown in Figure 13-6, and Figure 13-7 is an exploded view, showing how the pieces relate to each other.

Figure 13-5. The plan for the monster truck.

Figure 13-6. Maybe your truck will look something like this.

Figure 13-7. Exploded view of the parts of the truck.
When you consider the most visible feature that distinguishes a monster truck from a regular pickup truck, the answer is obvious: the big wheels. So, the first question is how you’re going to make those wheels. Maybe there’s some really large round dowel that you can cut into slices?
Unfortunately, the largest dowel I’ve been able to find is 2" diameter, which really isn’t big enough.
I think you’re going to have to make your own wheels.
Wheel Centering
You need to accomplish two tasks relating to the wheels: draw a circle on your one-by-six board, and mark the center of the circle. You have to know where the center is, so that you can drill it out to fit on an axle.
If you simply draw a pencil line around a circular object, you’ll get a circle, but you won’t know where the center is. There are some methods to figure this out, but I think the best option is to forget about drawing around an object. Use a piece of cardboard with two holes in it, as shown in Figure 13-8.

Figure 13-8. Prick two small holes in a piece of cardboard. Any cardboard will do.
After you place the cardboard on your one-by-six board, you attach it by using a small nail in one hole. Tap it in no deeper than ½", so that you’ll be able to pull it out easily. Now place the tip of your pencil in the other hole and rotate the pencil around the nail, as shown in Figure 13-9.

Figure 13-9. Using the world’s simplest circle-drawing system.
I’m suggesting that you space the holes in the cardboard 13/8" apart. This will create wheels that are 2¾" in diameter. If you want wheels that are larger, that’s up to you, but you’ll have to do more work cutting and sanding them.
After drawing your circle, pull out the nail. You can use the little hole it made as the starting point for drilling a 3/8" hole, because the wheel is eventually going to fit on a 3/8" round dowel as the axle, and drilling the hole is easier before you cut the wheel out of the wood.
You know the procedure to create a hole of this size: clamp the wood to a sacrificial piece, apply a countersink, then use a small bit (maybe 1/8"), then a ¼" bit, and finally the 3/8" bit, running it very slowly and pressing very gently, so that it doesn’t run away with you. The result is shown in Figure 13-10.

Figure 13-10. After you draw the circle, you can drill a 3/8" hole in the center.
Wheel Cutting
Now it’s time to start cutting around the circle, using your coping saw. This is a very old design of tool that requires good hand-eye coordination and some patience. You may want to test it on some scrap wood, to get the feel of it. I find it easiest to control when I use one hand on the handle, and my other hand stabilizing the frame.
Clamp your board to the work area with about 12" of it sticking out, so that you can cut around the circle without the saw bumping into the clamps. Steer the blade as you follow the circle, as in Figure 13-11. Note that you shouldn’t try to turn the blade unless it is moving, so that it has a chance to cut its way into a turn.

Figure 13-11. Cutting around the circle with a coping saw.
While cutting, pause frequently. This is hard to do, because I’m sure you want to see the finished result. But the coping saw can easily change its angle without you realizing it. You need to check it every minute or two, and blow sawdust out of the way frequently, so you can see the location of the blade. Always cut a fraction outside of the line, bearing in mind that you can sand it to the precise size afterward.
When you have cut about halfway around the circle, back the blade out of the cut where you started.
Now turn the saw so the teeth face the opposite direction and work it back into the cut with the back side of the blade leading the way. Once you have reached the outline of your circle, begin your second cut as in Figure 13-12. Continue to follow the line until the circle is complete.

Figure 13-12. Cutting the second half of the circle.
Wheel Smoothing
When you finish sawing and extract your wheel, you’ll find that it isn’t precisely circular, no matter how careful you were. What can you do about this? You can use your electric drill to rotate the wheel against some coarse sandpaper.
To accomplish this, you must mount the wheel on a piece of 3/8" dowel.
Begin by taking a piece of scrap two-by-four and drilling a 3/8" hole all the way through it. This will serve as a very simple jig. Clamp the scrap wood to your work area, then take a 3/8" circular dowel and cut a 2" piece.
Push this piece into the hole in your scrap wood, and grip it with some pliers to keep it under control. Now you can drill a hole in the center of one end with a 5/64" bit, as in Figure 13-13. The hole should be about ½" deep.

Figure 13-13. Drilling a hole in the center of the 3/8" dowel.
You need to mount the wheel on this dowel in such a way that it fits really tightly. The way to do this is by driving a screw into the end of the dowel, to make it expand. This is the same principle used in drywall and masonry anchors, which I talked about in the previous project.
The dowel won’t expand much unless you cut a slit in the end of it, as in Figure 13-14.

Figure 13-14. Cut a slit in the end of the dowel.
You’ll need to wiggle the knife a little to push it into the wood. Keep your other hand well away from the blade. The slit should be about ½" deep.
Pull the dowel out of the scrap wood, and push the split end into the center of your wheel. Insert the other end of the dowel into the chuck of your drill, making sure that the drill is unplugged (if it is a corded drill) or locked, or has its battery disconnected (if it is a cordless drill).
Tighten the chuck. Now you should be able to drive a #8 wood screw into the hole that you drilled in the dowel, as in Figure 13-15. This will force the dowel to expand, so that it is a tight fit in the wheel.

Figure 13-15. Making the dowel expand, so that it fits tightly in the wheel.
Place a rag on your work area, folded over a couple of times, because you’re going to need a shock-absorbing layer for the next procedure. Make sure the rag has no loose ends, so there is no risk of it getting caught in the spinning chuck of your drill.
Clamp some 80-grit sandpaper onto the rag, and you can sand your wheel as in Figure 13-16. This is a much quicker and more accurate way to smooth the wheel than if you tried to manipulate it by hand.

Figure 13-16. Run the drill at medium speed while sanding the wheel.
The wheel doesn’t have to be perfectly centered around the axle. It just needs to look reasonably round, and you may want to take off the sharp edges by angling the drill.
When you are satisfied with the appearance, loosen the chuck and remove the wheel.
To remove the 3/8" dowel from the center of the wheel, first unscrew the #8 screw to release the pressure in the dowel. Then hold the wheel between your hands with the dowel sticking out downward. Press the bottom end of the dowel against your work area, push down on the wheel, and the dowel will slide up and out.
After you’ve done all that—you just need to repeat the whole procedure, to make three more wheels!
Cutting the Truck Body
The body of the truck requires a piece of two-by-four that is 7" long, without any major defects in it.
Before you cut around the outline of the truck, you have to decide if you want windows. Making side windows will be relatively easy: just drill through the wood with a ¼" bit as in Figure 13-17, and then use your coping saw to modify the opening, as in Figure 13-18.

Figure 13-17. These ¼" holes were located by pricking through the plan for the truck.

Figure 13-18. Using the coping saw to connect the holes.
The finished window is shown in Figure 13-19. To smooth the edges, you can wrap sandpaper around a thin object such as a pencil, and poke it through the hole. Personally, I prefer to use metal files for this kind of task. A semicircular file and circular file work well for me. To smooth straight edges of softwood, I use a flat file. The correct tool for this job is a rasp, but most rasps are relatively expensive and tend to be too coarse for this kind of detail finishing of softwood.

Figure 13-19. The window, with rough edges.
Now you can use your tenon saw to make straight cuts in the two-by-four. First cut along the bottom of the body of the truck. After you have done that, I suggest you should turn the wood so that you are cutting downward, making it easier to check that the saw is horizontal and the cut that it makes is vertical. The first cut of this kind is shown in Figure 13-20.

Figure 13-20. Clamp the two-by-four so that you can cut down into the wood.
The remaining cuts will be easiest if they, too, can be made by sawing down vertically into the wood. One way to hold the two-by-four is shown in Figure 13-21, where a cut has just been started. A piece of scrap wood is clamped to the work area, and the two-by-four is clamped to the scrap. If you tighten the clamps as much as you can, I think you will find that the wood doesn’t slip.
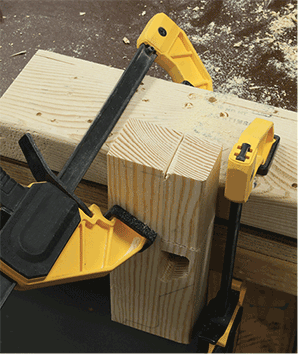
Figure 13-21. Making the second cut. The wood you are cutting will vibrate less if the saw is working as near as possible to the horizontal clamp. You will have to unclamp the wood and move it up a couple of times, as you progress.
The windshield area of the truck is angled at 45 degrees. This cut, also, will be easiest if you turn it so that it is vertical. See Figure 13-22.

Figure 13-22. Ready to cut the slope of the windshield.
After you have cut all around the body of the truck, you can consider an interesting question. Do you think it would look better if you drilled another hole to make the windshield, extending all the way through to make a rear window, too?
This would be challenging, because you’re working with soft pine, which splits easily. The more you remove from it, the weaker it gets. Personally, I decided to skip the windshield. You can give it a try if you like, but be sure to have a spare piece of two-by-four ready if your work piece splits unexpectedly.
Truck Assembly
It would be great if we could give your truck coil-spring suspension, but I’m afraid that isn’t an option. The suspension will consist of ¾" square dowel, into which you will glue axles consisting of 3/8" round dowel.
Figures 13-23 through 13-26 show the steps to assemble a pair of wheels. In Figure 13-23, a piece of square dowel has been drilled with a 3/8" hole at each end. Pieces of 3/8" dowel will be glued into the holes.

Figure 13-23. Two 3/8" axles will be glued into holes at the ends of a ¾" x ¾" square dowel.
In Figure 13-24, the axles have been glued in, and the wheels are ready to be slipped onto the axles. The wheels will be able to rotate freely.

Figure 13-24. Wheels ready to be slipped onto the axles.
In Figure 13-25, the wheels are on the axles, but we need to stop them from coming off. For this purpose, a retaining ring will be glued onto the end of each axle.

Figure 13-25. Retaining rings ready to be glued in place.
Finally the wheel-and-axle assembly is ready to be mounted under rear of the truck, as shown in Figure 13-26. An identical assembly will be mounted under the front of the truck.

Figure 13-26. Rear-wheel assembly has been mounted under the truck.
Now that you see the plan, you should have no trouble making it. First cut two 2" pieces of the square ¾" x ¾" dowel, clamp one of them vertically, and mark its center as in Figure 13-27.
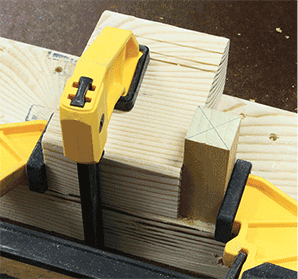
Figure 13-27. Square dowel, clamped to a block of scrap wood.
Now you need a 3/8" diameter hole, ¾" deep. Naturally you will need to drill smaller holes before using the 3/8" bit, and you’ll need to mark the depth on the drill bits with some masking tape. Assuming you have worked your way through previous projects, you already know how to do this. See Figure 13-28.

Figure 13-28. Drilling a 3/8" hole, ½" deep, in the end of the square dowel.
Drill another hole at the opposite end of the square dowel, and then make similar holes in the second 2" piece of square dowel.
For the axles, you need four pieces of round 3/8" dowel, each 2" long. Glue them into the holes that you drilled in the ends of the dowels.
When the glue has set, it will be easiest to attach the square dowels to the underside of the truck before you add the wheels. You can use 1½" #8 wood screws to do this.
First drill two screw holes in the side of a dowel, centered, ¾" apart, using a 5/32" bit. Countersink each hole, then clamp each square dowel to the underside of the truck and use a 7/64" bit, through the screw holes, to make pilot holes in the truck body.
Attach the square ¾" dowels using the wood screws, and then slide the wheels onto the axles. Now you need a way to make the retaining rings for the wheels, which can be done by taking a piece of ¾" round dowel, 2" long, and drilling a 3/8" diameter hole all the way through the center—exactly as you did when making the Swanee whistle in Chapter 9. Saw the round ¾" dowel into four slices at ½" intervals. Each slice can be glued onto the end of an axle—after you put the wheel on the axle, of course. I suggest using epoxy glue, because the retaining rings may not make a very tight fit, and cannot be clamped. Be careful not to get any glue between the wheels and the axle, which would stop them from turning.
The truck that I made is in Figure 13-29. It doesn’t have a high quality of finish, because basic hand tools don’t really enable this when shaping soft pine.

Figure 13-29. The finished truck.
My only concern about this project is that it uses 1½" screws to attach the square ¾" x ¾" dowels under the truck. Conceivably, an infant could throw the truck hard enough to split it open, in which case, could the screws be hazardous?
If you are concerned about this, you can easily modify the design. Instead of 1½" screws, use ¼" pegs as you did in the ends of the shelves in the bookcase, in Chapter 11. This will take a bit longer, which is why I didn’t specify it as the default procedure in the project.
Other Ideas
The ability to saw along curves suggests many other projects.
Wine Rack
How about the kind of wine rack in which the bottles are inserted neck-down? All it takes is a length of hardwood board and some holes big enough for the necks of the bottles. If you want to hang it on the wall, you’ll need a couple of brackets to support each end. See Chapter 12 for details about attaching a shelf to a wall.
Four Across
Fabricating your own version of the four-across game would be challenging, and would require a Forstner bit to drill smooth, regular holes. See the Holes and Curves Fact Sheet on page 164 to learn about Forstner bits.
Four Across is a game where players take turns dropping white and black discs down vertical channels, trying to be the first to get four of one color in a horizontal row. You can find pictures of it easily if you search online.
You would have to mount vertical internal strips to separate the channels, but that could be done with 3/8" square dowel, which is available from crafts stores. For the counters, you could either cut slices of 1¼" round dowel or look online, on a source such as eBay, for plastic counters or discs. Many sizes are available. You should obtain the counters before you build the game, to make sure they will fit.
This would not be a trivial project, but the result could look really nice.