
Chapter 16
A Better Box
In Chapter 10 I promised to build a better box, and that time has come. In fact, I am going to suggest a pair of better boxes. The first will be in this chapter, and the second will be in the next.
Making the Pieces
The box that I am hoping you will build is shown in a 3D rendering in Figure 16-1. All of the joints will be glued, using an ABS solvent that you can buy from plastic supply sources.

Figure 16-1. How the pieces of your box will fit together.
The pieces that you need for the first box are shown in Figure 16-2. I chose the dimensions so that everything can be taken from two strips of plastic, each measuring 12" x 2¾". All four sides of the box are square, so you don’t have to worry about which way up the pieces should be. (Because two of the sides overlap the edges of the other two sides, the box itself is not quite square.)
You can cut the strips in the same way that you cut pieces of ABS in the previous chapter. Establish a reference edge, if necessary, then make the strips by cutting parallel with it. After you have the strips, you can set up your miter box and use it to make the pieces shown in Figure 16-2. Remember to measure one piece, then cut it, then measure the next piece, and cut it, just as you did in Chapter 1 with the dowel. The dimensions have to be precise, so don’t ignore the thickness of the saw blade.

Figure 16-2. The pieces that you will need to cut.
Solvent Basics
The type of adhesive that is most often used with plastic is a solvent cement. While ordinary glue forms a layer between two objects, a solvent dissolves plastic so that the objects melt together. The solvent then gradually disappears through evaporation.
Solvent cannot fill gaps, so when you are making a butt joint where the edge of one piece of plastic is glued to the surface of another, your sawn edge has to be straight and smooth. This requirement is a bit more demanding than anything we have dealt with before, and a deburring tool isn’t really appropriate, because it bevels the edge, leaving less of it available for contact with the other piece.
A typical fresh-sawn edge of a 1/8" sheet of ABS is shown in Figure 16-3. You can see the marks made by the saw teeth. Clamp some 80-grit sandpaper to a rigid, flat, horizontal surface and rub the edges of your sawn pieces over it, as shown in Figure 16-4, taking care to keep each piece level while holding it vertically, so that the edge doesn’t become rounded. With a small amount of sanding, your sawn edge should look like the one in Figure 16-5.

Figure 16-3. Tooth marks from a saw on a freshly cut edge.

Figure 16-4. Sanding the edge of a square.
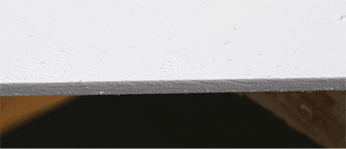
Figure 16-5. The saw-tooth marks have been sanded away. Some dust from the sanding is still visible, and should be wiped off before applying solvent cement.
The solvent that you are going to use will work with ABS even though the word “acrylic” is on the can. It is shown in Figure 16-6, alongside an applicator that consists of a squeeze-bottle with a hollow needle. The needle is large and blunt, and should not be hazardous to use, if you are reasonably careful. The solvent itself is another matter.

Figure 16-6. Solvent is supplied in a can, and must be transferred to a squeeze-bottle with a blunt, hollow needle for application.
Solvent Hazard Warning
The ABS solvent that I am recommending looks like water, but is very volatile and gives off fumes that you don’t want to breathe too much. Try to avoid getting it on your hands, and definitely keep it out of your eyes. Wear chemical-resistant gloves and goggles, and maintain good, active ventilation. Also, avoid using the solvent near any naked flame. It definitely requires a nonsmoking area.
The dispenser can squirt droplets unpredictably. If you merely drop it on your work area, the impact can provoke a little squirt of solvent. You need to take this risk seriously.
If you wear eyeglasses that have polycarbonate lenses, this solvent will dissolve them. Therefore, you should use goggles in addition to any eyeglasses that you wear.
Read the instructions on the can, and if there is any conflict between them and my instructions, the can takes precedence.
Solvent Application
You may want to protect your work area by laying cardboard over it before you begin. Then lay four or more thicknesses of clean rags to absorb any solvent that splashes or escapes from underneath a joint.
Opening a can of solvent can be difficult, because it may be sealed for shipment. This means that when you remove the screw-cap, you will find a metal seal underneath that is not removable. If you have an old-fashioned can puncher, you can use that to make a hole in the seal. Alternatively, use an awl to punch a hole. Tap the awl gently with a hammer, and be careful to avoid tipping the can over.
After you have perforated the metal seal, you’ll have to store the can with the cap screwed back on tightly to prevent evaporation and protect you from breathing the fumes.
The squeeze-bottle with its hollow needle is cheaply available from plastic suppliers online. Transfer solvent into the bottle by squeezing air out of it and inserting the needle into the can, so that it can suck up some liquid. The bottle only needs to be about one-quarter full.
When you are not using the bottle, keep the little plastic sleeve over the needle to prevent solvent from evaporating through it.
Demonstration videos usually show someone joining two pieces of transparent acrylic. The pieces are held in position while solvent is applied at the joint, and you can see the solvent being sucked into the joint by surface tension.
Your situation is more difficult, as you can’t see what’s going on when you are using opaque ABS. Here’s the procedure that I suggest.
Start with the square sides of the box, labeled D, E, F, and G in Figure 16-2. Lay one square of ABS flat, with the textured side down. I’ll call this the horizontal piece. The other square will stand on it. I’ll call this the vertical piece. The solvent will bond the edge of the vertical piece to the surface of the horizontal piece, to make a butt joint. A piece of square dowel will help to make the joint 90 degrees.
Remove any moisture or grease from the surfaces that you will be gluing by rubbing them with a dry cloth or paper towel. Then apply a strip of Scotch tape to the vertical piece, on its smooth side, aligned with the bottom edge, and a strip of tape parallel with the edge of the horizontal piece of ABS, but 1/8" away from it. The 1/8" margin is where the solvent should go. Figure 16-7 shows the plan.

Figure 16-7. Setting up two pieces for application of solvent cement.
The tape will provide protection from stray drops of solvent. I suggest genuine 3M Scotch tape that has “transparent tape” printed on its red label. “Magic tape” is more difficult to remove.
A piece of square dowel will help you to make a 90-degree joint. Place it on the horizontal piece, aligned with the edge of the tape, and add a clamp. The setup is shown in Figure 16-8.

Figure 16-8. Ready for cementing.
Now for the tricky part. I am assuming you have some solvent in your squeeze bottle, and you have removed the protective sleeve from the needle. Hold the solvent bottle vertically, and squeeze air out of it. Then release your squeezing pressure while, at the same time, you turn the bottle over. The bottle will draw air in through the needle, which should stop solvent from running out.
If you don’t do this, solvent will dribble out of the needle rapidly and unpredictably, making a mess. Practice inverting the bottle a couple of times in an area where nothing will be damaged if solvent escapes.
When you’re ready to glue the two pieces, invert the bottle and release just enough pressure to allow a little solvent to come out, while you run the end of the needle along the margin between the dowel and the edge of the plastic. This has to be done quickly. The position of the needle is shown in Figure 16-9.

Figure 16-9. How to position the syringe. See text for full details.
Quickly put the squeeze-bottle down and place the edge of the vertical square of plastic on the wet solvent, with the textured side facing outward. Press down on it hard, while also holding it against the dowel to keep it in alignment.
The solvent creates a bond almost immediately. This is a relatively weak bond, but good enough for you to remove the clamp and the dowel. Pick up the pieces, being careful not to disturb their alignment. You need to get them off the rags in case some solvent has trickled under the horizontal piece, where it will dissolve the plastic into the rags.
After a minute, any stray solvent will have evaporated, and you can put the pieces down. Check that they are still at 90 degrees. You have about 30 seconds in which to adjust their angle before the joint starts to harden. A successful joint is shown in Figure 16-10, still with a piece of tape attached to the vertical piece.

Figure 16-10. A completed joint.
Solvent requires about 24 hours to evaporate completely from inside the joint. You can continue working with the pieces in the meantime, so long as you are very gentle with them.
Additional Joints
Make another butt joint, identical to the first one, with your two remaining squares of ABS. Now you have two L-shaped combinations of pieces. When you put them together, they will form the front, back, and sides of your box. Figure 16-11 reminds you that there is a right way and a wrong way to do this.

Figure 16-11. Assembly of two pairs of side pieces.
Clamp the two L-shaped pieces in position, without using any solvent, yet. To avoid stressing the joints, use minimal force on the clamp—barely enough to hold the pieces in position. Now you can use the needle to trickle solvent into the crack inside between two of the pieces that are not glued yet, as in Figure 16-12. It should flow into the crack very rapidly. Turn the pieces over and glue the remaining pair in the same way. After a minute you can release the clamp.

Figure 16-12. Allow solvent to flow into the cracks between clamped sides of the box.
Let the joints set for an hour or so. Now you can use one of the pieces measuring 2¾" x 2½" to form the bottom of the box. (This is piece C in Figure 16-1.) Probably, it won’t quite fit, and will look like the one in Figure 16-13. Sand it repeatedly until it just slips into place. Don’t force it in—you’ll spring open the joints that you made previously.

Figure 16-13. The base will have to be sanded to fit. (In this photo, the box is upside-down.)
When the base is the right size, slip it into place and clamp the box gently, so that it holds the base, as shown in Figure 16-14. Turn the box over as in Figure 16-15 (base-down), and you can use the needle to apply solvent around the edges from the inside. Once again, some solvent may trickle through the cracks and drip from the bottom. Pick the box up to allow any stray solvent to evaporate.

Figure 16-14. The base now fits the bottom of the box, and can be clamped in place.

Figure 16-15. Ready to apply cement to the base of the box from the inside.
You may still see little gaps between the base and the box, which the solvent cannot fill. But probably you have enough points of contact to make a reasonably secure bond.
Now for the lid. In Chapter 10, the wooden blocks inside the box had a useful function: they stopped the lid from dropping down inside. A different arrangement is needed for this box.
The rendering in Figure 16-1 shows what I have in mind. The lid will have two layers. The top layer, identified as A in the figure, will overlap the sides of the box, so it won’t fall in. The lower layer of the lid, identified as B, will be about the same size as the inside of the box, functioning to center the lid.
Start by sanding the second layer till it fits easily. Then place the top side of the lid (piece A) textured-side-down on the rags. Make sure it is horizontal, and add a couple of drops of solvent in the center. (If the lid is not horizontal, the solvent will run off it.) Immediately take the underside of the lid (piece B) and position it textured-side-up on piece A, with an equal margin all around the edges. Press firmly, and it should stick immediately.
The finished box is in Figure 16-16, with the lid removed and turned upside-down, and in Figure 16-17, with the lid replaced.

Figure 16-16. The finished box with lid removed.

Figure 16-17. The finished box with lid replaced.
Conclusions
I’m betting that you had some trouble trying to control the solvent in this project. The applicator is difficult to use, as it allows liquid to escape unpredictably. The only way to deal with this problem is by practicing with the applicator.
Here are some take-home messages about using solvent with plastic:
- ■ When you are working with transparent plastic, you can see immediately if you have made a good joint. Opaque plastic leaves you wondering.
- ■ Rough-sawn or uneven edges do not work well with solvent, because it can’t fill gaps. Edges must fit well and must be smooth.
- ■ If a solvent joint is good, it can be quite strong, as the plastic merges together.
- ■ In a conventional glued joint, temperature changes can cause stresses from unequal contraction and expansion of the glue and the surfaces that it has joined. In a joint created with solvent, this should not occur, as the joint consists of pure plastic after the solvent has evaporated.
Personally, I like the look of glued plastic, but achieving the result is difficult, and I never quite trust the joints. Is there an alternative? Indeed there is, as I will show in you in Chapter 17.