
Let us now describe how to retrieve actual historic data. Each software repository is different, and so are the mining steps necessary to extract the relevant data points. But most mining tools and setups share a common procedure. Here we give a step-by-step guide to mining a software repository on a real-world example: the IBM Eclipse project. Eclipse is open source software and has been a subject of many empirical software engineering research projects.
Thus, Eclipse is an ideal candidate for a hands-on example. But even though it is an open source project that exposes all the data about bugs and their fixes, the unstructured ways in which this information was collected makes it an interesting and challenging case study.
Historic data for a software project is preserved through many different activities in many different systems (e.g., version control, bug tracking systems, email messages, etc.). In order to extract and learn from the history of a software project, you have to access these resources. For many open source systems such as Eclipse, most of these resources are publicly available and can be accessed easily.
Following the steps detailed in the following sections, we will extract and link Eclipse history, process data, and bug data that can be used for various kinds of defect prediction or process analysis. Normally, the results get stored in persistent data storage systems (e.g., relational databases) that allow further analysis steps and manual inspection. In the end, you will have a data set that identifies bug-inducing code changes and allows you to see how many bugs were fixed and in which source code file.
Eclipse stores useful information about coding problems and fixes in its version control system (CVS) and bug tracking system (Bugzilla). A wealth of related information is probably buried in email archives, but its lack of structure leaves it unfeasible for statistical analysis. As we’ll see, there are plenty of difficulties just mining the version control and bug tracking systems.
In our Eclipse example, we’ll store the source code change history and the bug reports in a MySQL database. To do so, we have to decide which information from each resource is
relevant for your purposes and how we want to link information extracted from both
repositories to each other. Our goal is to identify bug-inducing source code changes and
map defects to files. For this purpose, we need all the information we can get about
source code transactions (especially their commit messages) and all the information
about bug reports that can help us identify 1) in which source code transaction this bug
was fixed and 2) which files were changed. Figure 27-1 shows an example database table
layout that allows you to link source code change transactions (rcs_transaction) to source code file revisions (rcs_revision) as well as bug reports (bts_report).

Figure 27-1. Database layout for bug, transaction, and file data. The arrows indicate foreign keys and join points.
In order to map bugs to files, we need to find a way of linking bug reports to source code transactions. Since the two Eclipse data sources are not connected to each other (unlike more modern programming environments, such as IBM’s Jazz [Frost 2007], which do connect the bug report system and version control system), we have to rely on developer input. The only two locations that allow developer input are commit messages (messages that can be attached to a transaction when checking in source code changes) and the description/discussion body of the bug reports. Both types of data must be extracted.
To map defects to files, we have to keep track of which files were changed in which transactions. Combining this information with the bug-to-transaction mapping allows you to map bugs to files.
Version repositories maintain change logs for each set of simultaneously applied source code changes (transactions). These change logs contain information about the author, the time of the change, the files that changed, how these files changed, and the commit messages of the transaction. Thus, parsing these change logs will provide the information we need about all source code changes ever applied to the project.
To ensure the continued availability of the version control and bug tracking information, and to allow fast access to the data, you should make local copies.
A prepared dump of the version control system can be downloaded from the Eclipse website.[35] This dump can be used to create a local copy of the complete version control system, including all source code files and all source code changes ever applied to Eclipse.
Getting a local copy of the bug tracking system is more complicated. Parsing the bug reports requires a machine-readable and well-defined data format. Bugzilla meets these requirements by allowing you to export each bug report as an XML document. Triggering this functionality using a simple script, you can download all bug reports as XML documents to the local hard disk for later processing.
The following Bash script downloads all Eclipse bugs with an ID between 1 and 300,000 as XML documents to a temporary directory:
for i in {0..300000}; do curl -o /tmp/eclipse_bug_${i}.xml
"https://bugs.eclipse.org/bugs/show_bug.cgi?ctype=xml&id=${i}"; done
One caveat: Some bug IDs are not valid, because some bug reports got deleted while other bug reports are for internal members only. This means some of the downloaded XML documents will contain an error message instead of a bug report. Keep this in mind when parsing the bug reports.
Data mining requires you not only to download and process that data, but also to understand many of its characteristics in advance. Whenever you mine a repository, keep in mind the goal: extracting project and process data. So the data you are about to process should fit your prerequisites and conform to your assumptions.
In our case, the CVS version control system used by Eclipse does not have the same information basis as Bugzilla bug reports. A bug report encapsulates all information relevant for a single transaction (fixing a bug). CVS, on the other hand, maintains change logs corresponding to source files instead of transactions. So in the case of Eclipse, it makes sense to transform one of the two data resources to match the other’s data representation. For this purpose, you should convert the CVS repository to a repository format such as Subversion (SVN) that maintains logfiles for transactions instead of source files. To convert a CVS repository to an SVN repository, you can use the cvs2svn tool,[36] which converts large CVS repositories into SVN repositories with 100% data preservation (including repositories for GCC, Mozilla, FreeBSD, KDE, GNOME, and other projects).
The following command will turn the Eclipse CVS into an SVN repository:
cvs2svn --svnrepos path_to_new_svn_repo --include-empty-directories --no-prune
--no-cross-branch-commits --retain-conflict-attic-files --verbose
Be aware that this conversion step takes some time (depending on the size of the CVS
repository you are converting). To ensure that the process will actually succeed without
errors, it is highly recommended to run cvs2svn with the --dry-run option before doing the actual conversion. This
option will not convert any data but instead will simulate the conversion process and
show you what a real run would do.
Now that you have the data resources ready at your local hard disk and in a shape that fits your process prerequisites, you can process the data. Processing involves extracting, filtering, and storing the resources’ contents in a persistent and human-readable format.
In this step we create XML files containing the data from the version control system and bug database. As we explained earlier, logs in the Eclipse version control system contain information on transactions. Use a native SVN command to extract change logs as XML documents:
svn log --xml --verbose
You can parse these XML documents, along with the bug reports we downloaded in Step 2, using your preferred XML parsing framework. Then, store the information in the appropriate fields of your database (see Figure 27-1).
The next step is to parse the bug reports saved to the local hard disk in Step 2: Data
Retrieval. It is important to fill all the fields of the bts_report table, especially ID,
title, description, creationDate, status, resolution, and
version. These fields can be used to link bug
reports to version control transactions.
Now that you have extracted all information from your data resources, you can start linking these data sets together. So far, all data sources have been collected independently and without any cross-references to other data sources.
To map bugs to transactions, you have to rely on user input identifying or mentioning cross-reference candidates to other data sources. In our Eclipse example, there are two possibilities:
When committing code changes to the version repository, the developer specified the bug number that was fixed with these changes (e.g.,
"Fixed bug 88352: Operation supports leaks contexts...").When closing a bug report, the developer mentioned the transaction ID that fixed the bug (e.g.,
"Fixed for Windows, svn revision 6800. Would
                  someone double ..."
).
To handle these situations, you have to search for potential cross-reference candidates in both the transaction commit messages and the bug report comments.
Expect to find many false positive links between bug reports and commit messages, and be prepared to keep updating your regular expressions and heuristics. Perform the searches iteratively so that you can inspect each data set manually and use the classification problems you find to refine the next iteration.
The most common situation we’ve found is when a developer writes the ID of the fixed bug report into the commit message. Fischer et al. [Fischer et al. 2003] and Cubranic and Murphy [Cubranic and Murphy 2003] were among the first to search for references to bug databases in commit messages and to use these references to infer links from CVS archives to bug databases. Later, Sliwerski et al. refined both approaches to identify fix-inducing changes—changes that subsequently were reflected in successful closings of bug reports [Sliwerski et al. 2005]. Following their approach, we have to perform the following steps:
Select all commit messages that might contain keywords (such as
fix,issue,bug,solved, etc.) indicating that the transaction actually fixed a bug. Such messages are likely to contain cross-references.In all keyword-matching commit messages, search for each of the following regular expressions:[37]
bug[# ]*[0-9]+pr[# ]*[0-9]+show\_bug.cgi?id=[0-9]+or[[0-9]+]
Every match is a potential link to a bug. This approach, however, might give you a
lot of false positives (e.g., "Updated copyrights to
2004"). To validate a link, you have to consider information from the
linked bug reports. Since you are interested only in fix-inducing changes, you can
concentrate on links to bug reports with all of the following characteristics:
A status marked as “closed”
A resolution field set to “fixed”
A resolution date close to the commit date of the commit message candidate (for instance, a time difference of less than five days)
More link validation criteria can be checked, but these criteria typically depend on the development process of the software project and have to be adapted for each project. Also keep in mind that code changes applied within the same transactions can fix more than one bug.
Although scanning commit messages to find reference candidates suffices for many projects, others require an additional or different step. Cubranic and Murphy were among the first to infer links in the other direction, from Bugzilla to CVS archives, by relating bug activities to changes [Cubranic and Murphy 2003].
If necessary, reverse the process described in the previous step, searching for
possible revision IDs and keywords (e.g., revision,
transaction, patch, etc.) in comments and descriptions of bugs marked as “closed” and
“fixed.” Then, try to map these IDs to transaction IDs. Again, filter out false
positives by deleting references from bug reports to revisions applied after the bug
was marked as fixed. Keep in mind that a bug report might reference multiple
transactions. Some of them might be earlier, incomplete fixes. Other transactions
might have been reverted again. The temporal order in which these references were
added might matter.
When you link bug reports to changes and vice versa, you will find that a number of bug reports and changes remain unlinked—that is, you have bug reports that were fixed without your finding any associated change, and you have transactions in the version control repository without a recorded associated problem. Having such missing links is part of the noise you get during mining. You can be sure you’ve missed some links, but that’s hard to fix without lots of manual classification. Be aware, though, that missing links might not be random, but actually correlated with some confounding factor. For instance, experienced developers may have more discipline in associating changes with bug reports, so the subset of changes you are looking at may be biased with respect to developer experience.
Recently, Bird et al. showed that biased data sets lead to serious problems, especially for bug prediction models and hypothesis tests regarding bug data [Bird et al. 2009a]. Manual inspection of the data sets does not solve this issue, but can be used to detect coarse-grained bias.
So far you have mapped bugs to revision control transactions. Next, you have to assign bugs to source code files. Luckily, this step is easy. Using our database layout (see Figure 27-1), you can identify which source code files have been changed in which transaction. Zimmermann et al. used a similar technique to count the distinct number of bug IDs per source code location (file) [Zimmermann et al. 2007].
Now your resulting data set contains a count of bugs fixed in each source code file as a quality measurement for that file. This data can now be related to other factors, such as the number of changes in the file or its code complexity metrics.
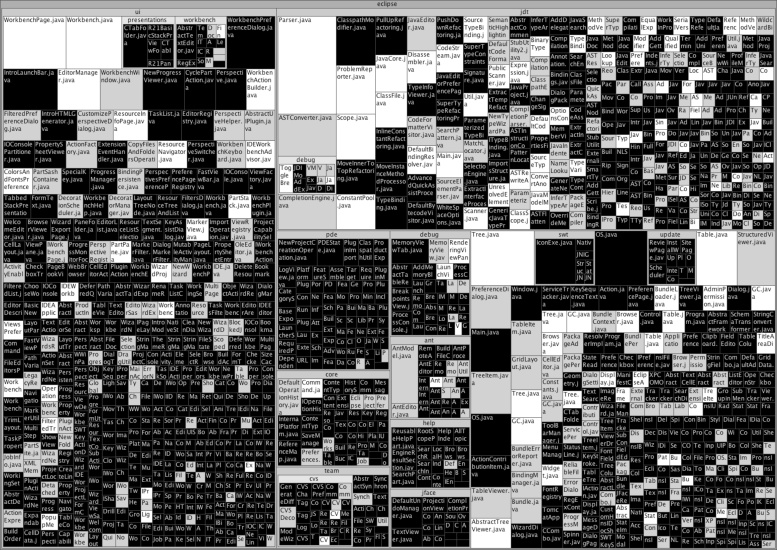
Figure 27-2 for instance, shows the distribution of fixed bugs in Eclipse 3.1 files with more than 300 lines changed, established from the Eclipse repositories using the steps described in this chapter.[38] Each square in the figure represents a source file shipped within Eclipse 3.1. All files within the same package are grouped together. The larger a file’s square, the more lines were changed since the previous release. The more white the square, the more bugs had to be fixed in the corresponding source file of Eclipse 3.1. Data like this raises lots of questions: why is it that some classes are so much more error-prone than others? Finding out the common factors, making predictions for where future bugs will be, and checking the quality of these predictors brings a lot of intriguing insights. Applying these techniques on your own project is the most exciting of all—giving you all the data at your fingertips that you need for making your next decision.
[37] This list is just illustrative. It is not complete.
[38] The figure was generated using the Treemap program developed by the University of Maryland, http://www.cs.umd.edu/hcil/treemap/.