
Schema objects represent different components of the logical data model and are directly mapped to a column or columns in the database. Attributes, facts, functions, and operations, hierarchies, partition mappings, tables, and transformations are all schema objects; however, three schema objects comprise the core of project definition and will be covered in this section:

Attributes are the descriptive part of the database. They provide information about the data; for example, customer name and city are attributes. The SELECT clause of a SQL statement is based on these attributes.
The following is the report with the Policy Number and Broker Name as an attribute:

When we see the SQL for this report, the Policy Number and Broker Name will be shown in the SELECT clause as follows:

We have three different types of attribute:
- Compound attribute
- Homogenous attribute
- Heterogeneous attribute
Compound attribute: Uses two or more columns as its ID. It is like the compound key of a relational table. You have to look at more than one column to get unique information. For example, let's assume our product attribute is a combination of product_id and product_code_id, which are the primary keys in our table.
Homogenous attribute: Each attribute form points to the same column or set of columns in every table to which it maps. For example, let's assume the ID form for the state attribute maps to two different tables, lu_geography and lu_region; state is still a homogenous attribute because its ID form maps to the same state_id column in each table.
Heterogeneous attribute: This attribute form points to the same column with different names across the database. For example, region_id and reg_id. It's the same column, but with different names.
Attributes have one or more attribute forms that directly map to the data warehouse column. In other words, attributes must have one ID and the other attribute forms are optional. The relationship between all of the attribute forms must be one to one.
Attribute forms can have any number of expressions; primarily we have the following two types of expression form:
- Simple attribute form expression: Maps directly to the single attribute column; here is an example:

Here, the ID form of days at job directly maps to the days_at_job column in the LU_EMPLOYEE table, creating a simple attribute expression form.
- Derived attribute form expression: Contains multiple attribute columns from the same table, mathematical operators, numbers or other functions such as ApplySimple, and so on. For example:

Here, the ID form for the days at job attribute maps to an expression that combines the Start_job_date and End_job_date columns in the LU_EMPLOYEE table, creating a derived attribute form expression.

The following are the Attribute Editor Tabs:
- Forms tab: Defines how an attribute will be displayed. A user can have ID or DESC as a form.
- Children and parent tabs: Defines how attributes are directly related to each other. In the case of normalized tables, the table with the primary key is the parent and the table with the foreign key is the child. In the case of denormalized tables, the attribute with high cardinality is the child and the attribute with low cardinality is the parent.
For example, for the Broker Name attribute we have the Broker Key as a child with a one-to-many relationship, and Broker Number as the parent with a one-to-many relationship:

- Display tab: Shows how an attribute is represented.
There are two ways of creating an attribute using MicroStrategy Architect:
- Manual attribution creation: where the user creates an attribute by themselves, deciding which column to use and designing an attribute and its forms
- Automatic attribution creation: where Architect creates the appropriate attribute and attribute forms
The following are the steps for manual attribution creation:
- Log in to MicroStrategy Desktop.
- Click on Schema | Architect.
- In the Project Tables View tab, find the project table you want to use to create an attribute.
- Right-click the header of the project table and select Create Attribute:

In the MicroStrategy Architect window, in the box, type a name for the attribute and click OK.
- In the Create New Form Expression window, define the ID form expression and click OK:

- Click on the Schema Objects | Attributes folder and right-click on the blank side to select New | Attribute.
- This will open three windows: the attributes, forms, and expressions editors.
- Select the source table under the source table dropdown and drag the column name under the Form expression section:

- After entering the information, click OK and it will display the new attribute form window, where the user can add or change the expression form, lookup table, and so on. Click OK upon completing the information:

- Click Save and close to save an attribute:

Facts are numeric data values, which are generally aggregatable and are used to analyze the business. Facts are the basis of all metrics; facts that create additive metrics exist as a column in fact tables, whereas facts that create non-additive metrics exist as a column in dimension tables. Revenue, sales, and profit are a few examples of facts.
There are two primary types of fact:
- Homogeneous
- Heterogeneous
Homogeneous fact: Points to the same column name or set of columns in the table to which it maps.
Here is an example of a homogeneous fact:

Here we have a sales fact mapping to two different tables, but it is still a homogeneous fact, because it maps to the same Salesamount column in each table.
Heterogeneous fact: Points to two or more different columns or sets of columns in the table to which it maps.
Here is an example of a heterogeneous fact:

Here we have a sales fact mapping to two different tables, but it is a heterogeneous fact because it maps to two different column names.
A fact expression is made up of a column or set of columns to which it maps. There are two types of fact expression, and they are:
- Simple fact: Maps directly to one column; for example, creating a sales fact using the
Salesamountcolumn from a table - Derived fact: Contains multiple columns from the same table, mathematical operators, numerical values, or other functions; for example, creating a sales fact using sales_quantity * unit_price
In SQL, these are mostly the numeric columns on which a user performs SQL aggregations such as SUM, AVG, and so forth.
The following is an example of SQL representation.
If a user wants to analyze the sales made by a company during March, sales represents a fact and the company and month represent the attributes:

There are two ways to create a fact using MicroStrategy Architect. These are:
- Manual fact creation: Here a user creates facts themselves, deciding which column to use. This process is time consuming as the user needs to create individual facts one by one.
- Automatic fact creation: Let MicroStrategy Architect identify the columns that can be created as a fact, based on a set of heuristics. This method provides a quick way to create facts.
Manual creation of facts:
- Log in to MicroStrategy Desktop and select the project.
- Click on Schema | Architect.
- In the Architect graphical interface, click the Project Tables View tab.
- In the Project Tables View tab, right-click the header of any table and select Create Fact:

- In the MicroStrategy Architect window, in the box, type the fact name and click OK:

- In the Create New Fact Expression window, define the fact expression and under mapping method, the user can either select the automatic method, which selects for the user all the tables corresponding to the columns that are used in the fact expression, or the manual mapping method, where you manually select each table corresponding to the columns used. It is preferable to select the automatic mapping method.
- Click OK:

Alternatively, the user can create these facts by right-clicking the appropriate column in the table and selecting Create Facts. It will, by default, use the automatic mapping method:

- Click on the Schema Objects | Facts folder and right-click on the blank side to select New | Fact.
- Select the source table under the source table dropdown and drag the column name under the form expression section in the expression editor window. Click OK:

- On the fact editor screen, click save and close, and provide a name for the fact.
Hierarchies are groupings of attributes that reflect the relationship of one attribute to another. In MicroStrategy, we have following two types of hierarchy:
- System hierarchy
- User hierarchy
System hierarchy: This is based on how data is related in the logical data model. This is the default hierarchy, is automatically created when a user creates a new project, and is not editable. The user cannot directly change a system hierarchy from the hierarchy editor, but can indirectly change it by adding, deleting, or modifying attributes' parent-child relationships. Although the system hierarchy specifies an ordered set of all attributes in the project, it does not define the ordering or grouping among attributes.
User hierarchy: This is based on the user's need to browse the data. The user can always include additional attributes or remove attributes as per the BI need. A user hierarchy provides element browsing and report drilling flexibility.
Consider the logical data model state | country | call_center | agent, which does not have a direct path between country and agent. The user will have to go through the call_center attribute. However, if the user wants to send data directly from country to agent, this could be achieved using a user hierarchy. With a user hierarchy, the user can also define a path between two totally unrelated elements.
A user can create hierarchies and attribute relationships either via Desktop or via Architect; the following section discusses both of these techniques in detail.
The following are the steps to create an attribute relationship:
- Log in to MicroStrategy Desktop.
- Select the project and click Schema and architect.
- In the Hierarchy View tab, click the parent attribute and drag the mouse pointer to the child attribute. When the user clicks on the middle of the attribute and drags the pointer, a line is dynamically drawn that links the two attributes:

- If the user needs to change the relationship type, right-click on the line that shows the relationship and select the appropriate relationship type. One to many is the default relationship type:

- If user need to change the relationship type, right-click the attribute and Edit Children Relations:

- To change the relationship table, right-click the line that shows the relationship, point to Relationship Table, and select the appropriate table:

The following screenshot shows the relationship between product and product price:


The following are the steps to create a new hierarchy:
- Log in to MicroStrategy Desktop.
- Select the project and click Schema and architect.
- In the Home tab, select New Hierarchy:

- Enter the new hierarchy's name:

- When a user creates a hierarchy, it does not contain any attributes. The next step is to add an attribute to the hierarchy.
- To add an attribute, right-click on the empty space in the hierarchy and select Add/Remove attributes in Hierarchy:

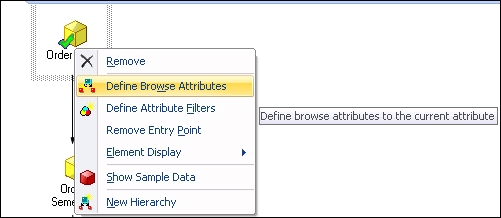
- Once the attributes are added, the user needs to define the browse attribute for each attribute. Browse attributes are attributes to which you can directly browse from any given attribute. They are indicated by a line that connects the two attributes. The following screenshot shows how to add a browse attribute:
- The following screenshot shows the order date user hierarchy with a browse path defined:

- Once the user has all the attributes and relationships defined, the user can also set the entry point for the user hierarchy. These are the attributes that are displayed when the user first opens the user hierarchy. Entry point attributes are indicated by a green checkmark beside the attribute icon. The following screenshot shows the option for setting entry points:

- A user hierarchy with an entry point set for an attribute is shown in the following screenshot:

- User hierarchies are mostly used for browsing attribute data, but the user can configure them for drilling attributes in a report. To configure a user hierarchy for drilling, select the Use as a Drill Hierarchy option by right-clicking the empty space in the user hierarchy window:

- The user can even change the element display for an attribute using the element display setting available via right-clicking an attribute. This provides the user with the following options:
- Limit: The user can browse a specified number of elements for an attribute
- Unlocked: The user can browse all the elements of an attribute at one time
- Locked: The user cannot browse the elements of an attribute at all

- Click File | New | Hierarchy, which opens a hierarchy editor with the select Attribute Dialog box.
- Move the attribute that's needed from available objects to the selected objects list.
- Click OK to view the hierarchy editor, where the user can specify the browse order and make it available for drilling:
