Now that you have created an OU for your virtual desktop machines, you can create group policy objects to link to that OU. In the example lab, the policy is called Horizon View Virtual Desktop Policy:
- To start the configuration, double-click on the Windows Administrative Tools icon to launch the admin tools. You will now see the Windows Administrative Tools screen being displayed.
- From this screen, scroll down and then double-click on the option for Group Policy Management. You will now see the Group Policy Management screen, as shown in the following screenshot:

- Expand the folders for Forest:pvolab.com (1), Domains, and pvolab.com. Click and highlight the Horizon View Desktops OU (2), and then right-click on it.
- From the contextual menu that appears, click the option for Create a GPO in this domain, and Link it here… (3).
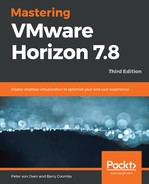
- You will now see the New GPO dialog box, as shown in the following screenshot:

- In the name box, type in the name for this policy. In the example lab, we have called this Horizon View Virtual Desktop Policy.
- Click OK.
- You will now return to the Group Policy Management screen, which will show the newly created policy, as shown in the following screenshot:

Now, if we edit the newly created Horizon View Virtual Desktop Policy, you will see the new Horizon-specific policy options listed:
- To edit the policy, from the Group Policy Management screen, click and highlight the Horizon View Virtual Desktop Policy (1).
- Right-click and from the contextual menu that appears, click Edit... (2), as shown in the following screenshot:

You will now see the Group Policy Management Editor screen with the VMware Horizon-specific policies outlined:

In the example lab, we are going to add all the policy templates to the one policy, just to show the various options that are available. In your environment, and depending on your design, you may want to create different policies and apply different templates to different policies. You may even want to create different OUs as well. Maybe this will be on a departmental basis or for different use cases, as we have previously mentioned. This is the recommended approach as it makes troubleshooting and the management of policies much easier.
Before we look at each of the individual policy options, in the next section, we will complete one final AD configuration task: to configure the loopback policy.