The next thing we are going to cover is how the Connection Broker decides which of the RDS host servers in the farm that is running the requested application is actually going to deliver the application. There are two options for configuring load balancing.
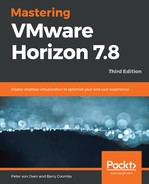
For the first option, there is no real complicated science behind the load balancing from a Horizon View perspective. It is purely based on how many sessions are available on any given RDSH server. So, that means when a user logs in and launches a published application, the application is delivered from the server that has the highest amount of free sessions available; that is, the one that is least busy.
This is illustrated in the following diagram:

This first option works fine, but how does it know what each session is consuming in terms of resources? A particular host may well have enough capacity for additional sessions based on the number of sessions it has free, but what if the sessions it's already hosting are consuming vast amounts of resources?
This is where the second option comes in, as it uses more in-depth information to place sessions, which is based on measuring the CPU and memory utilization of each host rather than the number of free sessions.
To enable this load-balancing method, there are a number of manual steps you need to complete, as we will now describe.
First of all, this method is based on executing scripts, and therefore you need to ensure that those scripts are stored on each RDS host server in the farm. You can create your own scripts; however, there are a couple of example scripts that ship as part of the View Agent installation. You will find them in the following folder once the View Agent has been installed (View Agent installation was covered earlier on in this chapter):
C:Program FilesVMwareVMware ViewAgentscripts
You will then see the two example scripts, as shown in the following screenshot:

As the names suggest, one script monitors CPU utilization and the other monitors memory utilization. Each script monitors its respective component and returns the following values to make the decision on placing sessions:
- 0: For utilization > 90%
- 1: For utilization > 75%
- 2: For utilization > 25%
- 3: For utilization > 25%
Let's now configure the CPU script for use in the example lab by completing the following tasks. The first of these is to enable the View Script Host service. To do this, perform the following the steps:
- Open a console to the RDSH host server, RDSH-Apps, and from the desktop of the server, launch a RUN command.
- In the Open box, type services.msc and click OK to launch the Services management screen. You will now see the Services screen, as shown in the following screenshot:

- Scroll down until you find the entry for VMware Horizon View Script Host. Click on it to highlight it, and then right-click.
- From the contextual menu that is now displayed, click Properties.
- You will now see the VMware Horizon View Script Host Properties screen, as shown in the following screenshot:

- In the Startup type box, from the drop-down menu (1), select the option for Automatic, so that this service starts when the server boots.
- Next, click the Apply button.
- Finally, click the Start button (2) to start the service. You should now see that the service is running, as shown in the following screenshot:

Once completed, close the Services management screen. The next step is to add the script details to the registry of the server. To do this, perform the following steps:
- Open a console to the RDSH host server, RDSH-Apps, and from the desktop of the server, launch a RUN command.
- In the Openbox, type regedit and click OK to launch the registry editor.
- Once the registry editor has launched, navigate to the following path:
![]()
- You will now see the following screen:

- Now right-click in the right-hand side pane and, from the contextual menu displayed, click on New (3), and then select the option for String Value (4), as shown in the following screenshot:

- You will now be able to enter a new string value. In the example lab, this is called cpuutilisation (5) to reflect the script that will be run, as shown in the following screenshot:

- Next, you need to edit the newly created string value and enter a value.
- To do this, highlight the cpuutilisation entry (6), right-click and from the contextual menu, and click the option for Modify… (7), as shown in the following screenshot:

- You will now see the Edit String box, as shown in the following screenshot:

- In the Value data, box enter the path to the script. In the example lab, this path is C:Program FilesVMwareVMware ViewAgentscriptscpuutilisation.vbs.
- Click OK.
- You will now see that the script has been added, as shown in the following screenshot:

- Exit the registry editor.
As you have changed the properties of the VMware Horizon Agent, you will need to restart this service for the changes to be applied. To do this, perform the following steps:
- Launch a RUN command.
- In the Open box, type service.msc and click OK to launch the Services management screen, as shown in the following screenshot:

- Scroll down until you find the entry for VMware Horizon View Agent (8).
- Click on it to select it, right-click, and, from the contextual menu, select the Restart option (9) to restart the service.
- Once the service has restarted, you can close the Services management screen.
You have now completed the configuration steps for load balancing and this will now be calculated based on CPU utilization. You can check that this is working by performing the following:
- From the View Administrator Dashboard, navigate to the System Health box.
- Then expand the options for RDS Farms and the farm for Horizon-Published-Apps. Now click on the RDSH-Apps.pvolab.com server. You will see the following screen:

You will see that at the bottom of the box, there is a Server load option now shown. This is being measured from the script, and as you can see, currently, the CPU load is light and new sessions are able to be resourced by this particular server.
Click OK to close the box. You have now successfully configured the optional load-balancing feature.