
Chapter 12. Tracking Progress on Tasks and Assignments
Chapter at a Glance

✓ | Update a previously saved baseline plan. |
✓ | Record actual work for tasks and assignments. |
✓ | Record actual work by time period. |
✓ | Interrupt work on a task and specify the date on which the task should start again. |
Building, verifying, and communicating a sound project plan might take much or even most of your time as a project manager. However, planning is only the first phase of managing your projects. After the planning is completed, the implementation of the project starts—carrying out the plan that was previously developed. Ideally, projects are implemented exactly as planned, but this is seldom the case. In general, the more complex the project plan and the longer its planned duration, the more opportunity there is for variance to appear. Variance is the difference between what you thought would happen (as recorded in the project plan) and what really happened (as recorded by your tracking efforts).
Properly tracking actual work and comparing it against the original plan enables you to identify variance early and adjust the incomplete portion of the plan when necessary. If you completed Chapter 6, you were introduced to the simpler ways of tracking actuals in a project plan. These include recording the percentage of a task that has been completed as well as its actual start and finish dates. These methods of tracking progress are fine for many projects, but Microsoft Project 2010 also supports more detailed ways of tracking.
In this chapter, you track task-level and assignment-level work totals and work per time period, such as work completed per week or per day. Information distributed over time is commonly known as timephased, so tracking work by time period is sometimes referred to as tracking timephased actuals. This is the most detailed level of tracking progress available in Project.
As with simpler tracking methods, tracking timephased actuals is a way to address the most basic questions of managing a project:
Are tasks starting and finishing as planned? If not, what will be the impact on the project’s finish date?
Are resources spending more or less time than planned to complete tasks?
Is it taking more or less money than planned to complete tasks?
As a project manager, you must determine what level of tracking best meets the needs of your project plan and stakeholders. As you might expect, the more detailed the tracking level, the more effort required from you and the resources assigned to tasks. This chapter exposes you to the most detailed tracking methods available in Project.
In this chapter, you work with different means of tracking work and handling incomplete work. You begin, however, by updating the project baseline.
Practice Files
Before you can complete the exercises in this chapter, you need to copy the book’s practice files to your computer. A complete list of practice files is provided in Using the Practice Files at the beginning of this book. For each exercise that has a practice file, simply browse to where you saved the book’s practice file folder.
Important
If you are running Microsoft Project Professional, you may need to make a one-time setting change. This helps ensure that the practice files you work with in this chapter do not affect your Project Server data. For more information, see Appendix C.
Updating a Baseline
If you completed Chapter 6, you saved a baseline plan for a project plan. Recall that a baseline is a collection of important values in a project plan, such as the planned start dates, finish dates, and costs of tasks, resources, and assignments. When you save (or set) a baseline, Project takes a “snapshot” of the existing values and saves it in the Project plan for future comparison.
Keep in mind that the purpose of the baseline is to record what you expected the project plan to look like at one point in time. As time passes, however, you might need to change your expectations. After saving an initial baseline plan, you might need to fine-tune the project plan by adding or removing tasks or assignments, and so on. To keep an accurate baseline for later comparison, you have several options:
Update the baseline for the entire project. This simply replaces the original baseline values with the currently scheduled values.
Update the baseline for selected tasks. This does not affect the baseline values for other tasks or resource baseline values in the project plan.
Save a second or subsequent baseline. You can save up to 11 baselines in a single plan. The first one is called Baseline, and the rest are Baseline 1 through Baseline 10.
Since you completed the initial planning for the new book project at Lucerne Publishing, the plan has undergone some additional fine-tuning. This includes some adjustments to task durations, a new task in the Acquisition phase, and some deactivated (or deleted) tasks in the Design and Production phase. Because of these changes, the initial baseline does not quite match the project plan as it is currently scheduled.
In this exercise, you compare the project plan as it is currently scheduled with the baseline plan and update the baseline for the project plan.
Set Up
Start Project if it’s not already running.
You need the Advanced Tracking A_Start project plan located in your Chapter 12 practice file folder to complete this exercise. Open the Advanced Tracking A_Start project plan, and then follow these steps.
On the File tab, click Save As.
The Save As dialog box appears.
In the File name box, type Advanced Tracking A, and then click Save.
Next, you will switch to a different view to see baseline and scheduled values arranged for easy comparison.
On the View tab, in the Task Views group, click the down arrow below the Gantt Chart button and then click Tracking Gantt.
The Tracking Gantt view appears.
In the chart portion of this view, the tasks as they are currently scheduled appear as blue bars (if they are not critical tasks) or red bars (if they are critical). Below them, the baseline values of each task appear as gray bars.
Tip
In Gantt Chart views, the colors, patterns, and shapes of the bars represent specific things. To see what any item on the Gantt chart represents, just point your mouse pointer at it and a description will appear in a ScreenTip. To see a complete legend of Gantt chart items and their formatting, on the Format tab, in the Bar Styles group, click Format and then click Bar Styles.
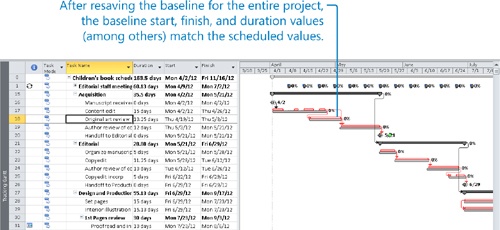
In the Task Name column, click the name of task 18, Original art review.
On the Task tab, in the Editing group, click Scroll to Task.
The Tracking Gantt view scrolls to display the Gantt bar for task 18, Original art review. This task was added to the plan after the initial baseline was saved. As you can see in the Tracking Gantt view, this task has no baseline bar, indicating that it has no baseline values.
To get a broader look at the project plan’s baseline, you’ll adjust the zoom level.
On the View tab, in the Zoom group, in the Timescale box, click Weeks.
You can see that currently none of the later tasks in the project plan match their baselines.
To conclude this exercise, you will resave the baseline for the project plan. Doing so will update all baseline information for tasks, resources, and assignments prior to tracking progress.
Tip
This project plan includes a previously saved baseline that you will now overwrite. That’s fine at this stage of the new book project, where the planning is complete and you’d like to have the most up-to-date baseline before recording any actual work. However, after work has been recorded, you should be careful about overwriting any previously saved baseline values. Once you overwrite a baseline, the original values are replaced and cannot be retrieved. Saving additional baselines is often a better strategy after work on the project has begun.
On the Project tab, in the Schedule group, click Set Baseline, and then click Set Baseline.
The Set Baseline dialog box appears.
Make sure that the Set Baseline option is selected. In the For area, make sure that the Entire project option is selected.
Tip
To update a baseline just for selected tasks, you can click Selected Tasks under the For label. When you do this, the options under Roll Up Baselines become available. You can control how baseline updates should affect the baseline values for summary tasks. For example, you could resave a baseline for a subtask and update its related summary task baseline values if desired. To remove a baseline, on the Project tab, in the Schedule group, click the Set Baseline button and then click Clear Baseline.
Click OK to update the baseline.
Project alerts you that you are about to overwrite the previously saved baseline values.
Click Yes.
Project updates the baseline values for the project plan.
Task 18 now has a baseline, and all of the other tasks’ baseline values now match their scheduled values.


Tracking Actual and Remaining Values for Tasks and Assignments
If you completed Chapter 6, you entered actual start, finish, and duration values for individual tasks. For tasks that have resources assigned to them, you can enter actual and remaining work values for the task as a whole or for specific assignments to that task. To help you understand how Project handles the actual values you enter, consider the following:
If a task has a single resource assigned to it, the actual work values that you enter for the task or assignment apply equally to both the task and the resource. For example, if you record that the assignment started on April 23 and has five hours of actual work, those values apply to the task and to the assigned resource.
If a task has multiple resources assigned to it, the actual work values that you enter for the task are distributed among or rolled down to the assignments according to their assignment units. This level of detail is appropriate if you aren’t concerned about the details at the individual assignment level.
If a task has multiple resources assigned to it, the actual work values that you enter for one assignment are rolled up to the task. However, the new actual work values do not affect the other assignments’ work values on the task. This level of detail is appropriate if details at the individual assignment level are important to you.
In this exercise, you record task-level and assignment-level actuals and see how the information is rolled up or down between tasks and assignments.
Open Advanced Tracking B_Start from the Chapter12 folder, and then follow these steps.
On the File tab, click Save As.
The Save As dialog box appears.
In the File name box, type Advanced Tracking B, and then click Save.
This version of the project plan includes the updated baseline values that you previously saved, as well as the first actuals reported against the first tasks in the Acquisition phase.
On the View tab, in the Task Views group, click Task Usage.
The Task Usage view appears. As you may recall from Chapter 7, the two sides of the usage view are split by a vertical divider bar. The Task Usage view lists resources under the tasks to which they’re assigned. This information appears in the table on the left side. On the right side, you see rows organized under a timescale. The rows on the right side show you the scheduled work values for each task or assigned resource. The Task Usage view color-codes the rows on the right side: task rows have a shaded background, and assignment rows have a white background.
In the Task Name column, click the name of task 18, Original art review.
On the Task tab, in the Editing group, click Scroll to Task.
The timephased grid on the right side of the view scrolls to display the first scheduled work for the task.
Next, you’ll switch the table and details shown in the view.
On the View tab, in the Data group, click Tables and then click Work.
The Work table appears.
This table includes the Actual Work and Remaining Work columns that you will work with shortly, although they might not yet be visible. The values in the Work column are the task and assignment totals for scheduled work. Note that each task’s work value is the sum of its assignment work values. For example, the work total for task 18, 160 hours, is the sum of Hany Morcos’ 80 hours of work on the task and Jane Dow’s 80 hours.
Next, you’ll change the details shown on the timephased grid on the right side of the view.
On the Format tab, in the Details group, click Actual Work.
For each task and assignment, Project now displays the Work and Actual Work rows on the timephased grid on the right side of the view.
Tip
You can change the details (that is, fields) shown under the timescale in a usage view. You can add or remove fields and change the formatting of the fields shown. For example, you can add the Baseline Cost field to the fields shown in the usage view and format it with a different colored background. To see the available fields and formatting options, on the Format tab, in the Details group, click Add Details.
In the timephased grid, you see the scheduled work values per day. If you were to add up the daily work values for a specific task or assignment, the total would equal the value in the Work column for that task or assignment. In a usage view, you see work values at two different levels of detail: the total value for a task or assignment and the more detailed timephased level. These two sets of values are directly related.
Next, you’ll enter task-level and assignment-level actual work values and see how they are reflected in the timephased details.
Using the mouse, drag the vertical divider bar to the right until you can see all the columns in the Work table.
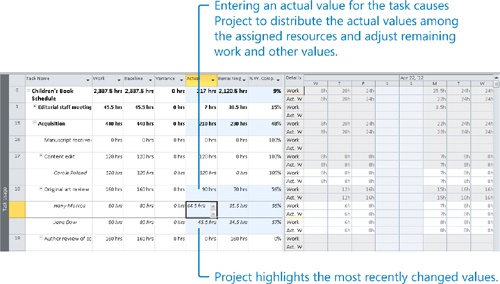
In the Actual column for task 18, Original art review, type or click 90h, and then press the Enter key.
Several important things occurred when you pressed Enter:
Project applied change highlighting to the updated values in the table.
The amount of actual work you entered was subtracted from the Remaining column.
The actual work was distributed to the two assignments on the task, resulting in 44.5 hours of actual work being recorded for one resource and 45.5 hours for the other resource. (The difference in assignments is due to Hany’s previously customized assignment values.) Likewise, the updated remaining work value was recalculated for each assignment.
The updated actual and remaining work values were rolled up to the Acquisition summary task.
The actual work values were also redistributed to the task and assignment timephased values.
In the timephased grid side of the view, you can see the daily scheduled work and actual work values for the two resources through Thursday, April 26. Because you entered an actual work value for the entire task, Project assumes that the work was done as scheduled and records these timephased values for the resource assignments.
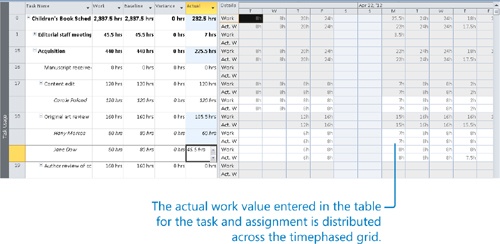
To conclude this exercise, you will enter actual work values at the assignment level and see the effect on the task.
In the Actual column for Hany Morcos’s assignment to task 18, type or click 60h, and then press Enter.
Hany’s actual and remaining work values are updated, and those updates also roll up to the task and its summary task (Project highlights the changed values). However, the actual and remaining work values for Jane Dow, the other resource assigned to the task, are not affected.
Drag the vertical divider bar back to the left to see more of the updated timephased values for the task.
Again, Project assumes that the actual work value that you entered for Hany was completed as scheduled; therefore, her work and actual work timephased values match through Monday, April 30.


Tip
You entered actual work values in this exercise, but you can also enter remaining work values or percentage of work complete. All these values are related to each other—a change to one affects the others. You can update these values in the Work table or on the Tracking tab of the Assignment Information dialog box (when an assignment is selected).
Tracking a task’s actual work complete value is more detailed than entering a simple percentage complete on a task. However, neither method is as detailed as entering timephased actual work for tasks or assignments (as you will see in the next section). There’s nothing wrong with tracking actual work at the task or assignment level (or simply entering a percentage complete value, for that matter) if that level of detail meets your needs. In fact, whether you see the timephased details or not, Project always distributes any percentage complete or task-level or assignment-level actual work value that you enter into corresponding timephased values, as you saw earlier. This is one reason why new Project users sometimes are surprised to encounter extremely precise values, such as 7.67 hours of work, scheduled for a particular day. If you generally understand the math that Project is following, however, you can figure out where such numbers come from. On the other hand, you might not care about this level of scheduling detail—and that’s OK, too.
Tracking Timephased Actual Work for Tasks and Assignments
Entering timephased actuals requires more work on the project manager’s part and might require more work from resources to inform the project manager of their daily or weekly actuals. However, doing so gives you far more detail about the project’s task and resource status than the other methods used for entering actuals. Entering timephased values might be the best approach to take if you have a group of tasks or an entire project that includes the following:
High-risk tasks
Relatively short-duration tasks in which a variance of even one day could put the overall project at risk
Tasks for which you’d like to develop or validate throughput metrics, or rates at which a given quantity of a deliverable can be completed over a given time period, such as copyedit 3000 words per day
Tasks in which sponsors or other stakeholders have an especially strong interest
Tasks that require hourly billing for labor
At this point in the new book project, the Acquisition work has been completed, and the Editorial phase has just begun. Because of the larger number of resources involved and the variability of the editorial work, these tasks are the riskiest ones so far in the project.
In this exercise, you enter some actuals for tasks for specific time periods.
Open Advanced Tracking C_Start from the Chapter12 folder, and then follow these steps.
On the File tab, click Save As.
The Save As dialog box appears.
In the File name box, type Advanced Tracking C, and then click Save.
Click the minus sign next to task 15, Acquisition, to collapse this phase of the project plan.
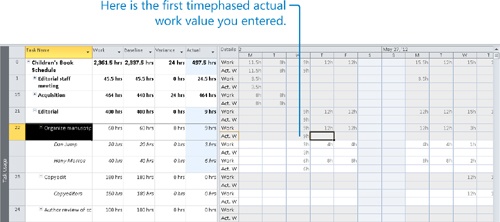
In the Task Name column, click the name of task 22, Organize manuscript for copyedit, and then, on the Task tab, in the Editing group, click Scroll to Task.
Project scrolls the timephased grid to display the first scheduled work values of the Editorial phase.
The first timephased actual work values that you will enter are at the task level and not for specific assignments.
In the timephased grid, click the cell at the intersection of the Wednesday, May 23 column and the task 22 actual work row. The actual work row is directly below the work row, which contains the value 12h.
Tip
If you point to the name of a day on the timescale, Project will display the full date of that day in a ScreenTip. You can change the formatting of the timescale to control the time period in which you enter actual values in the timephased grid. For example, you can format the timescale to show weeks rather than days; when you enter an actual value at the weekly level, that value is distributed over the week.
Type 9h, and then press the Tab key.
As soon as you entered the first actual value for the task, the scheduled work value changed to match it. Both work and actual work values rolled up to the summary task levels and were distributed among the specific assignments to the task. You can see this happen in the timephased grid on the right and the table on the left.
In the Thursday, May 24 actual work cell, type 15h, and then press Tab.
For task 22, enter the following actual work values for the dates listed.
Date
Actual Hours
Friday, May 25
12
Monday, May 28
12
Tuesday, May 29
15
This step concludes the actual work for this task. Next, you’ll enter actual work values for the assignments on the next task.
For task 23, Copyedit, you have weekly actual work values from the assigned resource. The copyeditors have completed the task. For this task, you’ll adjust the timescale to record weekly actual values.
On the View tab, in the Zoom group, in the Timescale box, click Weeks.
Enter the following actual work values into the timephased grid for the Copyeditors’ assignment to task 23, Copyedit.


Tip
When entering actual work, you do not need to include the “h” abbreviation (to denote hours). You can simply enter the number and Project will record it as hours. Hours is the default work value for data entry. If you wish, you can change this. Click the File tab and then click Options. On the Schedule tab of the Project Options dialog box, in the Work Is Entered In box, select the default time increment you want.
Date (Week of) | Actual Hours |
May 27 | 60 |
June 3 | 80 |
June 10 | 48 |

The resource’s actual work values were rolled up to the task’s actual work values. The original work values were saved in the baseline should you ever need to refer to them later.
Tip
In this exercise, you have seen how task and assignment values are directly related; an update to one directly affects the other. However, you can break this relationship if you want. Doing so enables you to record progress for resource assignments, for example, and manually enter actual values for the tasks to which those resources are assigned. You normally should not break this relationship unless you have special reporting needs within your organization—for example, you must follow a status reporting methodology based on something other than the actual values recorded for assignments in project plans. To break this relationship, do the following. On the File tab, click Options. In the Project Options dialog box, click the Schedule tab and then under the Calculation options for this project label, clear the “Updating Task status updates resource status” check box. This setting applies to the entire project plan that you have open at the time; you cannot apply it to only some tasks within a project plan.
When you need to track actual work at the most detailed level possible, use the timephased grid in the Task Usage or Resource Usage view. In either view, you can enter actual work values for individual assignments daily, weekly, or at whatever time period you want (by adjusting the timescale). For example, if a task has three resources assigned to it and you know that two resources worked on the task for eight hours one day and the third resource worked for six hours, you can enter these as three separate values on a timephased grid.
If your organization uses a timesheet reporting system for tracking actual work, you might be able to use this timesheet data in Project as timephased actuals. You might not need to track at this level, but if resources complete timesheets for other purposes (billing other departments within the organization, for example), you can use their data and save yourself some work.
Rescheduling Incomplete Work
During the course of a project, work might occasionally be interrupted for a specific task or for the entire project. Should this happen, you can have Project reschedule the remaining work to restart after the date you specify.
When you reschedule incomplete work, you specify the date after which work can resume—the rescheduled date. Here is how Project handles tasks in relation to the rescheduled date:
If the task does not have any actual work recorded for it prior to the rescheduled date and does not have a constraint applied, the entire task is rescheduled to begin after that date.
If the task has some actual work recorded prior to but none after the rescheduled date, the task is split so that all remaining work starts after the rescheduled date. The actual work is not affected.
If the task has some actual work recorded for it prior to as well as after the rescheduled date, the task is not affected.
At this point in the new book project, work on the Editorial phase has been completed, and the team has started work on the next phase, Design and Production. However, you need to troubleshoot a delay in work caused by an unforeseen problem.
In this exercise, you reschedule uncompleted work.
Open Advanced Tracking D_Start from the Chapter12 folder, and then follow these steps.
On the File tab, click Save As.
The Save As dialog box appears.
In the File name box, type Advanced Tracking D, and then click Save.
The project plan is currently in the Task Usage view. Next, you’ll switch to the Gantt Chart view.
On the View tab, in the Task Views group, click the down arrow below the Gantt Chart button, and then click Gantt Chart.
In the Task Name column, click the name of task 31, Proofread and index.
On the Task tab, in the Editing group, click Scroll to Task.
The Gantt Chart view scrolls to display the Gantt bar for task 31, Proofread and index. Currently, this task has two days of actual work completed and several days of scheduled work remaining.
Scroll the Gantt Chart view up so that the 1st Pages review (task 30) appears near the top of the view.
You have learned that over the weekend of July 28, a water pipe burst in the proofreaders’ office. None of the project’s equipment or material was damaged, but the cleanup will delay work until Wednesday, August 1. This effectively stops work on the proofreading task for a few days. Next, you will reschedule incomplete work so that the project can begin again on Wednesday.
On the Project tab, in the Status group, click Update Project.
The Update Project dialog box appears.
Select the Reschedule uncompleted work to start after option, and in the text box, type or select 7/31/12.
Click OK to close the Update Project dialog box.
Project splits task 31 so that the incomplete portion of the task is delayed until Wednesday.


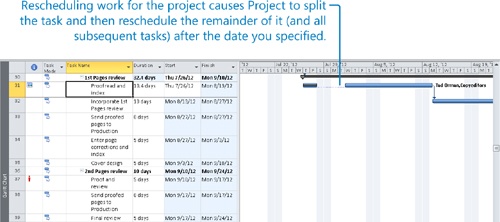
As you can see, although the duration of task 31 remains 10.4 working days, its finish date and subsequent start dates for successor tasks have been pushed out. Although we have addressed a specific problem, in doing so, we have created other problems in the remainder of the project. You will address this and other problems in the project plan in later chapters.
Here are a few other things to keep in mind when tracking progress:
You can turn off Project’s ability to reschedule incomplete work on tasks for which any actual work has been recorded. On the File tab, click Options. In the Project Options dialog box, click the Schedule tab, and then, under the Scheduling options for this project label, clear the “Split in-progress tasks” check box.
If you use status dates for reporting actuals, Project supports several options for controlling the way completed and incomplete segments of a task are scheduled around the status date. You can see the options by doing the following: On the File tab, click Options. In the Project Options dialog box, click the Advanced tab, and then, under the Calculation options for this project label, adjust the settings “Move end of completed parts after status date back to status date” and the three other check boxes below it.
Key Points
Saving a baseline saves a large set of task, resource, and assignment values in a project plan. Saving an interim plan, however, saves only the start and finish dates of tasks.
If you track work at the task level, work rolls down to the assignments. Conversely, if you track work at the assignment level, work rolls up to the task level.
In usage views, you can change the time increments of the timescale to match the time period against which you wish to track. For example, if you wish to record actual work as full weeks, you can set the timescale to display weeks.
Should work on a project be interrupted for some reason, you can reschedule the work to begin again on the date you specify.