Chapter 2. Creating a Task List
Chapter at a Glance

✓ | Start Microsoft Project Standard or Professional and save a new project plan. |
✓ | Enter task names. |
✓ | Estimate and record how long each task should last. |
✓ | Create a milestone to track an important event. |
✓ | Organize tasks into phases. |
✓ | Create task relationships by linking tasks. |
✓ | Switch task scheduling from manual to automatic. |
✓ | Set nonworking days for the project plan. |
✓ | Check the project plan’s overall duration. |
✓ | Record task details in notes and insert a hyperlink to content on the Web. |
Tasks are the most basic building blocks of any project—tasks represent the work to be done to accomplish the goals of the project. Tasks describe project work in terms of sequence, duration, and resource requirements. In Project, there are several different kinds of tasks. These include summary tasks, subtasks, and milestones (all discussed in this chapter). More broadly, what are called tasks in Project are sometimes also called activities or work packages.
In this chapter, you will manage the scheduling of tasks in two different ways:
Enter tasks as manually scheduled to quickly capture some details without actually scheduling tasks.
Work with automatically scheduled tasks to begin to take advantage of the powerful scheduling engine in Project.
Practice Files
Before you can complete the exercises in this chapter, you need to copy the book’s practice files to your computer. A complete list of practice files is provided in Using the Practice Files at the beginning of this book. For each exercise that has a practice file, simply browse to where you saved the book’s practice file folder.
Important
If you are running Project Professional, you may need to make a one-time setting change. This helps ensure that the practice files you work with in this chapter do not affect your Project Server data. For more information, see Appendix C.
Creating a New Project Plan
A project plan is essentially a model that you construct of some aspects of a project you are anticipating—what you think will happen, or what you want to happen (it’s usually best if these are not too different). This model focuses on some, but not all, aspects of the real project—tasks, resources, time frames, and possibly their associated costs. Note that throughout this book, we’ll refer to the types of documents that Project works with as project plans, not documents or schedules.
As you might expect, Project focuses primarily on time. Sometimes you might know the planned start date of a project, the planned finish date, or both. However, when working with Project, you specify only one date, not both: the project start date or the project finish date. Why? Because after you enter the project start or finish date and the durations of the tasks, Project calculates the other date for you. Remember that Project is not just merely a static repository of your schedule information or a Gantt chart drawing tool; it is an active scheduling engine.
Most projects should be scheduled from a start date, even if you know that the project should finish by a certain deadline date. Scheduling from a start date causes all tasks to start as soon as possible, and it gives you the greatest scheduling flexibility. In this and later chapters, you will see this flexibility in action as we work with a project that is scheduled from a start date.
Now that you’ve had a brief look at the major parts of the Project interface in Chapter 1, you are ready to create the project plan you will use throughout Part I. You’ll play the role of a project manager at Lucerne Publishing, a book publisher that specializes in children’s books. Lucerne is about to publish a major new book and you’ve been asked to develop a plan for the book launch. In this exercise, you create a new project plan, set its start date, and save it.
Click the File tab.
Project displays the Backstage view.
Click the New tab.
Project displays your options for creating a new project plan.
These options include using templates installed with Project or available on the Web. For this exercise, you will create a new blank project plan.
Under Available Templates, make sure that Blank project is selected, and then click the Create button on the right side of the Backstage view.
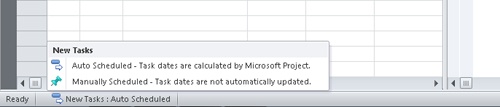
Project creates a new project plan. You may see a note briefly reminding you that new tasks are created in manually scheduled mode. This information remains visible on the status bar as well.
Notice the thin orange vertical line in the chart portion of the Gantt Chart view. This indicates the current date. When you create a new project plan, Project sets the plan’s start date to the current date. Next you’ll change the plan’s start date.
On the Project tab, in the Properties group, click Project Information.
The Project Information dialog box appears.
Important
If you are using Project Professional rather than Project Standard, the Project Information and some other dialog boxes contain additional options relating to Project Server. Throughout this book we won’t use Project Server, so you can ignore these options. For more information about Project Server, see Appendix C.
In the Start Date box, type 1/2/12, or click the down arrow to display the calendar and select January 2, 2012.
Click OK to accept this start date and close the Project Information dialog box.
On the File tab, click Save.
Because this project plan has not been previously saved, the Save As dialog box appears.
Locate the Chapter02 folder in the Project 2010 Step by Step folder on your hard disk. The default location for the Project 2010 Step by Step folder is DocumentsMicrosoft Press.
In the File name box, type Simple Tasks.
Click Save to close the Save As dialog box.


Entering Task Names
As mentioned previously, tasks represent the work to be done to accomplish the goals of the project. For this reason, it’s worth developing good practices about how you name tasks in your project plans.
Task names should be recognizable and make sense to the people who will perform the tasks and to other stakeholders who will see the task names. Here are some guidelines for creating good task names:
Use short verb phrases that describe the work to be done, such as “Edit manuscript.”
If tasks will be organized into phases, don’t repeat details from the summary task name in the subtask name unless it adds clarity.
If tasks will have resources assigned to them, don’t include resource names in the task names.
Keep in mind that you can always edit task names later, so don’t worry about getting exactly the right task names when you’re initially entering them into a project plan. Do aim to use concise, descriptive phrases that communicate the required work and make sense to you and others who will perform the work.
In this exercise, you enter some initial tasks required for the new book launch events.
Click the cell directly below the Task Name column heading.
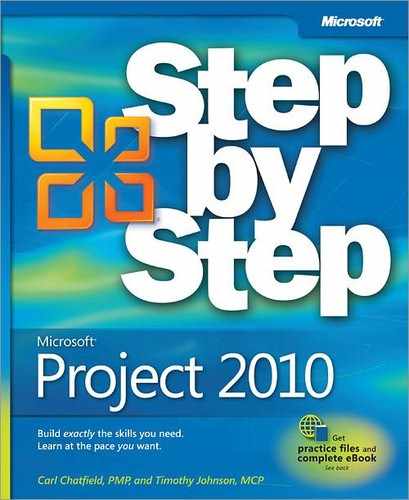
Type Assign launch team members, and then press the Enter key.
The task you entered is given an ID number. Each task has a unique ID number, but it does not necessarily represent the order in which tasks occur. Your screen should look similar to the following illustration.
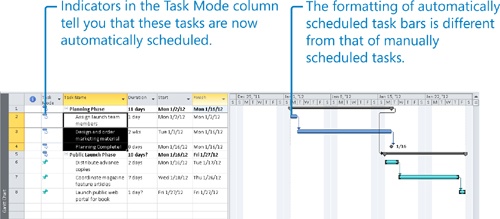
Because this is a manually scheduled task (as indicated in the Task Mode column), no duration or date values appear, and the task does not yet have a Gantt bar in the chart portion of the Gantt Chart view. Later you will work with automatically scheduled tasks that always have duration, start, and finish dates. Think of a manually scheduled task as an initial placeholder that you can create at any time without affecting the rest of the schedule. You might not know more than a task name at this time, and that’s OK. As you discover or decide more details about the task, such as when it should occur, you can add those details to the project plan.
Enter the following task names, pressing Enter after each task name:
Design and order marketing material
Public Launch Phase
Distribute advance copies
Coordinate magazine feature articles
Launch public web portal for book
Your screen should look similar to the following illustration.


Entering Durations
In this section, you begin to work with task durations—the amount of time you expect it will take to complete the task. Project can work with task durations that range from minutes to months. Depending on the scope of your project, you’ll probably want to work with task durations on the scale of hours, days, and weeks.
Let’s explore durations with an example. Let’s say a project has a project calendar with working time defined as 8 A.M. through 5 P.M. with one hour off for lunch breaks Monday through Friday, leaving nonworking time defined as evenings (after 5 P.M.) and weekends. If you estimate that a task will take 16 hours of working time, you could enter its duration as 2d, to schedule work over two eight-hour workdays. You should then expect that by starting the task at 8 A.M. on a Friday means that it wouldn’t be completed until 5 P.M. on the following Monday. No work would be scheduled over the weekend because Saturday and Sunday have been defined as nonworking time.
Tip
Project determines the overall duration of a project plan by calculating the difference between the earliest start date and the latest finish date of the plan’s tasks. The plan’s duration is also affected by other factors, such as task relationships, which are discussed in the Linking Tasks section later in this chapter. Because Project distinguishes between working and nonworking time, a task’s duration doesn’t necessarily correlate to elapsed time.
When working in Project, you can use abbreviations for durations.
If you enter this abbreviation | It appears like this | And it means |
m | min | Minute |
h | hr | Hour |
d | day | Day |
w | wk | Week |
mo | mon | Month |
Automatically scheduled tasks always have a duration (one day by default). Manually scheduled tasks, however, do not initially have any duration. A task’s duration is essential for Project to schedule a task, so it makes sense that a manually scheduled task, which is not scheduled by Project, does not require a duration. You can, however, enter duration values for manually scheduled tasks—you’ll do so in this section.
With manually scheduled tasks, you can enter regular duration values using the abbreviations shown previously; for example, 3d for three days. You can also enter text values, such as “Check with Bob.” Such text values are replaced with the default 1-day duration value when you convert a task from manual to automatic scheduling.
Project uses standard values for minutes and hours for durations: 1 minute equals 60 seconds, and 1 hour equals 60 minutes. For the durations of days, weeks, and months you can use Project’s defaults (for example, 20 days per month) or set your own values. To do this, on the File tab, click Options, and in the Project Options dialog box, click the Schedule tab, as illustrated here:

The exercises in this chapter use the default values: 8 hours per day, 40 hours per week, and 20 days per month.
In this exercise, you enter various duration values for the tasks you’ve created.
Click the cell below the Duration column heading for task 1, Assign launch team members.
The Duration field for task 1 is selected.
Type 1d, and then press Enter.
The value 1 day appears in the Duration field. Project draws a Gantt bar for the task, starting at the project start date you previously set.
Until the tasks are linked or a specific start or finish date is set, Project will set all new tasks that have a duration value to start at the Project Start date. This is true whether the tasks are manually or automatically scheduled.
Enter the following durations or text phrases for the following tasks:
Task ID
Task name
Duration
2
Design and order marketing material
Check with Marketing team
3
Public Launch Phase
(press Enter to skip this task for now)
4
Distribute advance copies
2d
For task 5, Coordinate magazine feature articles, you’ll enter start and finish dates and Project will calculate the duration.
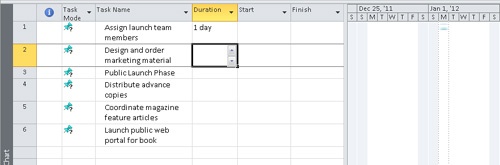
In the Start field (not the Duration field) for task 5, type or select 1/16/12, and then press the Tab key.
In the Finish field for the same task, type or select 1/24/12, and then press Enter.
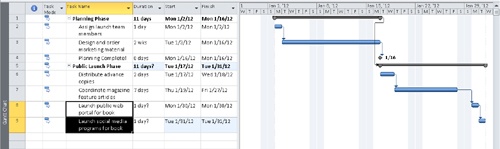
Project calculates the duration as seven days. Note that this is seven working days: Monday through Friday of the first week, and then Monday and Tuesday of the following week. Project also draws the Gantt bar for the task to span these working days plus the nonworking days (the weekend) between them, as shown here.
For task 6, Launch public web portal for the book, you don’t know a duration or start or finish date yet, but you can still capture what you do know.
In the Start field for task 6, type About two weeks before launch complete, and then press Enter.
As with the duration value of a manually scheduled task, you can also enter a text string for a start or finish date, or both. When the task is switched to be automatically scheduled, the text strings will be replaced with specific dates.
Entering a Milestone
In addition to entering tasks to be completed, you might want to account for an important event for your project, such as when a major phase of the project will end. To do this, you will create a milestone task.
Milestones are significant events that are either reached within the project (such as completion of a phase of work) or imposed upon the project (such as a deadline by which to apply for funding). Because the milestone itself doesn’t normally include any work, milestones are represented as tasks with zero duration.
In this exercise, you create a milestone task.
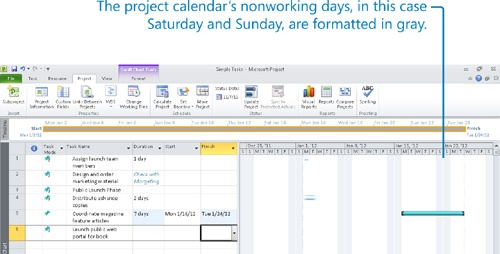
Click the name of task 3, Public Launch Phase.
On the Task tab, in the Insert group, click Milestone.
Project inserts a row for a new task and renumbers the subsequent tasks. Project names the new task “<New Milestone>” and gives it a zero-day duration. As with the other new tasks, the milestone is initially scheduled at the project start date of January 2.
Type Planning complete! and then press Enter.
The milestone task is added to your plan.
Organizing Tasks into Phases
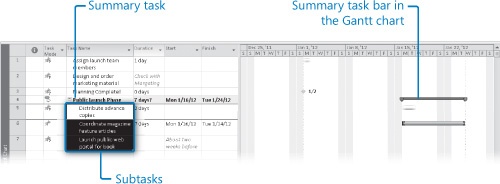
It is helpful to organize groups of closely related tasks into phases. When reviewing a project plan, seeing tasks organized into phases helps you and your stakeholders think in terms of major work items. For example, it is common to divide book publishing projects into Editorial, Design, and Production phases. You create phases by indenting and outdenting tasks. In Project, phases are represented by summary tasks, and the tasks indented below the summary task are called subtasks.
When a summary task is manually scheduled, its duration will be calculated based on its subtasks, just like the duration of an automatically scheduled summary task. However, you can edit the duration of a manually scheduled task and Project will keep track of both the manual duration that you entered and the calculated duration.
The duration of an automatically scheduled summary task is calculated by Project as the span of time from the earliest start date to the latest finish date of its subtasks. If you directly edit the duration of an automatically scheduled summary task, or its start or finish date, it will be switched to a manually scheduled task.
In this exercise, you organize the new book launch plan into two phases.
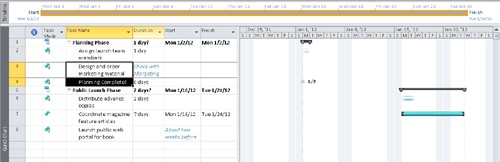
Select the names of tasks 5 through 7.
These are the tasks you want to make subtasks of the public launch phase.
On the Task tab, in the Schedule group, click Indent Task.
Project promotes task 4 to a summary task. Or you can think of it as Project demoting tasks 5 through 7 to subtasks; either way, the project plan now includes a summary task.
Notice the scheduling effect of creating the summary task. Since task 6 had specific start and finish dates already, Project set the start date of the summary task (and its other subtask with a duration) to the same date, January 16.
Next you’ll create another summary task in a different way.
Select the name of task 1, Assign launch team members.
On the Task tab, in the Insert group, click Summary.
Project inserted a row for a new task, indented the task directly below it, and renumbered the subsequent tasks. Project names the new task “<New Summary Task>.”
With the name of the new summary task selected, type Planning Phase and press Enter.
Select the names of tasks 3 and 4. You will indent these tasks under the summary task 1.
On the Task tab, in the Schedule group, click Indent Task.
Now the project plan is organized into two phases of work.
Linking Tasks
Most projects require tasks to be performed in a specific order. For example, the task of writing a chapter of a book must be completed before the task of editing the chapter can occur. These two tasks have a finish-to-start relationship (also called a link or a dependency), which has two aspects:
The second task must occur after the first task; this is a sequence.
The second task can occur only if the first task is completed; this is a dependency.
In Project, the first task (“write the chapter”) is called the predecessor because it precedes tasks that depend on it. The second task (“edit the chapter”) is called the successor because it succeeds, or follows tasks on which it is dependent. Any task can be a predecessor for one or more successor tasks. Likewise, any task can be a successor to one or more predecessor tasks.
Although this might sound complicated, tasks can have one of only four types of task relationships.
This task relationship | Means | Looks like this in the Gantt chart | Example |
Finish-to-start (FS) | The finish date of the predecessor task determines the start date of the successor task. | A book chapter must be written before it can be edited. | |
Start-to-start (SS) | The start date of the predecessor task determines the start date of the successor task. | Ordering prepress and ordering paper are closely related, and they should occur simultaneously. | |
Finish-to-finish (FF) | The finish date of the predecessor task determines the finish date of the successor task. | Tasks that require specific equipment must end when the equipment rental period ends. | |
Start-to-finish (SF) | The start date of the predecessor task determines the finish date of the successor task. | The time when the print run is scheduled determines when a binder selection task must end. |
Tip
You can adjust the schedule relationship between predecessor and successor tasks with lead and lag time. For example, you can set a two-day lag between the end of a predecessor task and the start of its successor task. For more information, see Chapter 7.
Representing task relationships and handling changes to scheduled start and finish dates are two areas where the use of a scheduling engine such as Project really pays off. For example, you can change task durations or add or remove tasks from a chain of linked tasks, and Project will reschedule tasks accordingly.
Task relationships appear in several ways in Project, including the following:
In the Gantt Chart and Network Diagram views, task relationships appear as the lines connecting tasks.
In tables, such as the Entry table, task ID numbers of predecessor tasks appear in the Predecessor fields of successor tasks. (You might need to drag the vertical divider bar to the right to see the Predecessor column.)
You create task relationships by creating links between tasks. In this exercise, you use different methods to create links between several tasks, thereby creating finish-to-start relationships.
First, you’ll create a finish-to-start dependency between two tasks.
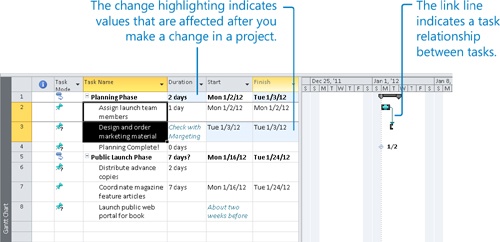
Select the names of tasks 2 and 3.
On the Task tab, in the Schedule group, click Link Tasks.
Tasks 2 and 3 are linked with a finish-to-start relationship. Note that task 3 previously had no start or finish date, but by making it a successor of task 2, you gave Project enough information to give task 3 a start date: January 3, the next working day following the end of task 2.
Have you noticed the light blue highlighting of some of the Duration, Start, and Finish fields as you linked tasks? Project highlights the values that are affected after each change you make in a project plan.
Tip
To unlink tasks, select the tasks you want to unlink, and then click Unlink Tasks in the Schedule group on the Task tab.
Next, you’ll link tasks 3 and 4 using a different means.
Select the name of task 4, Planning complete!
On the Task tab, in the Properties group, click Information.
The Task Information dialog box appears.
Click the Predecessors tab.
Click the empty cell below the Task Name column heading, and then click the down arrow that appears.
On the Task Name list, click Design and order marketing material.
Click OK to close the Task Information dialog box.
Tasks 3 and 4 are linked with a finish-to-start relationship.
Tip
Recall that any task can have multiple predecessor tasks. One way you can specify additional predecessor tasks is to add them on the Predecessors tab of the Task Information dialog box. For finish-to-start relationships (the default link type), the predecessor with the later finish date will determine the start date of the successor task.
Next you’ll link all the subtasks under Public Launch Phase in one action.
Select the names of tasks 6 through 8.
On the Task tab, in the Schedule group, click Link Tasks.
Tasks 6 through 8 are linked.
Tip
Tasks 6 through 8 are adjacent to each other. To select tasks that are not adjacent, select the first task, hold down the Ctrl key, and then select additional tasks.
Notice that Project replaced the text value in the start date field of task 8 with a scheduled date, and supplied a one-day duration. Project did so because it requires a date value for the task once it was linked to another task. The question mark following the duration value indicates that this is an estimated duration; it has no effect on the scheduling of the task.
There are several ways of linking tasks, and you’ll use one more to link the two phases of the new book launch plan.
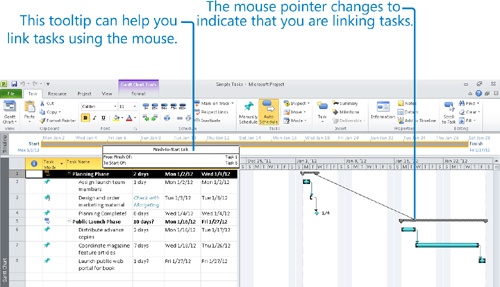
In the chart portion of the Gantt Chart view, point the mouse pointer at the Gantt bar for task 1, Planning Phase. Click and drag down and to the right to the Gantt bar for task 5, Public Launch Phase, and release the mouse over the task 5 bar.
The summary tasks 1 and 5 are linked with a finish-to-start relationship.
So far, you’ve used three different techniques to link tasks. As you use Project more, you’ll probably find you prefer one of these or another way of linking tasks.
Tip
When working with summary tasks, you can either link summary tasks directly (as you did previously), or link the latest task in the first phase with the earliest task in the second phase. The scheduling result is the same in either situation, but it’s preferable to link the summary tasks to better reflect the sequential nature of the two phases. Under no circumstances, however, can you link a summary task to one of its own subtasks. Doing so would create a circular scheduling problem, so Project doesn’t allow it.
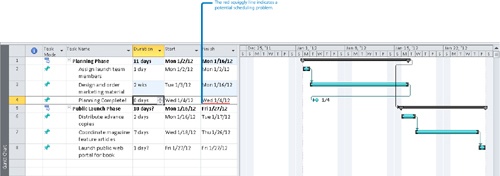
To conclude this exercise, you’ll enter a specific duration value for task 3. The Marketing team has reported that their estimate is task 3 should have a two-week duration.
In the duration field for task 3, type 2w, and then press Enter.
Notice that the new duration for task 3 caused the Planning Phase summary task’s duration to increase, but it did not affect the scheduling of the task 4 milestone. Why not? Remember that this task is still manually scheduled. You can force Project to adjust the start and finish dates of this task while leaving it as manually scheduled.
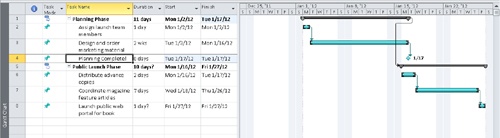
Select the name of task 4.
On the Task tab, in the Schedule group, click Respect Links.
Project reschedules task 4 to start following the completion of its predecessor, task 3.
You might have noticed that the start of the Public Launch Phase summary task does not respect its link to its predecessor, the Planning Phase summary task. Clicking the Respect Link button with the Public Launch Phase summary task selected will not cause it to be rescheduled, as it did for task 4. That’s because the start and finish dates of the summary task are driven by the earliest start and latest finish dates of its subtasks, which in this case are still manually scheduled. You’ll address this issue next by switching to automatic scheduling.

Switching Task Scheduling from Manual to Automatic
Up to now, you’ve worked with manually scheduled tasks in the new book project. Manually scheduled tasks let you focus on capturing basic task details, such as name and sequence, without dealing with the complexity of Project’s powerful scheduling engine. As a project plan becomes more detailed, though, you’ll be ready to switch some or all tasks to automatic scheduling and to change the default for new tasks to automatic scheduling.
In this exercise, you convert some tasks and then the entire project plan to automatic scheduling.
Select the names of tasks 2 through 4.
These tasks are currently set to be manually scheduled, as indicated by the push-pin indicator in the Task Mode column.
On the Task tab, in the Tasks group, click Auto Schedule.
Project switches these tasks to be automatically scheduled.
Project changes the Task Mode icons and formatting of the tasks’ Gantt bars to indicate that they are now automatically scheduled.
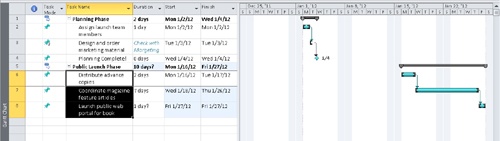
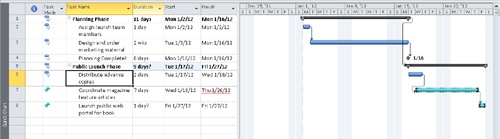
Select the name of task 6, Distribute advance copies.
On the Task tab, in the Tasks group, click Auto Schedule.
This time, task 6 was rescheduled to start later. Why did this happen? Recall the dependency between the two summary tasks. The dependency said in effect that the Public Launch Phase should start once the Planning Phase was complete. However, because task 6 and the other subtasks of the Public Launch Phase were manually scheduled, Project did not reschedule them to account for this dependency. As soon as you set task 6 to automatic scheduling, however, Project did just that and adjusted the start date of its summary task as well.
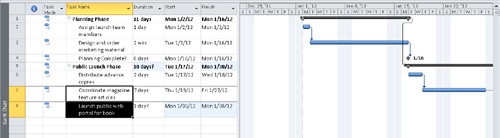
The remaining subtasks 7 and 8 are still manually scheduled, so Project left them alone. You’ll switch these tasks next.
Select the names of task 7 and 8.
On the Task tab, in the Tasks group, click Auto Schedule.
Project reschedules the remaining tasks. This extends the duration of the Public Launch Phase and of the overall project.
Right now, this project plan is set to treat all new tasks entered as manually scheduled. You could leave this setting as is and then switch specific tasks to be automatically scheduled. However, this project plan is developed enough now to switch to automatic scheduling and later set some specific tasks to manually scheduled as needed.
On the Task tab, in the Tasks group, click Mode and then click Auto Schedule.
Tip
You can also toggle the scheduling mode by clicking the New Tasks status bar text and then picking the other scheduling mode.
To see automatic scheduling in action, you’ll add a new task to the project plan.
In the Task Name field, below task 8, type Launch social media programs for book and then press Enter.
Project adds the new task to the plan. By default, it is not linked to any other task and is scheduled to start at its summary task’s start date. To end this exercise, you’ll link it to another task.
Select the names of tasks 8 and 9.
On the Task tab, in the Schedule group, click Link Tasks.
Project links the two tasks. Notice that the duration of the Public Launch Phase summary task was updated automatically from 10 to 11 days.
Setting Nonworking Days
This exercise introduces calendars, the primary means by which you control when each task and resource can be scheduled for work in Project. In later chapters, you will work with other types of calendars; in this chapter, you work only with the project calendar.
The project calendar defines the general working and nonworking time for tasks. Project includes multiple calendars, called base calendars, any one of which serves as the project calendar for a project plan. You select the project calendar in the Project Information dialog box. Think of the project calendar as your organization’s normal working hours. For example, this might be Monday through Fridays, 8 A.M. through 5 P.M., with a one-hour lunch break each day. Your organization or specific resources might have exceptions to this normal working time, such as holidays or vacation days. You’ll address resource vacations in Chapter 3.
In this exercise, you’ll create a working time exception in the project calendar.
If necessary, scroll the chart portion of the Gantt Chart view so the week of January 15 is visible.
You want to indicate that Thursday, January 19, will be a nonworking day for your organization.
On the Project tab, in the Properties group, click Change Working Time.
The Change Working Time dialog box appears.
In the For calendar box, click the down arrow.
The list that appears contains the three base calendars included with Project. These calendars are
24 Hours. Has no nonworking time
Night Shift. Covers a “graveyard” shift schedule of Monday night through Saturday morning, 11 P.M. to 8 A.M., with a one-hour break each day
Standard. The traditional working day, Monday through Friday from 8 A.M. to 5 P.M., with a one-hour break each day
Only one of the base calendars serves as the project calendar. For this project, you’ll use the Standard base calendar as the project calendar, so leave it selected.
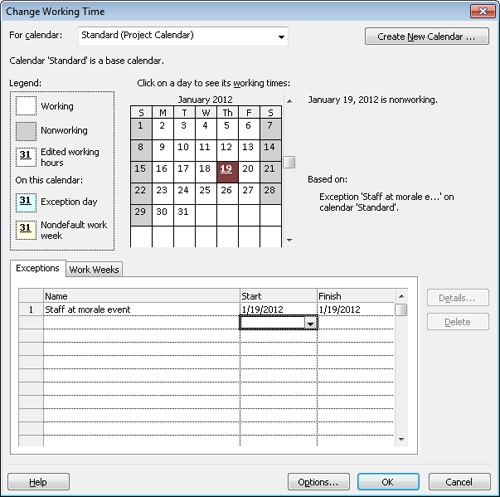
You know the entire staff will be at a morale event on January 19; therefore, no work should be scheduled that day. You will record this as a calendar exception.
In the Name field on the Exceptions tab in the lower portion of the dialog box, type Staff at morale event, and then click in the Start field.
In the Start field, type 1/19/12, and then press Enter.
You could have also selected the date you want in the calendar above the Exceptions tab or from the drop-down calendar in the Start field.
The date is now scheduled as nonworking time for the project. In the dialog box, the date appears underlined and color formatting is applied to indicate an exception day.
Click OK to close the Change Working Time dialog box.
To verify the change to the project calendar, note in the chart that Thursday, January 19, is now formatted gray to indicate nonworking time (just like the weekends). The subsequent task is automatically rescheduled to start on the next working day, January 20.

In this section, you’ve made just one specific day a nonworking day. Other common examples of nonworking time include recurring holidays or unique working hours. You’ll make such settings in Chapter 3.
Tip
If needed, you can schedule tasks to occur during working and nonworking time. To do this, assign an elapsed duration to a task. You enter elapsed duration by preceding the duration abbreviation with an e. For example, type 3ed to indicate three elapsed days. You might use an elapsed duration for a task that goes on around the clock rather than just during normal working hours. For instance, a construction project might have the tasks Pour foundation concrete and Remove foundation forms in a construction project. If so, you might also want a task called Wait for concrete to cure because you don’t want to remove the forms until the concrete has cured. The task Wait for concrete to cure should have an elapsed duration because the concrete will cure over a contiguous range of days, whether they are working or nonworking days. If the concrete takes 48 hours to cure, you can enter the duration for that task as 2ed, schedule the task to start on Friday at 9 A.M., and expect it to be complete by Sunday at 9 A.M. In most cases, however, you’ll work with nonelapsed durations in Project.
Checking the Plan’s Duration
At this point, you might want to know how long the project is expected to take. You haven’t directly entered a total project duration or finish date, but Project has calculated these values based on individual task durations and task relationships. An easy way to view the project’s scheduled start and finish dates is via the Timeline view and the Project Information dialog box.
In this exercise, you see the current total duration and scheduled finish date of the project based on the task durations and relationships you’ve entered.
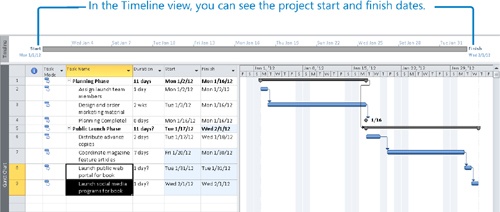
In the Timeline view above the Gantt Chart view, note the project plan’s current start and finish dates.
Tip
If the Timeline view is not shown, on the View tab, in the Split View group, click the Timeline check box.
The Timeline view is a handy way of seeing the “big picture” of the project plan. Here we’re looking just at start and finish dates, but in later chapters, you’ll work with the Timeline view in different ways.
On the Project tab, in the Properties group, click Project Information.
The Project Information dialog box appears.
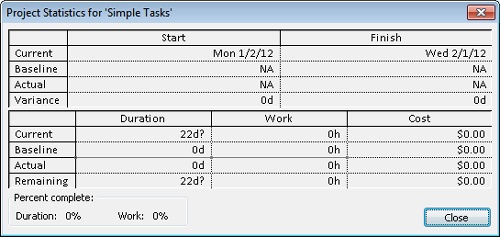
Here again you see the finish date: 2/1/12. You can’t edit the finish date directly because this project plan is set to be scheduled from the start date. Project calculates the plan’s finish date based on the span of working days required to complete the tasks, starting at the plan’s start date. Any change to the start date will cause Project to recalculate the finish date.
Next, let’s look at the duration information in more detail.
Click Statistics.
You don’t need to understand all of these numbers yet, but the current duration is worth noting. The duration is the number of working days (not elapsed days) between the project’s start date and finish date.
You can visually verify these numbers on the Gantt chart or Timeline view.
Click Close to close the Project Statistics dialog box.
Documenting Tasks and the Project Plan
You can record additional information about a task in a note. For example, you might have detailed descriptions of a task and still want to keep the task’s name succinct. You can add such details to a task note. That way, the information resides in the project plan and can be easily viewed or printed.
There are three types of notes: task notes, resource notes, and assignment notes. You enter and review task notes on the Notes tab in the Task Information dialog box. Notes in Project support a wide range of text formatting options; you can even link to or store graphic images and other types of files in notes.
Hyperlinks allow you to connect a specific task to additional information that resides outside of the project plan—such as another file, a page on the Web, or a page on an intranet.
In this exercise, you enter task notes and hyperlinks to document important information about some tasks.
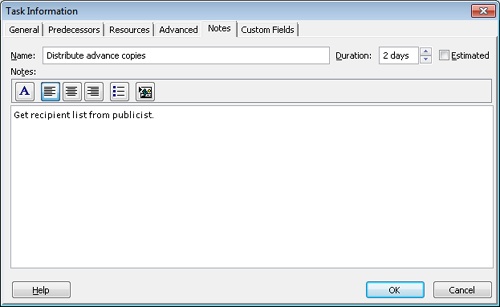
Select the name of task 6, Distribute advance copies.
On the Task tab, in the Properties group, click Notes.
Project displays the Task Information dialog box with the Notes tab visible.
In the Notes box, type Get recipient list from publicist.
Click OK.
A note icon appears in the Indicators column.
Point to the note icon.
The note appears in a ScreenTip. For notes that are too long to appear in a ScreenTip, you can double-click the note icon to display the full text of the note.
To conclude this exercise, you create a hyperlink.
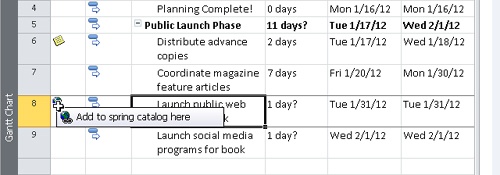
Right-click the name of task 8, Launch public Web portal for book, and then click Hyperlink on the shortcut menu.
The Insert Hyperlink dialog box appears.
In the Text to display box, type Add to spring catalog here.
In the Address box, type http://www.lucernepublishing.com/
Click OK.
A hyperlink icon appears in the Indicators column. Pointing to the icon displays the descriptive text you typed earlier.
To open the Web page in your browser, right-click on the hyperlink icon and in the shortcut menu that appears click Hyperlink, and then click Open Hyperlink.
To conclude this exercise, you’ll record some information about the project plan. Like other Microsoft Office programs, Project keeps track of several file properties. Some of these properties are statistics, such as how many times the file has been revised. Other properties include information that you might want to record about a project plan, such as the project manager’s name or keywords to support a file search. Project also uses properties in page headers and footers when printing.
In the following steps, you enter some properties that you will use later when printing and for other purposes.
Click the File tab.
The Backstage view appears. The Info tab should be selected by default. Note the thumbnail image and key statistics such as the start date on the right side of the Backstage view.
Click the Project Information button directly below the thumbnail image. In the menu that appears, click Advanced Properties.
The Properties dialog box appears with the Summary tab visible.
In the Subject box, type New book launch schedule.
In the Author box, type your name.
In the Company box, type Lucerne Publishing.
Select the Save preview picture check box.
The next time this file appears in the Open dialog box with the Preview option selected, a thumbnail image showing the first few tasks of the plan will be displayed.
Click OK to close the dialog box.

Key Points
Essential aspects of tasks in a project plan include their duration and order of occurrence.
Task links, or relationships, cause the start or end of one task to affect the start or end of another task. A common task relationship is a finish-to-start relationship, in which the completion of one task controls the start of another task.
In Project, phases of a schedule are represented as summary tasks.
Tasks can be manually or automatically scheduled. For manually scheduled tasks, you can record whatever information you may have about a task’s duration, start, and finish values.
You use calendars in Project to control when work can be scheduled to occur.
You can document additional details using task notes and create hyperlinks to the Web.