Chapter 3. Setting Up Resources
Chapter at a Glance

✓ | Set up basic resource information for the people who work on projects. |
✓ | Adjust the maximum capacity of a resource to do work. |
✓ | Set up cost information for work resources. |
✓ | Change a resource’s availability for work. |
✓ | Enter cost resource information for financial tracking. |
✓ | Record additional information about a resource in a note. |
Microsoft Project 2010 supports three types of resources. These are work resources, as well as two special-purpose resources: cost and material. Briefly, here is how to think about the three resource types:
Work resources include the people and equipment needed to complete the tasks in a project.
Cost resources represent a financial cost associated with a task that you need to account for. Examples include categories of expenses like travel, entertainment, and so on.
Material resources are consumables that you use up as the project proceeds. For example, a construction project might need to track steel or concrete as it is used throughout the project.
In this chapter you will set up work and cost resources. Material resources are described in Chapter 8.
In this chapter, you will set up the work and cost resources that you need to complete the new book launch at Lucerne Publishing. Effective resource management is one of the most powerful advantages of using Project instead of task-focused planning tools, such as paper-based organizers. You do not need to set up resources and assign them to tasks in Project; however, without this information, you might be less effective in managing your schedule. Setting up resource information in Project takes a little effort, but the time is well spent if your project is primarily driven by time or cost constraints (and nearly all projects are driven by one, if not both, of these factors).
Practice Files
Before you can complete the exercises in this chapter, you need to copy the book’s practice files to your computer. A complete list of practice files is provided in Using the Practice Files at the beginning of this book. For each exercise that has a practice file, simply browse to where you saved the book’s practice file folder.
Important
If you are running Project Professional, you may need to make a one-time setting change. This helps ensure that the practice files you work with in this chapter do not affect your Project Server data. For more information, see Appendix C.
Setting Up Work Resources
Work resources are the people and equipment that do the work of the project. Project focuses on two aspects of work resources: their availability and their costs. Availability determines when specific resources can work on tasks and how much work they can perform, and costs refer to how much money will be required to pay for those resources.
Some examples of work resources are listed in this table.
Work Resource | Example |
Individual people identified by name. | Jun Cao; Zac Woodall |
Individual people identified by job title or function. | Publisher; Contract specialist |
Groups of people who have common skills. (When assigning such interchangeable resources to a task, you might not be concerned about who the individual resource is so long as they have the right skills.) | Copyeditors; Typesetters |
Equipment. | Offset lithography press |
Project can help you make smarter decisions about managing work resources and monitoring financial costs.
In this exercise, you enter the names of several people resources.
Set Up
Start Project if it’s not already running.
You need the Simple Resources_Start project plan located in your Chapter03 practice file folder to complete this exercise. Open the Simple Resources_Start project plan, and then follow these steps.
On the File tab, click Save As.
Project displays the Save As dialog box.
In the File name box, type Simple Resources, and then click Save.
On the View tab, in the Resource Views group, click Resource Sheet.
You will use the Resource Sheet view to enter the initial list of resources for the new book launch project.
Click the cell directly below the Resource Name column heading.
Type Jun Cao, and press the Enter key.
Project creates a new resource.
On the next empty rows in the Resource Name column, enter the following names:
Sharon Salavaria
Toby Nixon
Toni Poe
Zac Woodall
These are all individual people. You can also have a resource that represents multiple people. You’ll enter such a resource next.
In the Resource Name field, below the last resource, type Copyeditors, and then press Enter.


Entering Resource Capacity
The Max. Units field represents the maximum capacity of a resource to accomplish any task. Specifying that a resource has 100% maximum units means that 100 percent of that resource’s working time is available to work on assigned tasks in the project plan. Project will alert you if you assign the resource to more tasks than they can accomplish at 100% maximum units (in other words, if the resource becomes overallocated). 100% is the default Max. Units value for new resources.
For a resource that represents not a specific person, but a category of interchangeable people with a common skill set, you can enter a larger Max. Units value to indicate the number of available people. Entering a Max. Units setting such as 800% for such a resource means that you can expect that eight individual people who all belong to that resource category will be available to work full time every workday.
In this exercise, you adjust the Max. Units values to indicate one resource that represents multiple people, and another resource whose capacity to work in this project plan is less than full time.
Click the Max. Units field for the Copyeditors resource.
Type or select 400%, and then press Enter.
Tip
When you click a numeric value in a field like Max. Units, up and down arrows appear. You can click these to display the number you want, or simply type the number in the field.
Next you’ll update the Max. Units value for Sharon Salavaria to indicate that she works half time.
Click the Max. Units field for Sharon Salavaria, type or select 50%, and then press Enter.

With these changes to Max. Units, Project will identify these resources as being overallocated when their assigned work exceeds their capacities. You will work with resource overallocation in Chapter 8 and Chapter 9.
Entering Resource Pay Rates
Almost all projects have some financial aspect, and cost limits the scope of many projects. Tracking and managing cost information allows the project manager to answer such important questions as the following:
What is the expected total cost of the project based on our task durations and resource assignments?
Are we using expensive resources to do work that less expensive resources could do?
How much money will a specific type of resource or task cost over the life of the project?
Are we spending money at a rate that we can sustain for the planned duration of the project?
You can enter standard rates and costs per use for work and material resources, as well as overtime rates for work resources. Cost resources do not use pay rates and are described later in this chapter.
When a work resource has a standard pay rate entered and is assigned to a task, Project calculates the cost of the assignment. Project does so by multiplying the assignment’s work value by the resource’s pay rate—both using a common increment of time (such as hours). You can then see cost per resource, cost per assignment, and cost per task (as well as costs rolled up to summary tasks and the entire project plan). You will assign resources to tasks in Chapter 4.
Project handles overtime expenses differently. Project will apply the overtime pay rate only when you specifically record overtime hours for an assignment. You will find more information about working with overtime in Chapter 14. Project does not automatically calculate overtime hours and associated costs because there’s too great a chance that it would apply overtime when you did not intend it. In the new book launch project plan, Jun Cao’s working schedule provides a good example. In the next exercise, you will set up a working schedule of 10 hours per day, four days per week for Jun. This is still a regular 40-hour workweek, even though 2 hours per day could be mistaken for overtime with the normal assumption of an 8-hour day.
In addition to or instead of cost rates, a resource can include a set fee that Project accrues to each task to which the resource is assigned. This is called a cost per use. Unlike cost rates, the cost per use does not vary with the task’s duration or amount of work the resource performs on the task. You specify the cost per use in the Cost/Use field in the Resource Sheet view.
In this exercise, you enter standard and overtime pay rates for work resource.
In the Resource Sheet, click the Std. Rate field for Jun Cao.
Type 42 and press Enter.
Jun’s standard hourly rate of $42 appears in the Std. Rate column. Note that the default standard rate is hourly, so you did not need to specify cost per hour.
In the Std. Rate field for Sharon Salavaria, type 1100/w and press Enter.
Sharon’s weekly pay rate appears in the Std. Rate column.
Enter the following standard pay rates for the given resources:
Resource Name
Standard Rate
Toby Nixon
2700/w
Toni Poe
Leave at 0 (Toni is the book author and you’re not tracking her rate-based costs in this project plan)
Zac Woodall
55
Copyeditors
45
As you can see, you can enter pay rates with a variety of time bases—hourly (the default), daily, weekly, and so on. In fact, you can enter pay rates in all the increments of time for which you can enter task durations—from minutes to years.
Next, you will enter an overtime pay rate for one of the resources.
In the Overtime Rate field for Jun Cao, type 67, and then press Enter.


Adjusting Working Time for Individual Resources
Project uses different types of calendars for different purposes. In Chapter 2, you modified the project calendar to specify nonworking days for the entire project. In this exercise, you will focus on the resource calendar. A resource calendar controls the working and nonworking times of an individual resource. Project uses resource calendars to determine when work for a specific resource can be scheduled. Resource calendars apply only to work resources (people and equipment), not to material or cost resources.
When you initially create resources in a project plan, Project creates a resource calendar for each work resource. The initial working time settings for resource calendars exactly match those of the project calendar, which by default is the Standard base calendar. The Standard base calendar is built into Project and accommodates a default work schedule from 8 A.M. to 5 P.M., Monday through Friday, with an hour off for lunch each day. If all the working times of your resources match the working time of the project calendar, you do not need to edit any resource calendars. However, chances are that some of your resources will need exceptions to the working time in the project calendar—such as
A flextime work schedule
Vacation time
Other times when a resource is not available to work on the project, such as time spent training or attending a conference
Tip
If you have a resource who is available to work on your project only part time, you might be tempted to set the working time of the resource in your project to reflect a part-time schedule, such as 8 A.M. to 12 P.M. daily. However, a better approach would be to adjust the availability of the resource as recorded in the Max. Units field to 50%, as you did for the previous exercise for the resource named Sharon Salavaria. Changing the unit availability of the resource keeps the focus on the capacity of the resource to work on the project rather than on the specific times of the day when that work might occur. You set the maximum units for a resource in the Resource Sheet view.
Changes that you make to the project calendar are reflected automatically in resource calendars derived from the same project calendar. For example, in Chapter 2, you specified a nonworking day for a staff morale event, and Project rescheduled all work to skip that day.
In this exercise, you specify the working and nonworking times for individual work resources.
On the Project tab, in the Properties group, click Change Working Time.
The Change Working Time dialog box appears.
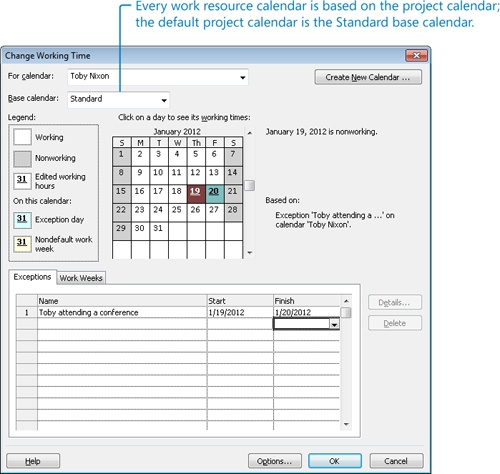
In the For calendar box, click Toby Nixon.
Toby Nixon’s resource calendar appears in the Change Working Time dialog box. Toby has told you he will not be available to work on Thursday and Friday, January 19 and 20, because he plans to attend a book industry conference.
On the Exceptions tab in the Change Working Time dialog box, click in the first row directly below the Name column heading and type Toby attending a conference.
The description for the calendar exception is a handy reminder for you and others who may view the project plan later.
Click in the Start field and type or select 1/19/12.
Click in the Finish field, type or select 1/20/12, and then press the Enter key.
Tip
Alternatively, in the calendar you can first select the date or date range for which you want to create an exception, and then enter the exception name. Project will insert the Start and Finish dates automatically based on your selection, and then press the Enter key.
Project will not schedule work for Toby on these dates.
Tip
To set up a partial working time exception for a resource, such as a portion of a day when a resource cannot work, click Details. In the Details dialog box, you can also create recurring exceptions to the resource’s availability.
To conclude this exercise, you will set up a “4 by 10” work schedule (that is, 4 days per week, 10 hours per day) for a resource.
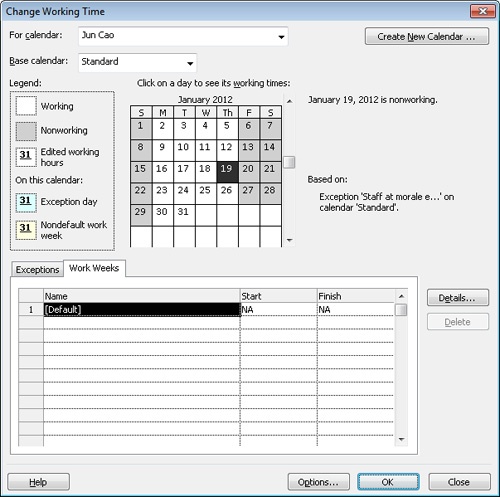
In the For box, click Jun Cao.
When prompted to save the resource calendar changes that you made for Toby Nixon, click Yes.
Click the Work Weeks tab in the Change Working Time dialog box.
Click [Default] directly under the Name column heading, and then click Details.
Next, you will modify the default working week days and times for Jun Cao.
Under Selected Day(s), select Monday through Thursday.
These are the weekdays Jun can normally work.
Click Set day(s) to these specific working times.
Next you’ll modify Jun’s regular daily schedule for the days she normally works.
In row 2, click 5:00 PM and replace it with 7:00 PM, and then press Enter.
Finally, you will mark Friday as a nonworking day for Jun.
Click Friday.
Click Set days to nonworking time.
Now Project can schedule work for Jun as late as 7 P.M. every Monday through Thursday, but it will not schedule work for her on Fridays.
Click OK to close the Details dialog box.
You can see in the calendar in the Change Working Time dialog box that Fridays (as well as Saturdays and Sundays) are marked as nonworking days for Jun Cao.
Click OK to close the Change Working Time dialog box.
Because you have not yet assigned these resources to tasks, you don’t see the scheduling effect of their nonworking time settings. You will observe this in Chapter 4.
Tip
If you find that you must edit several resource calendars in a similar way (to handle a night shift, for example), it may be easier to assign a different base calendar to a resource or collection of resources. This is more efficient than editing individual calendars, and it allows you to make project-wide adjustments to a single base calendar if needed. For example, if your project includes a day shift and a night shift, you can apply the Night Shift base calendar to those resources who work the night shift. You change a base calendar in the Change Working Time dialog box. For collections of resources, you can select a specific base calendar directly in the Base Calendar column on the Entry table in the Resource Sheet view.

Setting Up Cost Resources
Another type of resource that you can use in Project is the cost resource. You can use a cost resource to represent a financial cost associated with a task in a project. While work resources (people and equipment) can have associated costs (hourly rates and fixed costs per assignment), the sole purpose of a cost resource is to associate a particular type of cost with one or more tasks. Common types of cost resources might include categories of expenses you’d want to track on a project for accounting or financial reporting purposes, such as travel, entertainment, or training.
Cost resources do no work and have no effect on the scheduling of a task. The Max. Units Standard and Overtime pay rates and Cost/Use fields do not apply to cost resources. After you assign a cost resource to a task and specify the cost amount per task, you can then see the cumulative costs for that type of cost resource, such as total travel costs in a project.
The way in which cost resources generate cost values differs from that of work resources. When you assign a work resource to a task, the work resource can generate a cost based on a pay rate (such at $40 per hour for the length of the assignment), a flat per-use cost (such as $100 per assignment), or both. You set up such pay rates and cost per use amounts once for the work resource, as you did in the section Entering Resource Pay Rates earlier in this chapter. However, you enter the cost value of a cost resource only when you assign it to a task. You can do so in the Cost field of the Assign Resources dialog box or in the Cost field of the Task Form with the Cost detail shown.
Lucerne Publishing maintains a profit and loss (P&L) sheet for every book it publishes. Travel is a major expense incurred in a book launch.
In this exercise, you’ll set up a cost resource.
In the Resource Sheet, click the next empty cell in the Resource Name column.
Type Travel and press the Tab key.
In the Type field, click Cost.

You will assign a cost resource in Chapter 4.
Documenting Resources
You might recall from Chapter 2 that you can record any additional information about a task, resource, or assignment in a note. For example, if a resource has flexible skills that can help the project, it is a good idea to record this in a note. In that way, the note resides in the project plan and can be easily viewed or printed.
In this exercise, you enter resource notes relevant to the new book launch project. In Chapter 2, you entered a task note via the Notes button on the Task tab of the Properties group. You can enter resource notes in a similar way (via the Notes button on the Resource tab of the Properties group) but in this exercise, you’ll use a different method. You’ll use the Resource form, which allows you to view and edit notes for multiple resources more quickly.
In this exercise, you’ll enter notes in the Resource Form.
In the Resource Name column, click Toby Nixon.
On the Resource tab, in the Properties group, click the Details button.
The Resource Form appears below the Resource Sheet view.
In this type of split view, details about the selected item in the upper view (a resource, in this case) appear in the lower view. You can quickly change the selected resource name in the upper view by clicking directly on a name, using the up arrow or down arrow keys, or by clicking Previous or Next in the Resource Form.
The Resource Form can display one of several details; initially it displays the Schedule details. Next you’ll switch it to display the Notes details.
Click anywhere in the Resource Form.
On the Format tab, in the Details group, click Notes.
Tip
You can also right-click in the gray background area of the Resource Form and, in the shortcut menu that appears, click Notes.
The Notes details appear in the Resource Form.
In the Notes box, type Toby worked on launch campaigns for Toni Poe’s previous two books.
Notice that as soon as you started typing the note, the Previous and Next buttons changed to OK and Cancel.
Click OK.
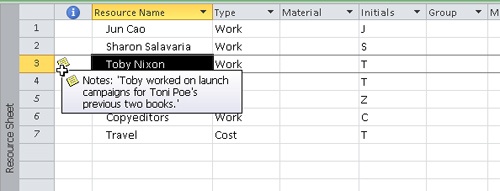
In the Resource Sheet view, a note icon appears in the Indicators column.
Point to the note icon that appears next to Toby’s name in the Resource Sheet.
The note appears in a ScreenTip. For notes that are too long to appear in a ScreenTip, you can double-click the note icon to display the full text of the note. You can also see more of long notes in the Resource Form or in the Resource Information dialog box.
To conclude this exercise, you’ll add a note for one more resource.
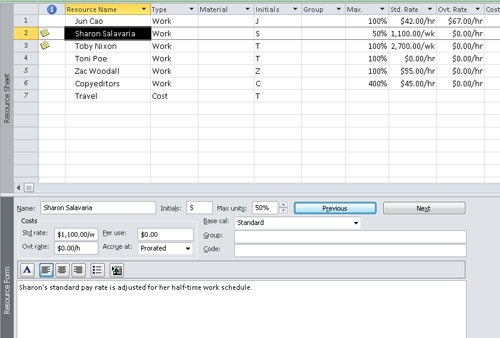
In the Resource Form, click Previous to shift the focus to Sharon Salavaria and display her details.
In the Notes box, type Sharon’s standard pay rate is adjusted for her half-time work schedule. Then click OK.
Finally, you’ll close the Resource Form.
On the Resource tab, in the Properties group, click the Details button.
The Resource Form is closed, leaving the Resource Sheet displayed.
In this exercise, you’ve entered notes for some resources. This information is unique to those resources.


Key Points
Recording resource information in your project plans helps you better control who does what work when and at what costs.
Work resources (people and equipment) perform the work in a project.
Cost resources account for the types of expenses that you may wish to track across a project.