
Chapter 9. Fine-Tuning Assignment Details
Chapter at a Glance

In this chapter, you will learn how to: | |
✓ | Delay the start of a resource assignment. |
✓ | Control how a resource’s work on a task is scheduled by using work contours. |
✓ | Apply different cost rates for a resource to account for different kinds of work performed by the resource. |
✓ | Assign a material resource to a task. |
✓ | See resources’ capacities to do work. |
✓ | Assign tasks in the Team Planner view (Project Professional only). |
Because work resources are often the most expensive part of a project, understanding how to make the best use of their time is an important project management skill. In this chapter, you apply a variety of Microsoft Project 2010 features to manage resources’ assignments to tasks and costs of assignments. Project Professional users also use the Team Planner view to manage assignments.
Practice Files
Before you can complete the exercises in this chapter, you need to copy the book’s practice files to your computer. A complete list of practice files is provided in Using the Practice Files at the beginning of this book. For each exercise that has a practice file, simply browse to where you saved the book’s practice file folder.
Important
If you are running Project Professional, you may need to make a one-time setting change. This helps ensure that the practice files you work with in this chapter do not affect your Project Server data. For more information, see Appendix C.
Delaying the Start of Assignments
If more than one resource is assigned to a task, you might not want all the resources to start working on the task at the same time. You can delay the start of work for one or more resources assigned to a task.
For example, assume that four resources have been assigned a task. Three of the resources initially work on the task, and the fourth later inspects the quality of the work. The inspector should start work on the task later than the other resources.
In this exercise, you delay the start of a resource assignment on a task.
Set Up
Start Project if it’s not already running.
You need the Advanced Assignments A_Start project plan located in your Chapter09 practice file folder to complete this exercise. Open the Advanced Assignments A_Start project plan, and then follow these steps.
On the File tab, click Save As.
The Save As dialog box appears.
In the File name box, type Advanced Assignments A, and then click Save.
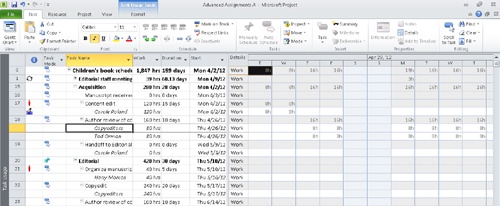
On the Task tab, in the View group, click the down arrow below the Gantt Chart button, and in the menu that appears, click Task Usage.
As you may recall from Chapter 7, the Task Usage view groups the assigned resources below each task.
In the Task Name column, below task 18, Author review of content edit, click the assigned resource Copyeditors.
On the Task tab, in the Editing group, click Scroll to Task.
As you can see, this task currently has two resources assigned to it: a copyeditor and the new book’s author, Tad Orman.
The intent of task 18 is that the author will review the edits made to his book manuscript, and shortly afterward, the copyeditor will begin to incorporate the author’s feedback. Right now, both resources are assigned work throughout the duration of the task, but you’d like to delay the start of the copyeditor’s work by two days. You’ll make this adjustment in the Task Usage view.
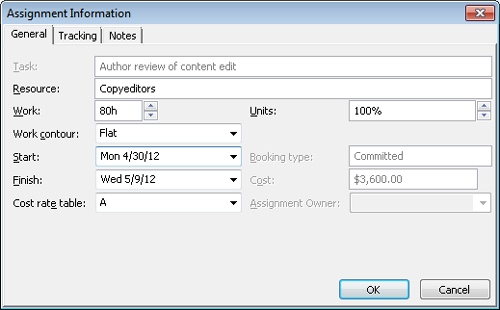
On the Format tab, in the Assignment group, click Information.
The Assignment Information dialog box appears. Click the General tab if it is not already selected.
In the Start box, type or select 4/30/12.
Click OK to close the Assignment Information dialog box.
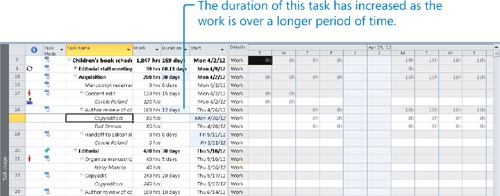
Project adjusts the copyeditor’s assignment on this task so that he works no hours on Thursday or Friday.
Now, in the timephased portion of the view, you can see that zero hours of work are scheduled for the copyeditor on Thursday and Friday, April 26 and 27. The other resource assigned to the task is not affected. Note that the total work of this task did not change, but its duration did—the finish date moved out two working days.
Tip
If you want an assignment to start at a specific time as well as on a specific date, you can specify the time in the Start box. For example, if you want the copyeditor’s assignment to start at 1 P.M. on April 30, type 4/30/12 1:00 PM. Otherwise, Project uses the default start time. To change the default start time, on the File tab, click Options. In the Project Options dialog box, click the Schedule tab, and in the “Default start time” field, enter the value that you want.
Applying Contours to Assignments
In the Resource Usage and Task Usage views, you can see exactly how each resource’s assigned work is distributed over time. In addition to viewing assignment details, you can change the amount of time a resource works on a task in any given time period. There are various ways to do this:
Apply a predefined work contour to an assignment. Predefined contours generally describe how work is distributed over time in terms of graphical patterns. For example, the Bell predefined contour distributes less work to the beginning and end of the assignment and distributes more work toward the middle. If you were to graph the work over time, the graph’s shape would resemble a bell.
Edit the assignment details directly. For example, in the Resource Usage or Task Usage view, you can change the assignment values directly in the timescaled grid.
How you contour or edit an assignment depends on what you need to accomplish. Predefined contours work best for assignments in which you can predict a likely pattern of effort—for example, a task that requires gradual ramp-up time might benefit from a back-loaded contour to reflect the likelihood that the resource will work the most toward the end of the assignment.
In this exercise, you apply a predefined contour to an assignment and manually edit another assignment.
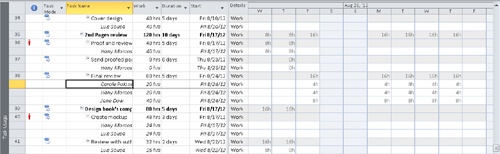
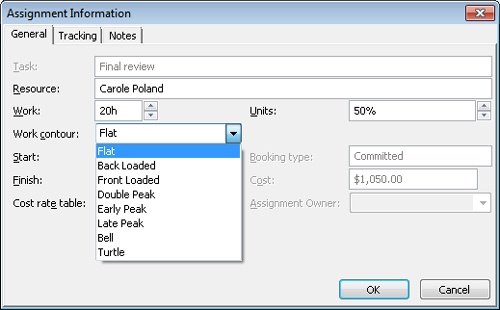
In the Task Name column, below task 38, Final review, click the assigned resource Carole Poland.
On the Task tab, in the Editing group, click Scroll to Task.
As you can see in the timescaled data at the right, two resources are scheduled to work on this task four hours per day (that is, 50 percent of their available working time) and a third resource is scheduled to work full time on this task. All these assignments have a flat contour; that is, work is distributed evenly over time. This is the default work contour type that Project uses when scheduling work.
You want to change Carole Poland’s assignment on this task so that she starts with a brief daily assignment and increases her work time as the task progresses. To accomplish this, you will apply a back-loaded contour to the assignment. Note that task 38, Final review is a fixed-duration task type, not the default fixed-units task type.
On the Format tab, in the Assignment group, click Information.
The Assignment Information dialog box appears. Click the General tab if it is not already selected.
Click the down arrow to display the options in the Work Contour box.
These are all predefined work contours, and some of the names of the contours are graphical representations of a resource’s work over time with that contour applied.
Select Back Loaded, and then click OK to close the Assignment Information dialog box.
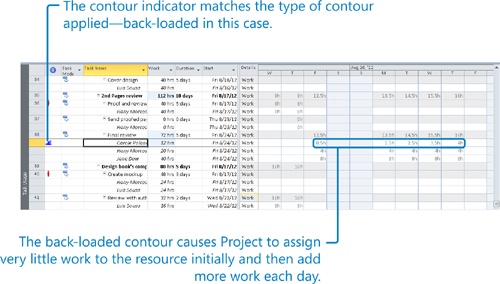
Project applies the contour to this resource’s assignment and reschedules her work on the task.
You see that in each successive day of the task’s duration, Carole Poland is assigned slightly more time to work on the assignment. You also see a contour indicator in the Indicators column displaying the type of contour that is applied to the assignment.
Point to the contour indicator.
Project displays a ScreenTip describing the type of contour applied to this assignment.
Tip
Applying a contour to a fixed-duration task will cause Project to recalculate the resource’s work value so that the resource works less in the same time period. For example, Carole’s total work on task 38 was reduced from 20 to 12 hours when you applied the contour. Depending on the task type, applying a contour to this assignment may cause the overall duration of the task to be extended. Task 38 is a fixed-duration task, so applying the contour did not change the task’s duration. For a fixed-work or fixed-unit task, however, it would. If you do not want a contour to extend a task’s duration, change the task type (on the Advanced tab of the Task Information dialog box) to Fixed Duration before applying the contour.
Next, you will directly edit another task’s assignment values.
In the Task Name column, below task 38, Final review, click the assigned resource Hany Morcos.
Note that Hany is currently assigned four hours per day for each day of the assignment’s duration. Why four hours? Hany normally has eight working hours per day on these particular days (as determined by her resource calendar). She was assigned to this task at 50 percent assignment units, however, so the resulting scheduled work is only four hours per day.
You want to increase Hany’s work on the last two days of this task so that she will work full time on it. To accomplish this, you will manually edit her assignment values.
In the timescaled grid in the right pane of the Task Usage view, select Hany Morcos’s four-hour assignment for Wednesday, August 29.
Type 8h, and then press the Tab key.
In Hany’s assignment for Thursday, type 8h, and then press Enter.
Hany is now assigned eight hours per day on these days. Project displays a contour indicator in the Indicators column showing that a manually edited contour has been applied to the assignment.


Tip
If you want to document details about contouring an assignment or anything pertaining to an assignment, you can record the details in an assignment note. In the Task Usage or Resource Usage view, select the assignment, and then click the Notes button in the Assignment group on the Format tab. Assignment notes are similar to task and resource notes.
Here are a few more capabilities that you can apply in a usage view:
In addition to editing work values manually at the resource level as you did before, you can edit work values at the task level. When you change a work value at the task level, Project adjusts the resulting work value per resource in accordance with each resource’s units value on that assignment. For example, assume that on a specific day, two resources were assigned four hours each to a task that had a total work value of eight hours. If you then change the total work on the task for that day to 12 hours, Project will increase the work per resource from four to six hours.
You can split a task in the Gantt Chart view to account for an interruption in the task, as you did in Chapter 7. You can also split a task in the Task Usage view by entering “0” work values in the task’s row in the timephased grid for the date range that you want. To preserve the total work on the task, you should add the same amount of work to the end of the task as you subtracted with the split. For example, assume that a task starts on Monday and has eight hours of total work per day for four days. Its work pattern (in hours per day) is 8, 8, 8, and 8. You interrupt work on the task on Tuesday and then add those eight hours to the end of the task (in this case, Friday). The new work pattern would be 8, 0, 8, 8, and 8.
When editing values in the timephased grid, you can work with the cells somewhat like you might work in a Microsoft Excel worksheet—you can drag and drop values and use the AutoFill handle to copy values to the right or downward.
Applying Different Cost Rates to Assignments
Recall from Chapter 8, that you can set as many as five pay rates per resource, which allows you to apply different pay rates to different assignments for a resource; for example, a different pay rate might depend on the skills required for different assignments. For each assignment, Project initially uses rate table A by default, but you can specify that another rate table should be used.
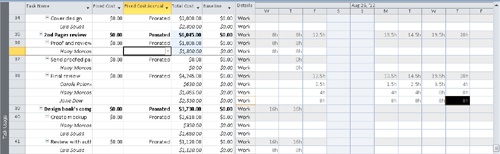
In the Entering Multiple Pay Rates for a Resource section of Chapter 8, you set up a second rate table for Hany Morcos to be applied for any assignments in which she is functioning as a content editor. Hany is currently assigned to task 36, Proof and review, as a content editor rather than her default role of a project editor, but her assignment still reflects her default pay rate as a project editor.
In this exercise, you change the pay rate table to be applied to an assignment.
In the Task Name column, below task 36, Proof and review, click the assigned resource Hany Morcos.
Next, you’ll view the cost of Hany’s assignment.
On the View tab, in the Data group, click Tables and then click Cost.
Project displays the Cost table. Note the current cost of Hany’s assignment to this task: $1,550.00.
On the Format tab, in the Assignment group, click Information.
The Assignment Information dialog box appears. Click the General tab if it is not already selected.
In the Cost Rate Table box, type or select B, and then click OK to close the Assignment Information dialog box.
Project applies Hany’s cost rate table B to the assignment.
The new cost of the assignment, $1,800.00, appears in the Total Cost column. The new cost value is also accounted for in the summary tasks and project summary task.

Assigning Material Resources to Tasks
In Chapter 8, you created the material resource named Bound galley proofs. As you may recall from Chapter 8, material resources are used up or “consumed” as a project progresses. Common examples for a construction project include lumber and concrete.
When assigning a material resource, you can handle consumptions and cost in one of two ways:
Assign a fixed-unit quantity of the material resource to the task. Project will multiply the unit cost of this resource by the number of units assigned to determine the total cost. (You’ll use this method in the following exercise.)
Assign a variable-rate quantity of the material resource to the task. Project will adjust the quantity and cost of the resource as the task’s duration changes.
In our new book project, we are interested in tracking the use and cost of the bound galley proofs of the new children’s book.
In this exercise, you assign a material resource to a task and enter a fixed-unit quantity of consumption.
On the Task tab, in the View group, click Gantt Chart.
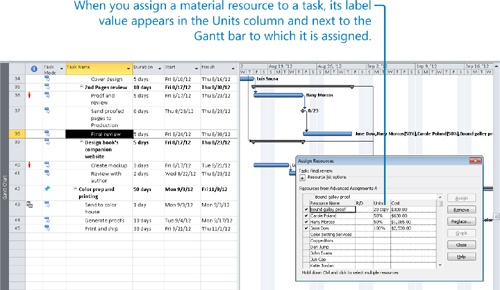
In the Task Name column, click the name of task 38, Final review.
You anticipate that you’ll need 20 bound galley proof copies for this review.
On the Task tab, in the Editing group, click Scroll to Task.
On the Resource tab, in the Assignments group, click Assign Resources.
The Assign Resources dialog box appears.
In the Assign Resources dialog box, select the Units field for the Bound galley proofs resource.
Type or select 20, and then click Assign.
Project assigns the material resource to the task and calculates the $300 cost of the assignment ($15 per copy times 20 copies).
Because Bound galley proof is a material resource, it cannot do work. Therefore, assigning a material resource does not affect the duration of a task.
Click Close to close the Assign Resources dialog box.
Viewing Resource Capacity
Recall that the amount of time that a resource is able to work on tasks in a project plan is called its resource capacity, and in Project, this is measured in units. By default, such units are presented as a percentage value, with 0% meaning no capacity and 100% meaning the full or maximum capacity of a single resource with a normal working schedule of 40 hours per week. In Project, a resource’s maximum capacity to do work is tracked as the resource’s Max Units value.
Even experienced project managers have been known to overestimate resource capacity for the people allocated to work on a given project. This can lead to problems during the execution of a project and unhappy resources, especially when the project manager has also underestimated the amount of work required to complete the tasks in the project plan. There are many legitimate reasons to expect some variability with task work estimates—especially in the initial planning stage of a project. Resource capacity, however, should be easier to estimate more accurately. This section introduces some useful tools in Project that can help you better see and understand resource capacity.
At this point in the planning for the new book project, you’ve set up an initial task list and initial resource details, as well as some of the resources’ working time exceptions such as planned days off. Viewing the working capacity per resource now will give you a better understanding of overall capacity for this project. This in turn can help inform you and the project’s stakeholders about any possible adjustments to the scope of the project to better match that capacity of the team (or vice versa). Normally, at this stage of project planning you can expect one of the following conditions:
Planned work is less than the working capacity of the team. You may be able to use some portion of your resources’ time for other projects, or to do more work in this project.
Planned work exceeds the working capacity of the team. You may need to reduce the scope of work or secure more resources.
Planned work is approximately equal to the working capacity of the team.
Tip
This way of understanding project scope and resource capacity is explored more in Appendix A.
In this exercise, you’ll look at individual resource capacity per day, week, and month during the time span in which the project plan is now scheduled.
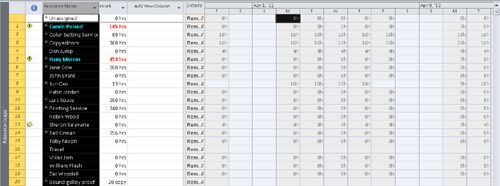
On the View tab, in the Resource Views group, click Resource Usage.
Project displays the Resource Usage view.
Recall that in this view, the left pane organizes tasks under the resources to which the tasks are assigned. The right pane shows assignment and other values organized on the timeline.
Here, our focus is on seeing availability for the resources. To begin, you’ll switch the timephased view to show resource availability.
On the Format tab, in the Details group, select the Remaining Availability check box.
On the Format tab, in the Details group, clear the Work check box.
Project hides the Work details, leaving the Remaining Availability detail visible.
Click the Resource Name column heading.
On the View tab, in the Data group, click Outline and then click Hide Subtasks.
Now you can see the daily remaining availability values for all work resources. The full-time resources, like Carole Poland, have the expected 8 hours per day available for the days in which they have no assignments. Dan Jump, the half-time resource with 50% max. units, has just 4 hours per day available.
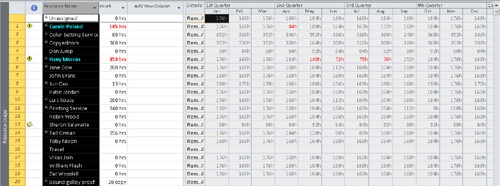
Next, you’ll adjust the zoom level of the timephased view to see availability per month.
On the View tab, in the Zoom group, click Months in the Timescale box.
Project shows available hours per resource, per month.
Do one of the following:
If you have Project Standard, proceed to the next chapter.
If you have Project Professional, proceed to the next section in this chapter.

Adjusting Assignments in the Team Planner View
Important
The Team Planner view is available only in Project Professional, not in Project Standard. If you have Project Standard, skip this section.
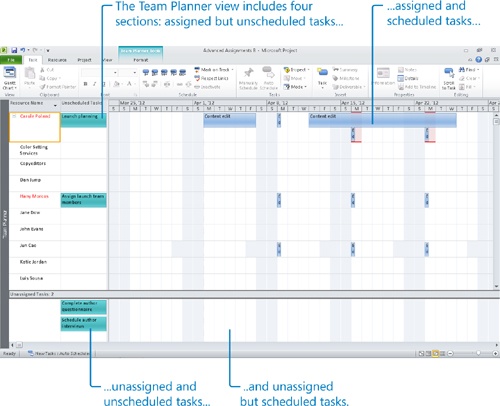
The Task and Resource Usage views are powerful views in which you can accomplish intricate goals, like manually contouring resource assignments. If these views present more details than you want, Project Professional includes a simple but powerful view called the Team Planner view.
In the Team Planner view, you see tasks organized by the resource to which they are assigned (like the Resource Usage view) and any unassigned tasks. Both assigned and unassigned tasks may be either:
Scheduled tasks. Scheduled for a specific time period and displayed in the Team Planner view at a specific point in time.
Unscheduled tasks. Manually scheduled tasks, with or without an assigned resource.
What the Team Planner view enables that the usage views do not is a simple drag-and-drop method of rescheduling or reassigning tasks.
In this exercise, you examine resource assignments and address some overallocation problems, as well as assign some unassigned and unscheduled tasks in the new book project plan.
Set Up
You need the Advanced Assignments B_Start project plan located in your Chapter09 practice file folder to complete this exercise. Open the Advanced Assignments B_Start project plan, and then follow these steps.
On the File tab, click Save As.
The Save As dialog box appears.
In the File name box, type Advanced Assignments B, and then click Save.
On the View tab, in the Resource Views group, click Team Planner.
The Team Planner view appears.
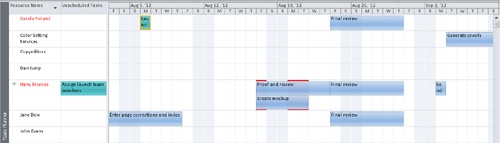
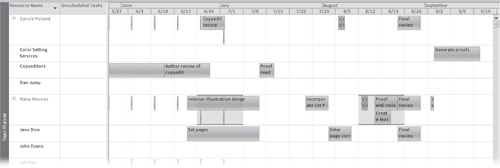
In the Resource Name column, select Carole Poland.
On the Task tab, in the Editing group, click Scroll to Task.
Carole Poland’s initial resource assignments come into view.
First, you’ll schedule the assigned but unscheduled (that is, manually scheduled) tasks. Carole has one unscheduled task, as well as several scheduled tasks. In fact, her scheduled tasks have caused her to be overallocated. The red formatting of her name communicates the fact that she is overallocated, and the red horizontal lines that run through the middle and end of April tell you when she is overallocated.
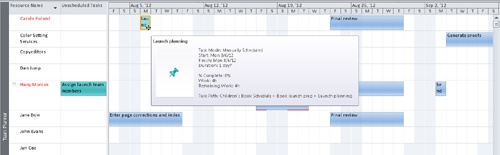
You’d like Carole’s unscheduled task, Launch planning, to start in the beginning of August, so you’ll move it there.
Horizontally scroll the view until the week of August 5th is visible in the timescale.
Click and drag Carole’s unscheduled task, Launch planning, in Carole’s row so that the task start date is Monday, August 6.
As on the Gantt Chart, the width of a scheduled task bar corresponds to its duration. Depending on the timescale zoom level, you may not see full task names in some task bars.
Point your mouse pointer at the task that you just scheduled.
A ScreenTip appears and contains the essential task details.
Note that although this task is now scheduled for a specific time, it is still a manually scheduled task, and it will remain so until it is switched to automatic scheduling.
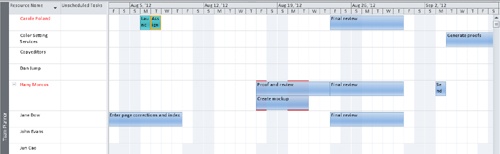
Next, you’ll schedule the unscheduled task assigned to Hany Morcos, and you’ll also reassign it to Carole. You’d like this task to be completed in early August as well.
Click and drag the name of Hany Morcos’s unscheduled task, Assign launch team members, to Carole Poland’s row so that the task start date is Tuesday, August 7.
Project schedules and reassigns the task.
Next, you’ll assign the two unassigned and unscheduled tasks. Both of these tasks should be assigned to Hany Morcos.
Click and drag the first unassigned task, Complete author questionnaire, to Hany Morcos’s row so that the task start date is Monday, August 13.
Click and drag the remaining unassigned task, Schedule author interviews, to Hany Morcos’s row so that the task start date is Tuesday, August 14.
Now both tasks are assigned and scheduled, though they remain manually scheduled tasks.
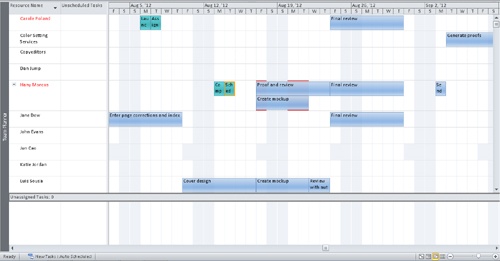
To conclude this exercise, you’ll address some of the resource overallocation problems that are visible in the timescale side of the Team Planner view.
On the View tab, in the Zoom group, click the down arrow next to the Timescale box and click Weeks.
The timescale adjusts to show more of the project plan.
Scroll the view horizontally until the week of June 24 is visible in the timescale.
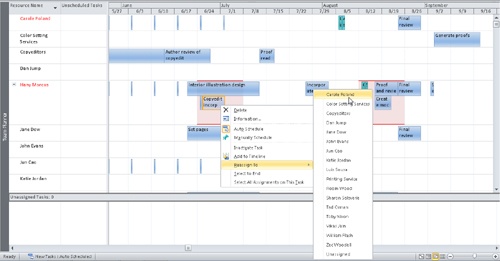
Most of the resource overallocations in the project plan are due to the weekly editorial status meeting overlapping with other tasks. Since each occurrence of the editorial status meeting is only one hour long, you’re not concerned with addressing this level of overallocation. You can see a more severe overallocation for Hany Morcos the week of June 24, however.
Because you need Hany’s full attention on the Interior illustration design task, you’ll reassign the Copyedit incorp task to someone else.
Right-click Hany’s task, Copyedit incorp, and in the shortcut menu that appears, click Reassign To, and then select Carole Poland.
Project reassigns the task but does not change the task’s start or finish dates or duration.

Tip
You can also reassign tasks by dragging them from one resource to another. To better control the scheduling of tasks when you reassign them this way, set the timescale to daily (to do this, on the View tab, in the Zoom group, click Days in the Timescale box).
There are still overallocation issues in the project plan, but they are minor issues that don’t require additional attention.
Key Points
You can change when a resource will start work on an assignment without affecting other resources assigned to the same task.
Project includes several predefined work contours that you can apply to an assignment.
When working with resource costs, you can specify different cost rates for different assignments.
When assigned to a task, material resources can have a fixed or variable consumption rate.
In a usage view, you can see remaining availability of work resources at whatever time increment you wish.
The Team Planner view allows easy dragging of assignments between resources (Project Professional only).