Chapter 8. Fine-Tuning Resource Details
Chapter at a Glance

✓ | Set resource availability to change over time. |
✓ | Set up different pay rates for resources. |
✓ | Set up pay rates that will change over time for a resource. |
✓ | Set up a material resource. |
Because work resources (people and equipment) are often the most expensive part of a project, understanding how to make the best use of resources’ time is an important project planning skill. In this chapter, you use a variety of advanced Microsoft Project 2010 features relating to resources—their availability and costs.
Practice Files
Before you can complete the exercises in this chapter, you need to copy the book’s practice files to your computer. A complete list of practice files is provided in Using the Practice Files at the beginning of this book. For each exercise that has a practice file, simply browse to where you saved the book’s practice file folder.
Important
If you are running Project Professional, you may need to make a one-time setting change. This helps ensure that the practice files you work with in this chapter do not affect your Project Server data. For more information, see Appendix C.
Setting Up Resource Availability to Apply at Different Times
One of the values that Project stores for each work resource is the resource’s Max. Units value. This is the maximum capacity of a resource to accomplish tasks. A resource’s working time settings (recorded in the individual resource calendars) determine when work assigned to a resource can be scheduled. However, the resource’s capacity to work (the resource’s Max. Units value) determines the extent to which the resource can work within those hours without becoming overallocated. A resource’s Max. Units value does not prevent a resource from becoming overallocated, but Project will indicate when the resource’s assignments exceed their Max. Units capacity. You can specify that different Max. Units values be applied at different time periods for any resource.
Tip
If you need a refresher on resource capacity or resource calendars, see Chapter 3.
Setting a resource’s availability over time enables you to control exactly what a resource’s Max. Units value is at any time. For example, you might have two copyeditors available for the first eight weeks of a project, three for the next six weeks, and then two for the remainder of the project.
In this exercise, you customize a resource’s availability over time.
Set Up
Start Project if it’s not already running.
You need the Advanced Resources_Start project plan located in your Chapter08 practice file folder to complete this exercise. Open the Advanced Resources_Start project plan, and then follow these steps.
On the File tab, click Save As.
The Save As dialog box appears.
In the File name box, type Advanced Resources, and then click Save.
Next, you’ll switch to a resource view.
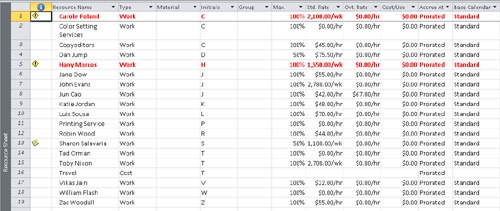
On the View tab, in the Resource Views group, click Resource Sheet.
The Resource Sheet view appears.
As you may recall from Chapter 3, this is one view where you can see and edit resources’ Max. Units values. The Max. Units values displayed here normally apply to the full duration of the project plan. Next, you will customize a resource’s Max. Units value to vary at different times during this project plan.
In the Resource Name column, click the name of resource 3, Copyeditors.
The Copyeditors resource is not one specific person; it describes a job category that multiple people may occupy at various times throughout the duration of the project. Unlike individually named resources like Hany Morcos or Fabrikam, Ltd., the copyeditors are interchangeable. As a project manager, you are more concerned about the specific skill set of whoever may be in this job role than you are about who the specific person is.
On the Resource tab, in the Properties group, click Information.
Tip
You can also double-click the Resource Name value to display the Resource Information dialog box.
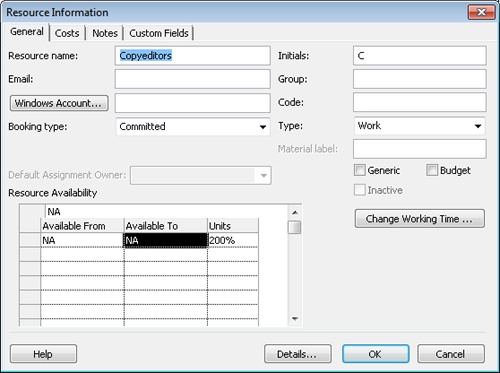
The Resource Information dialog box appears. If the General tab is not visible, click it.
You expect to have two copyeditors available to work on this project from the start of the project through the month of April, three for the month of May, and then back to two for the remainder of the project.
Under Resource Availability, in the first row of the Available From column, leave NA (for Not Applicable).
In the Available To cell in the first row, type or select 4/30/12.
In the Units cell in the first row, leave the 200% value.
In the Available From cell in the second row, type or select 5/1/12.
In the Available To cell in the second row, type or select 5/31/12.
In the Units cell in the second row, type or select 300%.
In the Available From cell in the third row, type or select 6/1/12.
Leave the Available To cell in the third row blank. (Project will insert NA for you after you complete the next step.)
In the Units cell in the third row, type or select 200%, and then press the Enter key.
For the month of May, you can schedule up to three copyeditors without overallocating them. Before and after this period, you have just two copyeditors to schedule.
Click OK to close the Resource Information dialog box.
The Max. Units field for the Copyeditors resource will display 300% only when the current date, based on your computer’s system clock or set in the Project Information dialog box (on the Project tab, in the Properties group, click Project Information), is within the May 1 through 31 date range. At other times, it will display 200%.

Entering Multiple Pay Rates for a Resource
Some work resources might perform different tasks with different pay rates. For example, in the new book project, the project editor could also serve as a content editor. Because the pay rates for project editor and content editor are different, you can enter two cost rate tables for the resource. Then, after you assign the resource to tasks, you specify which rate table should apply. Each resource can have up to five cost rate tables.
In this exercise, you create an additional cost rate table for a resource.
In the Resource Sheet view, click the name of resource 5, Hany Morcos.
On the Resource tab, in the Properties group, click Information.
The Resource Information dialog box appears.
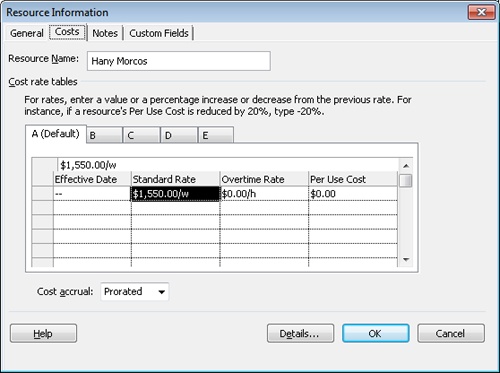
Click the Costs tab.
You see Hany’s default pay rate of $1,550 per week on rate table A. Each tab (labeled A, B, and so on) corresponds to one of the five pay rates that a resource can have.
Under Cost rate tables, click the B tab.
Select the default entry of $0.00/h in the field directly below the column heading Standard Rate, and then type 45/h.
In the Overtime Rate field in the same row, type 60/h, and then press Enter.
Click OK to close the Resource Information dialog box.
Notice that on the Resource Sheet, Hany’s standard pay rate is still $1,550 per week. (This is recorded in the Std. Rate column.) This matches the value in rate table A, the default rate table. This rate table will be used for all of Hany’s task assignments unless you specify a different rate table. You will do this in Chapter 9.

Setting Up Pay Rates to Apply at Different Times
Resources can have both standard and overtime pay rates. By default, Project uses these rates for the duration of the project. However, you can change a resource’s pay rates to be effective as of the date you choose. For example, you could initially set up a resource on January 1 with a standard rate of $40 per hour, planning to raise the resource’s standard rate to $55 per hour on July 1.
Project uses these pay rates when calculating resource costs based on when the resource’s work is scheduled. You can assign up to 25 pay rates to be applied at different times to each of a resource’s five cost rate tables.
In this exercise, you enter different pay rates for a resource to be applied at a later date.
In the Resource Name column, select the name of resource 6, Jane Dow.
On the Resource tab, in the Properties group, click Information.
Click the Costs tab if it is not already selected.
You’ll enter a pay rate increase in cost rate table A.
In the Effective Date cell in the second row of cost rate table A, type or select 6/1/12.
In the Standard Rate cell in the second row, type 15%, and then press Enter.
Note that Project calculates the 15% increase to produce a rate of $63.25 per hour. The previous rate of $55 per hour plus 15% equals $63.25 per hour. You can enter a specific value or a percentage increase or decrease from the previous rate.
Tip
In addition to or instead of cost rates, a resource can include a set fee that Project accrues to each task to which the resource is assigned. This is called a cost per use. Unlike cost rates, the cost per use does not vary with the task’s duration or amount of work the resource performs on the task. You specify the cost per use in the Cost/Use field in the Resource Sheet view or in the Per Use Cost field in the Resource Information dialog box.
Click OK to close the Resource Information dialog box.
Note that Jane Dow’s initial rate, $55 per hour, appears in her Std. Rate field. This field will display $55 per hour until the current date changes to 6/1/12 or later. It will then display her new standard rate of $63.25 per hour.

Setting Up Material Resources
Material resources are consumables that you use up as the project proceeds. On a construction project, material resources might include nails, lumber, and concrete. You work with material resources in Project to track a fixed unit amount or a rate of consumption of the material resource and the associated costs. Although Project is not a complete system for tracking inventory, it can help you stay better informed about how quickly you are consuming your material resources, and at what cost.
For the new book project, galley proofs are the consumable resource that interests you most. These are high-fidelity mock-ups of the new book that are created before the book is commercially printed. Because these galley proofs are relatively expensive to have produced, you’d like to account for their costs in the project plan.
In this exercise, you enter information about a material resource.
In the Resource Sheet, click the next empty cell in the Resource Name column.
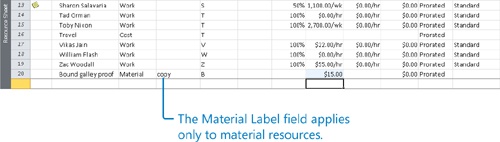
Type Bound galley proof.
In the Type field, click the down arrow, select Material, and press the Tab key.
In the Material Label field, type copy.
In the Std. Rate field, type $15 and then press Enter.
This is the per-unit cost of this material resource; put another way, each copy of a bound galley proof costs $15. In Chapter 9, you’ll specify the unit quantity of the material resource when you assign it to tasks. Project will then calculate the cost of the material resource assignment as the per-unit cost that you entered above times the number of units on the assignment.
Note that you cannot enter a Max. Units value for a cost resource or material resource. Since neither type of resource performs work, the Max. Units value doesn’t apply.
Key Points
When working with resource costs, you can specify different cost rates for different assignments and apply different cost rates at different times.
You can account for variable resource availability over time (via a resource’s Max. Units value), which allows you to control more finely when a resource will appear to be overallocated.
Create material resources to track the cost of items that are consumed during the execution of the project.