Chapter 7. Fine-Tuning Task Details
Chapter at a Glance

In this chapter, you will learn how to: | |
✓ | Adjust task links to have more control over how tasks are related. |
✓ | Apply a constraint to a task. |
✓ | Split a task to record an interruption in work. |
✓ | Create a task calendar and apply it to a task. |
✓ | Change a task type to control how Project schedules tasks. |
✓ | Record deadlines for tasks. |
✓ | Enter a fixed cost for a task. |
✓ | Set up a recurring task in the project schedule. |
✓ | View the project’s critical path. |
✓ | Enter a specific duration value for a summary task. |
✓ | Inactivate tasks so they remain in the project plan but have no effect on the schedule (Project Professional only). |
In this chapter, you examine and use a variety of advanced features in Microsoft Project 2010. These features focus on fine-tuning task details prior to saving a baseline, as well as commencing work on the project with the goal of developing the most accurate schedule representation of the tasks you anticipate for the plan.
Practice Files
Before you can complete the exercises in this chapter, you need to copy the book’s practice files to your computer. A complete list of practice files is provided in Using the Practice Files at the beginning of this book. For each exercise that has a practice file, simply browse to where you saved the book’s practice file folder.
Important
If you are running Project Professional, you may need to make a one-time setting change. This helps ensure that the practice files you work with in this chapter do not affect your Project Server data. For more information, see Appendix C.
Adjusting Task Relationships
You might recall from Chapter 2, that there are four types of task dependencies, or relationships:
Finish-to-start (FS): The finish date of the predecessor task determines the start date of the successor task.
Start-to-start (SS): The start date of the predecessor task determines the start date of the successor task.
Finish-to-finish (FF): The finish date of the predecessor task determines the finish date of the successor task.
Start-to-finish (SF): The start date of the predecessor task determines the finish date of the successor task.
When you enter tasks in Project and link them by clicking the Link Tasks button on the Task tab, the tasks are given a finish-to-start relationship. This is fine for many tasks, but you will most likely change some task relationships as you fine-tune a project plan. The following are some examples of tasks that require relationships other than finish-to-start:
You can start setting pages as soon as you start illustration work on a book project (a start-to-start relationship). This reduces the overall time required to complete the two tasks, as they are completed in parallel.
Planning the editorial work for a book can begin before the manuscript is complete, but it cannot be finished until the manuscript is complete. You want the two tasks to finish at the same time (a finish-to-finish relationship).
Task relationships should reflect the sequence in which work should be performed. After you have established the correct task relationships, you can fine-tune your schedule by entering overlap (called lead time) or delay (called lag time) between the finish or start dates of predecessor and successor tasks.
Assuming that two tasks have a finish-to-start relationship:
Lead time causes the successor task to begin before its predecessor task concludes.
Lag time causes the successor task to begin some time after its predecessor task concludes.
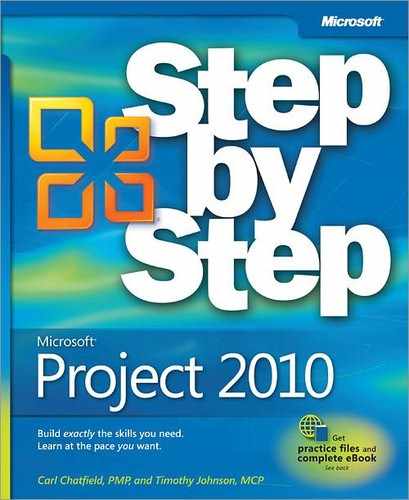
The following is an illustration of how lead and lag time affect task relationships. Assume that you initially planned the following three tasks using finish-to-start relationships.
Before task 2 can begin, you need to allow an extra day for the copyedited manuscript to be shipped to the author. You do not want to add a day to the duration of task 5 because no real work will occur on that day. Instead, you enter a one-day lag between tasks 1 and 2.

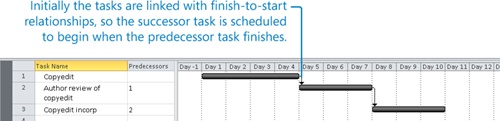
However, task 3 can start as soon as task 2 is halfway completed. To make this happen, enter a 50 percent lead time between tasks 2 and 3.
You can enter lead and lag time as units of time, such as two days, or as a percentage of the duration of the predecessor task, such as 50 percent. Lag time is entered in positive units and lead time in negative units (for example, –2d or –50%). You can apply lead or lag time to any type of task relationship: finish-to-start, start-to-start, and so on.
Places in which you can enter lead or lag time include the Task Information dialog box (Task tab), the Predecessors column in the Entry table, and the Task Dependency dialog box (viewable by double-clicking a link line between Gantt bars).
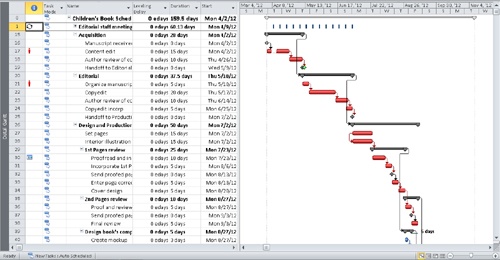
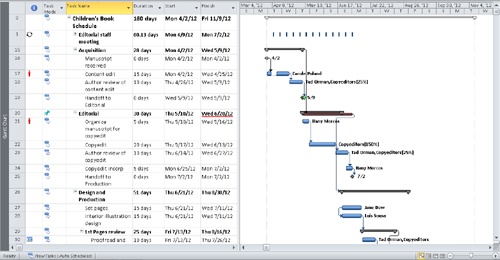
Lucerne Publishing is about to begin editorial and design work on a new children’s book. At this stage, you have an initial project plan with task names, durations, and relationships, and resource assignments.
In this exercise, you enter lead and lag time and change task relationships between predecessor and successor tasks.
Set Up
Start Project 2010 if it’s not already running.
You need the Advanced Tasks A_Start project plan located in your Chapter07 practice file folder to complete this exercise. Open the Advanced Tasks A_Start project plan, and then follow these steps.
On the File tab, click Save As.
The Save As dialog box appears.
In the File name box, type Advanced Tasks A, and then click Save.
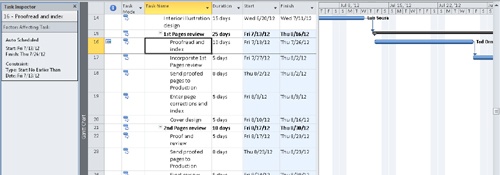
On the Task tab, in the Tasks group, click Inspect.
The Task Inspector pane appears. This pane succinctly reveals the scheduling factors that affect the selected task, such as predecessor task relationships, resource calendars, and/or task calendars. You can click any item in the Task Inspector that appears in blue to get more details. For example, you can click the assigned resource’s name under Calendar to see the resource calendar.
Select the name of task 31, Print and ship.
In the Task Inspector pane, you can view the scheduling factors affecting this task.
For task 31, you can see that its predecessor is task 30, Generate proofs. You can see in the pane that the two tasks have a finish-to-start relationship with zero lag time. Next, you’ll adjust the lag value on the task relationship to account for the transit time of the proofs to the printer. Because you cannot edit this value directly in the pane, you’ll display the Task Information dialog box. First, though, you’ll display this task’s Gantt bar so you can more easily observe the effect of adjusting the lag.
On the Task tab, in the Editing group, click Scroll to Task.
Next, you’ll adjust the lag value between this task and its predecessor.
On the Task tab, in the Properties group, click Information.
The Task Information dialog box appears. It contains details about the currently selected task, 31.
Click the Predecessors tab.
In the Lag field for predecessor task 30, type 3d, and then click OK to close the Task Information dialog box.
Task 31 is now scheduled to start three working days after the end of task 30.
Next, you will adjust the lag time between two other tasks.
Click the name of task 10, Copyedit incorp.
You’d like to overlap this task with its predecessor; the Copyedit incorp task can start before the author review of copyedit is completed.
On the Task tab, in the Properties group, click Information, and then click the Predecessors tab.
In the Lag field for predecessor task 9, type –25%, and then click OK.
Entering lag time as a negative value produces lead time.
To see the adjustment you made more directly, you’ll scroll to the task’s Gantt bar again.
On the Task tab, in the Editing group, click Scroll to Task.
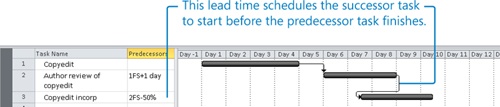
Task 10 is now scheduled to start at the 25 percent remaining point of the duration of task 9. Should the duration of task 9 change, Project will reschedule the start of task 10 so that it maintains a 25 percent lead time.
To conclude this exercise, you will change the task relationship between two tasks.
Double-click the name of task 14, Interior illustration design.
The Task Information dialog box appears. The Predecessors tab should be visible. Note also that the Task Inspector pane in the background updates to display the scheduling details for task 14, the currently selected task.
On the Predecessors tab, click in the Type column for predecessor task 13. Select Start-to-Start (SS), and click OK.
Project changes the task relationship between tasks 13 and 14 to start-to-start.
Assigning tasks start-to-start relationships and entering lead times where appropriate are both excellent techniques to fine-tune task relationships so that you get the results you want. However, Project cannot automatically make such schedule adjustments for you. As project manager, you must analyze the sequences and relationships of your tasks and make those adjustments where necessary.


Setting Task Constraints
Every task that you enter into Project has some type of constraint applied to it. A constraint controls the start or finish date of a task and the degree to which that task can be rescheduled. There are three categories of constraints:
Flexible constraints. Project can change the start and finish dates of a task. The default constraint type in Project is that tasks start as soon as possible. This type of flexible constraint is called As Soon As Possible, or ASAP for short. No constraint date is associated with flexible constraints. Project does not display any special indicator in the Indicators column for flexible constraints.
Inflexible constraints. A task must begin or end on a certain date. For example, you can specify that a task must end on November 9, 2012. Inflexible constraints are sometimes called hard constraints. When an inflexible constraint has been applied to a task, Project displays a special indicator in the Indicators column. You can point to a constraint indicator, and the constraint details will appear in a ScreenTip.
Semi-flexible constraints. A task has a start or finish date boundary. However, within that boundary, Project has the scheduling flexibility to change the start and finish dates of a task. For example, let’s say a task must finish no later than June 15, 2012. However, the task could finish before this date. Semi-flexible constraints are sometimes called soft or moderate constraints. When a semi-flexible constraint has been applied to a task, Project displays a special indicator in the Indicators column.
In total, there are eight types of task constraints.
This constraint category | Includes these constraint types | And means |
Flexible | As Soon As Possible (ASAP) | Project will schedule a task to occur as soon as it can occur. This is the default constraint type applied to all new tasks when scheduling from the project start date. There is no constraint date for an ASAP constraint. |
As Late As Possible (ALAP) | Project will schedule a task to occur as late as it can occur. This is the default constraint type applied to all new tasks when scheduling from the project finish date. There is no constraint date for an ALAP constraint. | |
Semi-flexible | Start No Earlier Than (SNET) | Project will schedule a task to start on or after the constraint date that you specify. Use this constraint type to ensure that a task will not start before a specific date. |
Start No Later Than (SNLT) | Project will schedule a task to start on or before the constraint date that you specify. Use this constraint type to ensure that a task will not start after a specific date. | |
Finish No Earlier Than (FNET) | Project will schedule a task to finish on or after the constraint date that you specify. Use this constraint type to ensure that a task will not finish before a specific date. | |
Finish No Later Than (FNLT) | Project will schedule a task to finish on or before the constraint date that you specify. Use this constraint type to ensure that a task will not finish after a specific date. | |
Inflexible | Must Start On (MSO) | Project will schedule a task to start on the constraint date that you specify. Use this constraint type to ensure that a task will start on an exact date. |
Must Finish On (MFO) | Project will schedule a task to finish on the constraint date that you specify. Use this constraint type to ensure that a task will finish on an exact date. |
These three constraint categories have very different effects on the scheduling of tasks:
Flexible constraints, such as ASAP, allow tasks to be scheduled without any limitations other than their predecessor and successor relationships, and the project’s start date (for ASAP task constraints) or finish date (for ALAP task constraints). No fixed start or end dates are imposed by these constraint types. Use these constraint types whenever possible.
Semi-flexible constraints, such as Start No Earlier Than or Start No Later Than, limit the rescheduling of a task within the date boundary that you specify.
Inflexible constraints, such as Must Start On, prevent the rescheduling of a task. Use these constraint types only when absolutely necessary.

Note
You cannot change the constraint type or set a constraint date for a manually scheduled task. For more information about manually scheduled tasks versus automatically scheduled tasks, see Chapter 2.
The type of constraint that you apply to the tasks in your projects depends on what you need from Project. You should use inflexible constraints only if the start or finish date of a task is fixed by factors beyond the control of the project team. Examples of such tasks include handoffs to clients and the end of a funding period. For tasks without such limitations, you should use flexible constraints. Flexible constraints provide the most discretion in adjusting start and finish dates, and they allow Project to adjust dates if your project plan changes. For example, if you have used ASAP constraints and the duration of a predecessor task changes from four days to two days, Project adjusts, or “pulls in,” the start and finish dates of all successor tasks. However, if a successor task had an inflexible constraint applied, Project could not adjust its start or finish dates.
In this exercise, you apply a constraint to a task.
Select the name of task 16, Proofread and index.
On the Task tab, in the Editing group, click Scroll to Task.
Tip
To select a task quickly, even a task you can’t see in the current view, press Ctrl+G, and in the ID field of the Go To dialog box, enter a task number, and then click OK.
This task requires the children’s book author, Tad Orman, to proofread his book at a certain stage in the design process. However, Tad has informed you that due to his travel schedule, he will be unable to start his review before July 13—later than currently scheduled.
On the Task tab, in the Properties group, click Information.
In the Task Information dialog box, click the Advanced tab.
In the Constraint Type box, select Start No Earlier Than.
In the Constraint Date box, type or select 7/13/12, and then click OK.
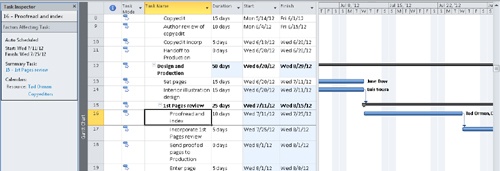
Project applies a Start No Earlier Than constraint to the task, and a constraint icon appears in the Indicators column. You can point to the icon to see the constraint details in a ScreenTip.
Because this constraint affects the scheduling of the task, the Task Inspector pane now includes the constraint details.
Task 16 is rescheduled to start on July 13 instead of July 11. All tasks that depend on task 16 are also rescheduled. One way to view this rescheduling is by the light blue change highlighting that Project applies to the Start and Finish dates of the successor tasks of task 16. Because the durations of the 1st Pages review and Design and Production summary tasks were also changed by applying the constraint to task 16, the Duration and Finish fields for the those summary tasks are also highlighted. Change highlighting remains visible until you perform another editing action or save the file, and it is an effective visual way to see the broader effects of your specific actions in your schedule.
Click the Close button (the “X” button in the upper-right corner) on the Task Inspector pane.


Here are a few other things to keep in mind when applying constraints to tasks:
Note
You cannot set constraints on manually scheduled tasks. The following issues apply only to automatically scheduled tasks. For more information about manually versus automatically scheduled tasks, see Chapter 2.
Entering a Finish date for a task (for example, in the Finish column) applies a Finish No Earlier Than constraint to the task.
Entering a Start date for a task (for example, in the Start column) or dragging a Gantt bar directly on the Gantt chart applies a Start No Earlier Than constraint to the task.
In many cases, entering a deadline date is a preferable alternative to entering a semi-flexible or inflexible constraint. You will work with deadline dates later in this chapter.
Unless you specify a time, Project schedules a constraint date’s start or finish time using the Default Start Time or Default End Time values on the Schedule tab of the Project Options dialog box (to open this dialog box, on the File tab, click Options). In this project, the default start time is 8 A.M. If you want a constrained task to be scheduled to start at a different time, enter that time along with the start date. For example, if you want to schedule a task to start at 10 A.M. on July 12, enter 7/12/12 10AM in the Start field.
To remove a constraint, first select the task or tasks and, on the Task tab, in the Properties group, click Information. In the Task Information dialog box, click the Advanced tab. In the Constraint Type box, select As Soon As Possible or (if scheduling from the project finish date) As Late As Possible.
If you must apply semi-flexible or inflexible constraints to tasks in addition to task relationships, you might create what is called negative slack. For example, assume that you have a successor task that has a finish-to-start relationship with its predecessor task. If you entered a Must Start On constraint on the successor task earlier than the finish date of the predecessor task, this would result in negative slack and a scheduling conflict. By default, the constraint date applied to the successor task will override the relationship. However, if you prefer, you can set Project to honor relationships over constraints. On the File tab, click Options, and in the Project Options dialog box, click the Schedule tab. Clear the Tasks Will Always Honor Their Constraint Dates check box.
If you must schedule a project from a finish date rather than a start date, some constraint behaviors change. For example, the As Late As Possible constraint type, rather than As Soon As Possible, becomes the default for new tasks. You should pay close attention to constraints when scheduling from a finish date to make sure that they create the effect that you intend.
Interrupting Work on a Task
When initially planning project tasks, you might know that work on a certain task will be interrupted. Rather than listing a task twice to account for a known interruption in work, you can split the task into two or more segments. The following are some reasons why you might want to split a task:
You anticipate an interruption in a task. For example, a resource might be assigned to a weeklong task, but she needs to attend an event on Wednesday that is unrelated to the task.
A task is unexpectedly interrupted. After a task is under way, a resource might have to stop work on the task because another task has taken priority. After the second task is completed, the resource can resume work on the first task.
In this exercise, you split a task to account for a planned interruption of work on that task.
Select the name of task 3, Content edit.
On the Task tab, in the Editing group, click Scroll to Task.
You have been informed that work on this task will be interrupted for three days starting Monday, April 9.
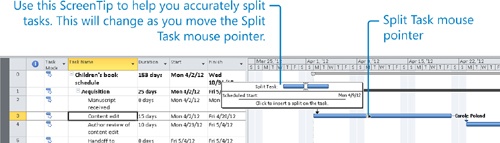
On the Task tab, in the Schedule group, click Split Task.
A ScreenTip appears, and the mouse pointer changes.
Move the mouse pointer over the Gantt bar of task 3.
This ScreenTip is essential for accurately splitting a task because it contains the date at which you would start the second segment of the task if you dragged the mouse pointer from its current location on the Gantt bar. As you move the mouse pointer along the Gantt bar, you will see the start date in the ScreenTip change.
Move (but don’t click) the mouse pointer over the Gantt bar of task 3 until the start date of Monday, April 9, appears in the ScreenTip.
Click and drag the mouse pointer to the right until the start date of Thursday, April 12, appears in the ScreenTip, and then release the mouse button.
Project inserts a task split, represented in the Gantt chart as a dotted line, between the two segments of the task.
Tip
Splitting tasks with the mouse might take a little practice. In step 6, if you didn’t split task 3 so that the second segment starts on April 12, just point to the second segment again. When the mouse pointer changes to a four-headed arrow, drag the segment to the correct start date.
Here are a few other things to keep in mind when splitting tasks:
You can split a task into multiple segments.
You can drag a segment of a split task either left or right to reschedule the split.
To rejoin two segments of a split task, drag one segment of the task until it touches the other segment.
The time of the task split, represented by the dotted line, is not counted in the duration of the task. No work occurs during the split.
If the duration of a split task changes, the last segment of the task is increased or decreased.
If a split task is rescheduled (for example, if its start date changes), the entire task is rescheduled, splits and all. The task keeps the same pattern of segments and splits.
Resource leveling or manually contouring assignments over time can cause tasks to split. You will contour assignments in Chapter 9, and level resources in Chapter 10.
If you do not want to display splits as a dotted line, you can remove the dotted lines. On the Format tab, in the Format group, click Layout. In the Layout dialog box, clear the Show Bar Splits check box.

Adjusting Working Time for Individual Tasks
There may be times when you want specific tasks to occur at times that differ from the working time of the project calendar (or for assigned resources, the resource calendar). To accomplish this, you apply a task calendar to these tasks. As with the project calendar, you specify which base calendar to use as a task calendar. The following are some examples of when you might need a task calendar:
You are using the Standard base calendar as your project calendar, and you have a task that must run overnight.
You have a task that must occur on a specific weekday.
You have a task that must occur over the weekend.
Unlike resources, Project does not create task calendars as you create tasks. (If you need a refresher on resource calendars, see Chapter 3.) When you need a task calendar, you assign one of the base calendars provided with Project (or, more likely, a new base calendar that you have created) to the task. For example, if you assign the 24 Hours base calendar to a task, Project will schedule that task according to a 24-hour workday rather than the working time specified in the project calendar.
For tasks that have both a task calendar and resource assignments, Project schedules work during the working times that are common between the task calendar and resource calendar(s). If there is no common working time, Project alerts you when you apply the task calendar or assign a resource to the task.
When you assign a base calendar to a task, you can choose to ignore resource calendars for all resources assigned to the task. Doing so causes Project to schedule the resources to work on the task according to the task calendar and not their own resource calendars (for example, to work 24 hours per day).
In the new book project, you need to record that a task has a more restrictive working time than the rest of the tasks. Task 29 relates to the handoff of final book proofs to a color setting services firm, who then prepares the book for commercial printing. However this firm starts new jobs only on Mondays through Wednesdays.
In this exercise, you create a new base calendar and apply it to account for the limited working time for a task.
On the Project tab, in the Properties group, click Change Working Time.
The Change Working Time dialog box appears.
In the Change Working Time dialog box, click Create New Calendar.
The Create New Base Calendar dialog box appears.
Make sure that the Make a copy of option is selected and that Standard is selected in the drop-down menu.
Click OK.
Tip
The benefit of basing the new calendar on the Standard calendar is that all the working day exceptions from the Standard calendar, such as national holidays you may have entered, will also appear in the new calendar.
Note that Monday-Wednesday now appears in the For calendar box.
In the Change Working Time dialog box, click the Work Weeks tab.
Next, you’ll enter the working time details for this new calendar.
Make sure that the Name value [Default] in Row 1 is selected, and then click Details.
In the Select day(s) box, select Thursday and Friday.
These are the days you want to change to nonworking days for this calendar.
Click Set days to nonworking time.
Click OK to close the Details dialog box, and then click OK again to close the Change Working Time dialog box.
Now that you’ve created the Monday-Wednesday calendar, you’re ready to apply it to a task.
On the Task tab, in the Properties group, click Information.
The Task Information dialog box appears.
Click the Advanced tab.
As you can see in the Calendar box, the default for all tasks is “None.”
In the Calendar box, select Monday-Wednesday from the list of available base calendars.
Click OK to close the dialog box.
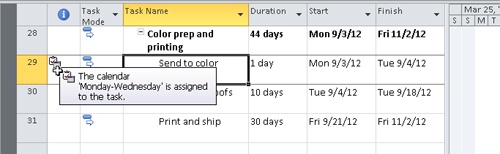
Project applies the Monday-Wednesday calendar to task 29. A calendar icon appears in the Indicators column, reminding you that this task has a task calendar applied to it.
Point to the calendar icon.
A ScreenTip appears, showing the calendar details. Right now, this task is scheduled to be completed on a Monday, but as you further adjust the project plan, this is likely to change. Due to the custom calendar that has been applied to this task, it will not be scheduled on a Thursday or Friday or over the weekend.


Changing Task Types
You might recall from Chapter 4, that Project uses the following formula, called the scheduling formula, to calculate a task’s work value:
Work = Duration × Assignment Units
where assignment units are normally expressed as a percentage. Remember also that a task has work when it has at least one work resource (people or equipment) assigned to it. Each value in the scheduling formula corresponds to a task type. A task type determines which of the three scheduling formula values remains fixed if the other two values change.
The default task type is fixed units: If you change a task’s duration, Project will recalculate work. Likewise, if you change a task’s work, Project will recalculate the duration. In either case, the units value is not affected.
The two other task types are fixed duration and fixed work. For these task types, Project uses a timephased field called peak units when responding to schedule changes.
For a fixed-work task:
You can change the assignment units value and Project will recalculate the duration.
You can change the duration value and Project will recalculate peak units per time period. The assignment units value is not affected.
For a fixed-duration task:
You can change the assignment units value and Project will recalculate work.
You can change the work value and Project will recalculate peak units per time period. The assignment units value is not affected.
Project also keeps track of the highest peak units value per assignment. This value is stored in the Peak field, which you’ll work with in the sidebar.
Which is the right task type to apply to each of your tasks? It depends on how you want Project to schedule that task. The following table summarizes the effects of changing any value for any task type. You read it like a multiplication table.

Note
You cannot change the task type of a manually scheduled task, and the effect of the task type on the scheduling of a task as described here applies only to automatically scheduled tasks. If you need a refresher on manually scheduled tasks, see Chapter 2.
To view the task type of the selected task, on the Task tab, in the Properties group, click Information. Then, in the Task Information dialog box, click the Advanced tab. You can also view the task type in the Task Form. (When in the Gantt Chart view, you can display the Task Form by clicking Details on the View tab, in the Split View group.) You can change a task type at any time. Note that characterizing a task type as fixed does not mean that its duration, assignment units, or work values are unchangeable. You can change any value for any task type.
In this exercise, you change a task type and some scheduling formula values.
On the View tab, in the Task Views group, click Task Usage.
The Task Usage view appears.
In the Task Name column, select the name of task 8, Copyedit.
On the Task tab, in the Editing group, click Scroll to Task.
Tip
To select a task quickly, even a task you can’t see in the current view, press Ctrl+G and in the ID field of the Go To dialog box, enter a task number, and then click OK.
Project displays the details for task 8, Copyedit, and its assignment.
The Task Usage view groups the assigned resources below each task and shows you, among other things, each task’s duration and work—two of the three variables of the scheduling formula.
If necessary, drag the vertical divider bar to the right so that the Finish column is visible.
Next, you’ll add two columns to the Task Usage view so that you can see the assignment units (the third variable of the scheduling formula) and the peak values. You don’t need to modify this view every time you want to use it, but for our purposes here, this is a good way to illustrate the effect of changing task types and scheduling formula values.
Click the Start column heading, and then, on the Format tab, in the Columns group, click Insert Column.
A list of fields appears.
Click Assignment Units.
Click the Start column heading, and then, on the Format tab, in the Columns group, click Insert Column.
Project inserts the Assignment Units and Peak columns to the left of the Start column. Peak is the resource’s maximum units value at any time throughout the assignment’s duration.
You can see that task 8 has a total work value of 240 hours, a resource assignment units value of 200%, and a duration of 15 days. Next, you will change the task’s duration to observe the effects on the other values.
After a discussion between the two copyeditors about who will perform the copy-edit, you all agree that the task’s duration should increase and the resource’s daily work on the task should decrease correspondingly.
In the Duration field for task 8, type or select 20d, and press the Enter key.
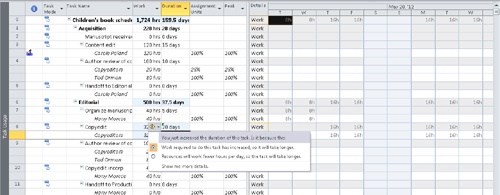
Project changes the duration of task 8 to 20 days and increases the work to 320 hours. Note that the change highlighting applied to the Work and Duration values. You increased the duration and wanted the total work to remain the same (it didn’t), so you will use the Action button to adjust the results of the new task duration.
Point at task 8’s Duration field, and then click the Action button.
Review the options on the list that appears.
Because task 8’s task type is fixed units (the default task type), the Action’s default selection is to increase work as the duration increases. However, you’d like to keep the work value the same and decrease assignment units for the task’s new duration.
On the Actions list, click Resources will work fewer hours per day so that the task will take longer.
The assignment units value decreases to 150%, and the total work on the task remains unchanged at 240 hours.
Next, you will change a task type and then adjust the work on the task.
In the Task Name column, select the name of task 24, Final review.
On the Task tab, in the Editing group, click Scroll to Task.
Project displays work values for task 24, Final review in the timephased grid.
On the Task tab, in the Properties group, click Information.
The Task Information dialog box appears.
Click the Advanced tab.
The selected task describes the final review of the new book’s page proofs. As you can see in the Task Type box, this task has the default task type of fixed-units. The task is scheduled for five days. You will make this a fixed-duration task.
In the Task Type box, select Fixed Duration.
Click OK to close the Task Information dialog box.
Next, you’ll add work to the task.
In the Work field for task 24, Final review, type 150h, and then press Enter.
Because this is a fixed-duration task and you’ve added work, Project adjusted the peak value to 125%; this represents an intentional overallocation. On the right side of the usage view, you can see that the resources assigned to task 24 now have 10 hours of work scheduled per day. Their original assignment units values of 100% each remain unaffected, however.


Entering Deadline Dates
One common mistake made by new Project users is to place semi-flexible or inflexible constraints on too many tasks in their projects. Such constraints severely limit your scheduling flexibility.
Yet, if you know that a specific task must be completed by a certain date, why not enter a Must Finish On constraint? This is the reason: Assume that you have a five-day task that you want to see completed by April 13, and today is April 2. If you enter a Must Finish On constraint on the task and set it to April 13, Project will move it out so that it will indeed end on April 13.

Even if the task could be completed earlier, Project will not reschedule it to start earlier. In fact, by applying that constraint, you have increased the risk for this task. If the task is delayed for even one day for any reason (a required resource is sick, for example), the task will miss its planned finish date.
A better approach to scheduling this task is to use the default As Soon As Possible constraint and enter a deadline of April 13. A deadline is a date value you enter for a task that indicates the latest date by which you want the task to be completed, but the deadline date itself does not constrain the task.

Now the task has the greatest scheduling flexibility. It might be completed well before its deadline, depending on resource availability, predecessor tasks, and whatever other scheduling issues apply.
Entering a deadline date causes Project to display a deadline indicator on the chart portion of the Gantt Chart view. If the task’s finish date moves past its deadline, Project displays a missed deadline indicator in the Indicator field for that task.
In this exercise, you enter a deadline date for a task.
Open Advanced Tasks B_Start from the Chapter07 practice file folder
On the File tab, click Save As.
The Save As dialog box appears.
In the File name box, type Advanced Tasks B, and then click Save.
In the Task Name column, select the name of task 5, Handoff to Editorial.
On the Task tab, in the Editing group, click Scroll to Task.
This task is a milestone marking the scheduled finish date of the acquisition phase of the new book project. You want to make sure that the acquisition task concludes by Friday, May 11, 2012, so you will enter a deadline date for this milestone.
On the Task tab, in the Properties group, click Information.
The Task Information dialog box appears.
Click the Advanced tab.
In the Deadline box, type or select 5/11/12, and then click OK.
Project displays a deadline indicator in the chart portion of the Gantt Chart view.
You can now see at a glance how close the end of the acquisition phase, as currently scheduled, will come to meeting or missing its deadline. If the scheduled completion of the Acquisition phase moves past May 11, Project will display a missed deadline indicator in the Indicators column.

Entering a deadline date has no effect on the scheduling of a summary or subtask. However, a deadline date will cause Project to alert you if the scheduled completion of a task exceeds its deadline date.
Entering Fixed Costs
For projects in which you must track budget or financial costs, you may need to work with several different sources of costs. These include costs associated with resources, as well as costs associated directly with a specific task.
For many projects, financial costs are derived mainly from costs associated with work resources, such as people and equipment, or with material resources. To handle costs of similar types for which you want to track aggregate sums (travel is one example in many projects), Project supports cost resources. If you need a refresher on cost resources, see Chapter 3.
However, you may occasionally want to associate a cost with a task that is not tied to resources or work and is not something you want to aggregate across the project. Project calls this a fixed cost, and it is applied per task. A fixed cost is a specific monetary amount budgeted for a task. It remains the same regardless of any resources assigned to the task. The following are common examples of fixed costs in projects:
A setup fee, charged in addition to a per-day rental fee, for a piece of equipment
A building permit
If you assign resources with cost rates, assign cost resources, or add fixed costs to a task, Project adds it all together to determine the task’s total cost. If you do not enter resource cost information into a project plan (perhaps because you do not know how much your work resources will be paid), you can still gain some control over the project’s total cost by entering fixed costs per task.
You can specify when fixed costs should accrue as follows:
Start. The entire fixed cost is scheduled for the start of the task. When you track progress, the entire fixed cost of the task is incurred as soon as the task starts.
End. The entire fixed cost is scheduled for the end of the task. When you track progress, the entire fixed cost of the task is incurred only after the task is completed.
Prorated. The fixed cost is distributed evenly over the duration of the task. When you track progress, the project incurs the cost of the task at the rate at which the task is completed. For example, if a task has a $100 fixed cost and is 75 percent complete, the project has incurred $75 against that task.
When you plan a project, the accrual method you choose for fixed costs determines how these costs are scheduled over time. This can be important in anticipating budget and cash-flow needs. By default, Project assigns the prorated accrual method for fixed costs, but you can change that to match your organization’s cost accounting practices.
For the new book project, you’ve learned that the generating of page proofs by the color setting services firm will cost $500. Lucerne Publishing has a credit account with this firm, but to keep the book’s P&L statement accurate, you’d like to accrue this expense when the color setting services firm completes the task.
In this exercise, you assign a fixed cost to a task and specify its accrual method.
On the View tab, in the Task Views group, click Other Views, and then click Task Sheet.
The Task Sheet view appears.
On the View tab, in the Data group, click Tables, and then click Cost.
The Cost table appears, replacing the Entry table.
In the Fixed Cost field for task 30, Generate proofs, type 500, and press the Tab key.
In the Fixed Cost Accrual field, select End, and press Tab.

Project will now schedule a $500 cost against the task Generate proofs at the task’s end date, and the project will incur this cost when the task ends. This cost is independent of the task’s duration and of any costs of resources that could be assigned to it.
Setting Up a Recurring Task
Many projects require repetitive tasks, such as attending project status meetings, creating and publishing status reports, or running quality-control inspections. Although it is easy to overlook the scheduling of such events, you should account for them in your project plan. After all, status meetings and similar events that indirectly support the project require time from resources, and such events take time away from your resources’ other assignments.
To help account for such events in your project plan, create a recurring task. As the name suggests, a recurring task is repeated at a specified frequency such as daily, weekly, monthly, or yearly. When you create a recurring task, Project creates a series of tasks with Start No Earlier Than constraints, no task relationships, and effort-driven scheduling turned off.
In this exercise, you create a recurring task that will represent a weekly meeting associated with this project.
On the View tab, in the Task Views group, click Gantt Chart.
The Gantt Chart view appears.
Select the name of task 1, Acquisition.
You’ll insert the recurring task above the first phase of the project plan, as it will occur throughout multiple phases of the plan.
On the Task tab, in the Insert group, click the down arrow below the Task button and then click Recurring Task.
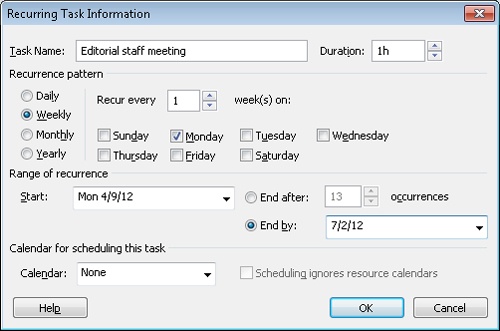
The Recurring Task Information dialog box appears.
In the Task Name box, type Editorial staff meeting.
In the Duration box, type 1h.
Under Recurrence pattern, make sure Weekly is selected, and then select the Monday check box.
Next, you will specify the date of its first occurrence. By default, it is the project start date. However, you want the weekly status meetings to begin one week later.
In the Start box, type or select 4/9/12.
Next, you will specify the end date. You’ll plan for these staff meetings to continue until the project reaches the Design and Production phase. In the Gantt Chart, you can see that as currently scheduled, that phase starts on July 2, so you’ll use that date for now. You can always update the recurring task later as needed.
In the End by box, type or select 7/2/12.
Click OK to create the recurring task.
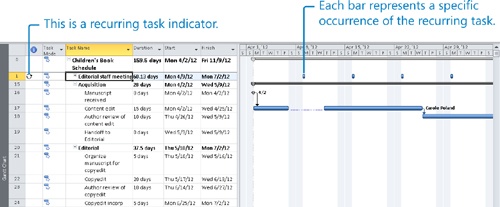
Project inserts the recurring task. Initially, the recurring task is collapsed. A recurring task icon appears in the Indicators column.
To view the first occurrences of the recurring meeting’s Gantt bars, on the Task tab, in the Editing group, click Scroll To Task.
A Gantt bar for a recurring task shows only the occurrences or rollups of the individual occurrences of the task.
Next, you will assign resources to the recurring task.
Verify that task 1, Editorial staff meeting, is selected, and then, on the Resource tab, in the Assignments group, click Assign Resources.
In the Assign Resources dialog box, click Carole Poland. Then hold down the Ctrl key while clicking Hany Morcos and Jun Cao.
Click Assign, and then click Close.
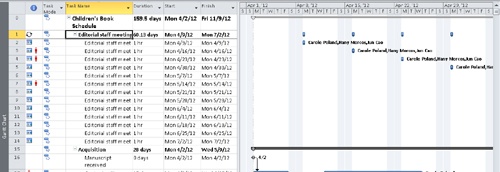
The Assign Resources dialog box closes, and Project assigns the selected resources to the recurring task. Next, you will view the individual occurrences of the recurring task.
Click the plus sign next to the recurring task’s title, Editorial staff meeting.
Each occurrence of the recurring task is sequentially numbered (if you wish to verify this, widen the Task Name column, or point to the task’s name and note the content of the ScreenTip), and the resource assignments appear for the individual occurrences.
Click the minus sign next to the recurring task’s title, Editorial staff meeting, to hide the individual occurrences.
Here are a few other things to keep in mind when creating recurring tasks:
By default, Project schedules a recurring task to start at the plan’s default start time. (Click File, click Options, and then click Schedule.) In this project, that value is 8 A.M. If you want to schedule a recurring task to start at a different time, enter that time along with the start date in the Start box of the Recurring Task Information dialog box. For example, if you want the recurring staff meeting to be scheduled for 10 A.M. starting on April 9, you would enter 4/9/12 10 AM in the Start box.
As with a summary task, the duration of a recurring task spans the earliest start to latest finish date of the individual occurrences of the recurring task.
When you schedule a recurring task to end on a specific date, Project suggests the current project end date. If you use this date, be sure to change it manually if the project end date changes later.
If you want to assign the same resources to all occurrences of a recurring task, assign the resources to recurring tasks with the Assign Resources dialog box. Entering resource names in the Resource Name field of the summary recurring task assigns the resources to the summary recurring task only and not to the individual occurrences.
Viewing the Project’s Critical Path
A critical path is the series of tasks that will push out the project’s end date if the tasks are delayed. The word critical in this context has nothing to do with how important these tasks are to the overall project. It refers only to how their scheduling will affect the project’s finish date; however, the project finish date is of great importance in most projects. If you want to shorten the duration of a project to bring in the finish date, you must begin by shortening (also referred to as crashing) the critical path.
Over the life of a project, the project’s critical path is likely to change from time to time as tasks are completed ahead of or behind schedule. Schedule changes, such as changing task relationships or durations, can also alter the critical path. After a task on the critical path is completed, it is no longer critical because it cannot affect the project finish date. In Chapter 14, you will work with a variety of techniques to shorten a project’s overall duration.
A key to understanding the critical path is to understand slack, also known as float. There are two types of slack: free and total. Free slack is the amount of time a task can be delayed before it delays another task. Total slack is the amount of time a task can be delayed before it delays the completion of the project.
A task is on the critical path if its total slack is less than a certain amount—by default, if it is zero days. In contrast, noncritical tasks have slack, meaning they can start or finish earlier or later within their slack time without affecting the completion date of a project. One way to see the critical path is to switch to the Detail Gantt view.
In this exercise, you view the project’s critical path.
On the View tab, in the Task Views group, click the down arrow below the Gantt Chart button and then click More Views.
In the More Views dialog box, select Detail Gantt, and then click Apply.
The project appears in the Detail Gantt view.
On the View tab, in the Zoom group, click Entire Project.
Because of the highly sequential nature of the task relationships in this project plan, almost all the tasks are on the critical path, and in the Detail Gantt view, their Gantt bars are formatted in red.
Notice the Gantt bar of task 41, Review with author. The blue bar represents the duration of the task. The thin teal line and the number next to it represent free slack for this task. As you can see, this particular task has some slack and is therefore a noncritical task. (Remember that the term critical in this sense has nothing to do with the task’s importance, but only with how much or little total slack is associated with the task—and, ultimately, what effect the task has on the project’s finish date.)
On the View tab, in the Task Views group, click the down arrow below the Gantt Chart button and then click Gantt Chart.
Working with the critical path is the most important way to manage a project’s overall duration. In later exercises, you will make adjustments that might extend the project’s duration. Checking the project’s critical path and, when necessary, shortening the overall project duration are important project management skills.
Here are a few other things to keep in mind when working with the critical path:
By default, Project defines a task as critical if it has zero slack. However, you can change the amount of slack required for a task to be considered critical. You might do this, for example, if you wanted to more easily identify tasks that were within one or two days of affecting the project’s finish date. On the File tab, click Options, and in the Project Options dialog box, click the Advanced tab. In the Tasks Are Critical If Slack Is Less Than Or Equal To box, enter the number of days you want. In this same dialog box, you can elect to display multiple critical paths.
Project constantly recalculates the critical path even if you never display it.
You see free slack represented in the chart portion of the Detail Gantt view, and you can also see the values of free and total slack in the Schedule table. You can apply the Schedule table to any Gantt Chart or Task Sheet view.
You can toggle the formatting of critical tasks and slack directly in any Gantt Chart view. On the Format tab, in the Bar Styles group, select or clear the Critical Tasks and Slack check boxes.
Scheduling Summary Tasks Manually
In Chapter 2, you worked with summary tasks and subtasks. Recall that the default behavior of Project is to automatically calculate a summary task’s duration as the span of time between the earliest start and latest finish dates of its subtasks. For this reason, Project sets summary tasks as automatically scheduled—their durations are automatically determined by their subtasks, regardless if those subtasks are manually or automatically scheduled (or a mix).
There may be times, however, when you want to directly enter a duration value for a summary task that is independent of its calculated duration as determined by its subtasks. For example, a summary task might represent a phase of work for which you want to allocate 60 working days, and compare that duration with the calculated duration determined by the subtasks (their durations, task relationships, and other factors). This is especially true during the initial planning of a project plan, when you may need to account for the gap between how long you’d like a phase of work to take and its duration as determined by its subtasks.
Fortunately you can enter any duration you wish for a summary task. When you do so, Project switches the summary task from automatic to manually scheduled and reflects both the automatically calculated and manually entered durations as separate parts of the summary task’s Gantt bar. If the summary task is a predecessor of another task, Project will reschedule the successor task based on the manual, not automatic duration.
Setting a manual duration for a summary task is a good way to apply a top-down focus to a project plan. You can, for example, introduce some slack or buffer to a phase of work by entering a manual duration for the summary task that is longer than its calculated duration.
In this exercise, you enter manual durations for some summary tasks.
To begin, you’ll adjust the outline display of the project plan to display just its top-level summary tasks.
On the View tab, in the Data group, click Outline, and then click Outline Level 1.
Project hides all subtasks and nested summary tasks, leaving only the top-level tasks visible.
On the View tab, in the Zoom group, click Entire Project.
Note that the minus signs next to the summary task names changed to plus signs, indicating that the subtasks are hidden.
In this view, you can more easily see and compare the durations of the individual summary tasks. Next, you’ll enter some manual durations. You’ll begin with the Editorial phase, which you’d like to see completed within 30 working days.
In the Duration field for the summary task 20, Editorial, type 30d and press Enter.
Project records your manually entered duration and makes some adjustments to the schedule:
The summary task is switched from automatically scheduled (the default for summary tasks) to manually scheduled. Note the pin icon in the Task Mode column that reflects the task’s scheduling status.
Project drew a two-part Gantt bar for the summary task. The upper portion of the bar represents the manual duration, and the lower portion represents the automatically scheduled duration.
Project draws a red squiggly line under the new finish date to flag this as a potential scheduling conflict.
Project rescheduled the successor tasks throughout the schedule based on task 20’s manually entered duration.
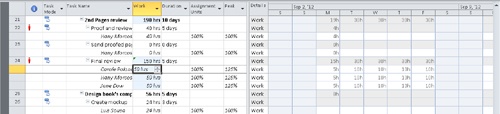
Looking at the updated schedule, you decide you’d like to allow a bit more time for the color prep and printing.
In the Duration field for the summary task 42, Color prep and printing, type 50d and press Enter.
Project records your manually entered duration, switches the summary task to manually scheduled, and redraws the Gantt bar. To conclude this exercise, you’ll adjust the display settings to see all subtasks.
On the View tab, in the Data group, click Outline, and then click All Subtasks.
Project expands the task list to show all subtasks. Next, you will collapse the recurring task.
Click the minus sign next to the name of the recurring task 1, Editorial staff meeting.
In the chart, you can see approximately where the tasks in the Editorial phase are extending beyond your preferred duration of the phase, and where there is a small amount of extra time, or buffer, in the Design and Production phase of the project plan.


Inactivating Tasks
Important
The ability to inactivate tasks is available only in Project Professional and not in Project Standard. If you have Project Standard, skip this section.
You can include tasks in a project plan that you might later decide you don’t want to have completed, but you also don’t want to lose the details about those tasks by deleting them. You might for example develop tasks that pose “what-if” questions that you can’t begin to answer until preliminary questions get answered. Or you could design a project plan that describes a likely-case scenario for completion but also includes more optimistic and pessimistic sets of tasks as well.
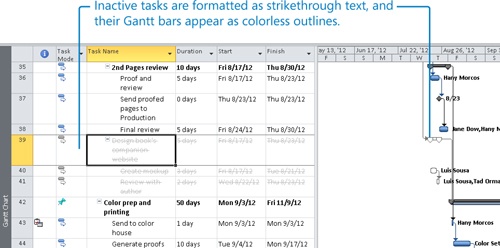
In Project, you can inactivate a single task or multiple tasks. Inactivating tasks may be preferable to deleting tasks, in that it keeps the task information in the project plan but removes the scheduling effect of those tasks. A task that drives the start of a successor task, for example, remains visible when inactivated, but it has strikethrough formatting applied in the Gantt Chart and other views, and its link relationship is broken and its successor is rescheduled.
Should you later wish to reactivate inactivated tasks, you can easily do so, and Project restores them as active tasks with the same scheduling impact as they previously had.
In this exercise, you inactivate a summary task and its subtasks.
Select the name of task 39, Design book’s companion website.
This summary task and its subtasks reflect an initial plan to account for the work of designing a Web site that would promote the new book at its launch. You still think you might want to include this work in the new book plan, but for now, you’d like to inactivate these tasks.
On the Task tab, in the Schedule group, click Inactivate.
Project inactivates the summary task and its subtasks.
The original task information is still visible, but now it has no impact on the overall project plan. Later, should you decide to include these tasks in the project plan, you could reactivate them by clicking Inactivate again.
Key Points
By using a combination of task relationships plus lead and lag time, you can more accurately model when work should be done.
When entering lead time between a predecessor and successor task, entering a percentage lead time value offers some flexibility because Project recalculates the lead time value whenever the duration of the predecessor task changes.
Think through the effects of semi-flexible and inflexible constraints on your schedules, and use them sparingly.
You can often set a deadline date for a task instead of applying a hard constraint, such as Must Finish On (MFO).
You can interrupt work on a task by splitting it.
You can record any fixed cost value you wish per task, and it is not associated with resource costs.
For tasks that must be completed at times other than of the project’s normal working time (as specified by the project calendar), you can create a new base calendar and apply it to the task.
The critical path indicates the series of tasks that determine the project’s finish date. Project constantly recalculates the critical path, which may change as the details of your project plan change.
Set up a recurring task for activities, such as status meetings, that occur on a regular frequency.
You can enter a manual duration on a summary task in addition to its automatically scheduled duration.
In Project Professional, inactivate tasks used in “what-if” scenarios or otherwise no longer needed in the project plan but that you don’t want to delete permanently.