Chapter 4. Assigning Resources to Tasks
Chapter at a Glance
✓ | Assign work resources to tasks. |
✓ | Control how Project schedules additional resource assignments. |
✓ | Assign cost resources to tasks. |
In Chapter 2 and Chapter 3, you created tasks and resources. You are now ready to assign resources to tasks. An assignment is the matching of a resource to a task to do work. From the perspective of a task, you might call the process of assigning a resource a task assignment; from the perspective of a resource, you might call it a resource assignment. It is the same thing in either case: a task plus a resource equals an assignment.
Important
When we talk about resources throughout this chapter, we are talking about work resources (people and equipment) unless we specify material or cost resources. For a refresher on resource types, see Chapter 3.
You do not have to assign resources to tasks in Microsoft Project 2010; you could work only with tasks. However there are several good reasons for assigning resources in your project plan. When you assign resources to tasks, you can answer questions such as the following:
Who should be working on what tasks and when?
Do you have the correct number of resources to accomplish the scope of work that your project requires?
Are you expecting a resource to work on a task at a time when that resource will not be available to work (for example, when someone will be on vacation)?
Have you assigned a resource to so many tasks that you have exceeded the capacity of the resource to work—in other words, have you overallocated the resource?
In this chapter, you assign work resources to tasks, and you observe where resource assignments should affect task duration and where they should not. You then assign a cost resource and see what effect it has on a task.
Practice Files
Before you can complete the exercises in this chapter, you need to copy the book’s practice files to your computer. A complete list of practice files is provided in Using the Practice Files at the beginning of this book. For each exercise that has a practice file, simply browse to where you saved the book’s practice file folder.
Important
If you are running Project Professional, you may need to make a one-time setting change. This helps ensure that the practice files you work with in this chapter do not affect your Project Server data. For more information, see Appendix C.
Assigning Work Resources to Tasks
Assigning a work resource to a task enables you to track the progress of the resource’s work on the task. If you enter resource pay rates, Project also calculates resource and task costs for you.
You might recall from Chapter 3 that the capacity of a resource to work is measured in units (a level of effort measurement), and recorded in the Max. Units field. Unless you specify otherwise, Project assigns 100 percent of the units for the resource to the task—that is, Project assumes that all the resource’s work time can be allotted to the task. If the resource has less than 100 percent maximum units, Project assigns the resource’s Max. Units value.
In this exercise, you make some initial resource assignments to tasks.
Set Up
Start Project if it’s not already running.
You need the Simple Assignments_Start project plan located in your Chapter04 practice file folder to complete this exercise. Open the Simple Assignments_Start project plan, and then follow these steps.
On the File tab, click Save As.
Project displays the Save As dialog box.
In the File name box, type Simple Assignments, and then click Save.
Before making any resource assignments, you’ll check the project plan’s current duration and cost values for later comparison.
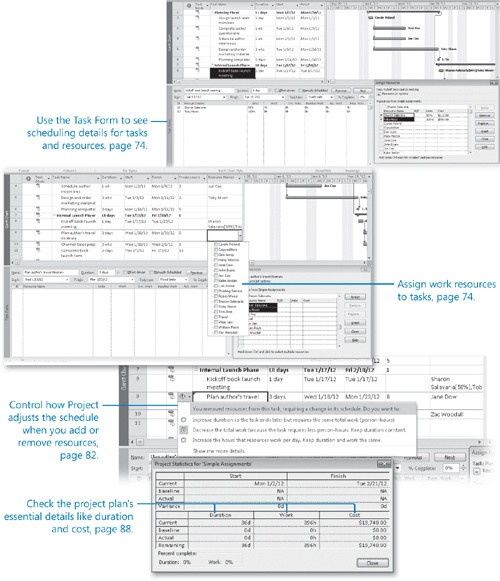
On the Project tab, in the Properties group, click Project Information, and then click Statistics.
Note the current duration of 41 days and zero cost. After you assign work and cost resources, you’ll check these values again.
Click Close.
Next you’ll make your first resource assignment.
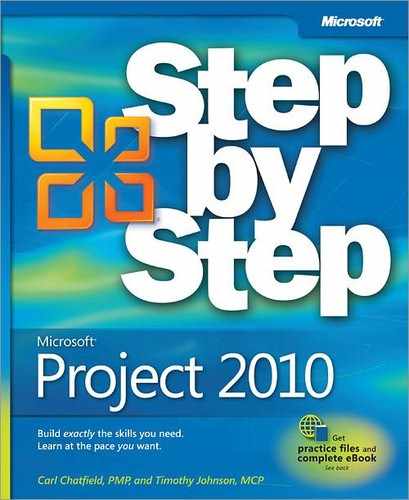
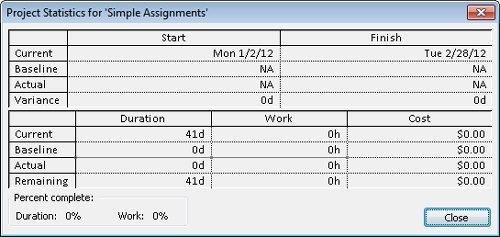
On the Resource tab, in the Assignments group, click Assign Resources.
The Assign Resources dialog box appears, in which you see the resource names you entered in Chapter 3, plus additional resources.
Except for assigned resources, which always appear at the top of the list, resources are sorted alphabetically in the Assign Resources dialog box.
In the Task Name column, click the name of task 2, Assign launch team members.
In the Resource Name column in the Assign Resources dialog box, click Carole Poland, and then click Assign.
A cost value and check mark appears next to Carole’s name, indicating that you have assigned her to the task. Carole’s name also appears next to the task 2 Gantt bar. Because Carole has a standard cost rate recorded, Project calculates the cost of the assignment (Carole’s standard pay rate times her scheduled amount of work on the task) and displays that value, $420, in the Cost field of the Assign Resources dialog box.
In the Task Name column, click the name of task 3, Complete author questionnaire.
In the Resource Name column in the Assign Resources dialog box, click Toni Poe, and then click Assign.
Tip
To remove or unassign a resource from a selected task, in the Assign Resources dialog box, click the resource name, and then click Remove.
Next, you’ll take a closer look at the details of task 3. You’ll use a handy view called the Task Form.
On the View tab, in the Split View group, click Details.
Project splits the window into two panes. In the upper pane is the Gantt Chart view, and below it is the Task Form.
If you completed Chapter 3, you may recognize that the Task Form is similar to the Resource Form but shows different details. In this type of split view, the details about the selected item in the upper view (a task, in this case) appear in the lower view, similar to the Resource Form. The Task Form displays one of several details. Next you’ll change the displayed details.
Click anywhere in the Task Form and then, on the Format tab, in the Details group, click Work.
The Work details appear.
Now, in the Task Form, you can see the essential scheduling values for this task: 1 week duration, 40 hours of work, and 100% assignment units. Because the Task Form is a handy way to see a task’s duration, units, and work values, you’ll leave it displayed for now.
Using the Assign Resources dialog box, assign the following resources to tasks. As you do so, note the Duration, Units, and Work values in the Task Form.
For this task
Assign this resource
4, Schedule author interviews
Jun Cao
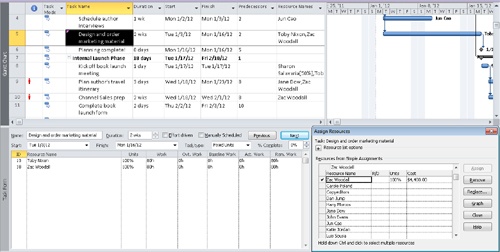
5, Design and order marketing material
Toby Nixon
When you are finished, your screen should look similar to the following illustration.
Next, you will assign two resources to a single task.
In the Task Name column, click the name of task 8, Kickoff book launch meeting.
In the Assign Resources dialog box, select the names of Sharon Salavaria and Toby Nixon, and then click Assign.
Tip
To select nonadjacent resource names, select the first name, hold down the Ctrl key, and then select additional names.
Sharon and Toby are assigned to the task. You can also see their names next to task 8’s Gantt bar.
Recall from Chapter 3 that Sharon has a 50% Max. Units value to account for her half-time schedule. As a result, Project assigned her at 50% units.
To conclude this exercise, you’ll use a different means of assigning resources.
In the Gantt Chart view, drag the vertical divider bar to the right until the Resource Names column is visible.
Click in the Resource Names column for task 9, Plan author’s travel itinerary, and then click the arrow that appears.
The resource names appear.
In the list of resource names, click the check boxes for Jane Dow and Zac Woodall, and then press the Enter key.
Jane and Zac are assigned to task 9.
Click in the Resource Names column for task 10, Channel Sales prep, and then click the arrow that appears. In the list of resource names that appears, check Zac Woodall and then press the Enter key.
Zac is assigned to task 10.


Tip
In this exercise, you assigned resources using the Assign Resources dialog box and the Resource Names column in the Gantt Chart view. In addition, you can assign resources in the Task Form and on the Resources tab of the Task Information dialog box, among other places. As you use Project, you’ll likely develop your own preference for the way you assign resources.
Controlling Work When Adding or Removing Resource Assignments
As you saw previously, you define the amount of work that a task represents when you initially assign a resource or resources to it. When using automatically scheduled tasks, Project gives you an option to control how it should calculate work on a task when you assign additional resources to the task or unassign resources from the task. This option is called effort-driven scheduling. You have a lot of flexibility in how you apply effort-driven scheduling. You can turn on effort-driven scheduling for an entire project plan or just specific tasks. You can also use the options in an Actions list to control how Project should recalculate work on a task immediately after making a resource assignment. Effort-driven scheduling applies only when you assign additional resources or remove resources from automatically scheduled tasks.
By now some time has passed since you made the initial resource assignments for the new book launch at Lucerne Publishing. You need to add and remove some assignments.
In this exercise, you adjust resource assignments on tasks and tell Project how it should adjust the tasks.
In the Gantt Chart view, click the name of task 5, Design and order marketing material.
Currently, Toby is assigned to this task. A quick check of the scheduling formula looks like this:
80 hours (the same as 10 days, or two weeks) task duration × 100% of Toby’s assignment units = 80 hours of work
Toby needs some help with this task, so you’ll add a resource.
In the Resource Name column in the Assign Resources dialog box, click Zac Woodall, and then click Assign.
Zac is added to the task and Project updates the scheduling formula values:
80 hours (the same as 10 days, or two weeks) task duration × 200% (that is, the sum of Toby’s and Zac’s assignment units) = 160 hours work.
Next, you will use a feature called the Actions list to control how Project schedules the work on a task when adding or removing resources. Note the small triangle in the upper-left corner of the name of task 5. This is a graphical indicator that an action is now available. Until you perform another action, you can use the Actions list to choose how you want Project to handle the additional resource assignment.
Click the name of task 5, and then click the Actions button that appears just to the left of the task name.
Look over the options on the list that appears.
These options allow you to choose the scheduling result that you want. You can adjust the task’s duration, the resources’ work, or the assignment units.
Tip
You will see other Actions indicators while using Project. They generally appear when you might otherwise ask yourself, “Hmm, why did Project just do that?” (such as when a task’s duration changes after you assign an additional resource). The Actions list gives you the chance to change how Project responds to your actions.
For this task, you want the additional assignment to mean additional work done in the original duration. This is the default setting, so you’ll close the Actions list without making a change.
Click the Actions button again to close the list.
Next, you’ll remove a resource from a task and then instruct Project how to schedule the remaining resource assignment on the task.
Click the name of task 9, Plan author’s travel itinerary.
Currently both Jane and Zac are assigned to the task. Jane has told you that she needs to complete the planned work alone, but over a longer time period. This is acceptable to you, so you’ll unassign Zac.
In the Resource Name column in the Assign Resources dialog box, click Zac Woodall, and then click Remove.
Project unassigns Zac from the task. Next, you’ll adjust how Project should handle the change in assignments.
Click the Actions button that appears just to the left of the task name.
Click Increase duration so the task ends later but requires the same total work (person-hours).
Project increases the task’s duration from three to six days, and increases Jane’s work total from 24 to 48 hours. This 48 hours is the same total work on the task when both Jane and Zac were assigned, but now all the work belongs to Jane.
So far, you’ve been adjusting duration and work values as you add or remove resources from tasks. You can also change the default setting for a task such that as you add resources to the task, its duration is decreased. You’ll do so next.
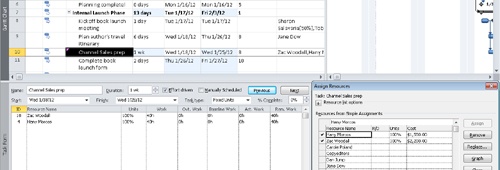
In the Gantt Chart view, click the name of task 10, Channel Sales prep.
Currently just Zac is assigned to this task, and it has a two-week duration.
In the Task Form, click Effort-driven, and then click OK in the upper-right corner of the Task Form.
There is no change to the duration, units, or work values for this task, but watch what happens when you assign an additional resource.
In the Gantt Chart view, click the name of task 10, and then, in the Assign Resources dialog box, click Hany Morcos, and then click Assign.
Task 10’s duration is reduced from two weeks to one week. The total work on the task remains 80 hours, but now it is split evenly between Zac and Hany. This is the scheduling result that you wanted. If it wasn’t, you could use the Actions list to change how Project responds to the additional resource assignment.
Tip
By default, effort-driven scheduling is disabled for all tasks that you create in Project. To change the default setting for all new tasks in a project plan, on the File tab, click Options. In the Project Options dialog box, click the Schedule tab and then select “the New tasks are effort-driven” check box. To control effort-driven scheduling for a specific task or tasks, first select the task or tasks. Then, on the Task tab, in the Properties group, click Information, and on the Advanced tab of the Task Information dialog box, select or clear the “Effort driven” check box.


The order of your actions matters with regard to effort-driven scheduling. If you initially assign two resources to a task with a duration of three days (equal to 24 hours), Project schedules each resource to work 24 hours, for a total of 48 hours of work on the task. However, you might initially assign one resource to a task with a duration of 24 hours and later add a second resource. In this case, effort-driven scheduling will cause Project to schedule each resource to work 12 hours in parallel, for a total of 24 hours of work on the task. Remember that when it’s turned on, effort-driven scheduling adjusts task duration only if you add or remove resources from a task.
Assigning Cost Resources to Tasks
Recall from Chapter 3 that cost resources are used to represent a financial cost associated with a task in a project. Cost resources do no work and have no effect on the scheduling of a task. Cost resources might include categories of expenses that you want to budget and track for accounting or financial reporting purposes. Broadly speaking, the costs that tasks can incur can include:
Work resource costs, such as a person’s standard pay rate times the amount of work they perform on the task.
Cost resource costs, which are a fixed dollar amount that you enter when assigning the cost resource to a task. The amount is not affected by changes in duration or any other schedule changes to the task, although you can edit the amount at any time. You can also see cumulative costs resulting from assigning the same cost resource to multiple tasks.
For the new book launch project plan, you’d like to enter planned travel costs for certain tasks. Since work has not yet started on this project at this time, these costs represent planned costs (indeed, you should consider all costs that Project has calculated so far in the schedule to be planned costs, such as those resulting from work resource assignments to tasks). Later, you can enter actual costs if you wish to compare them with the budget.
In this exercise, you assign a work resource and a cost resource to a task and check the plan’s overall duration and cost values.
Click the name of task 17, Author reading and signing at book fair.
This task requires air travel by the author, and you’ve allocated $800 in anticipation of this expense.
Currently task 17 has no assigned resource and no cost. First, you’ll assign the author to the task.
In the Resource Name column in the Assign Resources dialog box, click Toni Poe, and then click Assign.
Project assigns Toni Poe, a work resource, to the task. As you can see in the Cost field of the Assign Resources dialog box, this assignment has no cost. That’s because this work resource, Toni Poe, has no cost rate or per-use cost. So even though the assignment generated work, there’s no cost associated with it. Next, you’ll assign the cost resource.
In the Assign Resources dialog box, select the Cost field for the Travel cost resource, type 800, and then click Assign.
Project assigns the cost resource to the task.
To see both assigned resources, scroll up the Resource list in the Assign Resources dialog box.
You can see the cost incurred by this assignment in the Cost column of the Assign Resources dialog box. The travel cost value will remain the same regardless of any changes made to the scheduling of the task, such as work resources being assigned or unassigned, or the task’s duration changing.
Note the task has the same duration of one day and Toni Poe has the same units and work values as before. Assigning the cost resource affected only the cost incurred by this task.
To conclude this exercise, you’ll revisit the project’s overall duration and cost values now that you’ve made some resource assignments.
On the Project tab, in the Properties group, click Project Information, and then click Statistics.
Note the shorter duration of 36 days (it had been 41 days) and the $19,740 cost. The shorter duration is the result of applying effort-driven scheduling to some tasks. The cost is the sum of work resource assignments plus the one cost resource assignment.
Click Close.


Key Points
In Project, a task normally has work associated with it after a work resource (which can be people or equipment) has been assigned to the task.
You must assign resources to tasks before you can track resources’ progress or cost.
Project follows the scheduling formula Duration × Units = Work.
Effort-driven scheduling determines whether work remains constant when you assign additional resources to tasks. Effort-driven scheduling is turned off by default.
The easiest way to understand effort-driven scheduling is to ask yourself this question: If one person can do this task in 10 days, could two people do it in 5 days? If so, then effort-driven scheduling should apply to the task.
Actions lists appear after you perform certain actions in Project. They allow you to quickly change the effect of your action to something other than the default effect.
Assigning cost resources allows you to associate financial costs with a task other than those derived from work or material resources.