Modifying the Display of the Ribbon
The goal of the Microsoft Office working environment is to make working with Office documents, including Microsoft Project plans, Microsoft Word documents, Microsoft Excel workbooks, Microsoft PowerPoint presentations, Microsoft Outlook e-mail messages, and Microsoft Access database tables, as intuitive as possible. You work with an Office document and its contents by giving commands to the program in which the document is open. All Office 2010 programs organize commands on a horizontal bar called the ribbon, which appears across the top of each program window whether or not there is an active document.

Commands are organized on task-specific tabs of the ribbon, and in feature-specific groups on each tab. Commands generally take the form of buttons and lists. Some appear in galleries. Some groups have related dialog boxes or task panes that contain additional commands.
Throughout this book, we discuss the commands and ribbon elements associated with the program feature being discussed. In this topic, we discuss the general appearance of the ribbon, things that affect its appearance, and ways of locating commands that aren’t visible on compact views of the ribbon.
See Also
For detailed information about the ribbon in Microsoft Project, see the section The Ribbon and Tabs: Finding the Features You Want, in Chapter 1. For information about customizing the ribbon and other parts of the Project interface, see Chapter 16.
Tip
Some older commands no longer appear on the ribbon but are still available in the program. You can make these commands available by adding them to the Quick Access Toolbar. For more information, see the section Customizing the Ribbon and Quick Access Toolbar, in Chapter 16.
Dynamic Ribbon Elements
The ribbon is dynamic, meaning that the appearance of commands on the ribbon changes as the width of the ribbon changes. A command might be displayed on the ribbon in the form of a large button, a small button, a small labeled button, or a list entry. As the width of the ribbon decreases, the size, shape, and presence of buttons on the ribbon adapt to the available space.
For example, when sufficient horizontal space is available, the buttons on the Task tab of the Project program window are spread out and you’re able to see more of the commands available in each group.

If you decrease the width of the ribbon, small button labels disappear and entire groups of buttons hide under one button that represents the group. Click the group button to display a list of the commands available in that group.

When the window becomes too narrow to display all the groups, a scroll arrow appears at its right end. Click the scroll arrow to display hidden groups.

Changing the Width of the Ribbon
The width of the ribbon depends on the horizontal space available to it, which in turn depends on these three factors:
The width of the program window. Maximizing the program window provides the most space for ribbon elements. You can resize the program window by clicking the button in its upper-right corner or by dragging the border of a non-maximized window.
Your screen resolution. Screen resolution is the size of your screen display expressed as pixels wide × pixels high. The greater the screen resolution, the greater the amount of information that will fit on one screen. Your screen resolution options depend on your monitor. At the time of writing, possible screen resolutions range from 800 × 600 to 2048 × 1152. In the case of the ribbon, the greater the number of pixels wide (the first number), the greater the number of buttons that can be shown on the ribbon, and the larger those buttons can be.
On a computer running Windows 7, you can change your screen resolution from the Screen Resolution window of Control Panel.
The density of your screen display. You might not be aware that you can change the magnification of everything that appears on your screen by changing the screen magnification setting in Windows. Setting your screen magnification to 125% makes text and user interface elements larger on screen. This increases the legibility of information, but it also means that less fits onto each screen.

On a computer running Windows 7, you can change the screen magnification from the Display window of Control Panel.
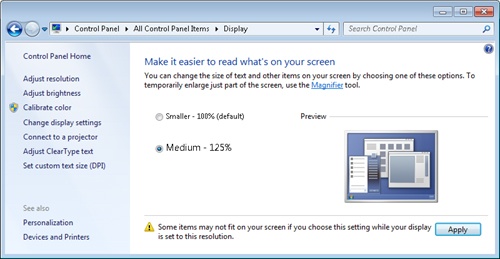
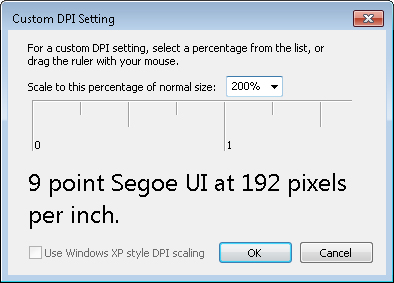
You can choose one of the standard display magnification options or create another by setting a custom text size.
The screen magnification is directly related to the density of the text elements on screen, which is expressed in dots per inch (dpi) or points per inch (ppi). (The terms are interchangeable, and in fact, they are both used in the Windows dialog box in which you change the setting.) The greater the dpi, the larger the text and user interface elements appear on screen. By default, Windows displays text and screen elements at 96 dpi. Choosing the Medium - 125% display setting changes the dpi of text and screen elements to 120 dpi. You can choose a custom setting of up to 500% magnification, or 480 dpi, in the Custom DPI Setting dialog box.
Adapting Exercise Steps
The screen images shown in the exercises in this book were captured at a screen resolution of 1280 × 800, at 100% magnification, and the default text size (96 dpi). If any of your settings are different, the ribbon on your screen might not look the same as the one shown in the book. For example, you might see more or fewer buttons in each of the groups, the buttons you see might be represented by larger or smaller icons than those shown, or the group might be represented by a button that you click to display the group’s commands.
When we instruct you to give a command from the ribbon in an exercise, we do it in this format:
On the Project tab, in the Properties group, click Project Information.
If the command is in a list, we give the instruction in this format:
On the View tab, in the Data group, click Tables and then click Cost.
The first time we instruct you to click a specific button in each exercise, we display an image of the button in the page margin to the left of the exercise step.
If differences between your display settings and ours cause a button on your screen to look different from the one shown in the book, you can easily adapt the steps to locate the command. First, click the specified tab. Then locate the specified group. If a group has been collapsed into a group list or group button, click the list or button to display the group’s commands. Finally, look for a button that features the same icon in a larger or smaller size than that shown in the book. If necessary, point to buttons in the group to display their names in ScreenTips.
If you prefer not to have to adapt the steps, set up your screen to match ours while you read and work through the exercises in the book.