
So far we have covered the new business intelligence features in Dynamics AX 2009 such as the Role Centers. In this chapter, we will embark on the implementation of yet another powerful new feature in the Dynamics AX 2009 component arsenal, Workflow.
The workflow system in Dynamics AX 2009 has been completely redesigned. In short, it is a web application that implements the Windows Workflow Foundation (WF) framework. Windows Workflow Foundation has been part of the Microsoft .NET Framework instance since version 3.0. If you have had experience setting up and defining custom workflow configurations in Microsoft SharePoint, then you will be familiar with the same terminology and interface.
A batch process must also be available to process Workflow events in Dynamics AX. The purpose of the batch process is to communicate the Workflow tasks generated in Dynamics AX to the Workflow web service. Additionally, the batch process also generates appropriate messages.
In this chapter, we will specifically cover:
The prerequisites required for Workflow
How to install Workflow
How to appropriately set up and configure Workflow
Testing Workflow
Before we begin installing and setting up Workflow, you will need to have administrator privileges on the machines in which you are installing Workflow on. The following prerequisites are required:
The Workflow component for Dynamics AX utilizes the Business Connector to communicate directly to Dynamics AX from its web service. Although it depends on the number of users and computing resources available, it is best practice to implement the Workflow web service application on its own server.
The Workflow system in Dynamics AX utilizes two accounts to function properly. If these accounts are not specified, workflow will still function; however, it is best practice to have dedicated accounts. One account is the service account. This account is responsible for the communication between Dynamics AX and the Workflow web service. The other account is the execution account. This account is responsible for executing Workflow tasks and processes. Similar to the Business Connector proxy account, these two accounts must be created with the following criteria:
The password must never expire
It must not be interactive
It must not be associated to any Dynamics AX users
Once the Workflow accounts have been created, the next process is to ensure that the Dynamics AX Workflow system will use the accounts. To do this, perform the following steps:
Log in to Dynamics AX 2009.
Go to Administration | Setup | Security | System service accounts.

In the System service accounts form, specify the Workflow System Account and the Workflow Execution Account. To specify the accounts that were created in the Active Directory, mark the Alias field radio boxes. When complete, click on the OK button.

Now that the Workflow accounts have been specified, the Dynamics AX Workflow system can utilize these accounts when communicating with the Workflow web service. It is also possible to create a user within Dynamics AX but not Active Directory, and use the Dynamics AX user accounts as the Workflow Service and Execution accounts. These accounts may appear as different users in Dynamics AX; however, these accounts will be impersonated by the AOS service account to the Workflow web service. This can make troubleshooting and connection auditing more difficult and therefore, it is not recommended.
Since Workflow consists of various parts that function together to create the Dynamics AX 2009 Workflow system, we will break down each part’s setup and complete each setup individually.
Before we can install the Workflow extended server component, we must have a website available to install upon. It is possible to use the default website that is on port 80. However, it is not recommended; therefore, a new website must be created. For information regarding how to create a website in IIS 7, refer to http://technet.microsoft.com/en-us/library/cc772350(WS.10).aspx.
By now you should be accustomed to the process of installing the extended components for Dynamics AX. Installing Workflow is no different. The following steps will guide you through the process:
Run the Microsoft Dynamics AX Setup wizard to add new components. In the Add or modify components screen of the wizard, mark the Workflow checkbox, as shown in the following screenshot and then click on the Next button:

In the following screen of the wizard, specify the password for the .NET Business Connector proxy account, and then click on the Next button:

In the next section of the wizard, you will be prompted to tweak the Workflow service. In other words, you can select which website you want to install the Workflow service into. By default, the wizard will select the default website in IIS. However, it is recommended to install Workflow on its own dedicated site and port, you have the flexibility to do so. When you are satisfied with the settings on this page, click on the Next button.

In the following screen you will be prompted to specify the AOS account for the Workflow service to grant permissions to. If there is more than one AOS and each AOS service account is different, provide the accounts for each AOS so that they can access the Workflow service.

In the following step, you are prompted to complete the installation of the Workflow by clicking on the Finish button. You will want to restart IIS after the Workflow has been successfully installed. Therefore, leave the option checked at the bottom, as shown in the following screenshot:

Once installed, you will be prompted with the final screen. The final screen will display the result of the installation of the Dynamics AX 2009 Workflow system. If the installation is successful, you will see a green box next to the installed component. Otherwise, if the box is orange or red, you should open the log file after you close the wizard by marking the checkbox at the bottom.

In Windows Server 2008 R2, additional setup is required to enable the Workflow web service. The Workflow web service application pool must be enabled to run 32-bit applications. Otherwise, the Workflow service will fail. To set up the application pool to run 32-bit applications, perform the following steps:
Go to the IIS console and access the web server that you installed the Workflow web service on.
Under <Your web server> | Application Pools, select the Dynamics AX Workflow application pool.

Under Actions, go to Advanced Settings.... In the Advanced Settings window, set the Enable 32-Bit Applications property to True. When complete, click on the OK button to save the changes.

After performing these steps, the Workflow web service can then be used by Dynamics AX to process Workflows. Next, we will set up Dynamics AX to use the Workflow web service.
Now that the Workflow service for Dynamics AX has been successfully installed, we can begin to configure it for use. Dynamics AX will not utilize the Workflow service after it has been installed. Therefore, in order to properly configure the Workflow system, we must do so within Dynamics AX 2009.
Before we begin configuring the Workflow system, we need to ensure that the following is set:
A dedicated Workflow batch group has been created
An AOS is set up as a batch server
Creating a dedicated batch group is not required but recommended since, there is no batch group dedicated for Workflow. Since Workflow uses batch jobs to generate notifications and run Workflow processes, a batch server is required.
The following steps cover the process of verifying whether an AOS is a batch server and how to create a Workflow batch group:


Since Dynamics AX workflow uses a batch job to send workflow tasks to the web service in order to be processed in Dynamics AX, we need to ensure that there is at least one AOS that is designated as a batch server. Without the batch job, the Workflow web service would sit idle, waiting for a workflow request even though a user may have initiated a workflow task in Dynamics AX. In this section, we will cover the process of setting up an AOS as a batch server and ensuring that a Workflow’s batch group will be associated to a designated batch server.
To view and modify the current batch server set up on an AOS or group of AOSs, go to Administration | Setup | Server Configuration.

Select the appropriate AOS that should run as the batch server and then click on the General tab and ensure that the Is Batch Server checkbox is marked.

Go to the Batch server groups tab, and add the Workflow batch groups that we created.

To specify the number of batch threads/processes that can run simultaneously and the time the batch processes can run, go to the Batch server schedule tab and provide the desired values. The following batch schedule is the default schedule and runs eight threads at any time of the day:

Now that we have an AOS that can run Workflows in a batch server, we must configure the batch processes. This section will guide you through the process of:
Configuring Dynamics AX to use the Workflow service
Specifying Workflow parameters for notifications and general use
The Workflow infrastructure configuration wizard allows you to quickly specify the Workflow web service address, Workflow batch groups, and specify when the Workflow batch jobs should run. It also validates the Workflow web service and ensures that it is accessible by the AOS. In this section, we will cover the process of running the wizard.
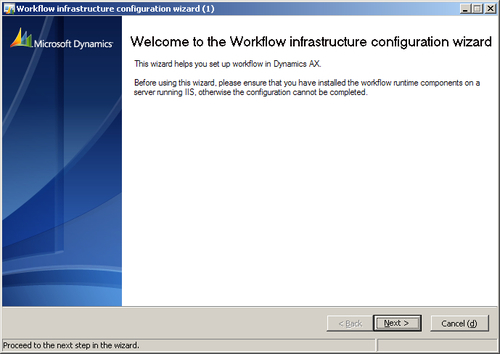
Go to the Administration module and in the Setup section, open the Workflow infrastructure configuration wizard. Once in the Workflow infrastructure configuration wizard form, click on the Next button, as shown in the following screenshot:
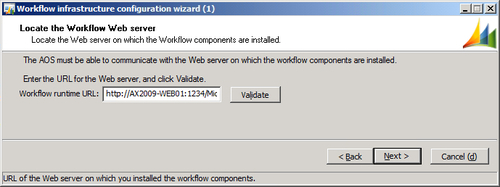
In the next section of the wizard, you may specify the URL of the Workflow web service, which you created as described in Creating a website for Workflow section of this chapter. By default, this field will already be populated if you installed the Workflow service correctly. However, if you want to modify this field, you certainly have the option to do so. Be sure to click on the Validate button to confirm that the URL is accessible by Dynamics AX, as shown in the following screenshot:
In the following section of the wizard, you will be able to see which batch group is designated to execute Workflow batch jobs. Verify that the appropriate batch group is assigned and then click on the Next button.

In this section of the wizard, you can specify how many times you want the batch server to repeat the Workflow batch process. The lowest value you can enter is 1. The wizard will allow you to enter in 0; however, the batch system only accepts 1 as the lowest value. Once you have specified the appropriate value, click on the Next button.

The next and final screen of the wizard displays a summary of all the settings that were specified. Click on the Finish button to apply these new settings and to make Dynamics AX start using the Workflow service.

The Workflow infrastructure configuration wizard assists in setting up common Workflow settings that are shared between companies. However, company specific settings for Workflow must also be specified such as Number sequences. Additional settings can be customized but are not required, such as specifying custom e-mail templates or another Workflow web service URL. In this section, we will cover the process of specifying company-specific workflow settings.
Go to Basic | Setup | Settings for workflow. In the General tab, provide a custom template for Approval and task notifications. By default, no template is specified. In this case, a generic e-mail template will be used.

In the Administration tab, verify that the correct Workflow web service is listed and verify that the system can access the service by clicking on the Validate button.

In the Number sequences tab, ensure that Number sequences are mapped to the appropriate Reference.

Note
If number sequences are not mapped, it may be because the number sequence wizard never ran. To run the number sequence wizard, go to Basic | Setup | Number sequences to load the Number sequences form. In the Number sequences form, run the wizard by clicking on the Wizard button. Dynamics AX will automatically check which number sequences need to be set up and associate number sequences to their reference.
At this point, you have performed all the steps required to process workflows. Running an actual Workflow is the best way to test the Workflow system. Depending on your license scheme, Dynamics AX will be equipped with default Workflow templates. In this example, we will cover the process of testing the Workflow system using the Purchase requisition workflow template.
In Dynamics AX, go to Account Payable | Setup | Workflow configurations to load the Workflow configuration form specific for Accounts Payable business processes.

In the Workflow configuration form, select the PurchReqApproval template from the Template drop-down.

To create a new Workflow configuration for Purchase requisitions, click on the New button. The Create configuration: Select a template form will load. Select Purchase requisition approval and click on the Create configuration button to start creating the new configuration.

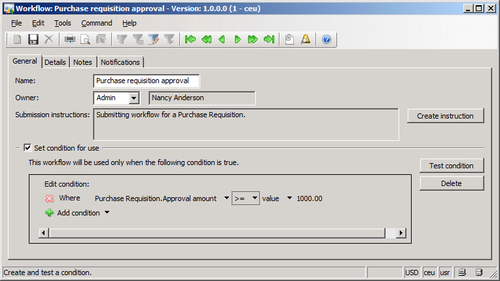
After you have clicked on the Create configuration button, a new form Workflow: Purchase requisition approval will load.

Provide the relevant field information in the current view. Various fields are required to be filled out in order to save a configuration. In this view, we must provide text in the Submission instructions field. You can set a specific condition that will allow this workflow to initiate. If the condition isn’t satisfied, the workflow will not proceed. For example, perhaps you would want the workflow to be used for Purchase requisitions that have a specific value. Instead of waiting for the workflow to run in order to verify that it works on specific conditions, you can simply test the conditions as you create them by clicking on the Test condition button. This will allow you to test your conditions on existing Purchase requisitions.
In the next step, we must specify the required parameters for the complete and approval stage of the Purchase requisition workflow template. Each workflow may have different stages and each stage has fields that are required to be populated. To specify the parameters for the complete and approval stages in the Purchase requisition workflow, click on the Details tab.

Select the PurchReqComplete task to specify the parameters for the complete stage as you did when you were in the General tab. When you have specified the required fields, collapse the PurchReqApproval task and select Step 1.

You must also assign a user, group, or role that can approve the PurchReqComplete task. To specify a user, click on the Assignment tab.

To specify a user, click on the Choose button. This will load the Assignment form where you can select a specific user, group, role, or hierarchy. You can also specify a time limit for how long a task must be approved by until it expires. Once you have specified the appropriate parameters, click on the OK button.

In the Step 1 step of the PurchaseReqApproval task, you must specify the same parameters in both the General and Assignment tabs as you did in the previous step.

When complete, save the workflow configuration by closing the form. You should be back in the Workflow configuration form in the General tab. You will also notice a record has been created with a version number and checkbox field, which—when marked—activates the current Workflow configuration version. To mark the checkbox, click on the Set as active button. Every time you modify a Workflow configuration version, a new version is automatically created. In order to activate a new version, ensure that you deactivate the previous version before activating the version you want to work with, by clicking on the Set as inactive button. Once you have activated the PurchReqApproval workflow, it will now be used to process Purchase requisition workflows.

Now that we have created the workflow configuration for Purchase requisitions, the next step is to perform a Purchase requisition workflow. To start this process, open the Purchase requisitions form by going to Accounts Payable | Common Forms | Purchase Requisition Details.

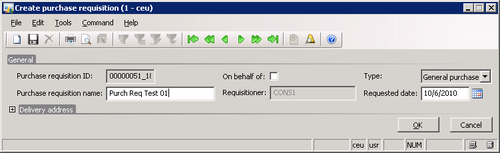
Create a new Purchase requisition by creating a new record in the form. This will load the Create purchase requisition form. In the form, specify the mandatory fields. When complete, click on the OK button to create the Purchase requisition.
Now that the Purchase requisition has been created, you must add at least one item to the Purchase requisition. To add an item, click on the Add item button or create a new line in the Lines section and select an item to add.
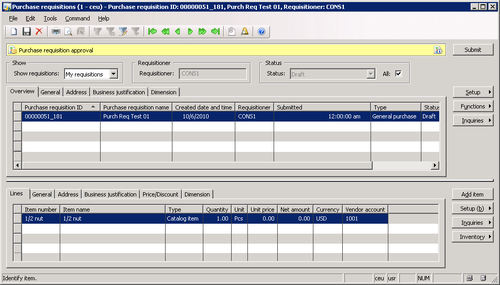
Once you have added an item and saved the record, the workflow info area will appear at the top of the form that states the workflow template name and a button to submit the current step. Click on the Submit button to submit the Purchase requisition. This will also load a form that provides a textbox to enter a comment for you submission. After specifying a comment, click on the Submit button to finally submit the workflow.

Once you submit the workflow, the Purchase requisition workflow info area will be updated with the employee name and the time of the last submission on the selected Purchase requisition.
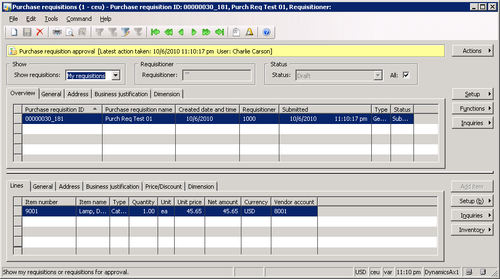
Once you submit the workflow, it will be sent to the workflow batch job that was created earlier in this chapter. You can press F5 to refresh the Purchase requisition form to view the latest workflow status. The batch job will communicate with the workflow web service, which will process the workflow logic. Once it is processed, the results will be sent back to Dynamics AX that will update the workflow. To see the current progress of the workflow, click on Actions | View history.

In the Workflow history form, you will be able to view the workflow details of the current Purchase requsition. To view the most recent status of the workflow, click on the Refresh button.

In the Purchase requisitions form, refresh the form by pressing F5. Once updated, the Actions button should now list additional options such as Complete, Reject, Request Change, and Delegate. Select the appropraite task to continue the workflow until it is complete, where it will automatically create a Purchase Order based on the Purchase requisition.

In this section, we initiated an actual Purchase requisition workflow to test if the Workflow system is functioning properly. If you were able to successfully submit a workflow without any errors, then the Workflow system is working properly. Errors can result from permissions not being set up properly on the Workflow web service or the Business Connector pointing to the wrong AOS or employee setup. The View history form and Windows Event Log will assist in determining the source of any errors.
Although Dynamics AX 2009 has many workflow processes which can be customized and extended, the actual workflow engine is a separate component. A workflow batch process is needed in Dynamics AX to execute the workflow process, which communicates with the Workflow service to determine the logical steps a workflow should take.
The Workflow is a very powerful and useful feature in general. In Dynamics AX, you can assign workflows to any facet of the system. However, by default, many common processes for which workflow would seem logical to have, already do so outside the box.
In the next chapter, we will cover yet another powerful component of the Dynamics AX 2009 arsenal of components, the Application Integration Framework (AIF). The AIF is a powerful yet simple framework, which is used to integrate third-party systems or other data sources into the Dynamics AX system.