
Whenever information is being shared and transferred, security is always a sensitive topic. As with any ERP system, security is a top priority. Dynamics AX contains many security features that ensure that specific personnel will only have access to information that they are supposed to have. The Dynamics AX system as a whole also adheres to Microsoft's security initiative. For more information on Microsoft's security initiative, please see the following website: http://technet.microsoft.com/en-us/library/cc723542.aspx.
Since Dynamics AX consists of base and extended server components, security must also be set up on each server component; otherwise, users may not be able to access or modify data. For example, the Enterprise Portal, Reporting Services, and Analysis Services all contain their separate security setup. Otherwise, unauthorized users can access data that should be confidential. Additionally, even though a user has access to specific data in Dynamics AX, they may not have access to data outside of Dynamics AX such as in the Enterprise Portal. Third-party and custom modifications will also need to be considered to ensure that they too adhere to the Dynamics AX security model.
The advanced Business Intelligence and Reporting features in Dynamics AX require security in not only Dynamics AX to be set up but also in their own specific server system as well. Advanced security settings and infrastructure must also be setup for external Enterprise Portal deployments. Below is a list of the components in Dynamics AX that have specific security requirements and will be covered in this chapter. It can also be used as a checklist to confirm that you have set up the security requirements for each component. However, some components may not be applicable to your implementation if they are not installed.
Application Object Server (AOS)
Application File Server
Database Server
Business Connector
Enterprise Portal
Workflow
Application Integration Framework (AIF)
Reporting Server
Analysis Server
Dynamics AX Client
In this chapter, we will cover the following topics:
Security requirements
Dynamics AX security model
Setting up User Access in Dynamics AX
Setting user permissions for the Enterprise Portal
Specifying user permissions for Reports
Setting user permissions for Analysis Cubes
Dynamics AX contains server base and extended components, which have unique security prerequisites and requirements. Before installing any of the server bases or extended components, it is necessary to understand the function that each component has to successfully determine the appropriate security settings. Dynamics AX utilizes other Microsoft server technologies such as Internet Information Services (IIS), SharePoint Server, and SQL Server, just to name a few. For more detailed information on setting up the security settings on each Microsoft technology used by Dynamics AX components, consult their individual security documentation. The following tables in this section contain the security requirements for each component.
Dynamics AX exists as three base server components, the AOS, database, and application files. In order to properly run and access Dynamics AX, all three must be set up in harmony. For example, not only does the AOS require both the database and application files to run, it also requires appropriate permissions to access both resources. The following are the security requirements for the base server components:
|
Application Object Server (AOS) |
During the installation, the Network Service account is sufficient for running the AOS. However, using a specific service account is best practice. |
|
Application File Server |
The AOS Service account should have access to the Dynamics AX application file folders and should only be accessible by the AOS service account and the Administrator. |
|
Database Server |
The AOS service account should be a valid user on the database with the ' |
Although setting up security in Dynamics AX will restrict or provide user access to specific objects or data, additional security setup is required on the extended server components to either restrict or allow user access. Since other server technologies outside of Dynamics AX are used, it's best to consult the appropriate server documentation for general security setup.
The following are the security requirements for the extended server components:
|
Role Centers and Enterprise Portal |
Since the Enterprise Portal runs on Windows SharePoint Services 3.0 or Office SharePoint server 2007 and thus Internet Information Services (IIS). Kerberos Authentication must be set up appropriately. Please refer to the vendor documentation for security best practices in SharePoint or go to: http://technet.microsoft.com/en-us/library/cc262331.aspx. Secured Socket Layers (SSL) is supported but not required. Since Role Centers utilize Microsoft SQL Reporting Services and Analysis Services, please refer to the appropriate vendor documentation for setting up security in Reporting Services and Analysis Services. For information on the Reporting Services security, go to: http://msdn.microsoft.com/en-us/library/ms156014(SQL.90).aspx. Similarly, for information on Analysis Services security, go to: http://msdn.microsoft.com/en-us/library/ms175386(SQL.90).aspx. |
|
Workflow |
Workflow security is dependent both on user security in Dynamics AX 2009 as well as integrated windows security in Internet Information Services (IIS). Secure Sockets Layers (SSL) is supported but not required. Since the Workflow service is a Foundation (WCF) service, additional security settings, specific for a WCF may be considered useful. For WCF security documentation, go to: http://msdn.microsoft.com/en-us/library/ms735093.aspx. |
The integration components, such as the Business Connector and AIF, are specific components that are used to integrate Dynamics AX with outside systems. Since these components directly communicate with the AOS, security access to Dynamics AX data and objects is handled by the AOS. However, specific settings are required for the use of these components to work properly and securely. The following are the security requirements for the integration components:
|
Business Connector |
Security for the Business Connector is governed by security settings specified on the Business Connector Proxy User. Since this is an Active Directory user, this user must not have interactive login rights and a password that does not expire. |
|
Application Integration Framework (AIF) |
If the AIF can be set up to exchange documents through a file system, web service, BizTalk, or by MSMQ. As a web service, then security for Internet Information Services (IIS) should also be considered. Since a web service is essentially a website in IIS, it means that an AIF web service can utilize Secured Sockets Layers (SSL). Otherwise, if the AIF is running on a third-party adapter, refer to the specific vendor documentation for that particular adapter. For example, if using the MSMQ adapter, refer to http://msdn.microsoft.com/en-us/library/aa926452.aspx for information on security set up. |
Unlike other Microsoft server technologies, user security in Dynamics AX is not controlled in Active Directory. Instead, Dynamics AX implements its own security model to control access in the environment. This security model consists of licensing, security keys, and configuration keys. The following lists explain the constituent parts of the Dynamics AX security model:
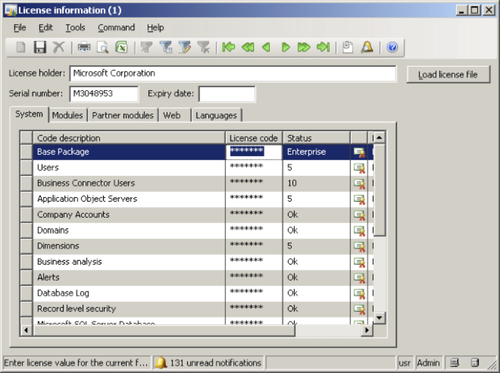
Licensing: Licenses are distributed by Microsoft for Dynamics AX or by vendors of third-party modules and features. Licensing can be modified in the License information form by going to Administration | Setup | System | License information, as shown in the following screenshot:
Configuration Keys: The administrator can enable or disable certain features in Dynamics AX through configuration keys. Even though a security key can unlock a certain feature, it may still be hidden because a configuration key is not active. To enable or disable configuration settings in Dynamics AX, go to the Configuration form in Administration | Setup | System | Configuration, as shown in the following screenshot:

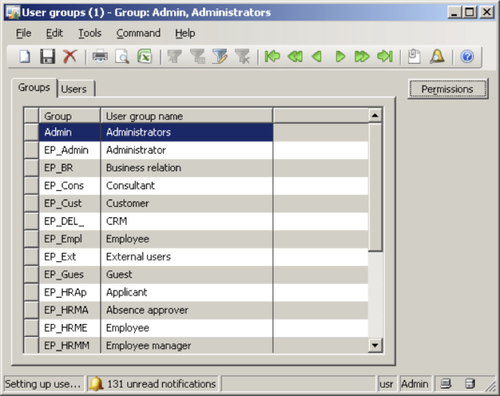
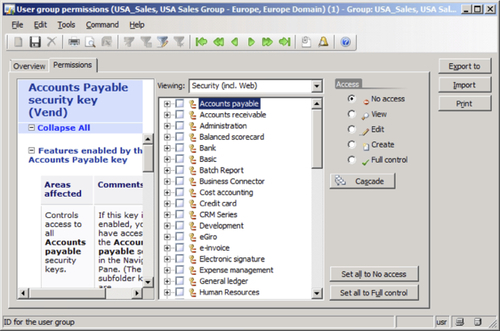
Security Keys: The administrator can control access to specific elements in Dynamics AX such as Forms, Tables, Menus, Buttons, Fields, Web menus, Web content in Dynamics AX through security keys. The administrator can control whether the environment will have a specific feature enabled or not. Security keys can be enabled or disabled for a specific user group in the User groups form located in Administration | Setup | User groups. After selecting the appropriate user group in User groups form, you can modify its permissions by selecting it then clicking on the Permissions button, as shown in the following screenshot:
In this section, we covered the security model for the Dynamics AX environment that enables or disables specific features. In the following sections, we will cover the process of specifying security at the user and group level.
There are a couple of processes required to successfully provide user access to Dynamics AX. In this section, we will cover the following:
By default, after installing and setting up the Application Object Server, Application Files, and Database, only the administrator or user who installed Dynamics AX will have access to the AOS. In order for users to have access to Dynamics AX, they will have to be imported from the Active Directory. You can either import Active Directory users or groups. It is recommended that you have logical groups (for example, by department and security level) created in Active Directory. This will ease the process of importing and setting permissions on users in Dynamics AX, especially in large implementations where hundreds or thousands of users must be imported. The process of importing Active Directory users or groups into Dynamics AX is outlined as follows:
Go to Administration | Common forms | Users.
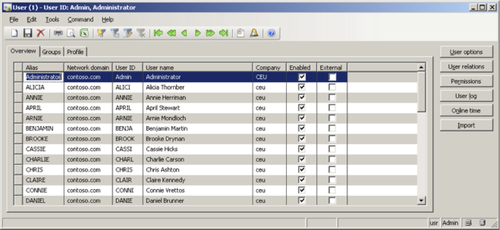
In the User form, click on the Import button. This will launch the Active Directory Import Wizard.

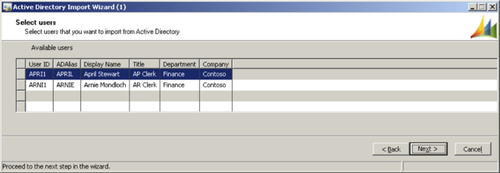
To start the wizard, click on the Next button. In the following wizard step, you can provide filter parameters to retrieve a specific subset of users in a certain domain. For a large implementation, it would be beneficial if users were already in logical user groups in the Active Directory. Each field can accept an '*' as a wildcard, as shown in the following screenshot. Once you are ready, click on the Next button.

In the following screen of the wizard, you can select one or more users at once to import. When selected, click on the Next button.

The next screen displays which users will be imported. When satisfied, click on the Next button.
The following screen enables you to assign one or more user groups to the newly imported users. To create a new user group, follow the instructions in the next section; otherwise, select and add the available user groups and click on the Next button.

The following screen of the wizard is where you can also assign a profile for the newly imported users. The profile is the Role Center page that a user will see upon logging into Dynamics AX or the Enterprise Portal. This is also known as the home page.

To complete the wizard and apply the settings for importing users, click on the Finish button.

To restrict or allow access to a specific element in Dynamics AX, the administrator must assign a specific user to a group and then enable or disable specific security keys for that group. The following steps outline the process of setting user permissions in Dynamics AX:
To begin modifying permissions, go to the User groups form located in Administration | Setup | User groups.

From here you can create or select a specific user group. In this step, create a new group by creating a new record in the grid. Name this user group, AR Clerk and then save this user group.

To assign users to this newly created group, click on the Users tab.

To specify the permissions for the group, click on the Permissions button.

Click on the Permissions tab to start assigning permissions and select the Accounts receivable node.
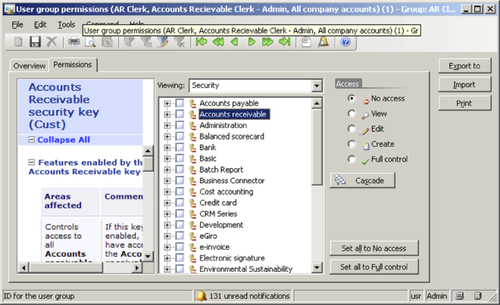
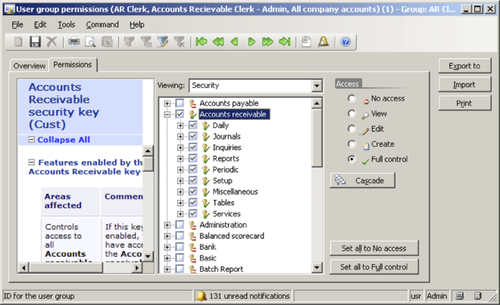
After selecting the Accounts receivable security key, click on the Full control option in the Access group and then click on the Cascade button to apply the permission to all the child nodes.
At this point, the permissions have to be applied to the current user group and assigned users. To save the current permission settings to a file so that you can quickly import the permissions settings in another environment without having to go through the same process again, simply click on the Export to button. Alternatively, to open a saved permission file, simply click on the Import button.
In other systems, permissions can be set on either a user or group. However, in Dynamics AX, you can only set permissions on groups. When it comes to general security, this is actually best practice. In the next section, we will cover the use of a tool, called the Security Profiler tool that will ease much of the detective work in figuring out which Security Keys are required when determining permissions on certain objects in Dynamics AX.
Setting up security in Dynamics AX can consume more time than one would like. Fortunately, there is a tool, the Security Profiler, that not only speeds up the process but simplifies it as well. The EMEA Dynamics AX Support Team created and released the Security Profiler tool and it can be downloaded from: http://blogs.msdn.com/b/emeadaxsupport/archive/2010/05/25/ax-2009-securityprofiler-tool.aspx.
When the Security Profiler is running, it "scans" the security keys on various objects in Dynamics AX, such as forms, reports, buttons, and menu items and logs the information. This information can then be used to determine which security keys are required for specific objects. Currently, it cannot profile Enterprise Portal content; however, in the future, this may be supported. In this section, we will cover the process of setting up the Security Profiler as well as show an example of how to use it.
After downloading Security Profiler, import (Ctrl+Shift+I) the XPO into Dynamics AX. When the import is complete, log out and then log back in to Dynamics AX. This ensures that the menu items will appear.

Once you log back in to Dynamics AX, go to Administration | Common Forms | Security Profiler to open the Security Profiler form. Click on the Start Profiling button to start the Security Profiler and keep it open.

Now that the Security Profiler is active, open a form or report, such as the Sales Order Details form. Once it is open, go to the already running Security Profiler and click on the Stop Profiling button. This will load up the Profiling Results form, which displays the security key information from the Sales Order Details form. To print out the results, simply click on the Print Report button.

Based on the result, assign the appropriate security permissions on any group, as shown in the previous section.
The Security Profiler helps to determine not only which security keys a group will need for access but also which specific security permissions. For example, even if a form is part of a Security Key, assigning an entire security key may provide additional privileges that a group should not have. Therefore, knowing the specific object permissions in a Security Key that are required will increase security and prevent unnecessary access.
In the earlier mentioned example, if a group requires access to the Sales Order Details form, you would go to the User group permissions form (as described in the previous section) and collapse the Accounts Receivable node, then collapse the Tables node, and finally mark the Sales orders node. Each permission on the Profiling Result form grid must be set to successfully provide access to the Sales Order Detail form. To access the profiling results in the future, simply open the Security Profile Results form by going to Administration | Common Forms | Security Profile Results. This would avoid having to run the Security Profiler on objects that you already profiled and thus save time.
At this point, users that have been imported and assigned to groups can access Dynamics AX and use the system, depending on their permission level. However, when creating Purchase Requisitions or working on other forms in Dynamics AX that require employee information, there is no way of telling which employee the current user is unless this information has been specified. Employees in Dynamics AX are not considered users and thus are not used to control permissions. Employee information is treated as data and is stored in tables. In the following section, we will cover the process of associating an employee to a user.
In Dynamics AX, go to Administration | Setup | User relations to open the User relations form.

Click on the Wizard button to initiate the User Relations Setup Wizard and click on the Next button to begin the process.

In the User type step, select the appropriate user type. In this example, since we are going to set up an employee, the Employee type is selected. When ready, click on the Next button.

In the Select an employee section, choose which employee to associate to a user in Dynamics AX then click on the Next button to continue.

In the Select a user section, select a user that has been imported, that you want to associate to an employee in Dynamics AX then click on the Next button.

Review the parameters and click on the Finish button to apply the relation.

In the previous example, we associated the imported Active Directory user bfran to the employee Charlie Carson in Dynamics AX. Now, whenever the user bfran logs in to Dynamics AX, he will automatically be represented as the employee Charlie Carson and therefore, when creating Purchase Requisitions or for tracking Commissions or responsible users, his employee information will automatically be specified.
You may have also noticed that other user types can be imported. This is useful in other scenarios. For example, perhaps a vendor should have access to view their orders on an Enterprise Portal page. You can automatically accomplish this by creating an Active Directory user, importing that user and then setting up a user relation of type Vendor. Then, when the vendor logs in to the Enterprise Portal to view their orders, they will only see their orders. The process and concept is the same for user type Customer or Business relation.
To put it simply, domains specify which user groups have permissions in specific company accounts. By default, when you create a user group, that user group has access to whichever forms or reports that you specify regardless of the company account the user accesses. Domains provide an extra layer of security. In some cases, especially in smaller implementations, they may be acceptable. However, in larger implementations, this is not the case and may propose a security risk or it simply does not make sense.
For example, consider the scenario where there are two company accounts. One company account is a USA company account that handles United States financial information while another company account specific to Europe, handles European financial information. If you created two user groups such as "USA_Sales" and "EU_Sales", with the same permissions because the users will have to access the same forms in Dynamics AX, there is no way to differentiate which company account the groups have access to. This is where domains become useful. You can create a "USA" domain for the USA company account and assign the "USA_Sales" user group to that domain and a "Europe" domain for the European company account and assign the "EU_Sales" to that domain. This way, users in the "USA_Sales" group cannot access data specific to the "EU_Sales" group and vice versa.
The following steps describe the process of setting up domains. Before starting these steps, ensure that you have existing user groups.
In Dynamics AX, go to Administration | Setup | Domains to load the Domains form.

In the Domains form, create two new domains. For example, one with the Domain ID USA and one with Europe.

Select the Europe domain and then click on the Company accounts tab.
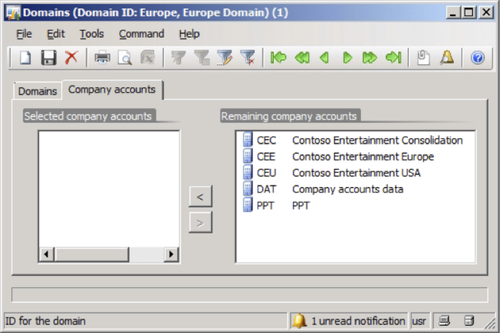
In the Company accounts tab, add the company account that should have access in the Europe domain.

Perform the same steps for the USA domain but add a company account that should have access to the USA domain.

Now that you have set up the domains for specific accounts, the next step is to assign appropriate user groups to the domains. To do this, go to Administration | Setup | User groups to open the User group form.
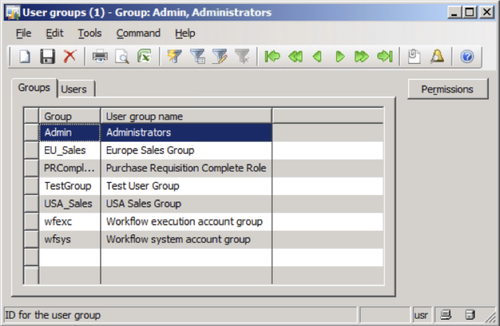
Select the USA_Sales group and then select a USA Domain in which to set specific permissions on.

Then click on the Permissions tab to choose which permissions the group should have in the selected domain. In this example, the USA_Sales group has view permissions on the Accounts payable security key and full control on the Accounts receivable security key in the USA Domain.

Click back on the Overview tab and then select the Europe Domain.

Click on the Permissions tab to set the appropriate permissions. In this example, the USA_Sales group cannot access anything in the Europe domain.
After completing these steps, any user that is in the USA_Sales group can access the Accounts Receivable section in the CEU company account. However, the same users will not be able to access it or anything else in the CEE company account.
Up until now, we have covered the process of setting up security on specific objects in Dynamics AX such as forms, reports, menu items, and so on. However, what if you want to apply security on the data itself? For example, consider two separate sales divisions in a company. One sales group controls customers in the east coast while two groups with the appropriate users added to them were created (for example, Sales_East and Sales_West). Both should have access to the Sales Order Details and Customer form in the same company; however, both should only see their Customers or Sales Orders. This is where Record Level Security (RLS) comes in handy. Record Level Security allows you to apply security for groups against data thus restricting what data a user will see. In the following steps, we will cover the process of setting up Record Level Security with such an example:
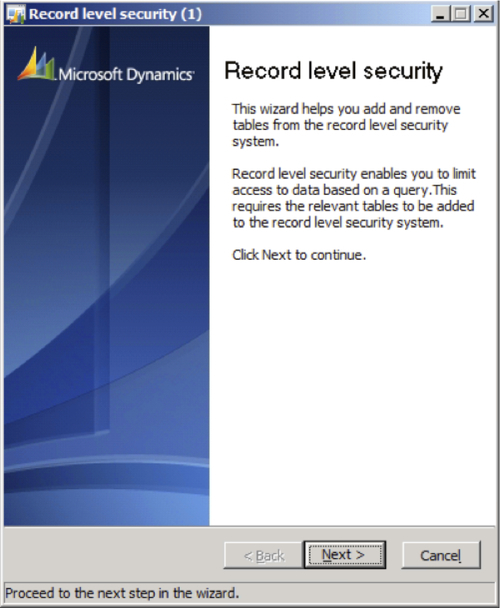
In Dynamics AX, go to Administration | Setup | Security | Record Level Security to open the Record level security form.

Create a new record in the form (Ctrl+N) to begin the process of setting up Record level Security. When the Record level security wizard opens, click on the Next button.
In the User groups section of the wizard, select the appropriate group to set up the Record Level Security on, then click on the Next button.

In the Tables step, a list of tables is organized into logical groups that resemble the modules in Dynamics AX. By default, only main, common, tables are shown but you can show all tables by marking the Show all tables radio button. Select the table or tables that you want to apply RLS on, for the group, then click on the Next button.

In the last step, click on the Finish button to apply the settings that have been applied in the earlier mentioned steps.

Once the wizard is complete, a new record is created in the Record level security form.

Although we specified the tables that RLS will be applied to for the group, we still need to specify a query that will filter that data. To do this, we need to create a custom for that table. To do this, ensure that the appropriate table is selected and click on the Query button. This will load a Dynamics AX query interface.

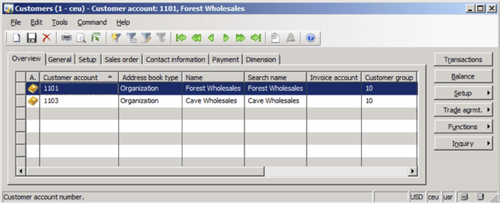
In the Inquiry query form, you can now add appropriate filters to the underlying data source of the Customers table. By default, the Customer account field is added in the Range tab. To filter by a specific set of customers, click on the Criteria field for the Customer account and select the appropriate Customer that the user group should be able to see. To add multiple customers or any other field, simply click on the Add button. When complete, click on the OK button to save the query.

Once the user logs in to Dynamics AX and opens the Customer Details form, they will only see records for Customers 1103 and 1101.
In this section, we covered the process of setting up security in Dynamics AX. The Dynamics AX security model is very flexible and adheres to common security best practices. Since the extended server components utilize other Microsoft technologies such as SharePoint, SQL Server Reporting Services, and SQL Server Analysis Services, additional security procedures are required to successfully provide and secure access to users. In the following sections, we will cover the process of setting up security across various extended server components such as the Enterprise Portal, Reports, and many more.
Even though you may have specified user permissions for the data from Dynamics AX in the Enterprise Portal in the User group permissions form, as described in the section Specifying user permissions in Dynamics AX, you still need to specify additional user permissions to allow access to Enterprise Portal and Role Center pages. User permissions for the Enterprise Portal are controlled both in Dynamics AX as well as on the SharePoint site. After you have specified the web content user permissions for a specific user group in the User group permissions form, permissions on the SharePoint site must also be assigned. The following steps outline this process:
Note
Dynamics AX has a wizard that automatically generates common user groups for the Enterprise Portal. To run this wizard go to Administration | Setup | Internet | Enterprise Portal | Configuration wizard.
Open the Enterprise Portal website. To do this, go to Administration | Setup | System | Internet | Enterprise Portal | Web sites. Select the Enterprise Portal website and click on the View in Browser button.

Once the Enterprise Portal website is opened, click on the Site Actions button and then click on the Site Settings button.

In the Site Settings page, click on the People and groups link.

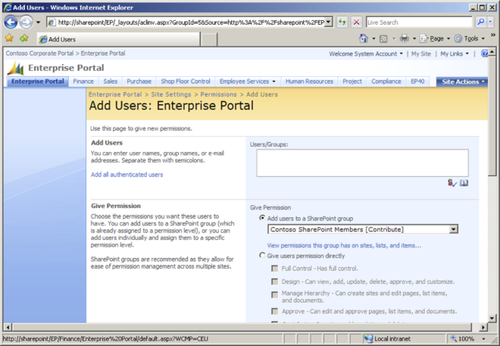
In the People and Groups page, click on the New drop-down button on the toolbar and then click on the Add Users button to add a new user.

On the Add Users page, add the Active Directory user or group in which to provide access to the Enterprise Portal page then click on the OK button. In order for a Dynamics AX user to have access to the Enterprise Portal, they must have Viewer permissions.
By default, reports will only be visible to the administrator. In order for users to view the reports after they have been deployed, you must specify the appropriate permissions. To specify the appropriate permissions, follow these steps:
Navigate to the SQL Server Reporting Services (SSRS) Report Manager site in Internet Explorer and then click on the Dynamics folder to open it.

In the Dynamics folder view, click on the Folder Settings tab.

In the Folder Settings page, click on the Security link on the menu on the left side. You will notice that only Administrators have the default Content Manager group permission.

To manually start adding new permissions, click on the Edit Item Security button. Then, to create, add, or modify permissions for a user or group, click on the New Role Assignment button.

In the New Role Assignment page, add a user or group in the first textbox and check the appropriate Role, which will provide specific permissions as stated in the description field. In this example, we are adding the group "Everyone", browser access to the reports. This will allow every user in the domain to only view the reports. Once you are satisfied with your permissions settings, click on the OK button to apply the new role assignment.

In the Security page, you should now see your newly created Group or User assigned to its role.

Since some reports, Key Performance Indicators (KPIs) or Business Data Lookups (BDL) utilize OLAP cubes to calculate report data, user permissions must be set not only in the SQL Server Reporting Services Report Manager, but also in the SQL Server Analysis Services OLAP Database.
The following steps outline this process:
Open SQL Server Management Studio. Select Analysis Services for the Server type and then connect to the appropriate server that contains the Analysis services database.

Once connected to the SSAS database, collapse the Dynamics AX SSAS database and then collapse the Roles folder to view the entire list of roles for the SSAS database.

Right-click on each individual role and go to Properties to open the Edit Role window.

In the Edit Role window, click on the Membership page.

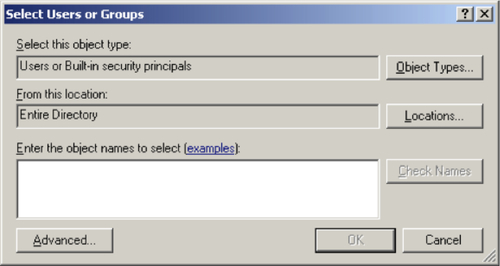
On the Membership page, click on the Add button. This will load the Select Users or Groups form. Add which Dynamics AX users from Active Directory should access the Analysis Services cubes. Once completed, click on the OK button in the Edit Role window.
Setting up Dynamics AX is not just about setting up and configuring the base and extended server components, but includes setting up security as well.
Security is not only important but essential in Dynamics AX. The security model in Dynamics AX is unique compared to the security model of other Microsoft server technologies. As with any other server software, the appropriate setup of security is essential. While licensing files unlock and provide the availability of certain features in Dynamics AX, security and configuration keys allow an administrator to control them.
In order to properly secure Dynamics AX, security must be set up in not only the Application Object Server (AOS) but also in each server component; otherwise, users may or may not have access to the content. When implementing security settings, be sure to start by providing the least security settings. This further ensures that the security is tightened in the system. Configuration keys can be used to activate or deactivate features in Dynamics AX. For example, the useful Fill utility, which provides the useful feature of applying a field value across every row in a form automatically, can be activated or deactivated by a configuration key.
In the next chapter, we will cover the event-based features of Dynamics AX that allow alerts and notifications to be sent. Alerts and notifications can be sent to users through e-mail or while they are logged in to Dynamics AX. Such features increase the productivity of users and streamline their tasks automatically.