
With the level of complexity and data that is processed in an ERP system, it can be quite difficult and cumbersome for an individual to monitor specific data manually. More importantly, specific personnel may want to be notified when specific criteria are met on a record or item, so they can act accordingly to make critical, timely decisions. Staying informed real-time is not only a nice benefit but it is critical.
For example, a controller or an accounting manager may need to be notified when a payment is due. A warehouse manager may want to be notified when delivery dates have changed, or a CEO or CFO may want to know when sales targets have decreased below margins. The earlier mentioned are just a few examples of information that is important to be notified as soon as possible. Fortunately, Microsoft Dynamics AX has an alerts feature that addresses these requirements.
The alert system in Dynamics AX is flexible and therefore can be used throughout any module because it can work on any table. A user can be notified of an alert either using e-mail or a non-intrusive pop up similar to that of Outlook's incoming e-mail notification. Alerts can also be used for administrative purposes. For example, an administrator may want to be notified when a batch process fails or completes. In this chapter, we will cover the capabilities of the alert system as well as provide an example of setting up an alert.
In this chapter, we will specifically cover:
Alerts prerequisites
Alerts permissions setup
Creating an alert batch job
Creating alert rules
Maintaining alerts
Setting up user alert options
By default, the alert system may not be functioning properly or at all. Various setup requirements must be met in order for a user to set up alerts. The following is a list of those requirements:
Permissions (using security keys)
Active batch job for processing alerts
Ensure user options are set up for alerts
Setup delivery method (e-mail):
Valid SMTP e-mail server
E-mail templates
To specify user permissions, in order for a user to be able to benefit from the usage of the alert system, they must be assigned the necessary permissions. Permissions must be set using the User groups form in the Administration module. For more information on setting permissions, refer to Chapter 9, Security and User Administration. The following table contains a list of security keys, user group permission locations and what functions they provide, the recommended user group to be created, and which users should be assigned to those groups:
|
Security key and user group permission location |
Functions |
Recommended group |
Recommended users |
|---|---|---|---|
|
|
|
AlertsUser |
Users and Administrators |
|
|
|
AlertsAdm |
Administrators |
|
|
|
AlertsSetup |
Administrators |
The previous list provided the necessary alert permission setup for rich client users. However, additional permissions must be set up for users using the Enterprise Portal. The following table lists the Enterprise Portal security keys and follows the same format as the previous table. Before assigning the permissions, make sure to set the Viewing drop-down field in the User group permissions form to Security (incl. Web).
|
Security key and user group permission location |
Functions |
Recommended group |
Recommended users |
|---|---|---|---|
|
|
|
EPAlertsUser |
Users and Administrators |
|
|
|
EPAlertsUser |
Users and Administrators |
|
|
|
EPAlertsUser |
Users and Administrators |
|
|
|
EPAlertsUser |
Users and Administrator |
In order to process and serve alerts, there must be an active batch process running. In order for a batch process to run, a batch server must be set up on a designated AOS (refer to the Creating a batch job section in the Appendix).
There are two different types of alert categories that operate in an alert batch job. They are as follows:
Event-based alerts: Trigger notifications based on changes (modifications, creation, or deletion) on records since previous batch iteration
Due date triggered alerts: Trigger notifications when rules are honored or not based on a specified due date
It is recommended that a separate batch group be created for each alert category. Event-based alerts should run as frequently as possible to provide the "real-time" effect of receiving notifications. However, as the amount of event-based alerts increases, the performance of the AOS set up as the batch server, proportionally decreases to compensate for this load.
A batch job that processes "due date" based alerts does not need to run as frequently as the event-based alert batch job. In fact, it can run only once a day. Preferably, right after midnight, when the system load is at its lowest and the date has just changed over to a new day. However, there may be a need to run the due date batch job more than once a day to serve notifications based on alerts that were generated the same day of their alert rule due date. In this case, running the batch process during the time of day when server utilization is at its lowest is the best choice (for example, during lunch time). It should also be noted that the batch server will continue to notify an alert that has not been acknowledged for a specified time window interval. It should also be noted that once a batch job processes a due date alert rule, it will not process it again even if the batch job runs more than once during the same day. Not only does this make sense, it also prevents redundant use of computing resources.
As in many typical cases (but not all), the same AOS is set up to provide client access as well as set up as a batch server. Consider the possibility of having a separate AOS to run batch jobs only if performance begins to degrade acceptable user access on the AOS that is mainly used for client access.
In order for event-based alerts to be processed automatically, a batch job must be set up for them to work properly. To set up or modify the event-based alerts, perform the following steps:
Open the Change based alerts form located in Basic | Periodic | Alerts | Change based alerts.

On the same form, in the Batch group drop-down, select a batch group in which to run the designated event (change-based) alerts batch job.

To specify the time and frequency that the event alerts will run, click on the Recurrence button to open the Recurrence form.

In the Recurrence form, specify the time that the batch job for alert events should run and how long it should reoccur thereafter. Once the appropriate properties are specified, click on the OK button.
To be alerted when this batch job ends, fails, or is canceled, click on the Alerts button in the Change based alerts form.

In the Setup alert for batch job form, you can also specify to be alerted by pop ups, which will notify you when you are logged into the AOS using a pop up. Once the appropriate options are marked, click on the OK button.
To complete the set up of the event-based alerts, click on the OK button in the Change based alerts form.

Setting up the due date alerts is very similar to setting up the event-based alerts. Having said that, setting up a batch job is required to process due date alerts. To set up or modify the due date-based alerts, you will need to perform the following steps:
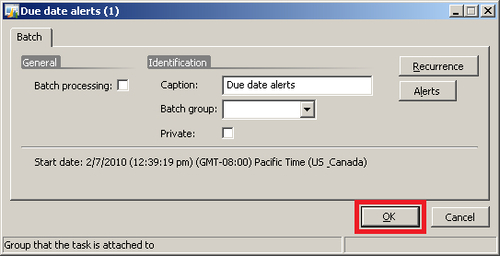
Open the Due date alerts form located in Basic | Periodic | Alerts | Due date alerts.

In the Batch group drop-down, select a batch group in which we run the designated due date alerts batch job.

To specify the time and frequency that the due date alerts will run with, click on the Recurrence button to open the Recurrence form.

In the Recurrence form, specify the time that the batch job should run for and how long it should reoccur thereafter. Once the appropriate properties are specified, click on the OK button.
To be alerted when this batch job ends, fails, or is canceled, click on the Alerts button in the Due date alerts form.

In the Setup alert for batch job form, you can also specify to be alerted by pop ups, which will notify you when you are logged in to the AOS using a pop up. Once the appropriate options are marked, click on the OK button.
To complete the setup of the due date-based alerts, click on the OK button in the Due date alerts form.
Unacknowledged due date alerts will continue to be processed for a specified number of days. This number is considered to be the window interval. To specify the window interval, perform the following steps:
Open the Alerts parameters form in the Basic module by going to Basic | Setup | Alerts | Alerts parameters.

In the Alerts—Parameters form, specify the number of days for the due date window. The recommended default value is 10. Ensure that an E-mail ID is specified. An e-mail ID is the template that will be used for alert e-mails. To create an e-mail template, go to Basic | Setup | E-mail templates. Specify a unique Drill-down target value. The Drill-down target ensures a unique method of identification, so that when a user wants to "drill down" to an alert's notification, it does not confuse it with multiple databases.

Now that the batch jobs are set up and configured to process alerts, users can now create alert rules to receive notifications. Alert rules are the very conditions that alerts run on. Alert rules can be specified in virtually any form. The general process of creating alerts is summarized in the following diagram followed by the basic steps to implement a rule on any record in Dynamics AX:

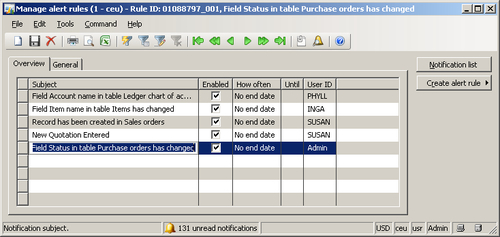
An example of how an alert can be used is to track purchase orders whose statuses have changed to a "Stopped" status. This would be useful for an employee to quickly respond to the purchase order and make any modifications to a purchase order or perform other tasks if necessary.
Since the process for creating alerts is similar no matter what form they are in, the following steps can be adapted for other forms and scenarios as well.
The following steps outline the process for creating an alert on a purchase order to track when the status has changed:
Open the Purchase Order Details form by going to Accounts Payable | Common Forms | Purchase Order Details.

Right-click on any field on the header for the current record and click on the Create alert rule... option to open the Create alert rule form. It is important to click on the header section; otherwise, if you click on the lines section, the system will only refer to the purchase lines table.

In the Create alert rule form, you may specify which field to set the alert rule on. In this case, select the Status field from the drop-down list. Set the event property to has changed. Leave the rest of the parameters defaulted or provide extra options if desired.

When you have completed setting up the alert rule, click on the OK button. The newly created alert rule will now be listed in the Manage alert rules form.
A user's alerts can be accessed by simply clicking on the bell icon in the status bar in the Dynamics AX client, on any form or the bell icon in the Dynamics AX toolbar.

Depending on the setup, the number of notification entries from alerts can increase significantly. The more alerts that exist, the more time it takes to process notifications. Therefore, it is good practice to periodically maintain a pristine notification repository. There are two methods for cleaning up alerts. One method is to run the alert cleanup wizard. The other is to manually delete the events. The following two sections outline both processes.
Fortunately, in Dynamics AX 2009, there is a form called the Notification clean-up form that can be used to clean up notifications automatically. The following steps describe the process:
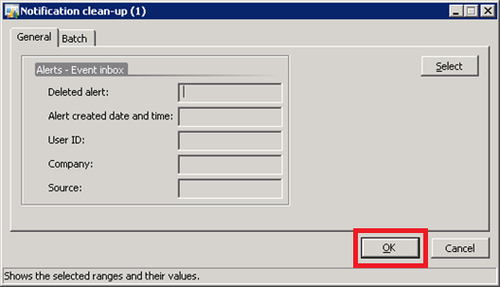
Open the Notification clean-up form found in Administration | Periodic | Notification clean-up.

Click on the Select button to create a Dynamics AX query with appropriate Criteria to make filters. Once the appropriate filters have been made, click on the OK button to return to the Notification clean-up form.

Click on the OK button to run the clean-up on the notifications based on the query specified.
Running the Notification clean-up form provides an easy method of cleaning up notifications. The Notification clean-up form can also be a batch process that is run periodically to clean-up notifications. To set up the Notification clean-up as a batch job, please refer to the batch job example in the Appendix. The next section covers a similar process, but manually.
Another option for cleaning up alerts and notifications is to manually delete them. To delete unwanted alerts, you must delete them from the EventCUD table. The following steps outline this process:
Open the Application Object Table (AOT) then go to Data Dictionary | Tables | EventCUD.

Right-click on the EventCUD table and click on Open from the context menu to browse the table.

Select the appropriate line that you want to delete and simply delete the record. This action will permanently remove the alert from being processed by the alert batch job.
Manually being able to delete notifications provides more control over which events to delete. It is also a method to view the specific details of a notification, which is useful—should the need arise—to troubleshoot alert issues.
When importing data into a company account, by default, alerts will be generated if they are contained in the imported company. This may be unnecessary and also spam unwanted notifications to users from alerts they may have already received from another company. Fortunately, there is an easy way to disable (or enable) this option. The steps are as follows:
Open the Import form that is used during data imports by accessing Administration | Periodic | Data export/import | Import. Then click on the Advanced tab.

Uncheck (or check) the Generate alerts during import option then click on the OK button to save the parameters and to have them applied during an import.
Alerts can be controlled and customized not only on the server level, but on the user level as well. For example, various settings such as a user's e-mail or if they would like to receive alerts, can all be specified in the user's options. Since alerts can also be controlled at the user level, they will only be specific to the user. The following section provides steps on how to specify alert settings in a user's options:
Go to Administration | Common Forms | Users. In the User form, select a user and click on the User options button to view the user's personal options. Similarly, a user can also view their own options by going to the Dynamics AX menu | Tools | Options.

In the General tab, ensure that the E-mail field is specified.

To specify more specific options on how alerts are notified, click on the Notification tab. To specify the interval, in which notifications should be delivered to the user, enter a value specifying the number of minutes. To specify whether a user should either go to an alert setup or the form in which an alert was set up, when clicking on an alert, specify its Pop-up link destination. You can also control the delivery and display of alerts by changing the Send alert as e-mail message setting or Show pop-ups setting respectively.
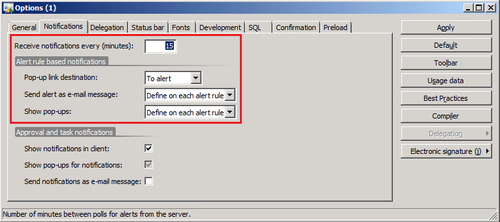
Approval and task notifications are the notifications that pertain to Workflow. Such notifications may appear during a workflow process. For example, if the user is assigned to approve a purchase order, they will be immediately notified. Notifications may be displayed as a user is logged into Dynamics AX. To suppress this, simply unmark the Show notifications in client checkbox. To send e-mail notifications of workflow tasks, simply mark the Send notifications as e-mail message checkbox.

When appropriate settings have been specified, click on the Apply button to save the changes.
Not only having access to information, but to be notified in real time as information changes, is becoming increasingly important as a business requirement. It is no longer efficient for a user to always check for updates on information that is important to them. Alerts in Dynamics AX are a powerful way to bring information to a user, which they may have once manually had to go out of their way to keep track of.
The alert system in Dynamics AX is also a handy way for an administrator to keep track of system functionality. For example, many batch jobs may run during after hours. Such batch jobs may be critical for business processes that need to occur the following day. If a batch job fails, it is not only beneficial for an administrator to know but also critical. Therefore, being notified using e-mail about the status of a batch job can certainly assist the function of a system administrator.
In the next chapter, we will look at how to tweak the Dynamics AX setup to ensure that your Dynamics AX environment is working as efficiently and robustly as possible.