
The previous chapters covered the process of setting up and running Dynamics AX and its components. This chapter focuses on maintaining the integrity of Dynamics AX throughout its life cycle.
Performing the relevant maintenance tasks ensures that Dynamics AX will function at its best and minimizes potential issues that may occur with data inconsistencies. Data errors become more difficult to resolve as data inconsistencies go unnoticed. The best way to prevent data inconsistencies is to perform regular maintenance tasks such as consistency checks and synchronizations. However, in worst case scenarios, when such methods do not prevail, a database restoration may be the most appropriate solution. In this chapter, we will cover the most common maintenance tasks that should be performed on a regular basis, specifically the following:
Backing up a Dynamics AX database, the application files, Role Centers, and Enterprise Portal
Re-indexing
Performing data consistency checks
Synchronizing a Dynamics AX database
The simplest and quickest solution for many issues that may occur is recovery. Therefore, having a backup and recovery plan for Dynamics AX is not only helpful but necessary, as it is with any other system that houses critical data.
Since Dynamics AX consists of multiple base and extended server components, different components have specific backup requirements. The following sections will cover the necessary components that must be backed up for best recovery. What the following sections do not cover are the operating system recovery procedures. For specific operating system backup and recovery procedures, please consult Windows Server 2003 or 2008 documentation (http://technet.microsoft.com/en-us/library/cc770266(WS.10).aspx).
Note
The following sections are only basic examples. More advanced procedures, third-party applications, or hardware may be required, depending on your setup and implementation.
Since all the data in Dynamics AX is stored in a database, it is essential to back up the data on a regular basis. Perhaps you already have other databases that are backed up during a SQL Server maintenance job. If so, you can easily add your Dynamics AX database to your existing job. Otherwise, you can use the following process to create a new SQL Server maintenance job that will automatically back up your Dynamics AX database:
To back up the database, log in to the SQL Server that contains the Dynamics AX database and go to Management | Maintenance Plans.

Right-click on Maintenance Plans and click on Maintenance Plan Wizard to create a new backup routine. (If you want to add a new database to the backup plan, right-click on an existing maintenance plan (for example, DB Backups) and click on Modify.)

For the backup to automatically run during specific dates and times, you will need to create a schedule. To create a schedule, click on the Change... button in the Maintenance Plan Wizard to load the Job Schedule Properties window. In the Job Schedule Properties window, specify the desired date and time parameters for the job to occur automatically, and then click on OK.

To proceed to the next step of the wizard, click on the Next button. In the following step, select the appropriate maintenance tasks. There are several tasks to select. For example, database integrity for checking if there are any data or log errors, shrinking a database for when the log file gets too big, or even rebuilding and updating the index to ensure optimal performance. All are useful tasks; however, this example has Back Up Database (Full) checked. Click on Next when completed.

The next step is to specify the order for maintenance tasks to execute. In this example, there is only one task; therefore, the order does not matter. If there was more than one task to select, then the order of the tasks could be rearranged as desired.

The next step is the configuration of the maintenance task. In this example, in the Define Back Up Database (Full) Task screen, select the database in which you want to fully back up as well as specify additional parameters such as backup medium, location, expiration, and schedule. Once all the desired parameters are set, click on Next.

In the following step, specify the output method for the maintenance plan results and then click on the Next button for the final step.

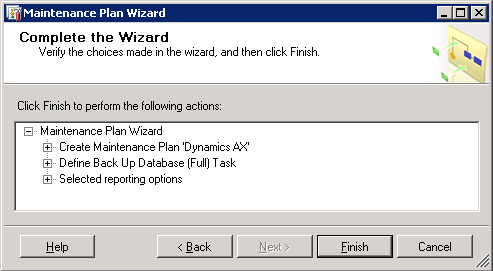
In the final step, review the entire maintenance plan for approval, and once you are satisfied, click on the Finish button.
There are more advanced methods that can be used as well as additional settings that can also be tweaked, such as doing a full or differential backup to save space. Nonetheless, the earlier mentioned steps are a simple and straightforward way to ensure that your Dynamics AX database will be backed up automatically. Keep in mind that backup processes may be different using third-party backup software or hardware. In that case, you must consult the normal process of backing up a database.
Since the application file directory contains critical application code such as object customizations and the label files, it must be periodically backed up. Therefore, a backup plan should be in place. Because there are many methods and applications for file backup, this section will not cover the specific methods or applications. Instead, we will back up the application files for each appropriate AOS. For example, %Program Files%Microsoft Dynamics AX50ApplicationApplAX593, is the directory for the application files of the AX593 AOS. The application file directory location is stored in the Application file location setting in the Microsoft Dynamics AX Server Configuration Utility. To access the setting, perform the following steps:
In Windows, go to Administrative Tools and open the Microsoft Dynamics AX Server Configuration Utility.

Select the appropriate Application Object Server Instance as well as the Configuration from the drop-down menu.
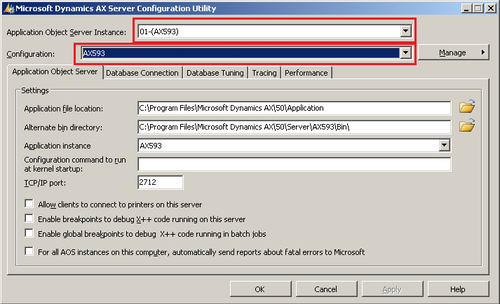
Verify that the Application instance setting is correct. If not, select the appropriate instance from the drop-down menu. Typically, the Application Object Server Instance setting should match with the Application instance setting.

The application file base location is C:Program FilesMicrosoft Dynamics AX50Application. Yet the actual application file directory for the AX593 AOS is a combination of both the Application file location setting and the Application instance setting. Thus, the location is C:Program FilesMicrosoft Dynamics AX50ApplicationAX593. If you navigate to this directory in Windows Explorer, you will see all the application files and label files.
The earlier mentioned steps provided the method of locating the correct location to back up an application file directory for a specific environment. You can simply back up the application file base location and thus back up all the encompassing sub directories, without discriminating which environments would be backed up. However, consider that each environment may have different backup requirements or the requirements may change through an implementation. Therefore, backing up each directory individually would make sense.
The content files for Role Centers and the Enterprise Portal should also be backed up. Typically, these files are ASP.NET files; however, depending on customizations, these files may also be JavaScript files. There is really no specific limitation as to what files should be backed up for the Role Centers and Enterprise Portal, therefore, the entire content directory should be backed up. The content directory for Enterprise Portal specific pages are stored in %Program Files%Common FilesMicrosoft SharedWeb Server Extensions12TEMPLATELAYOUTSep. Therefore, this directory should be part of a file backup routine.
Since the Enterprise Portal relies on SharePoint Server, it is also important to back up the SharePoint data and application files. For information regarding how to back up SharePoint, refer to the following documentation: http://office.microsoft.com/en-us/sharepoint-designer-help/back-up-restore-or-move-a-sharepoint-site-HA010069939.aspx.
Note
The Enterprise Portal content files are contained in Dynamics AX as Managed Content web objects. However, if recovering the complete Role Center and Enterprise Portal installation, the Enterprise Portal content files will be overwritten by default, unless otherwise specified during the installation. To prevent the overwrite of the content files, uncheck the Create Web Site option during the installation.
As tables increase in size, the time to traverse the data also increases. In a properly indexed table, the performance impact is proportional to the amount of data. However, if a table is not indexed or has not been indexed for some time, performance can be significantly hampered. Now we will cover the process of re-indexing tables in Dynamics AX:
In Dynamics AX, go to Administration | Periodic | SQL Administration | Re-index.

Select a table in the All tables node or an index in the All indexes node to re-index. If you want to re-index all tables, then select the All tables node. If you want to re-index all indexes, then select the All indexes node. When selected, click on the button Index actions | Reindex.

Re-indexing every table or index in Dynamics AX can take a while and consumes a lot of processing resources, thus making a system incapable of performing normal business tasks. Therefore, it is recommended that you perform this during off-peak hours. It is also beneficial to routinely re-index tables throughout the year or whenever table record counts significantly increase. This will help to ensure that Dynamics AX will operate at its best performance, especially when retrieving and viewing records.
Now that the process of backing up data and other critical files in Dynamics AX has been covered, the next approach is to ensure that the data is set up and operating at optimal efficiency. A consistency check can be run to ensure that data is consistent, valid, and structured correctly with the data model. For example, the consistency check tool will determine instances such as, when field data is incorrect or if field data does not exist in supported tables. If possible, the consistency check tool may also automatically fix errors; however, it is recommended that errors are fixed manually to ensure that the proper fix is applied. The consistency check tool can run across all modules or on individual modules. The following steps outline the process of running a consistency check in a Dynamics AX environment:
Open the Consistency check form in Basic | Periodic | Consistency check.

Select the module and specify any additional parameters, such as the date on which errors should be checked from as well as, specifying the consistency check tool to only check or fix the errors. Additionally, a query can be specified when applying the consistency check on a table by clicking on the Dialog button. Click on the OK button to run the consistency check. Once completed, the infolog will load with results of the consistency check.

Performing a consistency check is an excellent method to validate data within Dynamics AX. This is useful to run during the initial stages of an implementation, especially after data imports, as data may not always be formatted correctly when imported into Dynamics AX.
Whenever the object data model in Dynamics AX is modified, database synchronization is required. In Dynamics AX, this typically occurs automatically. However, at times it does not and at times there may be a need to manually synchronize the data model from Dynamics AX tables, fields, base enums, and extended data types, with the database. For example, if extended data types, base enumerators, tables, or field information is changed in Dynamics AX, the SQL database tables must be updated to be in sync. This may occur when the licensing schema changes in an environment or a modification is made. It is recommended to run this tool often to ensure that the data model in Dynamics AX is in sync with SQL. The following steps describe this process:
To synchronize Dynamics AX against SQL tables, run the SQL administration tool in Administration | Periodic | SQL administration.

Click on the Table actions button and click on Check/Synchronize to check if the Dynamics AX data model is in sync with SQL tables.

Then, pay special attention to any errors and warnings as they can signify data inconsistency and possible data loss. Information messages are not a concern since they do not affect data integrity or structure. If errors or warnings do exist, they must be fixed. Typically, running the synchronization fixes these issues. Since synchronization may delete fields in SQL tables, data may also be lost. Therefore, before performing synchronization, back up the Dynamics AX database in SQL. Once the database is backed up, click on the Continue button to synchronize the database.

If you are successful, there will be no message. However, if the synchronization fails or encounters errors, an Infolog window will appear with the errors. This may require manual intervention such as going into SQL Server and modifying the data manually.
Performing a synchronization is a straightforward approach to ensuring that the underlying database is in sync with the data model in Dynamics AX. It should be noted that the synchronization is one way. Any differences in the database that do not exist in Dynamics AX, will be overwritten by the data model in Dynamics AX. Having said this, it is also a good idea to back up a database before performing a synchronization.
This chapter focused on the common processes of backing up and maintaining Dynamics AX on a regular basis. However, depending on the hardware setup, more advanced techniques may be utilized.
Regular maintenance of a system allows many benefits and should be adopted as a common practice for a Dynamics AX implementation. This will ensure that not only is the system working as efficiently as possible, but will also validate data during a consistency check. The best method of prevention is early detection. Therefore, detecting errors before they turn into issues will save time and money.
In the Appendix, we will cover additional topics on Dynamics AX administration and configuration that did not fit in other chapters, yet are still relevant to know and understand for a Dynamics AX implementation.