
The Enterprise Portal is a SharePoint site that uses the Dynamics AX .NET Business Connector to access data from Dynamics AX. You can perform many common functions such as purchase requisitions, sales orders, customer lookups, CRM, and more, as you would from within the Dynamics AX Client. Additionally, you can access SharePoint web parts from within Dynamics AX, enabling you to access cues or reports on the user's home page. The Enterprise Portal can also provide access using a Local Area Network (LAN) or a Wide Area Network (WAN) such as the internet.
The setup and configuration of the Enterprise Portal will provide end users with access to Dynamics AX from their web browser. In addition, the Enterprise Portal will need to be installed to host Role Center pages, which we will go over in Chapter 4, Setup and configuration of the Role Centers.
In this chapter, we will cover the process of installing and configuring the Enterprise Portal for your Dynamics AX installation. In this chapter, we will specifically cover:
Installation and configuration of the Enterprise Portal
Setting up an Enterprise Portal in a Load Balanced web farm
Additional resources for the Enterprise Portal
Before we begin installing the Enterprise Portal, there are several prerequisites that need to be in place. The following are the prerequisite requirements needed for the Enterprise Portal to be installed and to run:
Note
We will cover the process of installing the Enterprise Portal on Windows SharePoint Services 3.0. However, the process is virtually identical when installing on Office SharePoint Server 2007.
Before we continue, the prerequisites must be set up and working; otherwise, we cannot successfully complete the rest of the instructions in this chapter. For example, verify that your SharePoint site is accessible. After the prerequisites are set up and configured properly, the next task is to set up and configure the Enterprise Portal site; this consists of the following steps:
Before we install the Enterprise Portal, we need to create a SharePoint Application to store the Enterprise Portal site. To do this, you will need to complete the following steps:
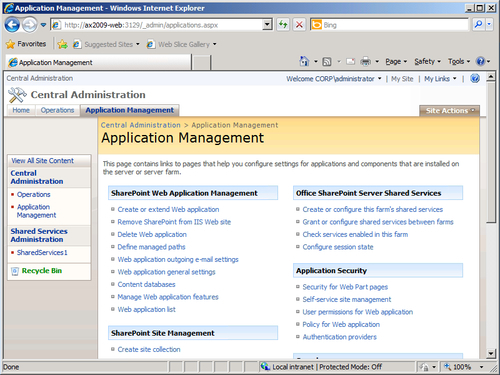
First, we will need to open up the SharePoint 3.0 Central Administration page by going to Start | Administration | SharePoint 3.0 Central Administration. A page similar to the one shown in the following screenshot will open up in Internet Explorer:

In order to create a new SharePoint site, we must go to the Application Management page. Click on Application Management tab in the Central Administration page, as shown in the following screenshot:
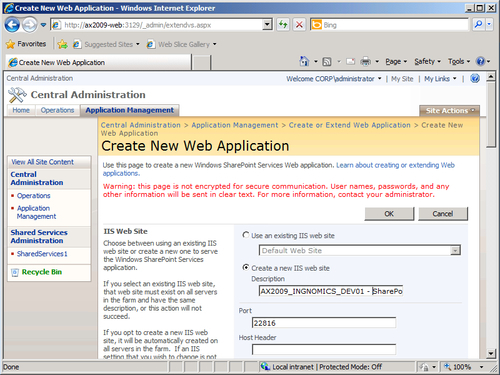
In the Application Management page, click on the Create or extend Web application link under the SharePoint Web Application Management section to start creating a new SharePoint site. Once you click on the Create or extend Web application link, you will initiate the site creation wizard as follows:

Since we want to create a new SharePoint site from scratch, click on the Create a new Web application link.
In the Create New Web Application page, you will notice many fields in which you can customize. We do not need to change everything. For the description of the SharePoint, you can prefix the site description with the name of the AOS in which the Enterprise Portal will reference. In this case, it is AX2009_INGNOMICS_DEV01, as shown in the following screenshot:
In a multiple server configuration, in which each Dynamics AX server component such as the database, Enterprise Portal, Reporting, and Analysis server are on different servers, we will need to use Kerberos authentication for the SharePoint site in order for the Role Centers to work properly, which we will cover in Chapter 4, Setup and configuration of the Role Centers. Therefore, we will need to manually enable Kerberos authentication as follows:

You will also need to set the appropriate service account to run the application pool for the new SharePoint site. Although it's not best practice to assign the Network Services account by default, it is acceptable here because the Dynamics AX 2009 installation wizard will change this anyway. It may be beneficial to also prefix the Application pool name with the name of the AOS, as shown in the following screenshot:

In the Database Name and Authentication section, it is acceptable to use the default specified database information. However, if your SQL database instance is on a different server, provide the appropriate location here. Additionally, it is also beneficial to change the name of the content database to the same name as the Dynamics AX instance. Specify the appropriate database instance to create the content database on. Once you have completed the previously mentioned steps, you can click on the OK button.

After the site is created successfully, you will be prompted to run
iisreset /noforcein the command prompt.
Now that you have created the SharePoint application in which the Enterprise Portal site and Role Center content files will be installed into, the next step is to continue with the additional prerequisites for installing and configuring the Enterprise Portal.
The Enterprise Portal requires the Business Connector to be installed. This component will automatically be installed when installing the Role Centers and Enterprise Portal because the Enterprise Portal uses the Business Connector to access Dynamics AX. However, you must create an Active Directory account in which the Business Connector will run on. The following is a list of attributes that the Business Connector domain account should have in place:
The password must never expire
It must not have an interactive login
It must not be associated to any Dynamics AX users
The Business Connector is utilized by various components in Dynamics AX such as Workflow, AIF, and the development tools. The Business Connector allows applications to communicate with Dynamics AX. It may also be utilized by third-party programs that integrate with Dynamics AX.
The Enterprise Portal uses the Business Connector to connect to the AOS and retrieve data and utilize the application file code base to perform business processes. After you have created the Business Connector proxy account, the next step is to notify Dynamics AX what the proxy account is. The Enterprise Portal will use this user account when accessing the AOS. The following steps describe this process:
Log in to Dynamics AX.
Go to Administration | Setup | Security | System service accounts.
In the System service accounts form, provide the Business Connector Proxy account information and then click on the OK button when complete.

Now that the Business Connector Proxy user has been specified in the System service accounts form, the AOS can now identify the appropriate privileges on the AOS for the Enterprise Portal or any other application that use the Business Connector.
By now the SharePoint application for hosting the Enterprise Portal site has been created in either Windows SharePoint Services 3.0 or SharePoint 2007. Now, we can begin installing the Dynamics AX 2009 Enterprise Portal. The base server components of Dynamics AX such as the database, Application files, and AOS are required in order to proceed with the installation of the Enterprise Portal. Moreover, you must also have completed the installation checklist. Refer to Chapter 2, Setup and Configuration of the Base Server Components for the process of installing the base server components.
The following steps cover the process of installing the Enterprise Portal content into the SharePoint site that we created earlier:
In the Add or modify components window of the installation wizard, mark the Role Centers and Enterprise Portal checkbox and then click on the Next > button.

In the next screen, you will be prompted to enter the password for the user account associated with the Business Connector, as shown in the following screenshot. If the Business Connector was already installed or the Business Connector proxy account has already been specified in Dynamics AX in the Administration | Setup | Security | System service accounts form, then it will automatically be selected and cannot be changed. To change the Business Connector proxy account, simply modify the account name in the System service accounts form, as covered in the Creating the Business Connector Proxy User section. Once the Business Connector credential information has been provided, click on the Next button.

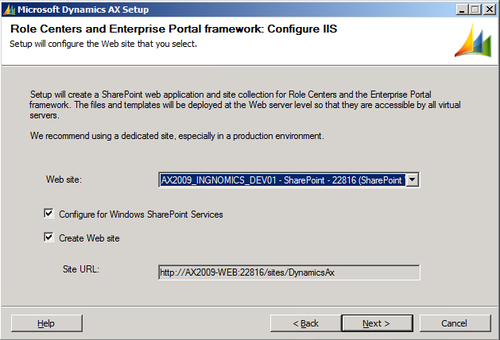
In the Configure IIS section of the wizard, select the SharePoint site that was newly created and ensure that both checkboxes are marked. The Configure for Windows SharePoint Services ensures that the selected Web site will be set up to accommodate an Enterprise Portal site. The Create Web site checkbox installs the entire Enterprise Portal content into the SharePoint site that was created, overwriting any existing content. When creating an Enterprise Portal site for the first time, both checkboxes must be marked. Once completed click on the Next button.
Note
If your version of Dynamics AX does not have a license for the language EN-US, you must:
Install the SharePoint or MOSS version of the language pack.
Only mark Configure for Windows SharePoint Services.
Create the site from Dynamics AX in Administration | Setup | Internet | Enterprise Portal | Web sites form..
In the Ready to install section of the wizard, you will be prompted to install the Enterprise Portal. To install, click on the Install button.

If there were no errors during the installation, you will see the following screen. Otherwise, you should mark the checkbox, Open the log file when Setup closes, for details on any errors or warnings. To complete the wizard, simply click on the Finish button.

In this section, we installed the Enterprise Portal. The Role Center page content was also installed along with the Enterprise Portal content. However, it will not be until the next chapter where we will actually set up and configure the Role Centers for use. Unfortunately, the Dynamics AX 2009 installation wizard for the Enterprise Portal does not provide the means to easily run multiple Enterprise Portal sites on the same SharePoint server, at the same time. To do this requires additional steps, which are outlined in the Appendix under the Multiple Instances of an Enterprise Portal in a Web Server section.
By default, only the Administrator can access the Enterprise Portal and its content. To provide users with access to the Enterprise Portal content requires the users to be set up with appropriate security privileges not only in Dynamics AX but also on the Enterprise Portal SharePoint site. This process is covered in Chapter 9, Security and User Administration.
After installing the Enterprise Portal, we should verify that it has been installed to ensure that it is accessible before proceeding to the next step. During the installation, the wizard performs various operations, from copying the Enterprise Portal content files to the specified SharePoint site, as well as setting up Dynamics AX for the Enterprise Portal. To verify that the Enterprise Portal has been installed and is running, we can simply access the Enterprise Portal site. Typically, the Enterprise Portal site is located at http://<SharePoint EP site URL>/sites/DynamicsAx. The following steps outline the process of verifying that the Enterprise Portal content was installed:
Log in to Dynamics AX and go to Administration | Setup | Internet | Enterprise Portal | Web sites.
In the Web sites form, there should be a record that contains the Enterprise Portal URL and additional settings.

Select the record and click on the View in Browser button to open the URL in your default browser. Your web browser will load and should display the default Role Center page. This signifies that the Enterprise Portal has been successfully installed.

If the Enterprise Portal is to be utilized heavily, it will be necessary to set up the Enterprise Portal in a web farm. A web farm distributes the load across multiple servers and is used in a large-scale distributed topology as described in Chapter 1, System Planning & Hardware Sizing. A web farm provides two key benefits:
The ability to distribute load and balancing server resources
The ability to provide redundant access
In the following section, we will cover the process of setting up the Enterprise Portal in a load-balanced SharePoint web farm.
Before we begin, you will need to ensure that the following is available and/or setup:
A configured Network Load Balanced (NLB) cluster on all SharePoint servers and SharePoint databases
Note
For information on NLB cluster architecture, refer to the following site: http://technet.microsoft.com/en-us/library/cc754833(WS.10).aspx. For information on setting up an NLB cluster, refer to the following site: http://www.jppinto.com/2009/05/install-and-configure-wlbs-nlb-on-windows-server-2008/
An existing SharePoint web farm:
Note
For more information on setting up a SharePoint web farm on an NLB cluster, refer to the following site: http://sharepointmagazine.net/technical/administration/best-practices-of-sharepoint-farm-configuring-and-deployment-part-1-architectural-and-logical-planning.
In the following diagram, there are five SharePoint web servers and one Windows SharePoint Service Database:

EP01 is highlighted in green to signify that it is the main SharePoint server on the web farm. The process of creating a SharePoint application is identical to creating a site on a non-SharePoint web farm implementation. Even though there will be one Enterprise Portal site, each SharePoint web server will have to have the Enterprise Portal setup.
In order for users to access a load-balanced Enterprise Portal, it must be deployed to a SharePoint NLB web farm. To deploy the Enterprise Portal in a SharePoint NLB web farm, you will need to perform the following steps. The example in these steps deploys the Enterprise Portal on a web farm that consists of two SharePoint servers but the process is the same for additional SharePoint servers.
Create a SharePoint application as described in the Creating the Enterprise Portal SharePoint Application section of this chapter. Before creating the application, ensure that a host header is specified. This host header is the host address that users will access. One host will be the access point that users will access while the NLB web farm will automatically forward requests to the appropriate server. After clicking on the OK button to create the web application, a site will be created on each IIS server in the SharePoint web farm.

Now that the SharePoint application for the Enterprise Portal site has been created with a host header, the next step is to run the installation wizard on all non-primary SharePoint servers in the web farm. (Typically, the SharePoint server that was first used to set up the SharePoint web farm is the primary SharePoint server. Additional SharePoint servers added to the web farm are considered non-primary.) On the wizard step Role Centers and Enterprise Portal framework: Configure IIS, make sure both checkboxes are unmarked. When complete, proceed through the wizard as you would when installing on a non-SharePoint web farm.

Now that each non-primary SharePoint server on the web farm has had the Enterprise Portal content installed, the final step is to install the Enterprise Portal on the primary SharePoint server. Simply install the Enterprise Portal content as described in the Creating the Enterprise Portal SharePoint Application. In the wizard step, Role Centers and Enterprise Portal framework: Configure IIS, ensure that both checkboxes are marked.
Here, we covered the process of installing and deploying the Enterprise Portal in an NLB SharePoint web farm. In large Enterprise Portal implementations where traffic demands are high, whether many users are external and/or internal users, a load-balanced web farm is absolutely necessary. Fortunately, the process is very straightforward.
For more information that tailors to the setup, administration, and troubleshooting of the Enterprise Portal, refer to the following table of additional resources. A subscription to Customer Source or Partner Source may be required to access the following content.
|
Resource description |
Site |
|---|---|
|
Troubleshooting Enterprise Portal installation and deployment | |
|
Enterprise Portal Tips and Tricks |
https://mbs.microsoft.com/partnersource/documentation/howtoarticles/ax2009_epinstall.htm |
|
Enterprise Portal Administration |
https://mbs.microsoft.com/customersource/documentation/userguides/ax2009_epadminguide.htm |
|
Redeploying Enterprise Portal sites using the AxUpdatePortal utility |
At this point, the Enterprise Portal is fully functional with out-of-the-box features of Dynamics AX 2009. However, the scope of the features available depends on your license scheme.
In the next chapter, we will be going a step further and setting up the Role Centers, the business intelligence component of Dynamics AX. Role Centers marriage SQL Server Analysis Services, SQL Server Reporting Services, and the Enterprise Portal to provide an informative yet aesthetically pleasing approach to viewing Dynamics AX data.