The funny thing about presentations is that you do a bunch of work to create your presentation and make it look good, and at the end of the process the real job hasn’t even started yet—you still have to give the presentation. For some people, giving a presentation (and public speaking in general) ranks in popularity just this side of dental surgery. Other folks like nothing better than to be standing in front of an audience. Most of us, however, fall somewhere between the two extremes.
Luckily, people have been speaking in front of groups for thousands of years, and there is a lot of received wisdom about what you can do to make giving a presentation a comfortable experience for both you and your audience. Besides the nuts and bolts of giving a presentation with PowerPoint, I’ll include some speaking tips in this chapter that should help improve your presentations.
You’ll also learn how to give presentations with laptops and external monitors or projectors; use PowerPoint’s Presenter View; discover some cool hardware and software extras for presentations; and print your presentation so that your audience can bask in the glory of your presentation long after you’ve disappeared into the night.
The more presentations you give, the better a speaker you will be. The key to giving a good presentation is to be prepared, pay attention to the details, and have plenty of practice. Here are some tips that can help your overall presentation.
Before you give a presentation, get a friend or coworker to read through it. You’ll be surprised at how often they’ll find a typo or awkward grammar that you missed.
Try hard not to run over your allotted time. It’s always a good idea to practice your presentation using a clock, stopwatch, or PowerPoint’s Presenter View to see how long your presentation is. It’s much better to cut slides before the presentation than to run out of time and not be able to finish at all. On the other hand, if your presentation is running short, it’s better to find out before you’re in front of a bunch of expectant faces.
Speaking of practice, make sure that you build enough time into your preparation schedule so you can practice the presentation, out loud, at least twice before you give it. By the way, practicing your presentation means giving the entire presentation just as you would in front of an audience. It doesn’t mean quickly riffling through your PowerPoint file half an hour before you hit the stage.
I recommend that you give the presentation in front of one or two trusted associates twice. The first time, your friends can stop you during the presentation and make suggestions or ask questions. Then you should incorporate their feedback and, if necessary, tighten up the presentation. The second time, give the presentation exactly the way you plan to give it to your audience. Your associates can take notes and give you feedback at the end. But you absolutely need the experience of giving the entire presentation all the way through before you give it for real.
Things do go wrong; your notebook computer could die before you give your show, or could have video problems with the venue’s projectors. Make sure that you keep a backup copy of your presentation file on something other than your notebook. I prepare two backup copies of important presentations; one on a USB drive, and another on either an iPod or burned to a CD. That way, if I get to the venue and my notebook goes south, I can borrow a computer and still go on with the show.
When you make your backup copies, if your presentation contains any video files, don’t forget to also copy those video files into the same folder as your presentation. PowerPoint doesn’t embed video files into the presentation file; instead it links to the external video files. See Chapter 7 for more information about using video in your presentations.
If you can, get to the presentation venue a little early. Sit or stand where you will be when you’re speaking, and make sure that your seating (or the podium) is adjusted the way that you want it. Take a moment to adjust the microphone and work with the venue’s audio technician to get the levels right before the audience arrives. Make sure you have a spot to place a cup of water. Getting comfortable with the physical space and the facilities helps a lot.
If you have the opportunity to greet some of the audience members as they enter the room, you should do so. It’s easier to speak to people you know, even if all you’ve done is say hello.
If you’re speaking at a conference and you are wearing a conference badge or pass around your neck, take it off before you begin your talk. It will often reflect stage lights back at the audience, which can be distracting.
Before you begin, visualize yourself giving a successful presentation. Imagine that you’ve spoken very well, and see in your mind the audience’s involvement in your talk. Hear their applause, and picture audience members coming up to congratulate you after the show. It sounds a bit silly, but visualizing success works.
Concentrate on your message, not on the audience. If you focus on what you’re saying, you will distract yourself from being nervous.
If you are nervous, never apologize for it. Except in extreme cases, most audiences don’t notice that speakers are nervous, and it doesn’t help your case to point it out.
Always keep in mind that your audience wants you to succeed. People don’t go to a presentation thinking, “I sure hope this guy gives a lousy talk and wastes my time.” They want to get something out of your presentation as much as you do.
Unless you are a professional comedian, keep the jokes to a minimum, or skip them altogether. A joke that falls flat isn’t a good way to start a show.
Never read straight from a script. Very few people can read from a script without putting their audience to sleep; we call those people actors (and professional speakers).
Don’t read your slides aloud word for word. Your slides should be signposts and reminders of what you want to say. Using your slides as your teleprompter is another way to lose audience interest. For prompts, use your Speaker Notes.
It’s a good idea to put a summary slide at the end of your presentation. Not only does it bring your talk to a natural end, but it helps to once again drive your argument home to your audience.
After the presentation is over, thank your audience and make yourself available for questions. As you are chatting with people, get feedback from them so that you can improve the next show. Simply asking them if there was anything they would have liked you to cover can yield useful information.
As already noted in this book, what matters is what you’re saying in your presentation. But there is a variety of hardware and software that can make giving the presentation easier, more convenient, or both.
The first bit of hardware that should be on your list is a laser pointer. These handy items are perfect for drawing the audience’s attention to a part of your slide, and they’re essential if you will be doing a demonstration on the computer as well as the slideshow. They are widely available for as little as $10. I think that the $100 lasers with a green beam are especially cool, but that’s because I’m a presentation geek.
One of the drawbacks to doing presentations with a computer is that you are usually tied to the location of the computer. For some presenters, especially people who are more comfortable if they can move around as they speak, a remote control is the answer. These units consist of a handheld control and some kind of receiver that usually connects to your computer via the USB port. Some remote controls use infrared as the connection between the handheld unit and the receiver, and others use RF (Radio Frequency). Infrared remotes require a line of sight between you and the receiver, and the remote can control your computer from a distance of between 20 and 30 feet. RF controllers can work even if you can’t see the computer (they can even work through walls), and have a slightly greater range, up to 40 feet. Don’t forget to bring extra batteries for your remote control to the presentation!
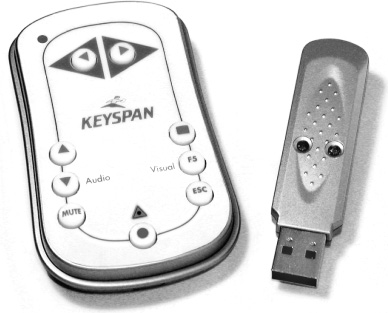
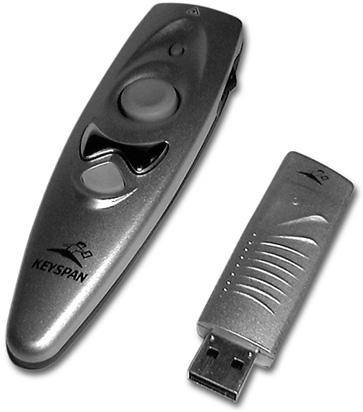
There are many remote controls available, starting at about $40 and zooming up to as much as $120. The two remote controls I’ve used the most are both made by Keyspan (www.keyspan.com). The $40 RF Easy Presenter (Figure 12.1) controls PowerPoint, and includes a built-in laser pointer and audio controls. The Keyspan Presentation Remote (Figure 12.2), an RF device that sells for $60, has a joystick-like touchpad that provides full mouse control, and includes a laser pointer.
You might already have a remote control for your Mac in your pocket, without even knowing it. If you have a Windows Mobile, Palm, Sony Ericsson, Motorola, or Nokia cellular phone with Bluetooth capability, you can use it as a remote control for PowerPoint and many other programs on your PC with the help of a terrific software package called Salling Clicker (see “Cool software,” below). Bluetooth connections are good for about 30 feet from your PC, and they do not require line of sight.
If you need to transport your presentation between computers, you can burn it onto a CD, or you can use a USB flash drive. These units are about as long as your thumb, and plug into any USB port. They provide up to 4 GB of storage, with no moving parts, and are powered by your computer. When you plug the flash drive into your computer, it shows up on the desktop, just as any other drive does. I put my presentation files on mine as a backup, so I know that even if my notebook dies, the show can go on with a borrowed computer. If you have an iPod shuffle, which is a USB flash drive, you can reserve some of its capacity for your files (later model iPod shuffles require you to use a docking cable for file storage, so don’t forget to pack that).
There are a few software packages that can enhance the presentation process or work around some of PowerPoint’s limitations:
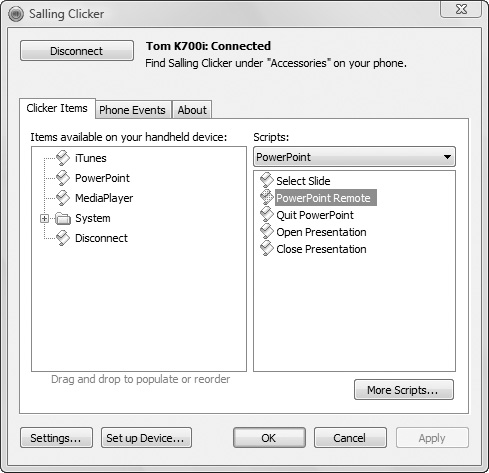
Salling Clicker, from Salling Software (www.salling.com), is a great program that allows you to use your Windows Mobile, Palm, Sony Ericsson, Motorola, or Nokia mobile phone or PDA with Bluetooth to remotely control a wide range of applications, including PowerPoint (Figure 12.3). The program uses scripts to control programs, so the more scriptable an application is, the more that Salling Clicker can do with it. The included scripts for PowerPoint let you play a presentation, go to the first, last, previous, or next slide; or toggle the screen to black.
The nice thing about using your cell phone as a remote control, of course, is that you don’t have to carry around a separate remote control.
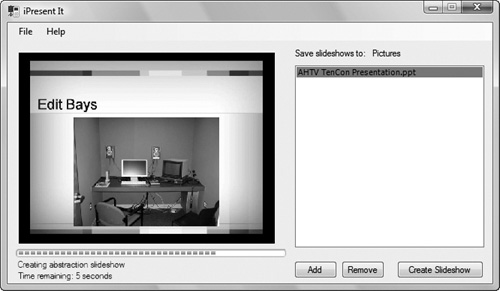
iPresent It lets you skip using PowerPoint altogether to give your presentation—if you have an iPod with photo and video output abilities and you don’t mind a presentation that is only a series of still images without animations. iPresent It converts your PowerPoint presentation into JPEG files and then syncs them to your iPod (Figure 12.4). You hook your iPod up to a television or a projector, and you can step through your slides. You can find iPresent It at www.zapptek.com.
There are times when you have your presentation ready to go, and you arrive at the venue and realize that you don’t want to show some of the slides in your presentation. Perhaps your company’s product line has changed, and you want to hide the slide that shows the fabulous Wonder Widget because it will soon be replaced by a new model (probably the Ultra Wonder Widget). Sometimes even news reports are a reason to remove slides from your presentation; for example, you probably wouldn’t have wanted to give a presentation with a picture of a sinking ship the day after the Titanic went down.
You must select slides to be hidden before you begin the presentation; you can’t choose to hide a slide while you are playing the presentation.
Procedure 12.1. To set slides to be hidden:
Open your presentation.
If PowerPoint isn’t already in Normal View, click the Normal View button at the bottom of the PowerPoint window, then click the Slides tab in the Normal View Pane.
In the Slides tab, click to select the slide that you want to skip.
You can select multiple slides by clicking the first slide that you wish to skip, holding down the Shift key, and clicking the last slide in the selection. You can select discontiguous slides by selecting the first slide, holding down the Control key, and then selecting subsequent slides.
Right-click one of the selected slides, then from the resulting shortcut menu, choose Hide Slide.
PowerPoint marks the hidden slides by dimming them in the Slides tab and putting a box with a slash through it over the slide number (Figure 12.5).

Most presentations are viewed by being projected onto a large screen, but you can also show them on your computer screen, or on a second monitor connected to your computer. When you’re using a second display (either a second monitor or a projector) you are using multiple monitors, where the presentation plays on the second display, and your display shows you PowerPoint’s Presenter View (more about that later).
When you’re using a notebook computer to give your presentation, your computer must support multiple monitors. To use multiple monitors on Windows, you must be running Windows Vista, Windows XP, or Windows 2000 SP3 or later. Your notebook must also have a VGA video output (most do). You’ll view the presentation on your notebook screen, and your audience will view the projected screen.
Hook the projector (if you don’t have a projector, you can use another external display, such as a monitor) up to the notebook. Most PC notebooks have a VGA port, but some require an adapter; check the documentation for your notebook.
Exterior displays, whether a monitor or projector, should be VGA compatible, and capable of displaying at either 800 × 600 or 1024 × 768 resolution.
Procedure 12.2. To set up multiple monitors:
To configure your computer for multiple monitors in Windows Vista, right-click the desktop, then choose Personalize from the shortcut menu. The Personalize control panel appears. Click Display Settings, and the Display Settings dialog opens (Figure 12.6).
or
If you’re using Windows XP, right-click the desktop, and choose Properties. The Display Properties dialog appears. Click the Settings tab.
The two monitors will appear as icons in the dialog. The notebook screen is by default the primary monitor (labeled with a 1).
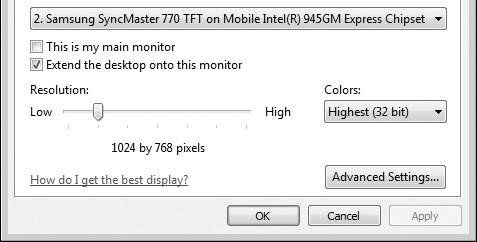
Click the icon for the second monitor, click “Extend the desktop onto this monitor” (on Windows XP, click “Extend my Windows desktop onto this monitor,”) and then click Apply.
The second monitor should now show your desktop wallpaper.
Using the Resolution slider (Figure 12.7), choose the screen resolution that matches the resolution of the projector display. It will typically be either 800 × 600 or 1024 × 768. Click OK to save your settings.
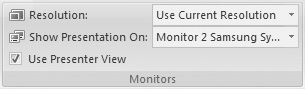
Now that you are set up for multiple monitors, you need to tell PowerPoint that you’ll be using a projector. Open your presentation in PowerPoint, then choose Slide Show > Monitors > Show Presentation On, then choose the projector from the pop-up menu (Figure 12.8).
If you want to use the Presenter View during your presentation, click the Use Presenter View checkbox. To learn more about Presenter View, see “Using the Presenter View,” later in this chapter.
✓ Tips
It’s usually a good idea not to run PowerPoint while you’re setting up multiple displays. Sometimes the change in video modes confuses PowerPoint, and you have to quit and relaunch it to make things work again.
If your laptop doesn’t sync with the projector (the image doesn’t appear on the projector or is distorted), shut down, then restart the computer with the projector connected. This usually fixes the problem.

Now that the presentation and the projector are ready to go, and the audience has arrived, it’s time to get your presentation going. During the presentation, you can control your show with the keyboard.
Procedure 12.3. To run your presentation:
In the Normal View Pane, click to select the first slide in the presentation.
Click the Slide Show button at the bottom of the PowerPoint window (Figure 12.9).
or
Choose Slide Show > Start Slide Show > From Beginning, or Slide Show > Start Slide Show > From Current Slide (Figure 12.10).
or
Press
 .
.The slideshow begins. Click the mouse button, or use the right arrow key to advance through your slides.
At the end of the show, by default PowerPoint will go to a black screen; click the mouse button to leave Slide Show mode and go back to the PowerPoint window.
or
To end the slideshow manually, press
 .
.

When you’re running the slideshow, PowerPoint gives you some control over the show’s progress by letting you press keys on the keyboard and click the mouse. See Table 12.1 for a list of controls.
Table 12.1. Keyboard Controls during Presentations
ACTION | KEY(S) |
|---|---|
Play the presentation | F5 |
End the presentation | Esc |
- (hyphen) | |
Next slide or animation | Mouse click |
Enter | |
Right arrow | |
Down arrow | |
Page Down | |
N | |
Spacebar | |
Previous slide or animation | Left arrow |
Up arrow | |
Backspace | |
Page up | |
P | |
First slide | Home |
1+Enter | |
Last slide | End |
Toggle black screen | B |
. (Period) | |
Toggle white screen | W |
, (Comma) | |
Go to the first or next hyperlink on a slide | Tab |
Go to the last or previous hyperlink on a slide | Shift-Tab |
“Click” the hyperlink | Enter (while a hyperlink is selected) |
✓ Tips
Table 12.1 isn’t a complete list of keyboard controls during the show; I’ve omitted rarely used controls. To get a complete list, while running your presentation, press the F1 key. You’ll get the Slide Show Help window, which lists all of the possibilities (Figure 12.11).
I usually use the spacebar to advance slides or slide animations when I present, because it’s the biggest and easiest to find by touch while I’m talking.

During the presentation, if you’re not using the Presenter View, PowerPoint provides some onscreen tools that you can use to control your show. They include ways to move to the previous and next slides, a menu that allows you to jump to any slide or custom show in your presentation, a way to pause your presentation or turn the screen black for a moment, and a tool that allows you to draw on the presentation screen (Figure 12.12).
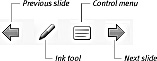
These controls appear at the bottom-left corner of the screen when you move the pointer over them. They are unobtrusive icons, so as not to attract too much audience attention.
Procedure 12.4. To control the presentation:
To advance to the next or previous slides, click the Next slide or Previous slide icons.
or
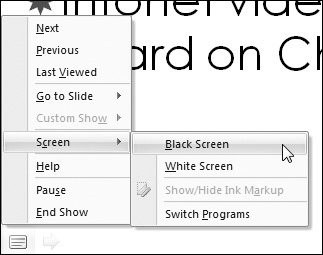
Click the Control menu icon.
The Control shortcut menu appears (Figure 12.13).
Of particular note in this menu is the Go to Slide choice, which has a submenu listing all of the slides in your presentation, allowing you to instantly jump to any point in your show. Another useful menu is Screen, which lets you turn the screen Black or White; you might want to do that to pause your presentation to handle a question from the audience, for example.
Procedure 12.5. To annotate the presentation:
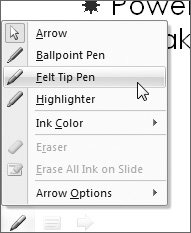
The annotation menu appears (Figure 12.14).
Choose the kind of drawing tool you want; your choices are Ballpoint Pen, Felt Tip Pen, or Highlighter.
(Optional) Choose the ink color you want from the Ink Color submenu.
Click the slide and draw or write your annotations (Figure 12.15).
At the end of your show, when you end the presentation, PowerPoint presents a dialog asking if you want to save your ink annotations. Click either the Keep or Discard buttons.
✓ Tips
You’ll usually use the notebook’s trackpad or a mouse to do the annotations, but if you’re presenting from a Tablet PC, you can use the stylus.
If you keep slide annotations, they become part of your presentation, as a graphic overlaid on your slide. If you want, you can erase these annotations in Normal View simply by selecting them on the slide and pressing Backspace.

The Presenter View allows you to view your presentation and display your Speaker Notes using an interface that only you see. It gives you a control panel that you see on your notebook’s screen, while the audience sees the regular slideshow on the projector. This mode is only available when you are using multiple monitors.
In Presenter View, you get a scrolling list of your slide thumbnails, a large view of the current slide, buttons for Previous Slide and Next Slide, your Speaker Notes, and best of all, an onscreen timer that tells you the elapsed time of your presentation (Figure 12.16). This timer is a great tool to help you stay on track; by knowing how long you have been talking, you can speed up or slow down to keep within your allotted speaking time.

Procedure 12.6. To activate Presenter View:
Set up your computer for multiple monitors. See “Setting Up the Projector,” earlier in this chapter, if you need help.
Choose Slide Show > Monitors > Use Presenter View checkbox.
In Slide Show > Monitors, choose the projector from the Show Presentation On pop-up menu.
Procedure 12.7. To use Presenter View during the presentation:
Click the Next or Previous buttons to go forward or back in the slide deck.
Click any slide thumbnail to jump directly to that slide. If there is a slide transition associated with the slide you clicked, it will trigger and the slide will appear on the projector.
Adjust the size of the Speaker Notes display by clicking one of the two Speaker Notes zoom buttons.
Click the Ink tool to annotate your slide.
Click the Control menu to apply any of its functions. See “Controlling and Annotating the Presentation” earlier in this chapter for more information.
Have you ever needed to show part of a presentation, but not all of it, for a particular audience? For example, let’s say that you have a presentation about a new product that includes slides with commission rates for the sales department. When you give the presentation to the marketing department, you can omit the commission slides by creating a custom show. This is a subset of the presentation that includes just the slides you want.
Procedure 12.8. To create and use a custom show:
Open your presentation.
Choose Slide Show > Custom Slide Show > Custom Shows.
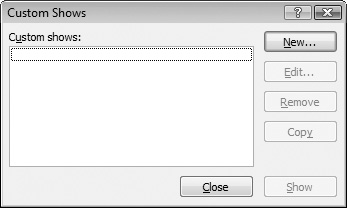
The Custom Shows dialog appears (Figure 12.17).
Click the New button.
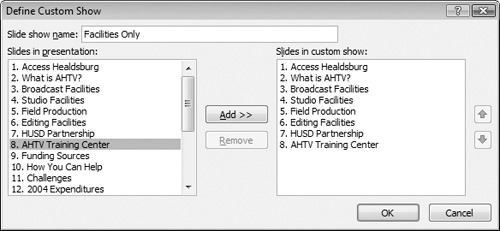
The Define Custom Show dialog appears (Figure 12.18).
Name the custom show, then select slides from the list on the left, and click the Add button in the middle of the dialog to add them to the list on the right.
Click OK, and then, back in the Custom Shows dialog, click Close.
To run the custom show, choose Slide Show > Custom Slide Show. In the resulting pop-up menu, choose the show you want.
The custom show runs.
Most of the time, your presentation will come to life on a monitor or when projected for your audience. But it’s quite common to be asked to provide your presentation in printed form as well. Printed presentations are often used as audience handouts. PowerPoint allows you to print your slideshow in several different ways to meet a variety of needs. You can print just your slides; your slides with your Speaker Notes; a handout, which is a layout that prints between two and nine slides per page; or you can print the slideshow’s outline.
Printing slides is a good way to proof your presentation. Presentations look different on paper than on-screen, so proofing printouts allows you to catch errors that you otherwise might have missed.
Procedure 12.9. To print your slides:
Open the presentation you want to print.
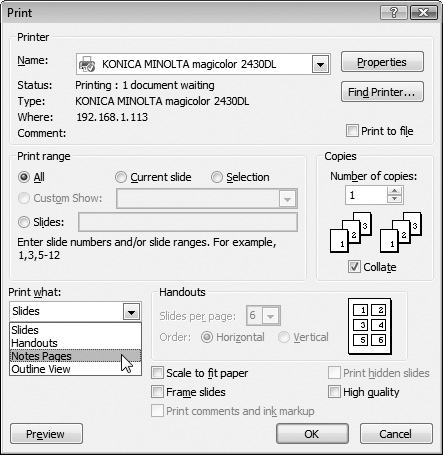
Choose Office Button > Print > Print (Figure 12.19).
The Print dialog appears (Figure 12.20).
In the Print what section, choose one of the following:
Slides prints just the slides, one per page. Slides will print in landscape orientation, to maximize their size on the paper.
Handouts prints 1, 2, 3, 4, 6, or 9 slides per page. If you choose Handouts, the Handouts section of the dialog becomes active, and you can pick the number of slides per page and whether they will be ordered horizontally or vertically. The 3-slide layout includes lines next to the slides for audience notes.
Notes Pages prints one slide per page, with your Speaker Notes below the slide.
Outline View prints the presentation’s outline, without slides.
From the Color/grayscale pop-up menu (not visible in Figure 12.20 because it is hidden by the Print what pop-up menu), choose the color option you want:
Color prints the slide as it appears on screen on your color printer.
Grayscale discards the color, but retains backgrounds, gradients and other visual effects, such as shadows.
Pure Black and White turns the slide backgrounds to white, turns all text to black, and hides text and object effects. However, photographs, clip art, and the charts are still printed in grayscale.
By default, PowerPoint sets the printer to Color or Grayscale depending on your printer’s capabilities.
Select the print formatting options that you want:
Scale to fit paper shrinks or expands the slides to fit your paper size.
Frame slides puts a thin border around the edges of each slide.
Print hidden slides prints all slides in the Slides tab, whether or not they are marked as hidden.
Print comments and ink markup prints any ink annotations on the slides.
High quality prints shadows on text in Color or Grayscale print modes. Choose this option if you want your slide printouts to look exactly like your slides; on the other hand, a drop shadow that looks good on a screen may not look great from your printer. Do a test print and make a choice.
(Optional) If you want to see a preview of your slides before they go to the printer, click the Preview button.
PowerPoint switches to its Print Preview mode. Click Print Preview > Preview > Close Print Preview to leave this mode.
(Optional) If you want to print just a portion of the presentation, make choices in the Print range section of the dialog.
PowerPoint will present you with a Save dialog so you can choose where to save the PDF file.
Click OK to print.
✓ Tips
It’s almost always a good idea to preview the slides on screen (see step 6) before you print them.
If you output the presentation as a PDF file, you can use the full version of Adobe Acrobat to add annotations, hyperlinks, and other enhancements.
Unfortunately, you cannot customize PowerPoint’s print layouts. So if you want a layout with six slides to a page, and with lines for audience notes, you’re out of luck, at least printing from PowerPoint. One alternate possibility would be to create a custom layout by taking screenshots of each slide, then creating the layout in a page layout program such as Adobe InDesign or QuarkXPress.