You’ve seen in earlier chapters a bit about how you can use other applications to enhance your PowerPoint presentations. For example, in Chapter 2, you saw how Microsoft Word can be used to write the text of your presentation. In Chapter 5, there was some discussion about using graphics programs such as Adobe Photoshop and Adobe Fireworks to produce presentation images.
But importing and exporting text and pictures doesn’t begin to exhaust PowerPoint’s abilities to work with other applications and with your colleagues. In this chapter, you’ll see how PowerPoint can use content from Microsoft Word and Microsoft Excel; and export your presentations to PDF (Adobe Acrobat) documents and other formats.
PowerPoint also has a robust commenting feature that you and your coworkers can use to add comments to a presentation while you’re developing it.
Microsoft Word is the most widely used word processor in the world. Naturally, at some point you’re going to want to use information that you already have in Word in your PowerPoint presentations. While there are a number of ways you can use Word documents in PowerPoint, I’m going to focus on using tables.
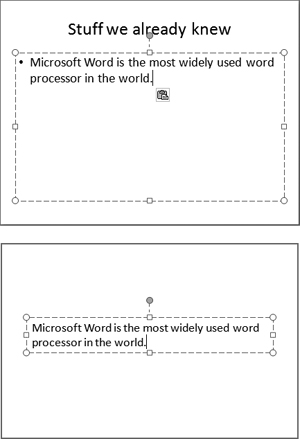
Of course, if all you want to do is move text from Word into PowerPoint, you can simply copy the text in Word, and paste it into PowerPoint. The text appears as bulleted text, if you paste it into a content box of a slide layout. On other layouts, the text appears as a new free text box on the slide in the default font for the presentation’s theme (Figure 11.1).
If you want to import data from tables that you have in Word documents, you can do so. The obvious reason to do this is so that you don’t have to waste time retyping information from Word into PowerPoint. Another reason is to use some of the table capabilities in Word that PowerPoint lacks. For example, you can do arithmetical calculations in Word tables. You can copy the entire Word table, calculations and all, into a PowerPoint slide, or you can import just the data in the table into an existing table in PowerPoint.
Procedure 11.1. To import whole Word tables:
In the Word document, select the table that you want to move to PowerPoint (Figure 11.2).
The easiest way to select the entire table is to click the table move handle, which is the square with the four-headed arrow inside it that appears when you move the mouse pointer over the table.
In Word 2007, choose Home > Clipboard > Copy, or press
 .
.or
In earlier versions of Word, choose Edit > Copy, or press
.Switch to PowerPoint.
Display the slide where you want the copied content.
Choose Home > Clipboard > Paste, or press
 .
.PowerPoint’s behavior is slightly different, depending on the destination:
If you pasted onto a slide with an empty content box, the content box is replaced by the table.
If you pasted onto a slide with a content box that already contains content (bulleted text, a graphic, etc.), the table appears in a layer on top of the content box.
If you pasted onto an empty slide, or an empty area of a slide (for example, the Title Only layout), the table appears on the slide (Figure 11.3).
In all cases, if you had applied any formatting to the table in the Word document, that formatting is retained in PowerPoint.

Procedure 11.2. To import just the data from a Word table into a PowerPoint table:
In the Word document, select the data inside the table that you want to move to PowerPoint.
In Word 2007, choose Home > Clipboard > Copy, or press
.or
In earlier versions of Word, choose Edit > Copy, or press
.Switch to PowerPoint.
Display the slide where you want the copied content.
Click to place the insertion point in the first cell of the PowerPoint table.
Choose Home > Clipboard > Paste, or press
.The data from the Word table appears in the PowerPoint table.
✓ Tip
When the data appears in PowerPoint, it retains any formatting it had in Word. If you want to instead have it appear with the formatting of the PowerPoint table, you must reapply the table’s formatting using the Design tab of Table Tools. See Chapter 8 for more information about formatting tables.
You’ll use information from Microsoft Excel to create a table on a PowerPoint slide, or you can put Excel charts on your slides. You can bring part of an Excel worksheet into PowerPoint, or you can copy a chart in Excel and place it onto a slide.
The best and easiest way to get worksheet data into PowerPoint is to copy the data in Excel, then paste it into a PowerPoint table. That way, you can use PowerPoint’s tools to style the table the way you want, rather than deal with the formatting from Excel. Because Excel and PowerPoint have different purposes, the formatting from Excel doesn’t always look great in PowerPoint, so it’s best to let PowerPoint handle the formatting for the slide.
Procedure 11.3. To import worksheet information:
On your PowerPoint slide, create a table by choosing Insert > Tables > Table, then choosing the table size you want.
Don’t worry about making the table the same number of rows and columns as the Excel data; if PowerPoint needs more room for the Excel data, it will automatically create enough rows and columns.
Position the table roughly where you want it on the PowerPoint slide.
If the worksheet includes totals, you should not select them (if you do, the totals will also be charted).
In Excel, open the worksheet that contains your data.
Select the cells containing the data (Figure 11.4).
If the data has row and column labels, you should select those, too.
In Excel 2007, choose Home > Clipboard > Copy, or press
.or
In older versions of Excel, choose Edit > Copy, or press
.Switch to PowerPoint.
Click the upper-left cell in the PowerPoint table to place the insertion point in it.
Choose Home > Clipboard > Paste (PowerPoint 2007), or choose Edit > Paste (earlier PowerPoint), or press
.The Excel data flows into the PowerPoint table (Figure 11.5).
If necessary, use PowerPoint’s table design tools to reformat the table to your liking. See Chapter 8 for more on formatting tables.


As you saw in Chapter 9, PowerPoint uses Excel to create and manipulate the worksheet underlying charts that you create in PowerPoint. But you can also take charts from an Excel worksheet and paste them into PowerPoint.
Procedure 11.4. To import an Excel chart:
In Excel, open the worksheet that contains the chart.
Click the chart to select it (Figure 11.6).
In Excel 2007, choose Home > Clipboard > Copy, or press
.or
In older versions of Excel, choose Edit > Copy, or press
.Switch to PowerPoint.
Display the slide where you want to add the chart.
Choose Home > Clipboard > Paste, or press
.The chart appears on your slide (Figure 11.7).
You’ll probably have to resize and reposition the chart on the slide.


If you need to export your presentation in a format that can be easily transported between computers and that can be easily printed, the correct choice is to export to PDF (Portable Document Format, also known as Adobe Acrobat format). PDF files can be viewed and printed with the free Adobe Reader, which is available for a very wide range of computer platforms, including Macintosh (Mac OS X and Classic Mac OS); Windows (3.1 through XP); Linux and other versions of UNIX; and even some handheld computers, such as Palm and Pocket PC.
PowerPoint slides that are exported to PDF generally look pretty good, but you should be aware of some limitations. For example, graphics and text in PowerPoint often turn out to look more jagged (less smooth) when exported to PDF.
An alternative to PDF is to export the file in XPS format. XPS (XML Paper Specification) is a document format developed by Microsoft as a competitor to PDF. XPS documents can be viewed using Internet Explorer 7 on Windows XP and Windows Vista. Unfortunately, as I write this (August 2007) there are no XPS viewers for the Mac or other platforms, though Microsoft promises to eventually provide them for the Mac and UNIX platforms. Unless you are certain that all of the recipients of your presentation can read and open XPS documents, I recommend that you use PDF instead.
Important
To save or export a file to PDF or XPS, you must first install the Save as PDF or XPS add-in for the 2007 Microsoft Office system. See the “Adding in PDF and XPS Support” sidebar for more information.
Procedure 11.5. To export a presentation to PDF or XPS:
Open the PowerPoint file that you wish to export to a PDF or XPS file.
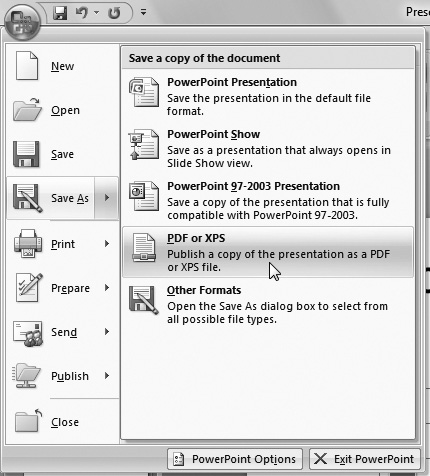
Choose Office Button > Save As > PDF or XPS (Figure 11.8).
The Publish As PDF or XPS dialog appears, prompting you for the name of the exported PDF or XPS file and where you want to put it on your hard disk.
Give the document a name, and if necessary, navigate to the directory where you want the document to go.
From the Save as type pop-up menu, choose either PDF or XPS document.
Click Publish.
The Publishing window appears, and shows you the progress of the export.
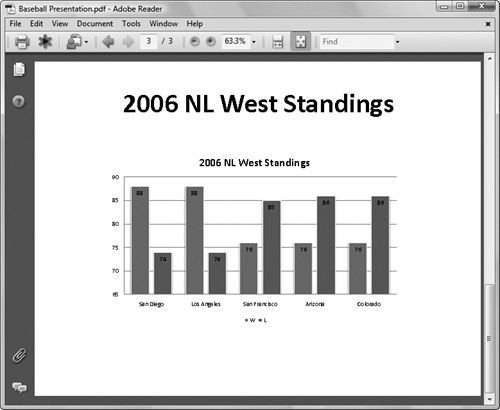
When the publishing is complete, the document opens in the designated viewer for the file type you selected, for your review (Figure 11.9).
✓ Tip
Presentation files exported to PDF can be quite large, especially if you have many photographic images in the slideshow. Large files are often not convenient to send via email, or to post on the Web for downloading. If all you need are lower-resolution images for use online or via email, click the Minimum size (publishing online) button in the Publish As PDF or XPS dialog. This applies extra compression to the images, reducing the overall file size.
If you’re working as part of a team to create a presentation, you might want to insert notes to other team members. In PowerPoint, comments work like electronic sticky notes that you can place anywhere on your slides. You can use them to remind yourself of missing or questionable info or keep track of where you left off work. Comment boxes are always labeled with the name and initials of the person who added the comment. This is a built-in workaround for the fact that PowerPoint, unlike Word and Excel, doesn’t have a function to track changes. But you can add, edit, delete, and step through comments in your presentation.
Procedure 11.6. To add a comment:
In the Normal View Pane, scroll to and select the slide on which you want to place the comment.
To add a comment about text or an object on a slide, select the text or object. If instead you want to add a general comment about a slide, click anywhere on the slide.
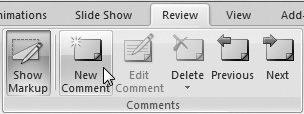
Choose Review > Comments > New Comment (Figure 11.10).
A new comment box appears on the slide, with your name (PowerPoint asked for your name during product registration) and the date.
Enter your text in the comment box (Figure 11.11). To save the comment, just click anywhere else on the slide.
When you click outside the comment box, the comment box collapses to the review comment thumbnail.

Procedure 11.7. To view comments:
Hover the mouse pointer over a review comment thumbnail. The comment appears while the mouse pointer is over the thumbnail, like a tool tip.
or
Click a review comment thumbnail.
The comment box appears, and it doesn’t disappear until you click somewhere else on the slide or on a different slide.
or
Choose Review > Comments > Next.
This brings you to the next comment, whether it is on the current slide or not. Repeat this command to step through all the comments in the presentation.
Procedure 11.8. To edit comments:
Double-click a review comment thumbnail.
or
Click to select a review comment thumbnail, then choose Review > Comments > Edit Comment.
The comment box opens, with the insertion point at the end of the existing text.
Procedure 11.9. To delete a comment:
Click a review comment thumbnail to select it.
Choose Review > Comments > Delete.
The comment disappears from the slide.
Procedure 11.10. To delete multiple comments:
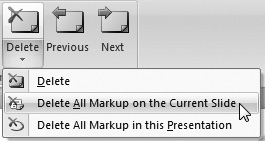
Under Review > Comments > Delete, click on the arrow to bring up the pop-up menu (Figure 11.12).
Choose “Delete All Markup on the Current Slide” or choose “Delete All Markup in this Presentation.”
If you choose the latter, PowerPoint will display a dialog asking if you’re sure you want to delete all comments. Click Yes.
PowerPoint makes it easy to share your presentation with colleagues via email.
Procedure 11.11. To email your presentation:
Save your current presentation.
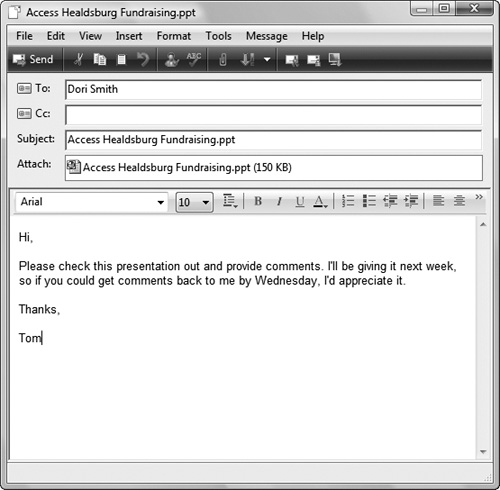
Choose Office Button > Send > E-mail (Figure 11.13).
Your default email program will launch and create a new email message, with your presentation file attached (Figure 11.14).
Address and send the email as you ordinarily would.

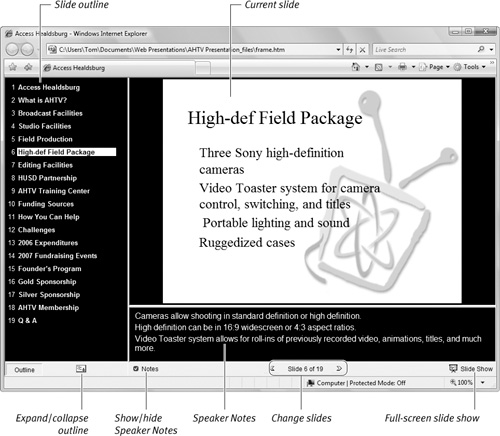
You can make your presentation available to the widest audience by converting it into a Web page and placing it on a Web server, either on the Internet or on your company’s intranet. The presentation will be readable in one form or another by anyone with a Web browser on any major computing platform (Windows, Mac, Linux, and others). Unfortunately, Microsoft adds proprietary code to the Web page that makes the presentation look best in Internet Explorer. If you need to have the presentation appear exactly as it does on screen, consider saving it as a PDF file, as discussed previously in this chapter.
Presentations turned into Web pages resemble Normal View, with the outline on the left, a large area for the slide, and a space for Speaker Notes (Figure 11.15).
Procedure 11.12. To convert your presentation into a Web page:
Choose Office Button > Save As > Other Formats.
In the Save As dialog, choose Web Page from the Save as type pop-up menu (Figure 11.16).
PowerPoint automatically fills in the file name and the Web page’s title with the name of the presentation.
To accept all of PowerPoint’s defaults for publishing your presentation, click Save. Most of the time, however, you’ll want to make changes, so follow the steps below.
(Optional) You can edit the file name by changing it in the Save As dialog, and you can edit the page title by clicking the Change Title button.
(Optional) To adjust PowerPoint’s default settings for Web pages, click Publish.
The Publish as Web Page dialog appears (Figure 11.17). In this dialog, you can choose whether or not to display your Speaker Notes on the Web, publish only certain slides, and more.
(Optional) For even more control over your new Web page, click the Web Options button in the Publish as Web Page dialog.
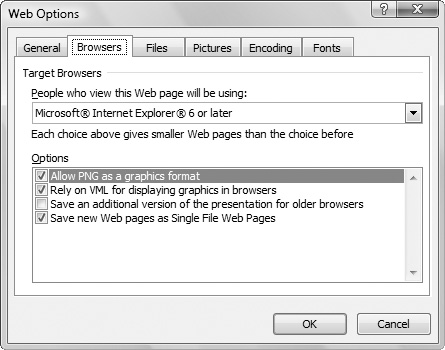
The Web Options dialog appears (Figure 11.18). It’s a good idea to make the files on a Web site smaller, and you can do that by telling PowerPoint to make the Web page for a modern version of Internet Explorer.
(Optional) In the Web Options dialog, click the Browsers tab, then choose Microsoft Internet Explorer 6 or later from the “People who view this Web page will be using” pop-up menu.
When you’re done setting the options, click OK to leave the Web Options dialog, which returns you to the Publish as Web Page dialog. Click Publish.
PowerPoint converts the presentation to a Web page. The saved Web page will consist of two parts. One is the HTML file, and the other is a companion folder with the files that make up the presentation (text, graphics, etc.).
You need to copy the Web page and the companion folder to a Web server for it to be viewable by others. If you don’t know how to do that, ask your Web site’s administrator.
✓ Tip
If you choose to put your Speaker Notes on your Web site, make sure that you review them first. Since Speaker Notes aren’t normally seen by the audience, you might have notes that make sense to you but not to your audience. Or you might even have notes that you would rather not share with your audience. To keep your Speaker Notes from appearing on the Web, uncheck “Display speaker notes” in step 6 above.


If you need to use your slides in another program—such as a page layout program—you can export your slides as image files, with one image per slide. You can choose the format of the image files. In ascending order of quality, you can export slides as GIF, JPEG, PNG, or TIFF files.
Procedure 11.13. To export a presentation as image files:
Open the PowerPoint file that you wish to export to image files.
Choose Office Button > Save As > Other Formats.
In the Save As dialog, choose one of the image formats from the Save as type pop-up menu.
Click Save.
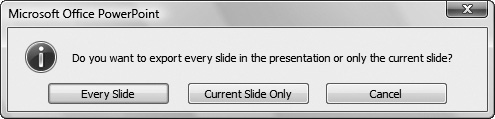
PowerPoint asks if you want to export every slide in the presentation or only the current slide (Figure 11.19).
Click Every Slide or Current Slide Only.
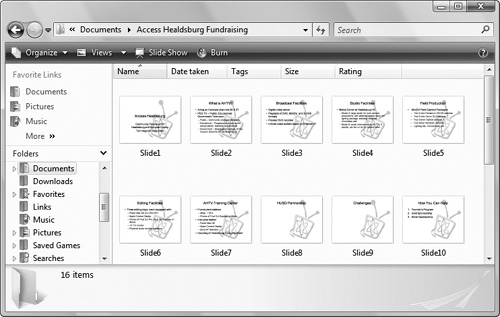
PowerPoint creates a new folder with the presentation’s name and puts the exported slides into it (Figure 11.20).
Sometimes you want to extract just the text of your presentation, so you can use it in a Word document, or for use in another program, such as a page layout program. You might also want to send just the outline in an email. PowerPoint allows you to export the presentation’s outline (as seen in Outline View) in Rich Text Format (RTF), which is an interchange format that retains text formatting, and can be read by many different programs on virtually all computing platforms.
Procedure 11.14. To export the presentation outline:
Open the PowerPoint file that you wish to export as an outline.
Choose Office Button > Save As > Other Formats.
In the Save As dialog, choose Outline/RTF from the Save as type pop-up menu, navigate to where you want to save the outline file, and if needed, give the file a name other than the default one PowerPoint provides.
Click Save.
PowerPoint saves the outline text. If you open the text in Word’s Outline View, you’ll see that slide titles and bulleted text are presented in outline form (Figure 11.21).

PowerPoint 2007 allows you to turn your presentation into a package, which is a folder or a CD that contains all of the files associated with your presentation, including graphics, the PowerPoint file, fonts, external movies linked to the presentation, and sounds. The package also contains a copy of the PowerPoint Viewer program, so the recipients of the CD don’t even have to have PowerPoint installed to admire your work.
The reason why you want to create a package, rather than just copy the presentation file to a CD, is that you need to make sure that all of the elements of your presentation come along with the file. To be efficient and to make sure the PowerPoint presentation file doesn’t get too big, PowerPoint invisibly links large external files (especially video files) into the presentation, but does not copy those files into the presentation file. Similarly, fonts that you have on your system may not be available on another computer, and creating a PowerPoint package copies the fonts used in the presentation for use by the PowerPoint Viewer.
Procedure 11.15. To package your presentation for burning to a CD:
Open the presentation you wish to burn to CD.
Choose Office Button > Publish > Package for CD.
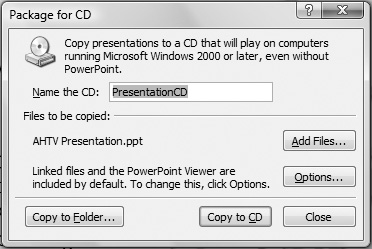
The Package for CD dialog appears (Figure 11.22).
In the dialog, if you don’t like the default name of PresentationCD, you can change it.
(Optional) You’re not limited to copying only one presentation file to the package; if you want to add additional presentations, click the Add Files button, then use the resulting Add Files dialog to choose the presentation files.
(Optional) By default, the PowerPoint Viewer and linked external files will be included in the package, and all the presentations in the package will play automatically when the CD is inserted. To change this, click Options.
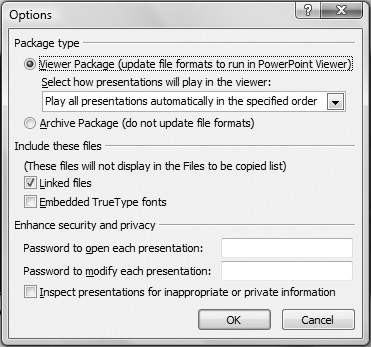
The Options dialog appears (Figure 11.23).
(Optional) Select one or more of the following choices:
To change how the presentations play in the Viewer, select one of the choices in the pop-up menu under Viewer Package.
Your choices are Play all presentations automatically in the specified order; Play only the first presentation automatically; Let the user select which presentation to view; or Don’t play the CD automatically.
If you don’t want to include the PowerPoint Viewer, choose Archive Package, rather than the default Viewer Package choice.
If you don’t want to include linked files or embed fonts in the package, clear those checkboxes.
If you like, you can enter passwords that will be required to either open or modify the presentation files included with the package.
When you’re done setting options click OK. You will return to the Package for CD dialog.
To burn the package to a CD, click Copy to CD.
If there isn’t a CD already in the drive, PowerPoint will ask you insert a blank CD. Do so, then click the Retry button.
After the CD is burned, PowerPoint asks if you want to make additional CDs. Make your selection.
or
To save the package as a folder on your hard drive (which you can copy to a network server, or even burn to a CD later), in the Package for CD dialog click Copy to Folder. In the resulting dialog, give the folder a name and browse to the location on your hard drive where you want to save it, then click OK.
✓ Tips
If PowerPoint tells you that it isn’t able to burn the CD, it may be because your computer has CD burning software that is incompatible with direct burning from PowerPoint. That doesn’t mean you can’t burn a CD with your presentation. The workaround is to save the package as a folder on your hard disk, then use your CD-burning program to copy the folder to a CD.
Before you save the presentation to a CD, make sure that the presentation’s settings are as you want them, especially if you’ve created Custom Shows. The show selected in Slide Show > Set Up Show will be the one that plays in the PowerPoint Viewer.
Always preview the contents of the CD before you send it off!
The PowerPoint Viewer program works only on Windows. If you want to share your presentation with a Mac user, save the package as an Archive Package on your hard disk, then copy the resulting folder to a hard drive, USB thumb drive, or burn it to a CD. Your friend will have to have either PowerPoint for Mac or Keynote installed to view the presentation, of course.