A PowerPoint presentation file contains several components that provide its structure and look; we discussed this in Chapter 2, but now we’ll go into a bit more depth. The overall structure is provided by the presentation’s template. Templates are starter documents that can have one or more slide masters, which in turn contain all of the slide layouts. Slide layouts are blueprints for each of the different kinds of slides in your presentation, such as Title Slide, Title and Content, and the like. Slide layouts define slide attributes such as the position of the title and content placeholders and the slide background.
The look of your presentation is dependent on the theme, which specifies colors, fonts, effects, and the bullet styles. You apply the theme to your presentation, and all of the slides in the presentation automatically take on the theme’s look, providing a consistent appearance. Themes are shared by other Office 2007 programs including Word, Excel, and Outlook. This helps you maintain a matching look between all of your documents.
When you create a new slide, PowerPoint copies one of the slide layouts, and the objects (text boxes, content placeholders, pictures, tables, or charts) from the slide masters are placed on the new slide. Then all you need to do is put content into the text boxes or graphic boxes. You’ll be applying slide layouts much more often than themes or templates. Most of the time you’ll use slide layouts without modification, but PowerPoint allows you to customize slide layouts within your presentation to accomodate for your presentation’s special needs.
In this chapter, you’ll learn about the different slide layout types, as well as how to apply slide layouts to your presentation’s slides and change slide layouts.
PowerPoint templates can contain any number of slide layouts, but in most themes, you’ll find at least nine slide layouts, because that’s how many slide layouts are included in most of the built-in Office 2007 templates. Templates aren’t required to have nine slide layouts; the lower limit is just one slide layout, and I’ve seen templates from third-party developers that had many more slide layouts from which to choose.
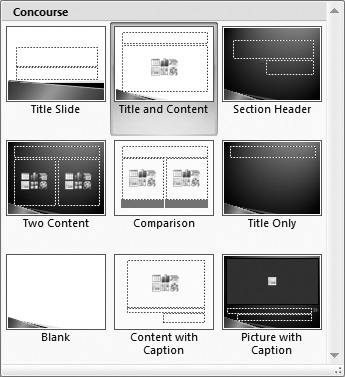
Most of the templates you’ll be working with will, however, contain the basic set of nine slide layouts, as shown in Table 3.1 and Figure 3.1. This set contains the slide layouts that you will use most often, so you should become familiar with them and how they are used.
Table 3.1. Slide Layout Types
TYPE | DESCRIPTION |
|---|---|
Title Slide | Often the first slide in the presentation. Includes title and subtitle text placeholders. |
Title and Content | Includes two placeholders. Top text box uses large type to serve as the slide title; a large content box at the bottom can contain bulleted text, table, chart, SmartArt, picture, clip art, or movie. |
Section Header | Similar to Title in that it contains title and subtitle placeholders. Used to set off a section in longer presentations. |
Two Content | Has three placeholders: a title and two content boxes. |
Comparison | Contains a title, two content boxes, and header text for each content box. |
Title Only | Alternate title slide. Includes one text box with large type, justified to the top of the slide. |
Blank | Contains only the slide background. Use this for really large or complex graphics. |
Content with Caption | Contains one large content box, with a large text box to serve as a title. |
Picture with Caption | Contains one large photo placeholder with a large text box to serve as a photo title. Good for photos that need captions. |

Every slide that you create in your presentation must have an associated slide layout. When you first create a presentation, PowerPoint creates an initial slide based on the first slide layout in the template. The slide is usually a Title slide of some sort.
When you create a second slide in your presentation, PowerPoint automatically switches to the second slide layout in the template. This is usually the Title and Content layout. Subsequently, each new slide you create takes on the slide layout of the slide that was selected when you chose Home > Slides > New Slide in the Ribbon. You can change the slide layout associated with any slide in your presentation. You’ll want to do this often; for example, if you add a photo, you’ll want to change the slide master to one that contains a photo placeholder.
Procedure 3.1. To apply a slide layout:
In the Normal View pane, select the slide for which you want to change the slide layout.
From the Home > Slides > Layout gallery, choose the new slide layout (Figure 3.2).
The slide changes to reflect the defaults associated with the new slide layout.
Sometimes you’ll modify a slide, for instance by moving a graphic or text box, and then decide that your changes aren’t quite what you want. PowerPoint allows you to reapply the format from the slide layout to your current slide. When you do this, objects on your slide that you moved will return to their positions as defined in the slide layout. If you want to also return the text style or other attributes of the text boxes on the slide to their defaults from the slide layout, you can reset the whole slide.
Procedure 3.2. To reapply a slide layout:
In the Normal View pane, select the slide to which you wish to reapply the slide layout styles.
Choose the layout again from the Slide Layout gallery.
The slide and all its objects return to the slide layout’s original layout.
Procedure 3.3. To reapply the slide layout and restore text formatting:
In the Normal View pane, select the slide to which you wish to reapply the slide layout styles.
Choose Home > Slides > Reset.
The slide and all its objects return to the slide layout’s original position and font attributes (Figure 3.3).

Most of the time, you’ll probably be happy with the theme styles and slide layouts from PowerPoint’s built-in selection. But each presentation is different, and sometimes you want to change one or more of the slide masters to better fit the content of your presentation. You’ll do this by making changes to one or more of the slide layouts in your presentation in Slide Master View, a special mode that reveals the slide layouts inside the slide master.
The benefit of changing a slide layout in the slide master, rather than on the individual presentation slides, is that layout changes you make in the slide master will appear in all of your presentation’s slides that use that slide layout, and this consistency improves the look of your presentation. For instance, you might want to change the size of the content box on the Content with Caption layout to better fit the photographs you want to use. If you changed it on a presentation slide, you would need to repeat those changes on every other Content with Caption slide. But if you change the Content with Caption layout in the slide master, those changes will appear every time you create a new Content with Caption presentation slide, and they’ll even be applied to Content with Caption slides you may have created before you modified the slide master.
It’s important to understand that modifying a slide layout changes it only for the presentation file you are currently working in; it doesn’t modify the copy of the slide layout that is in the template, and your changes also don’t modify slide layouts of the same name in other templates.
Procedure 3.4. To modify a slide layout:
Choose View > Presentation Views > Slide Master (Figure 3.4).
A new tab, the Slide Master tab, appears on the Ribbon, (Figure 3.5) and the rest of the PowerPoint screen changes to show the slide master and its associated layouts (Figure 3.6).
Roll your mouse over the slide layout thumbnails until you find the layout you want to change, then click to select it.
As you roll over each thumbnail, PowerPoint displays a tool tip showing the name of the layout and the number of slides in your presentation that use it.
Select elements on the slide layout and modify them.
See Chapter 4 for more information on modifying text boxes, and see Chapter 5 for more information on modifying graphics. If you want to change the slide background, see the next section in this chapter.
or
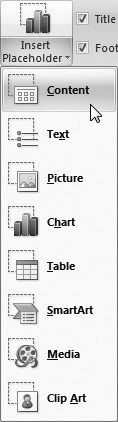
To add placeholders, choose Slide Master > Master Layout > Insert Placeholder, then choose from the pop-up menu (Figure 3.7). You can choose from content, text, picture, chart, table, SmartArt, media, or clip art placeholders. The cursor will change into a crosshair; click on the slide layout and drag the mouse to create a placeholder with the dimensions you want.
Format your layout with the tools on the Slide Master tab and its Edit Theme group.
Repeat steps 3 and 4 until you have made all the modifications you want.
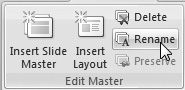
(Optional) If you want, you can save the modified layout with a new name. Choose Slide Master > Edit Master > Rename (Figure 3.8). In the resulting Rename Layout dialog, enter the new layout name, then click Rename.
When you’re done making changes to the slide layout, select another slide layout to modify, or choose Slide Master > Close > Close Master View to close the Slide Master tab and continue editing your presentation.
✓ Tip
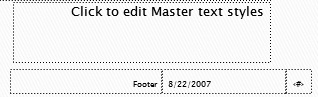
Note that all the slide layouts contain footer, date, and slide number fields (Figure 3.9). You can format each of these in the same way you would any other text field.


Number Those Slides!
You use the Header and Footer dialog to enable slide numbering in PowerPoint. In PowerPoint, all the slides are numbered sequentially from the first slide in the presentation to the last.
To set slide numbering, choose Insert > Text > Header and Footer, which opens that dialog (Figure 3.10). Click in the text boxes for the items you want to appear, including date and time, the slide number, and the footer. Click “Don’t show on title slide” if you want to skip numbering on the first slide. Finally, click Apply (which turns on the selected items on just the current slide) or Apply to All.
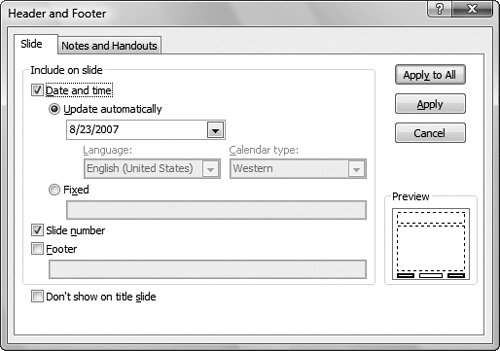
You can change the font and style of the slide numbering text box, but you can’t control the numbering format. So if you have that urge to use Roman numerals for your slide numbers, you’ll have to place them in your slide manually.
The most common reason to change a slide layout background is if you have a graphic or photo that doesn’t work well with the template’s regular background. That’s why, in fact, most templates have a Blank slide layout, which you can use as an empty canvas for your content.
Another good reason to change a slide layout’s background is so that you can use that changed background for a group of related slides in your presentation. For example, let’s say that you’re doing a presentation about three different local sports teams, and you’ll have several slides per team. For each team, you can use a different background, perhaps keyed to the team’s colors. You could change the slide background for each individual slide, but that’s more work than necessary. Just create a slide layout with a different background for each team.
Procedure 3.5. To change a slide layout background:
Choose View > Presentation Views > Slide Master to display the Slide Master tab in the Ribbon.
The PowerPoint window changes to Slide Master View.
Select the slide layout that you wish to change.
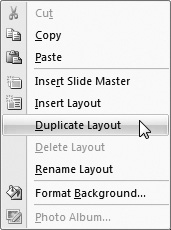
(Optional) If, as I recommend, you want to work with a duplicate of the original slide layout, rather than modify the original, right-click and choose Duplicate Layout from the shortcut menu (Figure 3.11).
PowerPoint duplicates the slide layout, allowing you to modify the duplicate. It automatically names the duplicate 1_layout name, which probably isn’t very useful, so you should right-click on the new duplicate layout and choose Rename Layout from the shortcut menu. Enter a more descriptive name in the Rename Layout dialog, then click Rename.
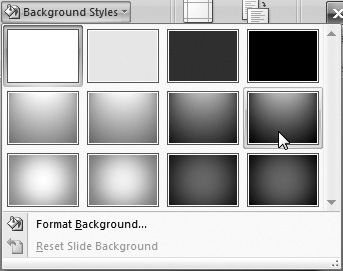
Choose Slide Master > Background > Background Styles, then choose from the style gallery (Figure 3.12).
The style gallery includes 12 gradient backgrounds, which may or may not be what you want.
or
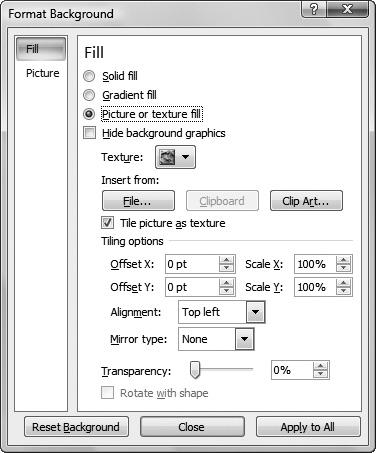
Choose Format Background.
The Format Background dialog appears (Figure 3.13).
In the Fill category, click Solid fill, Gradient fill, or Picture or texture fill. The dialog options change, depending on your choice.
For example, if you want to use a picture as the background (perhaps one you prepared in a photo editing program), you would choose Picture or texture fill. Then in the Insert from section, click File, choose from the resulting Insert Picture dialog, and then click Open to return to the Format Background dialog and insert the picture you just chose.
Click Close to apply and save your changes and return to the slide layout.
Add any other elements you wish to the background, including placeholders for text, graphics, charts, or tables.
When you’re done making changes to the slide layout, select another slide layout to modify, or choose Slide Master > Close > Close Master View to close the Slide Master tab and continue editing your presentation.
✓ Tips
Once you have placed an element on the background, you can use commands from other tabs to modify it. For example, you can format the font and style of a text box using the Home tab’s tools.
The Transparency slider in the Format Background dialog is great for fading out photos so they are less obtrusive as backgrounds.
You can also create a layered background with, for example, a color or gradient fill in the back, overlaid with an image that doesn’t take up the entire slide. See Chapter 5 for more information on using layers with graphics.