A PowerPoint file includes all of the items that make up your presentation, including text, images, and dynamic media, such as movies and sounds. It also includes the set of slide layouts for the presentation. Slide layouts are templates for slides that you can use throughout your presentation. Slide layouts contain slide backgrounds and boxes for text and graphics that you’ll fill in with your show’s content. Slide layouts help you make your presentation look more polished and consistent.
You’ll use each different sort of slide layout for a particular purpose in your show. For example, a common slide layout type for the beginning of a presentation is Title Slide, which gives you a large line of type for the presentation’s title, centered horizontally and vertically on the slide. Underneath is a smaller line of type for a subtitle, if you want one.
Design elements, such as backgrounds, fonts, and colors, are stored in the presentation’s theme. A group of slide layouts with one or more themes makes up a template, which you can use to build your PowerPoint presentation.
In this chapter, you’ll learn how to choose a theme for your presentation; apply a template; add and organize slides; and find the best ways to write a successful presentation.
All PowerPoint presentations have a theme, which defines the overall look and style of the presentation. A theme provides the graphic look for a presentation, and includes a set of backgrounds, fonts, and colors. Think of a theme as a guide from which you can build your presentation.
You can choose a theme when you first create a PowerPoint document, or you can apply one later. You may also change the presentation’s theme at any time.
If you choose to begin with a template (see the next section), a theme will already be chosen as part of the template.
Procedure 2.1. To choose a presentation theme:
Launch PowerPoint.
A new window appears, with the default Office Theme, which is a simple theme with a white background (Figure 2.1).
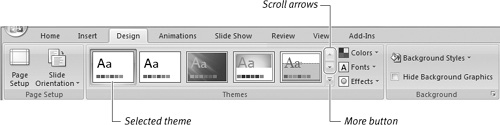
Click the Design tab in the Ribbon.
The Design tab tools appear, including the Themes group (Figure 2.2).
In the Themes group, move your mouse pointer over a theme thumbnail.
As you hover over a thumbnail, you see a live preview in the Slide Pane of what the theme will look like.
If you want to see more themes, scroll in the Themes group, or click the More button. If you use the More button, a gallery appears with the theme choices (Figure 2.3).
In the expanded gallery, hovering over thumbnails still shows you the live preview of the theme.
Click the thumbnail to apply the theme you want.
PowerPoint applies the theme to your presentation.
✓ Tip
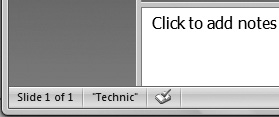
The name of the currently selected theme appears in the lower-left corner of the PowerPoint window (Figure 2.4).


Templates contain not only a theme, but a set of slide layouts. These slide layouts can be customized for a given type of presentation; for example, a presentation that displays mostly photographs would probably include the Picture with Caption slide master, and might omit business-oriented layouts, such as those including tables and charts.
PowerPoint comes with a few templates, and you can access many others on Microsoft Office Online. It’s easy to browse, download, and install new templates.
Procedure 2.2. To apply a template:
Choose Office Button > New.
The New Presentation dialog appears, set to the Blank and recent category (Figure 2.5).
If all you want is a blank presentation, click Create; the dialog will disappear and you’ll get a new presentation with the Office Theme applied and the basic set of slide layouts.
To apply a template, continue with the next steps.
Click the Installed Templates category on the left side of the dialog.
Thumbnails of the installed templates appear in the middle column, with a preview in the right column of the dialog (Figure 2.6).
Scroll to view the installed templates; to apply one of them, click to select it then click Create.
To browse templates on Microsoft Office Online, continue with the next steps.
In the left-hand column, click one of the categories under the Microsoft Office Online heading.
Thumbnails of the available templates appear in the middle column, with a preview in the right column of the dialog (Figure 2.7).
Scroll to view the available templates; to download one of them, click to select it then click Download.
The template downloads and creates a new presentation (Figure 2.8).


Once you have created a presentation and applied a theme or template, you’ll want to add additional slides. You need to first add the slide, then choose the slide layout you want for that slide.
Procedure 2.3. To add slides:
Choose Home > Slides > New Slide (Figure 2.9).
The slide appears below the currently selected slide in the Normal View Pane.
Choose a slide layout for the new slide from the Layout gallery in the Slides group (Figure 2.10).
Subsequent slides that you create will continue to use the same slide layout, until you change it.
Click in a text box placeholder to add text to the slide (Figure 2.11), or click one of the icons in the content box to add a table, a chart, graphics, or media clips.


Deleting unwanted slides is easy; just select the slide and get rid of it.
The Normal View Pane allows you to view the slides in your presentation in three different views, Slides View, Outline View, and Slide Only View.
This tab in the Normal View Pane shows the slides in your presentation as thumbnails (Figure 2.12). The currently selected slide is highlighted with a gold background (you’ll have to trust me in this black and white book). Slides View is good for getting an overall view of your presentation, and you can use it to move slides to different spots in your presentation (you’ll find more about moving slides later in this chapter).

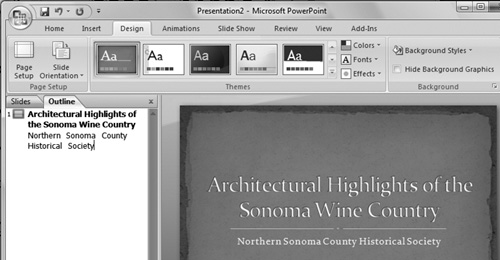
The Outline tab in the Normal View Pane displays your presentation as text, with each slide displaying its bullet points as indented text (Figure 2.13). Any graphics on your slide do not appear in Outline View. Outline View is useful when you want to concentrate on the words in your presentation, without the distractions of the slide layout or graphics. In fact, I recommend that you create the main structure of your presentations in Outline View. You’ll find more about that subject in the “Writing in the Outline” section later in this chapter.

This view hides the Normal View Pane, displaying only the slide area (and the Notes field). Use this view when you want to concentrate on tweaking the appearance of a slide.
Procedure 2.5. To change views:
Click the Slides or Outline tab at the top of the Normal View Pane.
or
To get to the Slide Only View, point at the border between the Normal View Pane and the Slide Pane. When the cursor turns into a double-headed arrow, click and drag the border to the left until the Normal View Pane is eliminated. The easiest way to bring the Normal View Pane back is to click the Normal View button at the bottom of the PowerPoint window.
Every good presentation begins with a good outline, and PowerPoint’s Outline View is the best and easiest way for you to make better presentations. Using the Outline View helps you keep the presentation logical and structured, because you can easily see the content of slides throughout your presentation. The benefit of working in Outline View is that it lets you create and edit the content of your presentation without focusing on the presentation’s appearance, as always seems to happen when you add text directly on the slide. And after all, isn’t the content of your presentation its most important aspect?
Another benefit of writing your presentation in the outline is that it is considerably faster than entering text directly on the slides. You can type your text entry in the outline without using the mouse, and any time that you can rely on the keyboard, work tends to get done quicker.
Consider sharing your outline with coworkers, and make changes based on their feedback. When the words are right, that’s the time to spice them up with visuals. But first, get the words right.
The flexibility of PowerPoint’s Outline View makes it easy to rearrange your ideas as you work on your presentation. PowerPoint provides the tools to move headings up and down, demote headings to subheadings, and promote subheadings to headings
Procedure 2.6. To write your presentation in the outline:
In the Normal View Pane, click the Outline tab.
Ignore the slide’s entreaty to “Click to add text” and enter your text in the outline.
If you’re working on a slide layout that has a subtitle or bulleted text, press Return between lines and press Tab to indent the text (Figure 2.14).
When you’re done with a set of bulleted text, press Return, then press Shift-Tab to create a new slide.
or
Choose Home > New Slide.
Continue creating slides in this fashion until you are done.
✓ Tips
You can style text in the outline. If you want to make text bold or italic or make other style changes, just select text in the outline and make a choice from the Home tab’s Font group.
When you’re working in Outline View, it’s a good idea to drag the border between the Normal View Pane and the Slide Pane to the right to make the Outline View as wide as possible. I often make the outline so wide thast it crowds out the slide; I don’t mind because I want to concentrate on the text, and not be distracted by the styled text and graphics on the slide.
Procedure 2.7. To move headings in the outline:
In the Outline View, click on a heading you want to move (Figure 2.15).
Right-click the mouse.
The Outlining shortcut menu appears (Figure 2.16). This shortcut menu appears only when you’re working in the Outline tab of the Normal View Pane.
Choose one or more of the commands in this menu:
Choose Promote to move a heading left, making it a higher outline level, and therefore, more important.
Choose Demote to move a heading right, reducing its importance.
The Move Up and Move Down choices move a heading and any subheads up or down in the outline.
Collapse a section to hide (but not delete) all but its main heading; choose Expand to show the subheads again. In the submenus, the Collapse All and Expand All commands collapse and expand all the sections in the entire presentation.
After a few strategic moves, the outline is better organized (Figure 2.17).

Figure 2.17. If you compare this to Figure 2.15, you’ll see that some headings moved up and other headings became subheads, making the slide clearer.


PowerPoint’s Outline View is adequate in most cases, but when you have a large presentation, it’s a good idea to turn to a program that’s designed to handle big outlines. Microsoft Word is a good choice. It’s got all the power you need to write an outline that you can move to PowerPoint to turn into a great presentation. The program’s topics and subtopics correspond to slide titles and bullet points.
The benefit of using Word, however, is that it has many features for organizing ideas that PowerPoint’s outliner lacks. For example, Word allows you to sort topics and lets you move topics around with more freedom than PowerPoint allows (Figure 2.18).

It’s beyond the scope of this chapter to show how to create and work with outlines in Word, but I’ll show you how to get information back and forth between the program and PowerPoint.
After you’ve created an outline in Word’s Outline View, all you need to do is save it as a regular Word document; PowerPoint will be able to read it.
Procedure 2.8. To export an outline to PowerPoint:
In Word, save the outline you wish to export.
Close the document.
PowerPoint won’t let you open the Word document if it is still open in Word.
Switch to PowerPoint.
Choose Office Button > Open.
The Open dialog appears.
Navigate to the folder where the Word document is, click to select the document, then click Open.
PowerPoint reads in the Word document and applies the plain, default Office Theme.
When you’re writing a presentation, you often need to look up a bit of information here, check a fact there, or use a thesaurus to find a better word. The Research pane, found in all of the Office 2007 applications, gives you instant access to reference materials, both online and on your machine.
Procedure 2.9. To use the Research pane:
Click Review > Research.
The Research pane opens (Figure 2.19).
Do one of the following:
To look up a word, copy it from your outline or slide and paste it into the Search for field in the Research pane, then click the green Start Searching button to look up its definition.
Type a word or phrase in the Search for field and press Enter to start a search.
If you want to use a different reference source (say, you would rather do a thesaurus lookup, or search the online Encarta Encyclopedia), choose the source from the Source pop-up menu (the one directly under the search field) (Figure 2.20).
✓ Tips
To look up words another way, right-click a word in your presentation, then choose Look Up from the shortcut menu. The word will be transferred to the Research pane and looked up in the reference source you last used.
The Research pane has a Translation reference source. You can use it to translate a word or short phrase to and from a wide variety of languages.


Speaker notes help guide you while you’re giving the presentation. You can also print notes along with your slides, for use as audience handouts. PowerPoint’s Notes field is completely free form, so you can enter text as you wish. The Notes field is just for text; you can’t add graphics or charts to notes.
Procedure 2.10. To add speaker notes:
If it isn’t already visible, enter Normal View by clicking the Normal View button at the bottom of the PowerPoint window.
In the Normal View Pane, select the slide to which you want to add notes.
Enter your notes in the Notes field (Figure 2.21).

The Normal View Pane also lets you rearrange the slides in your presentation by dragging the slide’s thumbnail up or down in the Normal View Pane.
Procedure 2.11. To rearrange slides:
Select the slide that you wish to move.
Drag it up or down in the Slide Navigator.
A white line with a small rectangle appears, indicating where the slide will go when you release the mouse button (Figure 2.22). The cursor also changes to indicate you are moving a slide.

There are two ways to duplicate slides in PowerPoint. Why might you want to duplicate a slide? The most common reason is that you have added some custom elements to a slide—such as a graphic or a custom text box—that you want to include on a few slides, but that isn’t worth saving as a new slide layout.
You can duplicate slides in either the Slides or Outline tabs of the Normal View Pane using the Duplicate command from the Ribbon or using a different Duplicate command in the shortcut menu.
Procedure 2.12. To duplicate slides:
In the Normal View Pane, select the slide or slides that you want to copy.
Choose Home > Slides > New Slide, then choose Duplicate Selected Slides from the bottom of the gallery (Figure 2.23).
or
Press
 .
.or
Right-click on the slide to bring up the shortcut menu, then choose Duplicate Slide.
The new slide appears. You can now add text or graphics to the new slide.

When you are placing text and graphics on slides, you’ll often want to make sure that objects on slides are aligned to each other or to the boundaries of the slide. Similarly, you might want to make sure that objects are a particular size, especially if you have the objects on more than one slide. This helps you create a consistent-looking presentation. PowerPoint gives you on-screen rulers and gridlines to help you get the job done.
The horizontal and vertical rulers can be shown or hidden. You can also set tabs and indents using rulers. See “Setting Text and Bullet Tabs” in Chapter 4 for more information.
Procedure 2.13. To turn on rulers:
Choose View > Show/Hide, then select the Ruler checkbox.
The rulers appear (Figure 2.24).
To hide the rulers, click in the Ruler checkbox again to clear it.

Procedure 2.14. To hide the vertical ruler:
Choose Office Button > PowerPoint Options, then click the Advanced category.
The PowerPoint Options window appears (Figure 2.25).
In the Display section, deselect the Show vertical ruler checkbox.
Click OK to save your changes.

Gridlines help you center and align objects on the slide. When you use gridlines, a grid of small dots appears on the slide, making it easier to align objects. Gridlines do not appear when you are presenting and do not print.
Procedure 2.15. To turn on gridlines:
Choose View > Show/Hide, then click to select the Gridlines checkbox.
The gridlines appear (Figure 2.26).
To hide the gridlines, choose View > Show/Hide, then clear the checkbox next to Gridlines.

When you’re done writing your presentation, it’s often useful to run through it as a slideshow once or twice. This helps you get a feel for the flow of the presentation and almost always shows you places where the presentation could use tightening or better explanation.
After you run the slideshow, you can return to Outline View to tweak the text, or you can begin adding graphics, tables, and charts to your presentation.
Procedure 2.16. To run your presentation:
In Normal View, click to select the first slide in the presentation.
Click Slide Show > Start Slide Show > From Beginning (Figure 2.27).
or
Click Slide Show > Start Slide Show > From Current Slide.
or
Press
 .
.The slideshow begins. Click the mouse button or use the right arrow key to advance through your slides.
To end the slideshow, press
 or
or  (hyphen).
