Welcome to PowerPoint! PowerPoint 2007, part of the Microsoft Office 2007 package, is an exciting presentation program that can help you create compelling presentations with a minimum of effort. PowerPoint’s attractive presentation themes, superior text handling, attractive animations, and excellent graphics capabilities allow you to deliver your ideas with maximum visual impact.
This visual power doesn’t come at the price of complexity; it’s easy to build a PowerPoint presentation, whether you’re a novice speaker or a polished presenter. But don’t be fooled into thinking that because PowerPoint is easy to use, it lacks power; there’s a lot of substance behind that pretty face.
PowerPoint 2007 runs on Windows (Vista and XP), and has a new file format that allows it to do even more than past versions, but it does a good job of getting along with past versions. PowerPoint 2007 imports from and exports to older PowerPoint formats, so you’re able to share your PowerPoint presentations with colleagues who have not yet upgraded, or with your Mac-using colleagues who have Microsoft Office.
In this chapter, you’ll learn how to start PowerPoint, see an overview of the program’s workspace, customize the PowerPoint interface, and ask the program for help. Let’s get started with PowerPoint.
Starting PowerPoint for the first time is slightly different on Windows Vista or Windows XP. After you open PowerPoint, you can jump right into creating presentations.
Procedure 1.1. To start PowerPoint on Windows Vista:
Click the Start menu at the lower-left corner of the screen, then click All Programs.
From the list of programs, click the Microsoft Office folder, then click the Microsoft Office PowerPoint 2007 icon (Figure 1.1).
The program launches.
The first time you use any of the Office programs, you’ll be asked to activate and register the program over the Internet or by telephone.
You can try out Office before activation. Your Office installation will stop working after 25 uses, unless you activate the program by entering a registration key.
Fill out the activation form, then click Activate.
PowerPoint connects to the Internet and sends your registration information to Microsoft.
A blank presentation document appears.

Procedure 1.2. To start PowerPoint on Windows XP:
Click the Start menu at the lower-left corner of the screen, then click All Programs.
Navigate through the pop-up menu of program folders to the Microsoft Office folder, then choose Microsoft Office PowerPoint 2007(Figure 1.2).
The first time you use any of the Office programs, you’ll be asked to activate and register the program over the Internet or by telephone.
You can try out Office before activation. Your Office installation will stop working after 25 uses, unless you activate the program by entering a registration key.
Fill out the activation form, then click Activate.
PowerPoint connects to the Internet and sends your registration information to Microsoft.
A blank presentation document appears.
✓ Tips
If you do not activate any of the Office programs after running them 25 times, the programs fall back to Reduced Functionality mode, which allows you to view documents that you have created, but does not allow you to modify them or create new documents. Entering a registration key unlocks Office and restores full functionality.
When you activate one Office program, it activates all the programs in the suite.

The PowerPoint workspace is made up of one main window with several sections (Figure 1.3). Let’s look at the pieces one by one.

If you’ve used previous versions of PowerPoint, you’ll see that things have changed in a big way in Office 2007. The first thing you’ll notice is that the menu bar and toolbars are gone. In their place is the Ribbon, which contains the tools and commands you’ll use to build your presentation.
The idea behind this big change is a good one. Microsoft was forever being asked to add features to the Office programs. But most of the time, those features were already in the programs; they just couldn’t be found in the jumble of menus and toolbars (PowerPoint 2003 had 9 menus and 20 toolbars!). So the big makeover (shared by Word 2007, Excel 2007, and Outlook 2007) is designed to make the program’s features more discoverable; that is, to make them easier to find and use.
This is the main PowerPoint document window; it’s where you will edit your slides and place graphics, tables, and charts.
The Normal View Pane is the pane at the left edge of the document window. It actually does double duty, showing two different aspects of your presentation. The Slide tab shows thumbnails of your slides (Figure 1.4).

You can organize slides in this view by dragging slide thumbnails up and down in the presentation.
The second function of the Normal View Pane is the Outline tab; in this view the content of your slides appears (Figure 1.5). You can create, write, edit, and rearrange your slides and their content in this view. In fact, that’s one of the best ways to create a presentation; more on that in Chapter 2.

The Notes Pane is where you can enter speaker notes that help you give the presentation; these won’t appear on the presentation screen, but they can be viewed on a second display. For example, if you are presenting using a notebook computer and a projector, the notes can appear on the notebook’s screen while the presentation runs on the projector.
If you prefer, you can print speaker notes. See Chapter 12 for more information about printing your presentation, including speaker notes.
The Office Button replaces the File menu (Figure 1.6). This is where you create, open, close, save, and print documents. It is also how you access PowerPoint’s preferences, now renamed PowerPoint Options.

The Ribbon has eight tabs, each with groups of buttons and pop-up menus with commands and features. More about the Ribbon in the next section.
The customizable Quick Access Toolbar allows you to place frequently used commands just a click away. By default, it contains buttons for Save, Undo, and Redo. Later in this chapter, you’ll see how to customize this toolbar.
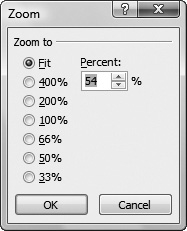
You can zoom into (or out of) the action in the Slide Pane with the Zoom slider at the lower-right corner of the document window (Figure 1.7). The Zoom percentage is shown next to the slider; clicking the percentage brings up the Zoom dialog, where you can choose between several standard zoom values (Figure 1.8). The Fit choice in the dialog expands or shrinks the slide to fit in the Slide Pane, so you can see all of the slide. There is also a Fit slide in window button next to the Zoom slider that has the same function.

The View Buttons let you switch between three different ways to look at your presentation (Figure 1.9). Normal View, as shown in Figure 1.3, has the Normal View Pane on the left, and also displays the Slide Pane and the Notes Pane.
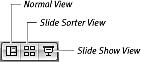
Slide Sorter View allows you to rearrange slides by dragging and dropping them into a different order. Each slide is shown as a thumbnail, along with the slide’s number. You’ll learn more about this view in Chapter 2.
The Slide Show View starts the slide show, allowing you to preview your presentation full-screen. This is also the view you use to actually give the presentation.
The Task Pane only appears in specialized circumstances, and changes its contents depending on what you are doing. It probably isn’t open on your computer; The Research pane is shown in Figure 1.3 for illustration. Learn more about the Task Pane in Chapter 2.
The Ribbon is the main new part of the Office 2007 interface, so let’s go into some detail on how it works. The Ribbon replaces two familiar structures from all previous versions of PowerPoint: menus and toolbars. In their place, there are three new structures:
Tabs on the Ribbon are task-oriented. The most common tasks, like adding slides, formatting text, and cutting, copying, and pasting text and graphics, are located on the Home tab. You should be able to figure out which tab to use just by asking yourself “What do I want to do?” and then going to the appropriate tab. So for example, if you wanted to add clip art to a slide, the Insert tab should be your first stop (Figure 1.10). There are eight tabs: Home, Insert, Design, Animations, Slide Show, Review, View, and Add-Ins.
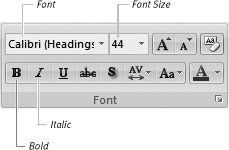
Groups are areas on each tab that contain related commands. For example, Figure 1.11 shows the Home tab’s Font group.
Commands within a group are usually buttons (as in the Bold and Italic commands in Figure 1.11) or pop-up menus (the Font and Font Size commands). In this book, when I tell you to use a command in PowerPoint, I’ll use the name of the tab, followed by the group, then the command. For example, to make some text bold, I’ll say, “Select the text, then choose Home > Font > Bold.”
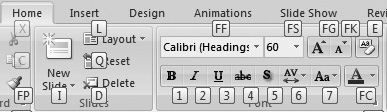
Groups automatically expand and contract, depending on the width of the PowerPoint window. If your window size is wide, the whole group appears; narrower windows cause the group to contract, but still show all of its controls, albeit in a more squeezed-together fashion (Figure 1.12).
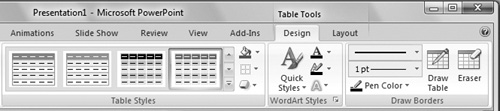
When you click on some objects to select them, a new tab or tabs may appear on the ribbon. These contextual tabs appear to add additional commands to modify the object you have selected, and they go away when you deselect that object. For example, let’s say that you’ve put a table on a slide. When you click on the table, the Table Tools contextual tab appears at the right end of the Ribbon, and it brings along two subtabs: Design and Layout (Figure 1.13). The idea is that you only get the tools to work with the table while you are modifying it, and when you no longer need them, the table tools are whisked out of your way.


Some groups contain a Gallery, which has many premade styles for whatever you’re working with. The gallery in Figure 1.14 has table styles. You can scroll through a gallery, or you can expand it to see all of the styles it contains by clicking its More button.
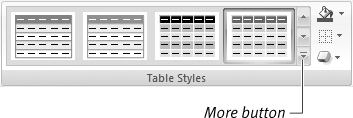
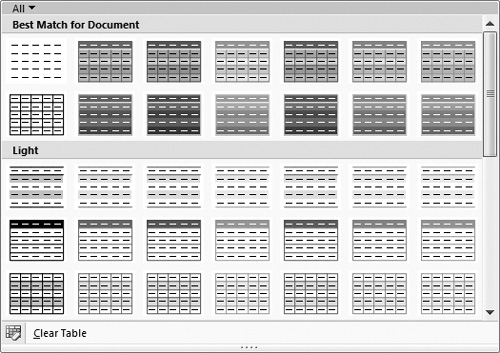
Hovering over a thumbnail in the gallery applies a live preview of that design to the selected object (in this case the table). You can easily try out a variety of looks for the object just by moving your mouse, and when you find one that you like, simply click the gallery thumbnail to apply that style to the object.
✓ Tip
You can’t delete or replace the Ribbon with the menus and toolbars from previous versions of PowerPoint.
The Ribbon is useful because it keeps most of the commands you might want to use right at hand; most commands are no more than two or three clicks away. But the Ribbon’s drawback is that it takes up a fair amount of screen real estate, especially on smaller screens like those found on many notebook computers. If you prefer, you can minimize the Ribbon so that it is mostly out of the way, with its tools hidden until you need them. You can temporarily minimize the Ribbon, or you can make the change “permanent.”
Procedure 1.3. To minimize the Ribbon:
Double-click the name of the active tab in the Ribbon. The Ribbon disappears, leaving only the tabs (Figure 1.15). When you click on a tab, its tools appear, and choosing a command from the tab executes that command, then the tools disappear. To bring the Ribbon back, double-click the name of the active tab again.
Procedure 1.4. To keep the Ribbon minimized:
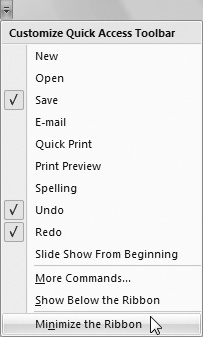
Click the Customize Quick Access Toolbar button at the top of the PowerPoint window (Figure 1.16).
The Customize Quick Access Toolbar menu appears (Figure 1.17).
Choose Minimize the Ribbon.
The Ribbon collapses to just the tab names.

PowerPoint 2007 allows much less user interface customization than previous versions, which let you change any menu or toolbar. But you can customize the Quick Access toolbar, which lets you put the commands you use most often within easy reach.
Procedure 1.5. To customize the Quick Access Toolbar:
Click the Customize Quick Access Toolbar button at the top of the PowerPoint window.
The Customize Quick Access Toolbar menu appears, as in Figure 1.17.
The top part of the menu contains common commands that you might want to add to the Quick Access Toolbar. Choose one or more of these to toggle them on or off.
Icons for the commands you chose appear in the Quick Access Toolbar.
or
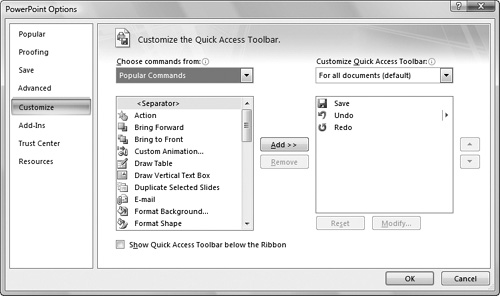
To get access to a larger set of commands, choose More Commands from the Customize Quick Access Toolbar menu.
The PowerPoint Options dialog appears, set to the Customize category (Figure 1.18). Commands not in the Quick Access Toolbar appear in the list on the left, and commands already in the toolbar appear in the list on the right.
(Optional) To narrow your choices, pick from the Choose commands from pop-up menu (Figure 1.19).
The commands in the left-hand list change to reflect your choice.
Click to select a command in the left list, then click the Add button in the middle of the dialog.
The command moves to the right-hand list. Repeat this process as needed until you have moved all of the commands you want into the Quick Access Toolbar.
Click OK.
The Quick Access Toolbar updates to show your added commands.

PowerPoint also has on-screen Help files. If you have an active Internet connection, the local files are supplemented by additional Help material from Microsoft.
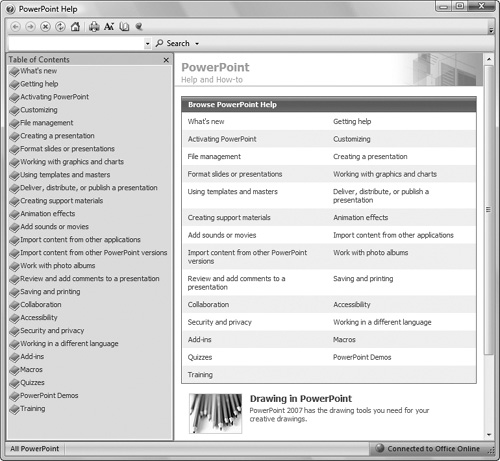
Procedure 1.6. To get help with PowerPoint:
Click the Help button (the round button with a ? in it) at the upper-right corner of the PowerPoint window.
or
Press F1.
The PowerPoint Help dialog appears (Figure 1.20).
Click the topic you want, or enter search text in the search field, then press Enter.
If you prefer to use the keyboard, rather than the mouse, to operate PowerPoint (it can often be faster, especially for speedy typists), no problem. You can get to any command in PowerPoint by using a keyboard shortcut, even those found in the Ribbon.
Procedure 1.7. To use keyboard shortcuts:
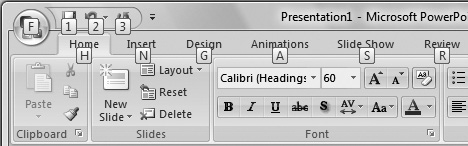
Press and release the Alt key.
KeyTips appear over each feature that is available (Figure 1.21).
Press the letter shown in the KeyTip for the feature you want.
For most choices, you will then see additional KeyTips. For example, if you pressed H for the Home tab in Figure 1.21, KeyTips for the Home tab’s features appear (Figure 1.22). Press the KeyTips for the command you want.
✓ Tip
Of course, there are many “regular” keyboard shortcuts in PowerPoint too. You activate these by holding down the Control key while pressing another key. For example, you can make text bold by pressing
 These regular keyboard shortcuts are listed in the PowerPoint Help file, or they appear when you hover the mouse cursor over a command in the Ribbon.